Every master encounters the problem of reduced tool performance, or complete failure due to the battery. Manufacturers use batteries made from nickel-cadmium batteries in 12, 14, 18-volt screwdrivers. The sequential assembly of several elements creates the required voltage. Replacing nickel-cadmium batteries with lithium ones increases battery life by making the design lighter. Mandatory installation of a BMS board adds reliability. Therefore, converting the screwdriver to lithium batteries, mainly to the 18650 form factor, is justified.
The meaning and procedure for converting screwdrivers to lithium batteries
Why do nickel-cadmium batteries fail quickly? In a garland of cans connected in series, each one is special. The chemical process is individual, the charge in closed systems is different. If there is a malfunction in one bank, the design does not provide the required voltage. A charge control and balancing system is not provided in individual components.
- Each Ni-Cd bank provides 1.2 V, and li-ion 18650 - 3.6 V.
- The capacity of a lithium battery is 2 times larger than a nickel-cadmium battery, which is similar in size.
- An overheated li-ion battery threatens to explode and catch fire, so installing charge uniformity control in the banks is mandatory. BMS is not installed in nickel-cadmium batteries - the manufacturer is not interested.
- Lithium cells do not have a memory effect, unlike Ni-Cd, they can be charged at any time and within an hour.
- The screwdriver becomes much lighter after converting the battery to li-ion, using 18650 cans.
There are only two obstacles to converting a screwdriver for lithium batteries - it is impossible to work with it at minus. The capacity of the cans decreases, starting from a decrease already from +10 0 C. Lithium batteries are expensive.
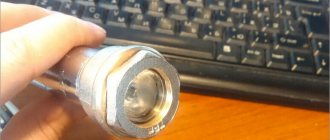
Knowing what input voltage is required for the screwdriver, the charger is redesigned, taking into account the placement of lithium battery cans and control elements in the factory container. You can do the same with a flashlight by upgrading the socket for a block of 18650 elements.
Let's say you need to rework a 12 V screwdriver using Ni-Cd cans on li-ion. If you use 3 banks, the output voltage is not enough: 3.6 x 3 = 10.8 V. With 4 components, the power of the device will be higher: 3.6 x 4 = 14.4 V. At the same time, the tool will become 182 g lighter , its power and capacity will increase slightly - all pluses. But when dismantling it is necessary to leave the terminals and the original temperature sensor.
Some useful tips
These modern batteries, due to their large capacity, slowly consume their charge. With proper use they will last at least 10 years .
An advantage of equipping a screwdriver with a lithium battery may be the ability to relatively quickly fill them with energy. This type of cell tolerates storage and operation well in a not fully charged state.
They are very sensitive to the charging process . The voltage should always be as low as possible, otherwise the lithium-ion battery will quickly fail.
You need to know how to store lithium batteries for a screwdriver, this will help:
- extend battery life;
- minimize capacity losses;
- effectively use their capabilities.
For storage, they are taken out and placed in a dry, cool place where the temperature is maintained from +1 to +25 degrees . Do not allow batteries to freeze. You can put it in a bag and in the refrigerator, but not in the freezer. The lithium battery is stored in a charged state with a state of charge of 40%. In this case, during self-discharge the voltage will not drop below 2.5 V/cell. If stored at a voltage below the threshold value of 2.5 V for 3 months or more, the capacity will drop and it will be impossible to restore, the elements will rust.
Conversion of a screwdriver to lithium batteries 18650 14 V
When converting screwdrivers of different power and flashlights from Ni-Cd to Li-ion, 18650 form factor batteries are more often used. They easily fit into a container or socket, since instead of two or three original ones they install one lithium one. The modification of the screwdriver battery should be carried out taking into account the features of 18650 lithium batteries.
This type of energy source does not tolerate deep discharge and excessive charge. This means that it is necessary to use voltage control boards. Since each battery has its own character, their charge is adjusted by a balancer. The point of converting a screwdriver with a voltage of 14.4 V is to create a device using lithium batteries to make a hand tool lighter and improve its performance. 18650 lithium batteries are most suitable for these purposes.
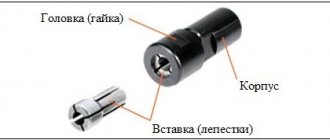
When selecting components, it should be taken into account that the starting current of the screwdriver is high; you must select the appropriate BMS for the required number of cans and at least 30 A. To convert the charging of the screwdriver to a lithium battery, you need to stock up on a good soldering iron, non-acid flux and thick wires for making jumpers.
Equipment:
- Lithium-ion cans in the amount of 4 pcs.
- Li-ion battery controller for 4 banks, CF-4S30A-A fits well. It has a built-in balancer that controls the charge of each element.
- Hot melt adhesive, TAGS soldering flux, solder.
- Heat-resistant tape;
- Connecting jumpers or thick insulated wire with a cross-section of at least 0.75 square, cut for bridges.
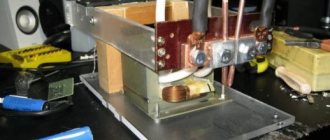
The procedure for converting a screwdriver for 18650:
- Disassemble the case and remove a bundle of 12 Ni-Cd elements from the container.
- Remove the garland, leaving the connector with the “+” and “-” terminals. Instead of a temperature sensor, a thermocouple from the controller will be installed.
- Solder the assembly, taking into account that you cannot use acid, only neutral flux and clean solder. During the connection period, the lids must not be heated. Work precisely.
- Connect balancing points to the controller according to the diagram. There are connectors on the board.
- Connect the assembly to the plus and minus terminals.
- Check the functionality of the circuit. If everything works, place the assembled battery, place the controller in the socket, and secure it with sealant.
If the memory is not universal, additional rework will be required. 12 V screwdrivers with a universal charger are assembled in the same way, but a protective circuit for connecting 3x18650 3.7 V to lithium batteries is used. A screwdriver is converted in the same way using a 18650 battery kit consisting of 2 elements.
Safety precautions when working with batteries
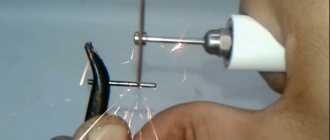
When assembling the battery, you should remember that the currents during operation of a screwdriver can reach 11-12 amperes, so the contact area of the connecting bars between the elements should be maximum. Therefore, the spot welding connection option, often offered on the Internet, is not the best . It is better to solder the busbars over the entire contact area of the battery. At the same time, you need to understand that the elements are very sensitive to overheating, so you need to solder quickly and confidently, using acid fluxes - battery cases are not made of copper or brass. It is advisable to use heat sinks, which can be pliers, etc.
It is necessary to ensure that splashes of acid during soldering do not fall on other surfaces, because this will subsequently lead to corrosion in these places. The ration areas must be thoroughly washed.
Converting a Makita screwdriver to a lithium battery
There is a Makita screwdriver with a battery capacity of 1.3 A/h and a voltage of 9.6 V. To change the power source on it to lithium-ion, you will need 3 18650 components. The conversion will give the old tool new capabilities: it will increase the operating time on a single charge , will add power as the operating voltage rises to 10.8 V.
The design will require the use of a BMS, a control controller that maintains the operation of lithium cells within operating limits. With this breaker, the charging of each bank will be uniform without exceeding 4.2 V, the lower voltage is 2.7 V. A built-in balancer is used here.
The controller parameters must accompany the operation of the tool when the operating current increases to 10-20 A. A 30 A Sony VTC4 board, designed for a capacity of 2100 A/h, can ensure operation without shutdown. Of the 20 amperes, the Sanyo UR18650NSX is suitable, receiving energy 2600A/h. The board is needed for 3 elements, which is marked in the 3S classification. In this case, the board should have 2 contacts, plus and minus. If the terminals are designated with the letters “P-”, “P+”, “C-”, they are intended for later models of screwdrivers.
Step-by-step instructions for converting a Makita screwdriver to lithium batteries look like this.
- You can disassemble the battery with glue by tapping the joint while holding it with a soft-headed hammer. The direction of the blow is downward, into the joint along the lower part of the body.
- Take only the contact plates from the old assembly, carefully disconnecting them from the battery. The sensor and breaker must be left.
- Solder 3 elements in series using TAGS flux and insulated jumpers. The wire cross-section must be greater than 0.75 mm2.
- Assemble the circuit with the controller, and connect the power supply to the contact connectors with 1.5 square wires.
- Check the functionality of the circuit and reassemble the body, placing it back on the glue.
In a screwdriver with an old DC9710 charger, after the 18650 lithium battery has finished charging, the red LED on the panel will turn off. The charge level is monitored by a built-in controller.
The Makita DC1414 T charger is used to charge 7.2-14.4 V power supplies. While charging is in progress, the red light is on. But when charging a lithium battery, its voltage does not fit into the standards of salt products, and after 12 V the charger will start flashing red and green. But the necessary charging is already there. The screwdriver is ready for use.
Controller selection
For all their advantages, lithium-ion cells are sensitive to:
- deep discharge;
- recharge;
- excessive charging current;
- overheating.
It is difficult to independently control these parameters for several hours, which will be required to replenish the battery’s energy. Therefore, these functions are assigned to the PCB (Power Control Board) system or SOF (function support system). It is a small board, which is often built into the battery case (because of this, the length of the 18650 element is slightly longer than the promised 65 mm). This system stops charging when the required voltage is reached and turns off the battery when discharged to the set level. Such elements are marked Protected . If there is no marking or it is directly indicated as Unprotected, then the battery is not equipped with such a system and you will have to control the charging parameters manually or assign this function to an external device.
Do not confuse the PCB (SOF) with the BMS - Battery Management System or PCM - Power Charge Module. This system is designed for element-by-element control of the charge of batteries included in the battery in a series circuit. The elements that make up the battery have a certain range of parameters, so it is possible that some of the elements are already charged, while the other part still needs to be charged. Obviously, this mode is unfavorable for batteries. BMS ("balancer") is designed to solve this problem. And in this case we cannot do without this system.
Typical diagram for switching on a balancer.
A typical BMS connection diagram is shown in the figure. When the nominal parameters are reached, the element is bypassed with an internal key, and the remaining batteries continue to charge.
For boards from different manufacturers, the markings may be slightly different (instead of “B-” there is the designation “0V”, instead of the serial number of the battery - the total voltage at the connection point). You can purchase a ready-made device on the Internet at well-known trading platforms. You must select according to the following parameters:
- operating current – not less than 30 A;
- the number of connected elements must correspond to the number of batteries in the battery.
And, of course, it is necessary to compare the dimensions of the board with the available installation space.
Converting a 12V Hitachi screwdriver to 18640 lithium batteries
Features of converting a 12 V Hitachi screwdriver to lithium batteries. The very compact battery cell socket is designed for finger-type cells. Therefore, you should prepare space for 18650 elements. It is necessary to cut one side of the partition in order to tightly place 1 element.
You need to get flux, flat metal connecting tape, hot glue. It is necessary to install lithium batteries in a screwdriver during remodeling through a protective controller. It should handle 3 18650 cells, 3.7V and rated at 20-30 amps.
Remove the old battery from the socket, carefully disconnect the contacts in the assembly with the temperature sensor and power indicator. Clear and sign contacts. They should be brought out in one direction, connected with solder to the leads from thick wires, and the assembly should be filled with hot glue.
Assemble an energy source with one of the controllers designed for 3 elements. Assemble a sequential circuit of 3 Li-ion elements. Connect the controller. The 12-volt lithium battery conversion is complete when the structure is installed in the block, secured, and the charging indicator lights up. After full charging, measurements show 12.17 volts in the external network. But this is enough for trouble-free long-term operation of the device.
Battery Cell Connection
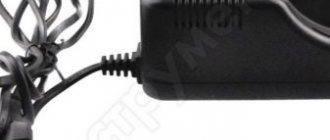
Automatic charger
Li - Ion batteries for a screwdriver connected in several ways:
- The use of special cassettes. The method is fast, but the contacts have a high transition resistance and can quickly be destroyed by relatively high currents;
- Soldering. A method suitable for those who know how to solder, since you need to have certain skills. Soldering must be done quickly, because the solder cools quickly, and prolonged heating can damage the battery;
- Spot welding. Is the preferred method. Not everyone has a welding machine; such services can be provided by specialists.
Connecting elements by soldering
Important! The elements must be connected in series, then the battery voltage is added, but the capacity does not change.
At the second stage, the wires are soldered to the contacts of the assembled battery and to the protective board according to the connection diagram. Wires with a cross-sectional area of 1.5 mm² are soldered to the contacts of the battery itself for power circuits. For other circuits, you can take thinner wires - 0.75 mm²;
A piece of heat shrink tubing is then placed over the battery, but this is not necessary. You can also put heat shrink on the protective microcircuit to isolate it from contact with the batteries, otherwise sharp solder protrusions can damage the shell of the element and cause a short circuit.
Converting the Interskol screwdriver to 18650 lithium batteries
Sooner or later, the nickel-cadmium assembly of 15 cans fails. One or two elements have become lazy, and it is no longer possible to obtain output voltage. Modern Interskol DS with lithium batteries serve much better. Craftsmen have mastered converting a screwdriver to 18-volt lithium batteries.
You need to purchase a protection board for 5S, 3.7 V and 40-50 A. You will need a balancing board and the energy sources themselves - 5 lithium 18650 batteries, you can leave them with factory thermistors by lengthening the wires. During installation, create a contact pad, insert the assembly, check functionality, and secure it. Assembly features and expert advice are given in detail in the video. Here's complete information about converting an 18-volt lithium screwdriver
Converting a screwdriver to 18650 lithium batteries