Even the most reliable branded power tool, such as an electric drill, hammer drill or screwdriver, not to mention a Chinese-made tool, wears out over time, depending on the intensity of use, and begins to hold drills and bits poorly, or the chuck jams.
The same fate befell the chuck of my electric drill, which has been serving faithfully for more than 12 years. The malfunction began to manifest itself with jamming, resulting in difficulty in rotating the release ring. In addition, water got inside the cartridge during the renovation of the apartment, and a coating of rust appeared in the guide grooves of the cartridge cams. The working surfaces of the cams are also worn out. Although the drill chuck was still working, changing drills was extremely inconvenient. I decided to replace it with a new one, and then the question arose, how to remove the chuck from the drill shaft?
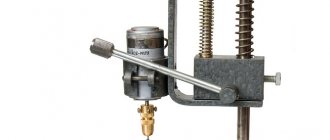
Collet chuck device
The design of the collet chuck is quite simple. The main part of the equipment is a collet, a special device in the form of a sleeve with longitudinal cuts. These cuts form springy petals that securely hold the workpiece. There can be three, four, six or more petals, depending on the diameter of the sleeve.
Mechanical engineering companies usually use ER type clamps. These parts have two clamping zones along the axis. Therefore, the tool placed inside is rigidly fixed, and there are no radial runouts, so they are not even taken into account in the calculations.
Image No. 1: Collet chuck design
Serial collet chucks are made of hardened tool steel and have high strength and wear resistance. Homemade clamps are made from bronze, brass, aluminum and steel.
How is a collet chuck different from a jaw chuck?
Collet chucks, like jaw chucks, are holders for tools and workpieces, so they are often confused. However, these equipments have fundamental differences. Jaw chucks are considered more universal and can therefore be used to hold tools with shanks of different diameters. On the contrary, collets are designed to work with certain diameters and are not suitable for tools with other shanks.
Fastenings: what they are like + (Video)
The clamping mechanism is attached to the drill shaft using the following methods:
- threaded connection;
- conical connection.
The design of a threaded connection often uses an additional locking screw, shown in the photo below. With its help, reliable fixation of the cartridge is ensured.
Chuck, key and locking screw for threaded connection
The threaded connection is ensured by identical threads on the tool shaft and in the channel of the clamping mechanism. The type of thread used in a given connection plays a significant role, and they can be metric or inch. The thread used on a drill is designated using a special abbreviation, which looks like this:
"1.5-15 M13x1.2"
The abbreviation stands for the following:
| Designation | Decoding |
| 1,5-15 | The first digits of the abbreviation indicate the minimum and maximum diameter of drill bits that can be used for clamping with this chuck |
| M13 | The letter designation indicates the use of a metric type of thread, and the number “13” is its diameter in mm |
| 1,2 | Designation of thread pitch in mm |
If the tool uses inch thread markings, the abbreviation is designated UNF. Modern drill models use inch threads, since the choice of clamping mechanisms with inch threads is much wider.
To securely fasten the clamping mechanism, the shaft is equipped with a locking screw, which has a left-hand thread. Therefore, unscrewing the screw to remove the cartridge is carried out in a clockwise direction.
A less common method is to secure the cartridge using a clamping mechanism based on the use of a Morse taper. In this case, the shaft is a cone shape and the clamping mechanism is equipped with a similar shape in the internal channel. The fastening of the mechanism occurs under the influence of forceful mounting of the device onto the structure of the shaft of the electric motor of the tool. Such mechanisms are marked using the following abbreviations: B10, B12, B18, etc.
Key chuck for drill with cone connection (marking)
The letter designation indicates the marking of the cone, and the digital designation indicates the diameter of the tail of the tool. The conical connection has the following appearance, shown in the photo below.
Cone Connectors for Chucks
The conical fastening method is more reliable, since it can withstand greater force loads than the first connection option. In addition, it is easy to use: it is easy to remove and just as easy to put on the shaft.
Finding out how to secure the cartridge
In order to find out how the chuck is secured to the drill, it is necessary to conduct an external inspection. Experts can determine this moment at first glance, and for inexperienced craftsmen there are markings by which one can judge the method of securing the chuck to the drill. Examples of markings for conical and threaded connections are described above.
How does a collet chuck work?
We'll tell you how a collet chuck works, which is used on lathes and hand tools.
The equipment consists of several collets and a self-clamping nut, which applies pressure to the end of the cartridge. Due to the applied force, the collet moves into the sleeve, decreasing in size, and its petals are compressed and securely fasten the tool shank or the workpiece. To remove the workpiece, the nut is unscrewed, thereby increasing the diameter of the collet.
The main advantage of the equipment is its ability to be perfectly centered, which is why the tool fixed with their help has minimal radial runout. And there is no need to use keys to operate the clamp.
What other types of machines can be made
Even the simplest homemade wood lathes can be turned into multifunctional devices by equipping them with additional equipment. In addition, using ready-made components and parts from other equipment, you can assemble an excellent model for home creativity.
With a copier
This device will make it possible to put into production the production of similar parts. With a copier, the easiest way to turn out a chess set, cutlery handles and other items. The essence of this device is to fix a template with the profile of a future plywood blank or a finished wood part on a tool rest. To work in this case, you will need to upgrade the hand cutter by installing a limiter on it. When processing wood, the cutter processes the part, and having reached the required diameter, it rests against the edge of the template, and then, moving along the relief, it creates the desired profile on the part itself.
Mini
A mini wood lathe is needed primarily to gain initial woodworking skills. The tabletop machine is also useful for creating crafts, such as checkers or chess, and for professional use - for modelers creating architectural models or exhibition dioramas. This model is usually small in size, because most parts are rarely longer than 10 centimeters.
From an electric drill
This type of tool is simply created to be used in the construction of lathes for woodworking. Essentially, this is a ready-made headstock - there is a motor, there is a clamping chuck, there is an electric drill speed control. All that remains is to clamp the body in a clamp and install the tailstock opposite. Of course, it’s not worth working on it for hours, but for small parts this is what you need.
Designation of collet chucks
The designation of a collet chuck with an outer cone, intended for fixing a tool with a cylindrical shank, in the drawing is as follows.
Image No. 2: Collet for a universal machine with a cone number 50, diameter under the shank (d) 12 mm, length 90 mm
The table below shows the standard dimensions of collet chucks, which are important to take into account in the calculations:
| Cone designation | D | d | l, no more |
| 30 | 31,75 | from 2 to 12 | 90 |
| 40 | 44,45 | ||
| 50 | 69,85 | ||
| 30 | 31,75 | from 10 to 25 | 100 |
| 40 | 44,45 | ||
| 50 | 69,85 | ||
| 30 | 31,75 | from 15 to 40 | 110 |
| 40 | 44,45 | ||
| 50 | 69,85 |
Current GOSTs
The main current standard related to this type of equipment is GOST 26539-85. It introduces the characteristics and markings of the 7:24 external taper collet chuck. And the Resolution of the USSR State Committee on Standards No. 5943 gives the following recommendations:
- graphic designations of supports, clamps and installation devices (including collet chucks) used in technical documentation;
- To display supports and clamps, solid thin lines are used (GOST 2.303-68).
Jaw chucks
The most convenient and functional. They work both in compression and expansion, so they can grip the workpiece both from the outside and from the inside. They differ in the number of jaws and their drive mechanism. Unlike metalworking, two- and three-jaw chucks are practically not used for turning wood. Options with a spiral drive and non-removable jaws are also not popular. The most common type of lathe chucks for woodworking are self-centering four-jaw, with a rack-and-pinion transmission mechanism and replaceable jaws. They are supplied to the Russian market by the brands Axminster, Jet, Barracuda and others, less well-known companies.
Types of cams
According to their shape and purpose, replacement jaws for wood lathe chucks are divided into several types, which have special markings:
- A, G, M – for compression, differ in size and depth of grip;
- D and F – act on unclenching;
- C and H are universal. Different shapes of sponges;
- To work with soft, compression-sensitive wood, cams with rubber fastenings are used.
Making a collet chuck for hand tools and machine tools
The simplest homemade collet chuck for hand tools can be created without using a lathe. If you need equipment for a machine, it will have to be machined from a workpiece and you cannot do it without special knowledge.
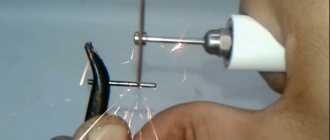
Method 1. The simplest wire collet
To equip a drill with low engine power, which will be used to work with wooden and plastic workpieces, a miniature collet coupling soldered from steel wire is suitable. It is important to consider that the resulting chuck can only be used for drills of the same diameter, and the diameter of the drill must correspond to the output shaft of the motor.
Photo No. 2: The simplest collet clamp made of wire
For work you will need the following tools and materials:
- a cylindrical metal blank, the diameter of which coincides with the diameters of the output shaft of the motor and the drill;
- steel wire 1 mm thick;
- electric soldering iron;
- soldering flux or KFET.
The wire should be wound around a blank, forming a rigid spring. The turns of wire must be placed as close to each other as possible. The finished spring is soldered directly on the workpiece using flux or KFET.
The resulting collet coupling is put on the electric motor shaft, and a drill is inserted into the hole at the opposite end.
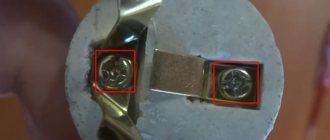
Method 2. Collet clamp from a screw
A collet chuck with similar characteristics can be made in another way. The product will consist of two parts connected by a screw. Fixation of the clamp on the shaft of the electric motor and the tool is ensured by cylindrical grooves on the internal surfaces of the equipment.
Photo No. 3: Blanks for making a collet clamp
To work you will need:
- 8 mm bolt or screw;
- closed nut M8;
- grinder with a metal disc;
- drill and drill bits 2 and 5 mm.
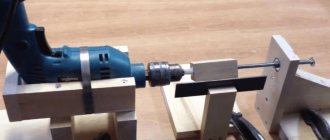
Photo No. 4: A collet chuck made from a screw mounted on an electric drill, in use
Drill a 3mm hole in the bolt leg. Make two even axial cuts crosswise with a grinder or a hacksaw. After this, drill a hole with a diameter of 2 mm in the closed nut exactly in the center. Extend it to 5mm. Round the edge of the bolt to create a cone. The finished collet chuck must be centered before use. Only in this case will it work correctly.
Method 3. Homemade collet chuck for a milling machine
A homemade collet chuck for a milling machine can be made on a lathe. For equipment you will need a steel blank (round timber with a diameter of 40 mm and a height of 70 mm). The work is carried out in two stages. First, the cartridge body is made, then the clamping nut.
Photo No. 5: Collet for a milling machine, turned on a lathe
Manufacturing of the cartridge body:
- Clamp the blank into the chuck with reverse jaws.
- Drill a through hole in it along the axis and bore it.
- Cut a M27 x 2 thread in the hole.
- Grind the outer surface of the blank.
- Trim the end that will support the base bearing surface on the spindle.
- Remove the resulting mandrel from the chuck and the three-jaw chuck from the machine and screw the mandrel onto the spindle until it stops.
- Bore the cylindrical and conical surfaces of the collet socket.
- Grind the end of the mandrel and cut a thread in it for the clamping nut.
Making a clamp nut:
- Clamp the workpiece into the reverse jaws of the three-jaw chuck.
- Drill a hole in it, bore the internal cavity.
- Grind the inner end bearing surface.
- Cut a counter thread in the nut.
- Screw the nut onto the chuck previously installed on the machine spindle.
The resulting equipment can be improved to make it easier to fix the tool. For this purpose, grooves are rolled on the side surfaces of the cartridge body and nut and grooves are made in the outer side surfaces.
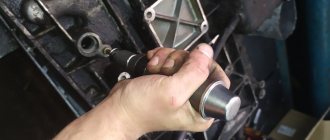
We remove cartridges with their various connections + (Video)
To remove a chuck that is screwed onto a tool, do the following:
1) There is a screw inside the cartridge located in the middle of the device. This screw has a left-hand thread.
2) To unscrew the screw, you will need to use a Phillips head screwdriver.
3) It must be unscrewed in the clockwise direction, that is, to the left.
4) After unscrewing the screw, which may not be present on some drill models, it is necessary to unscrew the unit that serves to fix the working element. Unscrewing is carried out by rotating the unit to the right.
To make it easier to remove the chuck, it is recommended to clamp the drill in a vice. If you cannot unscrew it manually, you can use a pipe wrench or a hammer, following the procedures described in the section on removing a jammed drill.
Such popular manufacturers of power tools as Interskol and Makita have a similar design for securing cartridges on drills and screwdrivers. Therefore, all that is needed to unscrew the cartridge is to determine the type of connection and then use one or another method to remove the cartridge.
Makita drill with keyless chuck and threaded connection
When removing a cartridge with a cone connection, there are often no problems at all. The simplest way is to carry out the work using a hammer. It is used to dislodge the structural element from its engagement. The drill must be secured in a vice so that the chuck faces down. After this, blows are applied to the back of the cartridge, thereby dismantling it.
Drill with various cones for securing the chuck
Attaching the collet chuck to the machine and hand tools
The collet chuck is mounted and centered on the lathe spindle. Note that the diameters of the cartridges and methods of their installation are standardized. The most common spindle end designs include Type C and Type D (cam-lock) fasteners. Also, to install collet chucks, flanges and faceplates are often used, which are placed on the spindle.
Now we will tell you how to center a collet chuck on the motor shaft of a hand tool (electric drill). The adjustment is carried out in two planes, and first the runout is eliminated in one plane, then in the other. Work progress:
- Fix the drill on the table (in a lying position).
- Rotate the chuck until the desired pair of bolts is parallel to the table.
- Rotate the chuck 180 degrees and note the deflection of the chuck.
- Eliminate wobble by tightening and loosening a couple of screws.
Do the same with the second pair of screws. To make the deviation in two planes more noticeable, use a long drill.
What is the function of the chuck in a drill?
The drill chuck is one of the main components of the electric drill mechanism. It serves to transmit rotational motion from the electric motor to the working tool. Its task also includes fixing the drill in such a way that during operation the maximum accuracy of drilling holes, reliable fastening and quick replacement of the tool are observed.
In any drill, the tool is fixed in a chuck
Attaching the chuck to the spindle of an electric drill
Actually, there are two methods of fastening:
- cone mate;
- threaded connection.
You can find out the type of fastening by the marking:
- the inscriptions B10, B12, B18, etc. characterize the parameters of the Morse cone, the special shape of the mating surfaces (in total there are 9 standard sizes from B7 to B45); before this designation, the range of drill shank diameters is marked, for example, 1−6 B10;
- type designations 1−15 M13×1.3; characterizing the parameters of metric threads (diameter of drill shanks, thread diameter and thread pitch);
- abbreviation UNF (the full marking is similar in structure to the marking of metric threads, for example, 2−13 mm ½ - UNF, where ½ denotes the diameter of the thread in inches, and the number 20 characterizes the number of threads of thread per length of one inch), which indicates fastening using an inch thread ; this type of connection is typical for imported instruments.
Why load your own ammunition?
First, let's try to figure out why people even load their own cartridges. After all, modern gun stores offer a wide range of ammunition for every taste and budget. That’s right, but don’t forget about the following nuances that most often encourage people to load shells on their own:
- Desire to save money. No matter what anyone says, loading your own cartridges is much cheaper than ready-made ammunition from a store. The cost of the main elements of the cartridge is relatively low, and the finished projectile is subject to an excise tax stamp, as a result of which its price also increases. However, if the hunter loads the ammunition himself, he will not have to pay sales tax. As a result, a person saves half, or even 70% of the amount that could have been spent on purchasing cartridges.
- The desire to achieve better ballistic performance. Magazine cartridges are versatile. For example, when choosing ammunition for duck hunting, you may encounter different weights of gunpowder and shot, and even different numbers of striking elements. However, the accuracy of the battle in almost all cases will be 50-60% at a distance of 35 meters. But what if you need to shoot from a distance of 50 meters? That's right, you just need to experiment a little with different attachments.
- The desire to obtain unique ammunition, tailored for specific purposes. Let's say you have a shotgun with a 76mm chamber, but you don't want to use a full load of shot and powder because you just want to practice skeet shooting. In this case, you can equip the cartridge case yourself, using a minimal amount of gunpowder and shot. Also, many hunters may not be happy that the factory cartridge contains a wad that is too thick or thin.
- The desire to obtain the highest quality ammunition. There is an opinion among inexperienced hunters that a cartridge from a trusted manufacturer is the highest quality and best. However, we hasten to disappoint you. The fact that the ammunition does not explode inside the barrel does not mean that it is ideal. A high-quality cartridge is considered to be the one that is best suited for firing from your weapon. Some shotguns prefer plastic ammunition, others prefer brass, and still others prefer fast-flammable powder.
- Lack of access to a gun store. Sometimes people switch to “roll-your-own” guns also because they simply live far from the city where there is a gun shop. In this case, the only way out is to equip the cartridges yourself at home. And such a process is resorted to not only by residents of the Far North, as one might initially think, but also by many hunters from the villages who simply do not have transport to get to the city.
And these are just the main reasons that encourage people to start loading their own cartridges. You should also not forget about the banal desire to learn something new, as well as the fact that there is an unspoken rule among hunters: if you don’t know how to make ammunition yourself, then you cannot be considered a professional.
DIY vacuum chuck for wood
If your lathe's headstock spindle has a through hole for knocking out the gear center, you can add a homemade vacuum chuck to your arsenal. For this you will need:
- Powerful vacuum cleaner
- Closed bearing, approximately equal in outer diameter to a vacuum cleaner hose
- A piece of thick rubber hose for connecting the vacuum cleaner and the bearing
- Clamp
- Standard faceplate with hole in the center
- A small piece of MDF or thick plywood
- Textolite for adapter
A bushing is machined from the textolite, one side of which should be equal in diameter to the internal size of the bearing, the other - to the spindle. This homemade adapter is pressed into the bearing using glue; it will be held in the machine due to the tightness of the fit. The resulting structure is connected with a piece of hose to the vacuum cleaner and secured with a clamp.
A disk is cut out of MDF or plywood, attached to a faceplate and ground. It is better to make the surface slightly concave. To ensure a tight fit, linoleum or thin rubber is glued on top. The disk is drilled through the center to remove air. A similar self-made chuck provides a pressing force of 40 - 50 kg, sufficient to hold medium-sized parts during finishing.
If you find an error, please select a piece of text and press Ctrl+Enter.
How to choose
To choose the right lathe chuck, you need to consider several important points:
- operating parameters and exact dimensions of the machine spindle;
- method or option for attaching the chuck to the spindle;
- for hobby machines, drive power plays an important role; a weak engine may not cope with the torque task;
- what and how many parts are included in the lathe chuck kit.
Without a clear understanding of the information presented above, you cannot consider yourself ready to purchase a lathe chuck as an important component of the machine. You need to understand that the quality and productivity of a lathe affect the quality and productivity of labor and material condition
You need to understand that the quality and productivity of a lathe affect the quality and productivity of labor and material condition.
What you need to equip cartridges
Pharmacy scales
They are commercially available complete with weights. Any model will do - electronic or mechanical. The main condition is the measurement limits (g). The maximum is 50, the minimum is 0.01.
Dispenser or measures
They measure the required amount of shot and gunpowder per charge.
Experienced hunters, who have been loading cartridges at home for several days, use paper cartridges cut to a certain level as such. Several of them are prepared, and they are all labeled. Such a homemade dispenser significantly saves time, since working with scales is a rather lengthy process. Especially if we are talking about fifty or more rounds of 12 or other gauge. But such “homemade products” can only be used by experienced hunters! Not recommended for novice shooters!
Navoynik
Purpose – adding wads and gaskets to the sleeve. The author, for lack of anything better, used a wooden block, turned on a 12-gauge machine and polished. If its end is slightly rounded, then it will simultaneously serve as a cone, which is necessary to straighten the ends of spent folder and plastic cartridges.
OOPS
Without this device, cartridges cannot be loaded. It is needed to “seat” the primer into the socket on the head of the case and remove the already used one. Any attempts to press it in, hammer it in, etc. will lead to nothing good! Not only is there a high probability of the primer firing, but the cartridge case will also become completely unusable.
Actual dates of autumn hunting in 2022, recommendations for choosing prey
Rolling device (twisting)
After the cartridge is fully loaded, the edges of the cartridge case are bent with this device.
Funnel (small)
With its help, it is easy to load a measured amount of gunpowder and shot into the cartridge case.
Die cutting
You can make wads for loading a cartridge yourself. For example, from a piece of thick felt. This is what this device is used for.
Gauge ring
In this case, chambered for 12 gauge cartridges. It is necessary to check the accuracy (correctness) of the shape of the ammunition after it is loaded. Often, a hunter twists the edges of the cartridge case too hard, which is why it “bulges” a little in the area where the shot is located. There is no point in taking such a cartridge for hunting, since it simply will not fit into the bore.