A drilling machine for printed circuit boards belongs to the category of mini-equipment for special purposes. If desired, you can make such a machine yourself using available components. Any specialist will confirm that it is difficult to do without the use of such a device in the production of electrical products, the circuit elements of which are mounted on special printed circuit boards.
Simple mini PCB machine
General information about drilling machines
Any drilling machine is necessary in order to ensure the ability to efficiently and accurately process parts made from various materials. Where high precision processing is required (and this also applies to the process of drilling holes), manual labor must be eliminated as much as possible from the technological process. Similar problems are solved by any drilling machine, including homemade ones. It is practically impossible to do without machine equipment when processing hard materials, for drilling holes in which the efforts of the operator himself may not be enough.
Design of a benchtop belt driven drill press (click to enlarge)
Any drilling machine is a structure assembled from many components that are securely and accurately fixed relative to each other on a supporting element. Some of these nodes are rigidly fixed to the supporting structure, and some can move and be fixed in one or more spatial positions.
An example of motors used in the manufacture of a homemade mini drilling machine
The basic functions of any drilling machine, through which the processing process is ensured, is the rotation and movement in the vertical direction of the cutting tool - the drill. On many modern models of such machines, the working head with the cutting tool can also move in a horizontal plane, which allows this equipment to be used for drilling several holes without moving the part. In addition, automation systems are being actively introduced into modern drilling machines, which significantly increases their productivity and improves processing accuracy.
Below, as an example, are presented several design options for homemade drilling machines for circuit boards. Any of these diagrams can serve as a model for your machine.
Description of design
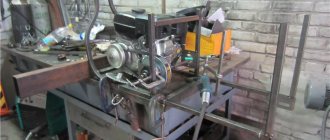
The design is based on a fairly powerful 12-volt motor from China. Included with the engine, they also sell a cartridge, a wrench and a dozen drills of different diameters. Most hams simply buy these motors and drill the boards while holding the tool in their hands. We decided to go further and, based on it, make a full-fledged machine with open drawings for independent production.
Burator. General form
For linear movement of the motor, we decided to use a full-fledged solution - polished shafts with a diameter of 8 mm and linear bearings. This makes it possible to minimize backlash in the most critical place.
Burator. General form
The main frame is made of 5mm thick plywood. We chose plywood because it is very cheap. Both the material and the cutting itself. On the other hand, nothing prevents (if possible) from simply cutting out all the same parts from steel. Some small parts with complex shapes are 3D printed. To lift the engine to its original position, two ordinary rubber bands were used. In the upper position, the motor switches itself off using a microswitch. On the back side we made a place to store the key, a small case for drills. The grooves in it have different depths, which makes it convenient to store drills with different diameters.
Burator. Drill storage case
However, it’s easier to see all this in the video:
Features of equipment for drilling holes in printed circuit boards
A machine for drilling printed circuit boards is one of the types of drilling equipment, which, given the very small size of the parts processed on it, belongs to the category of mini-devices.
Any radio amateur knows that a printed circuit board is the base on which the components of an electronic or electrical circuit are mounted. Such boards are made from sheet dielectric materials, and their dimensions directly depend on how many circuit elements need to be placed on them. Any printed circuit board, regardless of its size, simultaneously solves two problems: accurate and reliable positioning of circuit elements relative to each other and ensuring the passage of electrical signals between such elements.
Depending on the purpose and characteristics of the device for which the printed circuit board is created, it can accommodate either a small or a huge number of circuit elements. To fix each of them in the board, you need to drill holes. Very high demands are placed on the accuracy of the location of such holes relative to each other, since it is this factor that determines whether the elements of the circuit will be positioned correctly and whether it will be able to work at all after assembly.
Drilling holes in foil getinaks on a homemade machine
The difficulty of processing printed circuit boards also lies in the fact that the majority of modern electronic components are miniature in size, therefore the holes for their placement must have a small diameter. To form such holes, a miniature tool (in some cases even micro) is used. It is clear that it is not possible to work with such a tool using a conventional drill.
All of the above factors led to the creation of special machines for forming holes in printed circuit boards. These devices have a simple design, but can significantly increase the productivity of this process, as well as achieve high processing accuracy. Using a mini-drilling machine, which is easy to make with your own hands, you can quickly and accurately drill holes in printed circuit boards intended for assembling various electronic and electrical products.
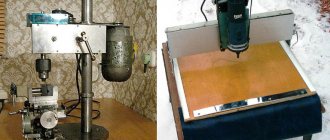
Drilling machine from an old microscope
Dual spindle machine
A two-spindle machine is used to bore holes on both sides and turn the ends of parts. But there are several nuances in this equipment that are worth getting acquainted with:
- The OS-402A vertical double-spindle deep drilling machine has a stepped and automatic drilling cycle.
- To increase its own productivity, a double-spindle rotary milling unit has been developed.
- The design of a two-spindle machine for lapping reinforcement was designed and manufactured at the Lenenergo enterprise.
- To screw two threaded parts simultaneously from both ends of the roller, a two-spindle unit with a mechanical drive with a horizontal spindle was manufactured at another production facility.
- The three-spindle unit type C - 13 and the unit type C - 12 are similar in technical characteristics and design. But there is also a difference between the machines, where the table of a two-spindle machine has a shorter length.
- There are rotary table surface grinders with one or two spindles. The difference is that with a dual-spindle machine, one spindle is used for preliminary grinding and the other is used for final grinding.
- Devices for rolling rods and fillets on shafts are in great demand among the population. Only in some cases can one count on the simultaneous rolling of two shafts on their side for a two-spindle machine; the installation of a special valve is also present on the machine.
- The specialized machine has manual control and, thanks to the 4723D model, a mechanical drive. The machine is also used for multi-position processing of many parts. Its kit includes the following: a machine tool, a machine generator of unipolar pulses, a high-frequency electronic semiconductor generator. In contrast to this model, the double-spindle machine is reinforced with an L-shaped traverse.
It is worth noting that each dual-spindle unit represents the most powerful equipment for any workshop, which any master should use.
How does a machine for drilling holes in printed circuit boards work?
The machine for forming holes in printed circuit boards differs from classic drilling equipment in its miniature size and some features of its design. The dimensions of such machines (including homemade ones, if the components for their manufacture are correctly selected and their design is optimized) rarely exceed 30 cm. Naturally, their weight is insignificant - up to 5 kg.
Design of a homemade drilling machine
If you are going to make a mini drilling machine with your own hands, you need to select the following components:
- supporting frame;
- stabilizing frame;
- a bar that will ensure movement of the working head;
- shock absorbing device;
- handle for controlling the movement of the working head;
- device for mounting an electric motor;
- the electric motor itself;
- power unit;
- collet and adapters.
Drawings of machine parts (click to enlarge)
Machine console drawing
Let's figure out what all these components are for and how to assemble a homemade mini-machine from them.
DIY drilling machine
What to do if you don’t have a drilling machine for printed circuit boards at home? Of course, it’s expensive to buy, and it happens that the machine is not needed for frequent use.
I offer you 2 simple ideas for making your own drilling machine with your own hands. The first option is very simple; to make it we will need an electric motor from cassette recorders.
Remember these? Such motors can be removed from any Chinese or Soviet-made tape recorder.
They look something like this:
So, we have an electric motor, we also need a drill of the required diameter, usually 0.7-1 mm, we need to take thin paste from a ballpoint pen, a thin thread of 10 centimeters, scissors and instant glue.
Is everything ready? Let's start collecting.
We take the scribbled paste from a ballpoint pen (you can use a new one) and cut off 15 mm, then we need to put it on the motor shaft a little less than half (6-7 mm). Then remove it with a screwdriver or tweezers and put it aside (although you don’t have to remove it).
We take a drill, wind a thread on it turn to turn in 2 layers, below is the photo:
Holding the end of the thread (so as not to unwind), apply a drop of second glue and quickly push the drill into the tube. If you hesitate, the glue will harden.
Here's what we got:
If the drill rotates crookedly, you simply bend the paste in the desired direction until the drill is centered, and you can start drilling your board
Second version of the drilling machine
Now I’ll tell you about the second version of the drilling machine, the one I use. Making it will be a little more difficult. I will not give detailed drawings with dimensions, because...
the machine was assembled from what we have, let the article be for informational purposes only, but I will still describe the machine in photographs and schematically.
You can try to assemble a similar machine for yourself using my drawings. This machine looks like this:
- It is built on a lever mechanism, when pressed, the motor and the drill are lowered, and if the lever is released, the motor rises up again.
- Here is a photo of the mechanism itself:
The lifting and lowering part is made of sheet metal, the sheet is cut to the desired shape, bent and holes are drilled. Instead of the bent rod shown in the photo, you can use something similar, for example, replace it with two long M4 screws with a thread at the end.
- Mechanism drawings:
- Drawing of the lifting mechanism.
- To avoid confusion, I drew the lifting and lever mechanisms separately
- This is what you get if you combine the two top pictures
- I think the essence is clear and now, using my sketches, if you wish, you can put together something similar, I gave you the idea, so go for it!
I also want to give a little advice about drills, drills become dull very quickly and begin to drill poorly, if you don’t have a sharpening machine, then why not throw them away? I found the following way out of this situation: we take a drill and carefully break off the end of the drill with pliers (a millimeter or a little more), and we don’t need to break it off haphazardly, as correctly shown in the pictures below.
Structural elements of a mini drilling machine
Do-it-yourself mini-drilling machines can differ significantly from each other: it all depends on what components and materials were used for their manufacture. However, both factory-made and home-made models of such equipment work on the same principle and are designed to perform similar functions.
It will be easier to make the machine if you take a slide from a computer drive for the drilling head
The supporting element of the design of a drilling machine for printed circuit boards is the base frame, which also ensures the stability of the equipment during the drilling process. Based on the purpose of this structural element, it is advisable to make the frame from a metal frame, the weight of which should significantly exceed the total mass of all other equipment components. If you neglect this requirement, you will not be able to ensure the stability of your homemade machine, which means you will not achieve the required drilling accuracy.
The role of the element on which the drilling head is mounted is performed by a transitional stabilizing frame. It is best made from a metal strip or corners.
Drive carriage with attached homemade corner for the engine
The bar and shock-absorbing device are designed to ensure vertical movement of the drilling head and its spring-loading. Any structure can be used as such a bar (it is better to fix it with a shock absorber) (the only important thing is that it performs the functions assigned to it). In this case, a powerful hydraulic shock absorber can come in handy. If you don’t have such a shock absorber, you can make the bar yourself or use spring structures removed from old office furniture.
The vertical movement of the drilling head is controlled using a special handle, one end of which is connected to the body of the mini-drilling machine, its shock absorber or stabilizing frame.
Lever attachment
The engine mount is mounted on a stabilizing frame. The design of such a device, which can be a wooden block, a clamp, etc., will depend on the configuration and design features of the remaining components of the drilling machine for printed circuit boards. The use of such a mount is determined not only by the need for its reliable fixation, but also by the fact that you must bring the electric motor shaft to the required distance from the movement bar.
Choosing an electric motor that can be equipped with a mini-drilling machine that you assemble yourself should not cause any problems. As such a drive unit, you can use electric motors from a compact drill, cassette recorder, computer disk drive, printer and other devices that you no longer use.
Hair dryer motor
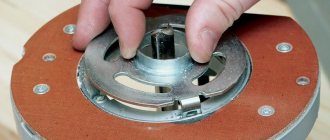
Depending on what kind of electric motor you found, clamping mechanisms for fixing drills are selected. The most convenient and versatile of these mechanisms are the chucks from a compact drill. If a suitable cartridge cannot be found, you can also use a collet mechanism. Select the parameters of the clamping device so that it can hold very small drills (or even micro-sized drills). To connect the clamping device to the motor shaft, it is necessary to use adapters, the dimensions and design of which will be determined by the type of electric motor selected.
Miniature collet chuck
Depending on which electric motor you installed on your mini-drilling machine, you need to select a power supply. When making this choice, you should pay attention to the fact that the characteristics of the power supply fully correspond to the voltage and current parameters for which the electric motor is designed.
Diagram of automatic speed control depending on the load for a 12 V engine (click to enlarge)
Do-it-yourself mini electric drill - very simple and fast
And again, good day to all, dear enthusiasts of homemade devices, tools and other mechanisms.
Today I am pleased to share with you a simple method for making a simple, budget-friendly option for making a mini electric drill. Then we will consider with you the identified pros and cons of the resulting product. The mini drill has become widespread and is used to perform an incredibly large number of tasks at home, in the garage, in the country or for repairs. A mini drill is used for a wide variety of small jobs. In particular, it is used for drilling electrical printed circuit boards; a conventional electric drill is completely unsuitable for such work. A mini drill equipped with special attachments can be used as an engraver, a grinder or a router. To use it in this capacity, special nozzles with a rough working surface are used. During operation, the nozzle processes the part or applies the required pattern to the product being processed. Of course, a mini drill will not be able to handle thick iron, but a hole in a metal sheet up to one millimeter thick will be enough to drill. There are an unimaginable variety of options for making a mini-drill with your own hands. Everything fits into your flight of imagination, fantasy and is limited solely by the components available to you for making a drill. So your imagination is limited only by your spare parts bins. The heart of any mini drill is a small but quite powerful electric motor. Also, for the manufacture of our mini drill, you will need a collet chuck (a collet chuck is a type of drill chuck. They hold the drill in the drill during the drilling process. The quality of the work performed by the electric drill depends on the quality of the collet chuck and, accordingly, the fastening of the drill to the electric motor. Therefore, the choice of collet cartridge should be approached with all responsibility), it is quite problematic to make a high-quality collet cartridge on your own at home, so it is better to purchase it in a store. Standard chucks (with collets for drills with a diameter of 0.5 to 3.2 millimeters) can be found in any online store at an affordable price, the price varies from 100 to 150 Russian rubles
An important part of the mini drill, where all the components are placed and attached, is the body. There are many options, in our case we use a pipe from a fan pipe, the inner diameter of which perfectly matches the outer diameter of the electric motor
When fixed in the housing, the engine stood up with virtually no gaps. Connecting electrical wires are selected based on the power of the drill, but due to the fact that we are using an electric motor with low power consumption, we select insulated electrical wires of small cross-section. For high-quality soldering of an electrical circuit, we will need soldering acid and tin rods, a soldering iron or connectors. Almost any novice DIY enthusiast can assemble a mini drill on their own. It's a matter of desire and perseverance. As always, about observing safety precautions when working with high-risk tools. Work carefully. Following all safety regulations. Do not taste electricity with your tongue, do not stick your fingers where the dog does not stick its tail. Before any action, turn on your brain. And then, take my word for it, each member of your friendly family, including the dog, will have their own mini drill.
The procedure for assembling a homemade device
As practice shows, it is most convenient to assemble a homemade machine for drilling holes in printed circuit boards in a certain sequence. You must act in accordance with the following algorithm.
- The frame is installed, and legs are attached to its underside, if they are provided for in the design.
- A movement bar and a holder frame on which the drilling head will be mounted are attached to the assembled frame.
- The holder frame is connected to a shock absorber, which is also fixed to the equipment frame.
- A handle for controlling the movement of the drilling head is installed, connected to a shock absorber or holder frame.
- An electric motor is mounted, the position of which is carefully adjusted.
- A collet or a universal drill chuck is attached to the shaft of the drive motor using adapters.
- A power supply connected to the electric motor via electrical wires is being installed.
- A drill is installed in the chuck and securely fixed in it.
- The assembled homemade machine is tested by trying to drill a hole in a dielectric sheet with its help.
To ensure that your homemade mini-drilling machine can always be disassembled and modified, it is best to use bolts and nuts to connect its structural elements.
If you want to make your own mini-equipment for making holes in printed circuit boards, you can always use the drawings and advice of those who already own such a machine and are actively working on it in their home workshop.
Parts for assembly
- Engine with chuck and collet. You can use any other with a diameter of up to 28mm
- Plywood parts. A link to laser cutting files in dwg format can be downloaded at the end of the article. You just need to find a company that deals with laser cutting of materials and transfer the downloaded file to them.
- 3D printed parts. A link to laser cutting files in dwg format can be downloaded at the end of the article
- Polished shafts with a diameter of 8mm and a length of 75mm - 2 pcs. Here is a link to the seller with the lowest price for 1m that I saw
- Linear bearings 8mm LM8UU - 2 pcs.
- Microswitch KMSW-14
- Screw M2x16 - 2 pcs.
- Screw M3x40 h/w – 5 pcs.
- Screw M3x35 slot - 1 pc.
- Screw M3x30 h/w – 8 pcs.
- Screw M3x30 h/w with countersunk head - 1 pc.
- Screw M3x20 h/w - 2 pcs.
- Screw M3x14 h/w - 11pcs
- Screw M4x60 slot - 1 pc.
- Bolt M8x80 - 1 piece
- Nut M2 - 2 pcs.
- M3 square nut – 11pcs
- Nut M3 – 13pcs
- M3 nut with nylon ring - 1 pc.
- Nut M4 - 2 pcs.
- M4 square nut – 1 piece
- M8 nut – 1 piece
- Washer M2 - 4 pcs
- Washer M3 – 10pcs
- M3 washer enlarged - 26 pcs.
- M3 locking washer – 17 pcs.
- Washer M4 - 2t
- M8 washer - 2 pcs.
- M8 locking washer – 1 piece
- Set of installation wires
- Heat shrink tube set
- Clamps 2.5 x 50mm - 6 pcs
Plywood cutting