5/5 — (31 votes)
Good day! Or as they also say, ok Google))). Tell me, my friend, how to make something out of a St. George ribbon? Admit it, you often communicate like this, ah-ha-ha.
In general, today we are going to get acquainted with such a funny and very beautiful attribute that we always attach to our clothes and even hang on our cars. Whatever one may say, it has become very fashionable lately. We even started selling such crafts near large supermarkets, and I see that in the May days they are snapped up by young needlewomen with a bang.
Well, so what, it really looks very attractive, and most importantly symbolizes this significant day in the history of our beloved country, Russia. Do you know the history of this attribute? Write your guesses and assumptions at the bottom of this note.
I just want to remind you that in addition to such decorations and badges of honor, veterans on this day should be presented with flowers, read poetry to them and, of course, present some surprise in the form of a craft or postcard.
How to correctly and beautifully tie a St. George ribbon on clothes? (diagram inside)
It has long been known that such a ribbon denotes two states, death and resurrection, or rather these two colors, orange and black.
There are several ways to tie such an attribute; it dates back to the reign of Catherine II. It was then that soldiers and wars were awarded such a gift and this is how you could tie this detail on your attire.
I think you will be surprised now when you see this picture, but at the same time you will know, and perhaps practice at home in advance.
The most popular methods are presented before you, you can do it using the easiest way, you can also tie it with a tick, in the form of a tie, or even with a scarf. Yes, this image shows everything perfectly.
But that’s not all, it’s not enough to be able to fold the tape this way, you also need to know where and in what places it can be placed.
There are prohibited areas of the body where, according to new recommendations, this attribute should not be applied. Look at the picture and remember.
Well, of course, you can not just take and attach such beauty, but somehow decorate and design it in a cool way so that it attracts the eye. This is exactly what we will talk about next.
Features of symbolism
The St. George Ribbon is one of the most recognizable and popular symbols of Victory in the Great Patriotic War today. Its colors have a special meaning:
- orange - the eternal fiery flame of war;
- black - smoke from burnt cities and villages.
In the 18th century, Catherine II signed an order establishing the Order of St. George the Victorious; it became a reward for special services to the Motherland. The order was attached to a strip of black and orange fabric, which was called St. George's.
In Soviet times, military personnel were awarded the “Guards Ribbon,” the color of which was similar to the ribbon of St. George the Victorious. During the Second World War, the block of the Order of Glory was covered with black and orange fabric. All these facts explain why the use of the St. George ribbon as a symbol of Victory is logical and acceptable.
In 2005, employees of the news agency RIA Novosti for the first time organized the “St. George’s Ribbon” campaign for Victory Day. Their desire was to pay tribute to the participants of this terrible war, who survived and died on the battlefields. The creation of symbols that carry the depth of the heritage of the Second World War led to the spread of the action throughout the country. Every year it gains momentum and attracts more and more people.
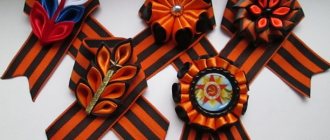
DIY St. George ribbon made from ribbons using the kanzashi technique
Undoubtedly, for the holiday this sign of honor of clothing can be secured in a special and more effective way. If you are also a creative person, then please pay attention to such a product. It can be done in 1 hour, it can be done by a child, but only by an adult, or it can be done by younger children, but only under the supervision of elders. Because some parts are melted here.
You'll get a cool brooch in the shape of a three-dimensional star, I saw one like this last year, but I didn't think that it could be made so easily and quickly at home. Class! MK is taken from the Country of Mothers.
You will need:
- tape by meter (width 35 mm) - 60 cm
- brooch base - 1 pc.
- pin - 1 pc.
- rhinestones, beads, etc.
- ruler
- scissors
- tweezers
- candle or lighter
- glue gun
Stages of work:
1. Take an orange and black ribbon and cut it into rectangular pieces, each shape should be 7 cm long.
2. Now, to make it convenient, you need to take tweezers. You can do without it, take eyebrow tweezers, and this is what we do, we bend the base so that the angle comes out, as you can see, as a straight line.
3. Then crumple it again, from right to left, and level the bottom part so that it comes out smooth.
4. Fold in half again.
5. What does it look like? I think it's a petal. Select the edges of the product.
6. And you have to set them on fire
7. This is how beautiful it will turn out. This is what the reverse side looks like.
8. To create a star, you will need to make 5 such templates, the main thing is that they are almost the same so that it looks perfect.
9. The rest of the tape, its length should be about 20 cm, trim the ends in the form of a greater and lesser sign on both sides. In other words, you should fold it in half and cut it at a 45 degree angle.
10. Next, place each end in the center and glue it together.
11. Glue or sew on the back side, depending on what base you have for the brooch. Thread a pin through.
12. Turn the workpiece over and, well, now glue the star or perhaps it will resemble a flower with a glue gun, and decorate the middle with any decor.
This beauty can be used as a pendant for a car; then, instead of the base for the brooch, you need to glue a satin ribbon. It will look like a keychain.
By the way, the middle can be done in this way, you can cheat it, decorate it with inscriptions that you can find on the Internet or download right now.
Next, print the finished templates on a color printer, cut them out and glue them to cardboard, and then the petals can be glued directly to such a blank.
You can print it on photo paper, it will look brighter and even more beautiful.
It will look unusual and very worthy at the holiday!
Here are some more ideas you can implement.
Such waves, or lambs, I don’t even know what to call such a craft, also made an impression on me. Like?
Or something similar, as they did in the first version.
Only here the fabric doesn’t bend so much, see for yourself.
You can do without glue and sew with a regular needle and thread. Some people are simply afraid of a glue gun, or perhaps they don’t have one yet. So, no big deal, consider this option then.
Another amazing design idea. Of course, more accurate measurements are needed here.
It still looks magical.
Subtleties of self-production
Before you study how a kanzashi headband is made and create pictures using this technique, you should understand all its features. Petals in this case can be made in different ways. Each of them is worth considering in detail.
Round
Beginners are advised to first figure out how to make a round kanzashi petal. The technology for its manufacture is quite simple.
Squares of suitable size are cut out.
These blanks are folded diagonally.
The corners of the resulting triangle are folded in the center.
To fix these corners, they are connected by making several stitches.
Then you need to turn the petal over and fold the corners towards the middle.
The resulting structure is folded in half, pointing the corners inward.
The bottom of the petal is cut off.
The cut points are soldered together using fire.
Pointed
Such kanzashi petals are created no less simply. The technology for their manufacture comes down to performing simple steps.
The tape is cut into squares.
The resulting blank, as in the case of round petals, is folded diagonally.
The resulting triangle must be folded in half.
Such actions are performed again.
The bottom of the resulting structure is carefully cut off.
The cut edge is singed and the lower part is immediately pressed.
A neat cut is made in this part and also singed.
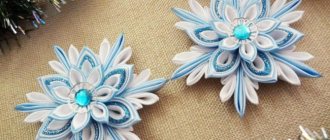
We decorate the St. George ribbon easily and simply 2021
Now I offer step-by-step instructions, with the help of which you can teach children how to tie this little thing like this. After all, sometimes you want to show the children something unusual in kindergarten or, for example, in elementary school. So, just this case and take this idea as a basis.
Lay the strip of fabric horizontally in front of you.
Then, with your hands on each side, bring the ends towards the center. But before that, you still need to determine the middle.
This can be done by eye or using a regular ruler.
I think this will make a bow.
Yes, of course it is. Secure it with a pin or gently drip glue. You can sew it on, depending on what age group of children is gathered.
Or simply tie it with thread or satin ribbon.
The next option is more complicated, and it is already for older schoolchildren or for those who do needlework and love this skill. Make the petals first. The piece of fabric should be about 11 cm.
Use tweezers to pinch very tightly and bring it to the candle, slightly melting it.
Be careful with the fire; it is better to place the candle in a bowl or place it on a special stand.
Make exactly five of these things.
Glue them together with a glue gun to make a flower.
It looks more like an icon in the form of a five-pointed star.
All that remains is to complete it with any decorative decoration. For example, a rhinestone or a button.
Next to this blank is the rest of the tape folded in half. You can additionally cut out another circle of felt and first glue a strip to it, then a star.
And on the back side glue the clasp from the brooch.
The result was a souvenir in the form of the Order of Victory.
How to decorate with tulips?
Tulip buds can be made from fabric, paper, using different techniques and colors. Tulips made in blue, white and red colors (the colors of the Russian tricolor), nested in green triangles, look fresh and original.
See also: Is it possible to baptize a child during Lent before Easter in 2022
First, strips of fabric are selected, cut to length and folded into petals. Then they create a “bouquet” - several petals form a bud, which is placed in a green leaf. All that remains is to secure the finished composition on a strip of St. George’s ribbon.
Step-by-step master class for Victory Day
You know, while I was preparing for this article, I found so many awesome crafts that I simply couldn’t put them all here. But, among the wide variety, I really liked this masterpiece. In general, I decided to devote two notes on this topic this year. So, if anyone is interested, wait for another note to come out soon.
Moreover, the author showed and described everything in very detail, all that remains is to repeat these actions. But to make it easier, you can actually watch this MK in this video.
If you don’t like watching, or the Internet is slow and hangs, then read this. This option is similar to the previous ones, but it is still different, but you will see for yourself that it is new.
We will need:
Stages of work:
Take the width of the tape 2.5 cm. Determine the length yourself, bend it at an angle, as shown in the picture below.
You need to cut out 5 such blanks.
Remember that you need to be extremely careful and careful when working with a glue gun so as not to burn your hands.
We repeat step by step.
Also keep an eye on your workspace.
You can use a candle instead of a lighter.
And now the most interesting thing is that this decor will make this craft even more beautiful.
You can take any color, silver and gold.
It turns out amazing.
By the way, you can make such a badge in the style of the tricolor of our Russian flag. A video from the YouTube channel will help with this.
How to make a St. George ribbon from paper?
Amazed? Surprised? But this option also exists. Paper is a material that is found in every home; it is not difficult to work with, and most importantly, it is always available.
Read this manual and repeat all the necessary steps.
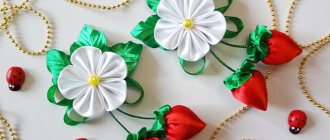
Two-color ribbon decorated with flowers
Spring has come and brought with it a good mood and, of course, singing birds and blooming flowers. On Victory Day it is nice to give carnations and tulips to veterans. Therefore, I propose to make such creations this time.
In fact, you can make not only these flowers, I have seen that such brooches are decorated with forget-me-nots, roses and a sprig of lilac or apple blossom. Of course, this is the well-known kanzashi technique. Take a look at this selection of stories.
I think they will be useful to many, who are making this wonderful creation for the first time.
Great! Is not it? And most importantly, the author shows everything in detail.
Let's get to work, make a brooch with tulips, recommendations were given by Olga Ivanova.
This time take a wide satin ribbon, its width should be 5 cm. Using a ruler and pencil, make segments equal to 4 cm, cut the fabric into 9 parts. Cut each template in half.
The ends should be made in a semicircle; these will be the petals of the future flower.
Now you need to set the edges on fire so that they do not fluff.
Using your fingers, carefully form two folds at the bottom of the base, as if making a small accordion, and secure with fire. Use tweezers. You will need to make 18 such petals to make three tulips; each bud will require 6 blanks.
Next, decorate the thin wire with any green fabric or corrugated paper and twist it along the surface of the wire. Then use pliers to wrap the edge into a loop. The result is a stem.
Interesting! You can also wrap it with green threads, in general, use your ingenuity and imagination.
And into this rounding place small stamens (6-7 pieces) made of wire.
Now let's start assembling, complete the first row and decorate it with three petals. Glue them to each other in a circle.
Next, glue the next batch of three petals so that they stick together with the petals of that row.
Now we make the sepals, to do this, bend a piece of square green fabric 5 cm x 5 cm in such a way as if you were working with a sheet of paper and fold it in half diagonally twice, and then again. These actions are reminiscent of the process of folding a snowflake.
Next, cut and round and open the product, then heat the needle (hold it over the flame for 14 seconds) and pierce the workpiece. But, before that, don’t forget to treat the edges with a candle when your sepal is rolled up.
We put the resulting green beauty on the stem to the flower and glue it with a gun.
This is how we make all the other samples, and then connect everything with another sepal, and treat the stem with corrugated paper.
Now you need to make an elegant bow from a thin ribbon (12 mm). Take a fork and thread the end of the strip through like this. With the end you are not working, take it to the right side, and pass the working end into the center.
Then press it a little and pass the working ribbon again through the middle of the fork.
Tie a knot tightly with your hands.
All that remains now is to remove it.
And cut the ends at an angle of 45 degrees, and then melt each one so as not to fringe.
Do the same with the St. George ribbon itself, trim the ends and melt them.
Roll it into a figure eight and glue it together with the bouquet.
Also glue the base of the brooch to the back, that is, thread at least a small pin.
And finally, a stunning spring masterpiece with blooming tulips.
Main elements
The kanzashi technique usually involves creating flowers. True, there are no strict restrictions. It could be a chrysanthemum, chamomile, pansy, dahlia or sunflower. Kanzashi roses look especially elegant. Petals can be made in different shapes. They can be oval, round or with sharp corners.
Leaves and stems may also be present at the edges of the composition. The accessory is complemented with various decorative elements. Kanzashi bows can also be made from ribbons, which become original decorations.
Brooch for May 9th in kanzashi style (MK + photo illustrations)
Since you have landed on this page, I can assume that this is the information you are looking for. Is not it? How do you like such diverse ideas? I tried to find as much stuff as possible so that you could find the best and most beautiful option for yourself.
Write your review or wish at the bottom of the article, I will be very grateful for your response.
Well, on the monitor screen we look at the next victory icon, only it is different from all the previous ones, it also has two elegant ribbons dangling at the bottom. It looks like an honorary medal for services to the Fatherland.
We will need:
Stages of work:
1. Take a St. George ribbon 3.5 cm wide and 25 cm long. Make squares of 10 pieces of each color from a black and orange satin ribbon (strip width 5 cm).
For decoration you will need a ribbon 2.5 cm wide, from it cut out 6 squares 2.5 cm by 2.5 cm.
2. Take a piece of black tape and fold the square diagonally.
3. Do the same with the yellow-orange square.
4. Then close it one more time.
5. And again, to make a small petal, draw lines like this. And then unfold it, there is no need to fold it a third time.
6. Now place the black triangle like this with the angle down, and the orange blank with the base down.
7. Start folding the ends of the black fabric.
8. Do this on each side. As shown in this picture.
9. Repeat the work one more time.
10. Then flatten it with your hands, you can transfer the work to tweezers.
11. Light and singe the ends.
12. Trim off the excess.
12. And again use a lighter.
13. Next, start making small petals for the funnels.
14. They are also performed in the same way. Glue these blanks onto 6 mm tape with a glue gun.
15. From those first blanks, also assemble a flower. Coat each side of the petal with glue.
16. Next, take the badge and glue it to the front side of the product.
17. Thus we come to the final part. Fold the two-color ribbon into a figure eight and glue it together.
18. Decorate with the remaining details. It is preferable to make the base for the brooch on the reverse side. So that you can pin it on clothes or any other object.
What else can you do?
There are many options on how to make a St. George ribbon with your own hands. We suggest considering the following crafts:
- Ribbon crocheted from orange and black bobbin thread;
- Craft made from beads;
- Paper ribbon (you will need crepe and regular colored paper);
- The middle of the flower on the ribbon can be decorated with a brooch with a festive inscription or design;
- Ribbon brooch decorated with artificial flowers;
- Crafts made from satin ribbons and colored beads, and much more.
We offer a master class on how to make a carnation for a ribbon. The carnation will emphasize the grief for the people who died during the war, and at the same time beautifully decorate the two-color symbol of victory.
Let's get started:
- First we make a flower. Cut a long strip from the red fabric and fold it into squares.
- Cut out a circle from cardboard (diameter 4 cm). We attach the template to the folded ribbon and cut out circles.
- Using curly scissors, we make a beautiful jagged edge on each circle.
- We fold each circle in four and seal it with matches or a lighter.
- Cut oval-shaped leaves from a piece of green fabric. Glue them onto a round cardboard base.
- We form a flower from the St. George's ribbon. To do this, you need to cut rectangles of the same length, fold them in half, and scorch the edges with a candle or lighter. Glue each rectangle onto a cardboard base. Attach two longer ribbons with curly ends to it.
- The last step is to assemble the parts into a complete structure. We attach a red carnation to the flower made of ribbons using a glue gun, and on the back side we glue the base for a brooch with a pin.
If you try and do everything carefully, you will get a wonderful decoration for the great holiday.
From simple materials you can create worthy crafts for May 9, using your imagination. Handmade ribbons will become a festive decoration and will demonstrate that you are not indifferent to the feat of our people during the Great Patriotic War.
Original and simple car suspension
In general, you can take absolutely any type of work as a basis, just instead of the pin that is made on the back, make a ribbon and then such a symbol of victory can be hung in the car.
I suggest you make it this time in the tricolor style, this can also be used for Russia Day.
Since in this article I have already given many recommendations on how to make petals using the kanzashi technique, I think I will not repeat myself here, you can scroll above and read the information.
Let me just say that you will need 6 squares of each color (blue, red and white) ribbon 5 cm x 5 cm, tricolor 2 cm, and a satin ribbon in the style of the three colors of the flag.
Make petals from squares of different colors using any method you like, as described above.
Don't forget to scorch the edges to prevent them from fraying.
Make petals from the three-color style ribbon too.
Then start assembling the product, insert one petal into another, as if making a spikelet.
Make two such blanks.
Use glue to create a star using other colorful petals.
Afterwards, connect everything and insert another decorative satin ribbon in the form of a loop.
You can decorate it in different ways. To your taste and discretion.
Many are satisfied with another option so that they can secure it somewhere. Yes, if you don't have a brooch base, you can use a regular pin and a piece of felt instead, take a look.
Accessory placement rules
There are several popular ways of tying the St. George ribbon:
- A loop. You just need to fold the edges of the ribbon crosswise, leaving a loop at the top, and pin it together with a pin. This is one of the most common and simplest options.
- Check mark. This method is also very simple - fold the tape into a V and secure it.
- Butterfly. To tie, you need to put the ribbon around your neck so that one end is longer than the other. After this, thread the long side into the loop, and fold the short side in half to form a bow. Then you need to straighten the ends - you get a butterfly.
- Simple bow. A very popular method, it is usually used for children. You need to tie the ribbon into a bow and secure it.
- The bow is elegant. It’s easy to make, but the attribute looks elegant. You need to tie a regular bow and tighten it in the middle with an elastic band.
- Corner. It looks very unusual. You will need to roll the ribbon into a tube, form a corner, and pin the ends.
- Scarf. The method is as simple as possible. You need to tie the ribbon like a scarf around your neck, leaving the ends hanging down.
- Tie. Wrap the ribbon around your neck so that one end is longer. Afterwards, cross the elements and thread the right one around the left one. Pull the tip out of the resulting loop, insert it into the resulting eye and tighten the tie.
- Lightning. Making the decoration is simple; you just need to repeat the image of the letter N from the ribbon and attach it to your clothes.
- In the form of the letter "M". Fold the ribbon in four, stretch the top end to the right and the bottom end to the left. Secure the resulting figure with pins.
You shouldn’t thoughtlessly use ready-made ideas for tying a ribbon; you need to understand where and how it would be appropriate to wear this symbol. So, it is permissible to fasten it on the chest, wrist or shoulder. It is prohibited to wear ceremonial jewelry below the waist.
It is inappropriate to attach a ribbon to hair clips.
By May 9, kanzashi brooches will be wonderful gifts for family, friends, and colleagues. This attribute is appropriate for a walk, an official event, or at work. Children will be happy to make kanzashi from St. George ribbons, but it is important to explain to them that this is not just a decoration, but a special symbol that must be treated with respect.
The main attribute of the holiday made of satin ribbons and beads
Among the wide variety of jewelry, another souvenir decorated with beads is very impressive.
In fact, if you are into beadwork, then you just need to glue the necessary attribute onto the St. George ribbon. For example, in one of our previous articles we made a rose, it can be used here too.
And now I suggest you familiarize yourself with this story.
Or this instruction.
Tips from needlewomen
The following tips from experienced craftswomen will help you create a St. George ribbon with your own hands:
- When making a brooch for May 9 using the kanzashi “marshmallow” technique, the length of the ribbon can be more than 90 cm. It directly depends on the density of the ribbon. The thinner the material, the better it curls. If it is not possible to determine the exact length, take a strip with a reserve or make a brooch directly from a skein, unwinding it as you go and making a cut at the very end of the work process.
- Too lush kanzashi flowers on the St. George ribbon look out of place.
Important! When sewing kanzashi marshmallow petals with tacks, you need to use the same needle and thread, without making new knots each time. To make the petals lie closer to each other, the thread is pulled up by first passing it through all the inner edges. - To prevent the product from becoming deformed when the edges are scorched, the fire should not be brought too close. Also, deformation can occur with a very large flame.
- If the purpose of singeing the edges is not processing, but joining, it is important to pinch the edges a little with tweezers to make the joint tighter and more reliable.
- To make carnations, you can use not only braid, but also ordinary fabric, cut into strips of the appropriate length and width.