Do you want to decorate your home for the New Year? We will help connect Father Frost and Snow Maiden - the main characters of this holiday.
New Year is approaching . Everyone wants to decorate their homes in order to quickly plunge into this fabulous holiday atmosphere. Needlewomen can make decor with their own hands - Santa Claus and Snow Maiden , crocheted or knitted. Just look below how cute and beautiful they are; your interior will definitely sparkle with new colors.
In another article on our website you will find master classes that will help you crochet a heart for Valentine's Day . Make a heart for the holiday with your own hands on a skewer or a three-dimensional one - it’s simple and quick.
In this article we have published several master classes on knitting these characters, and you follow the instructions and knit. Read on.
Simple crochet Santa Claus: description
A simple crocheted Santa Claus.
Any novice craftswoman can knit this Santa Claus. String a lot of them, and here you have gifts for friends and family. You can decorate a Christmas tree or interior with these “grandfathers” - beautifully and stylishly. Here is a description of creating a simple crochet Santa Claus:
- Tie a slip stitch using pink thread. Then 2 chain stitches.
- Knit 4 stitches inside the sliding loop. with one yarn over. Another pillar. with one yarn over. It turned out to be 2 pets.
- Take a white thread and knit these loops together.
- 8 columns with one yarn over with white thread. Another pillar. with one yarn over, without knitting to the end, close with pink thread.
- Pull the ring of the first slip stitch. and connect the edges using one connection. pet.
- 2 tbsp. bn next pet., then 1 tbsp. bn. Repeat again - 2 tbsp. bn next pet., then 1 tbsp. bn. Close the loops with white thread.
- 1 air pet, 4 columns. with one yarn over. We make popcorn by knitting the first and last white threads.
- We knit 5 air. pet. Insert the hook into the second stitch. and knit the connection. pet.
- 1 air pet, 4 columns. with one yarn over. We make popcorn by knitting the first and last white threads.
- Again we knit 5 air. pet. Insert the hook into the second stitch. and knit the connection. pet. Repeat this until the end of the white part.
- 3 air pet and conn. loop.
- Now we knit a hat. loops to the end and at the end connect. pet.
- Then we knit with red thread, pulling out one stitch from each white loop.
- Cast off all stitches by 2 sts. together. But 1st pet. air
- We dial pet. second row.
- Now cast off, but decrease by 2 stitches. from each side.
- Next row - 1 st. skip at the beginning and knit two loops together at the end.
- Close the new row, like the previous ones - 1 air. pet., and then 2 pets. together.
- We cast on sts, and then cast off, as in the previous rows of 2 sts. together.
- Knit the next row as usual, and then close it again, knitting 2 stitches at a time. together.
- Decrease next row and then cast off 2 stitches. together. Tie this to the end of the hat.
- Unfold the work and knit the connection from the inside out. pet. to the end of the cap so that it turns out beautiful and keeps its shape.
- That's it - all that remains is to make the pompom, nose and eyes. The nose will be red: knit 2 air. pet. and in the first air. knit a lush stitch and yarn over. Repeat this several times. Then knit all stitches. together and air. pet.
- Just like the nose, make a pompom for the hat, but from white threads: knit 2 air. pet. and in the first air. knit a lush stitch and yarn over. Repeat this several times. Then knit all stitches. together and air. pet.
- Sew the pompom onto the hat.
Sew on Santa's nose
- To make a mustache, wrap some thread around your finger, remove it, thread it from your nose, and tie it off. Sew the nose and mustache to the muzzle and cut off the white threads in the middle with scissors.
- Sew bead eyes. Ready.
Look how good Santa Claus turned out, and most importantly - simple and fast. If something is not clear, you can clearly see in the video how a craftswoman knits such decor.
Knitted Snow Maiden
What you will need for work:
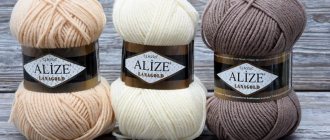
- yarn of various colors - pink, blue, white, yellow (preferably the same thickness, in this master class the blue yarn is thinner);
- hook (in this master class 1.9);
- filler;
- decorations for the face (plastic eyes, beads, etc., you can also draw the face with paints/markers/varnish).
Head knitting. Fill with filler as you knit the elements. Use pink or flesh-colored yarn. Knit according to the pattern:
- Knit six single crochet stitches with an amigurumi ring.
- Add six more. Just twelve.
- Next - one single crochet, add six. Only eighteen.
- Two columns without outline, add six more. Twenty-four in total.
- Three columns without casting, add six. Just thirty.
6-10. Knit five rows without changing anything. Just thirty.
- Three single crochets, decrease six. Twenty-four in total.
- Two columns without outline, subtract six more. Only eighteen.
- Single crochet, decrease six. Just twelve.
14-15. Knit without changing anything.
Take blue yarn.
- One tbsp. without nak., add six. Only eighteen.
17-18. Knit without changing.
- Two tbsp. without nak., add six. Twenty-four in total.
20-21. No changes.
- Three tbsp. without nak., add six. Just thirty.
22-23. No changes.
- Four tbsp. without nak., add six. Thirty-six in total.
25-26. No changes. Thirty-six in total. Knit into the back wall of the loop.
- Four tbsp. without nak., reduce six. Just thirty.
- Three tbsp. without nak., reduce six. Twenty-four in total.
Next, take pink (flesh) color.
- No changes. Twenty-four in total.
Knitting the right leg.
- Knit twelve stitches. without nac. Divide the snow maiden's body in half, knit the leg in twelve loops in a circle.
31-32. There are no changes for three rows.
Prepare white yarn. Knitting boots.
- Six st. without nak., add five, one tbsp. without nac.
34-35. No changes. Connecting column.
Tie the second leg in this way. Pull the yarn to the other side of the body and tie. Knit the same way up to point 33, then as described below:
- One tbsp. without nak., add five, six tbsp. without nac.
34-35. No change, connecting column.
It turns out like this:
Knit a hat:
- Six st. without nac. amigurumi ring.
- Add six more. There are twelve in total.
- One tbsp. without nak., add six. Only eighteen.
- Two tbsp. without nak., add six. Twenty-four in total.
- Three tbsp. without nak., add six. Just thirty.
6-10. There are no changes for five rows.
Take yarn for finishing. Knit 1-2 rows.
Insole:
- Six st. without nac. amigurumi ring.
- Add six. There are twelve in total.
- Six st. without nak., add five, one tbsp. without nac. Only seventeen. Connecting column. Leave the thread for later stitching. Tie the second one in a similar way, except:
- One tbsp. without nak., add five, six tbsp. without nac. Only seventeen. Connecting column.
Hands. Knit with pink or nude yarn:
- Six st. without nac. amigurumi ring.
- Add six. Just twelve.
3-4. No changes.
- One tbsp. without nak., reduce four. Just eight.
Take blue color. Knit seven rows in the round. Using finishing yarn, knit a row of sts. without nac. between blue and pink yarn.
Finishing. Fur coat: at the bottom of the hem of the dress (where the back stitch of the eyelet) attach blue yarn. Knit circle st. without nak., then a row of st. with nak. Next row st. without nac. using finishing yarn. Collar: Yarn to the center of the neck at the front (where the colors meet). Knit one circle in a column without casting and without cutting the threads, knit along the entire fur coat downwards. Cut and fasten the thread.
Sew all the details of the doll.
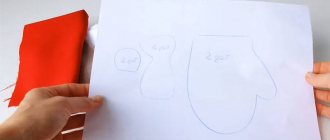
Hairstyle. Wrap yellow (or other) colored yarn around an object. Then cut from one end.
- Tie the strands in the middle.
Place the hat on the Snow Maiden’s head and sew it on. When stitching the threads of the trim and the cap, it is better to take threads of the same color. Hair can be cut and braided.
- It turns out this doll:
What remains is the face. You can draw elements using paints, varnish or felt-tip pens, or you can glue plastic eyes, sew on beads, seed beads, etc. You can also stitch with yarn.
The Snow Maiden is ready!
In addition to the product, you can sew Santa Claus according to the same pattern (but with some changes) or a couple more Snow Maidens, decorating them differently to suit your taste.
- Other options for crocheting the Snow Maiden:
Video on the topic of the article
Source: https://DekorMyHome.ru/rukodelie/snegyrochka-kruchkom-master-klass-so-shemami-i-opisaniem.html
Knitted Santa Claus and Snow Maiden with knitting needles with description: step by step, video
Knitted Santa Claus and Snow Maiden
Knitting such cute characters is much easier and faster than it might seem. You will definitely succeed in them, since the knitting technique is simple. We will knit with 3.5 knitting needles. You will need red yarn for Santa Claus, blue for the Snow Maiden, beige for the face and white for finishing the toy items. So, we suggest making knitted Santa Claus and Snow Maiden. Here's a step-by-step description:
Description of knitting Description of knitting
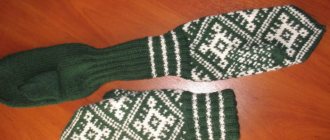
- Collar - cast on 35 stitches with white threads.
- Knit faces. stitch 15 rows. Edge loops are also needed.
Description of knitting Description of knitting
As you can see, everything is simple. A little time and thread, but the result is so beautiful. Watch the video clips below. In them, the craftswoman knits these characters in her own way. It turns out also interesting.
Making a bag and strap
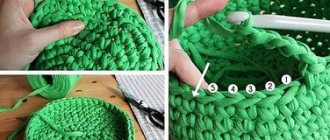
The bag itself is made of red yarn, and the strap is made of white.
To do this, a chain of five holes is tied along an oval. Then an addition is made to each loop. Then nine lines are knitted without increasing. The product is filled with foam rubber.
For the strap, you need to cast on loops in the amount of 70 pieces from white threads. The resulting bag can be tied with a bow and attached to the hand of Santa Claus. Decorate the face using black beads and a red nose from a piece of yarn.
So, your cute DIY craft is ready. It will become an indispensable and creative decoration for the New Year's green spruce. The process does not take much time and does not require professional knitting skills, and even a beginner can make a product using this master class. Santa Claus amigurumi crochet patterns can be found on the Internet on home craft sites.
How to crochet Santa Claus and Snow Maiden: description
Crochet Santa Claus and Snow Maiden
Look what a cute couple. They are simply touching. In this case, the Snow Maiden is not a granddaughter, but a faithful companion of Grandfather Frost. She is his wife, and the faithful companion of the main gift giver. She urges him on so that Grandfather can get to all the children and bring a bag of gifts. So, how to crochet Santa Claus and Snow Maiden? Here's the description:
Materials you will need:
- Acrylic threads - flesh-colored, red, blue, white, brown
- Hook 1.5 mm
- Filler
- Needle with a large eye
- Special eyes with glue or beads
Conventions for knitting
Descriptions for knitting
- Attach a flesh-colored thread and continue.
Description for knitting Description for knitting Description for knitting
- The collar can be simply knitted and sewn on. Fasten the thread, cut it and hide it in the piece.
- Once you have tied the legs, fill them with stuffing and sew them on.
Description for knitting Description for knitting Description for knitting
- Sew the hair at the back of the head right next to the edge of the hat tightly.
Description for knitting
- You can knit 35 chains on each side to the ends of the crown. If you don’t want to knit, then just attach a ribbon.
We collect products:
- Santa Claus - follow all the instructions above for assembling and sewing the parts to the body. Embroider the eyebrows with white thread and brown the nose.
- Snow Maiden - make hair from white threads and braid it. To do this, attach 2 rows of white threads from the back of the head, like a fringe, and braid it. Tie the ribbon. Embroider your eyebrows with dark threads, your bangs with white threads, and rouge your cheeks. Sew on the crown, making stitches in different places. Attach bead earrings.
The products are ready, now you can use them to decorate the interior or give them as a gift. Watch the video below to see how interesting the craftswomen knit these characters.
Preparation of materials and process of creating a figure
Before you start work, you need to prepare:
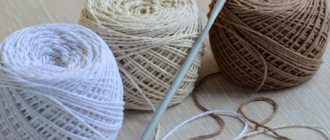
- Red wool blend yarn - 50 grams.
- Cream-colored wool blend yarn - 15 grams.
- White yarn - 1 gram.
- “Grass” yarn for beard – 10 grams.
- Pieces of foam rubber.
- Black beads for eyes.
- Glue gun.
- Scissors.
Knitting body figures
The first stage of work is knitting the Grandfather’s torso. For this purpose, red yarn and Grass yarn will be used. We crochet a chain of three loops and connect it so that we get a small ring.
- Starting row. Knitting loops with the addition of 1 extra loop to each.
- Second and third row. A loop is added to every even number.
- Fourth and fifth row: tied in a circle. Loops are not added.
- Sixth row. Loops are added to each even numbered stitch.
- From the seventh to the tenth row: rows are knitted in the round. Loops are not added in this case.
- Eleventh line. Loops are added every two.
- From the twelfth to the fifteenth row. No loops are added. The rows are knitted strictly in the round.
- Sixteenth line. An increase is made in every third stitch.
- From the seventeenth to the nineteenth row: knit in the round. There is no need to add loops.
The body of the figurine is almost ready. Now it needs to be filled with pieces of foam rubber. After filling the body, you need to knit from the inside. The next 2 rows are simply knitted in the round, after which the stitches are shortened. Two rows must be decreased every 2 stitches. In the next row, the reduction occurs through each loop, then in each loop. The thread is cut and the body is completely finished.
You can tie a white thread around the bottom and top of the body in a circle so that you get an impromptu edge on Grandfather’s fur coat.
Knitting a head from yarn
Knitting the figurine's head is made from cream-colored yarn. To get started, 3 loops are connected into a ring. Next 2 rows an increase is knitted in each stitch. On the third row, the increase is performed through 1 loop. The fourth row is performed in a circle without any increase. The fifth row is performed exactly the same as the third.
From the sixth to the ninth - knitting is done in a circle. There is no need to add anything at these stages. On the tenth line the reduction is performed every 3 stitches. We knit the eleventh line without any additives. The next row is similar to the tenth row in its design. The difference is the number of cuts. They occur every 2 holes. After which knitting is performed without adding or subtracting - 1 row. The last line is shortened in each loop and the remaining thread is cut.
Making a cap for Grandfather
At the initial stage, the hat is made of red threads. The work begins with a ring of three loops. In the first two lines, you need to make an addition in each line. The next row allows adding through one sling. Then knitting occurs without any additives. In the fifth line, the addition occurs through each line. The next row is simply knitted in the round. The last two rows are made with White Grass yarn for beauty, and the thread is cut.
Making the hands of Santa Claus
The hands are knitted from red threads. Getting started is also done from those loops that are connected to each other:
- First line. Increase in every hole.
- Second line. There is no increase.
- Third line. A chain of five holes is knitted. Then it is folded in half and knitted in the round. It turns out to be a finger.
- Fourth line. It does not involve additions.
- Fifth line. Knitted with Grass yarn.
Then we knit in a circle with red threads. After this, the hand is filled with foam rubber. In the next few lines the reduction is performed. The second arm of the figure is knitted similarly to the first.
Then you can attach the head to the body using a glue gun. Grandfather’s face must be decorated with the beard familiar to all children. For this, the needlewoman will need white yarn. For a beard, it is enough to knit two rows on the figure’s face. The arms are glued to the body of the figure.
How to crochet Santa Claus on a bottle of champagne: description, video
Santa Claus on a bottle of champagne crochet
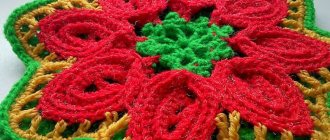
New Year is a special holiday. Everything on the festive table should be beautiful, even bottles of champagne. You can decorate them using covers that are easy to knit yourself. Look how stylish Santa Claus and the Christmas tree look on the bottles. Crochet this decor, it’s very simple. Here's the description:
Santa Claus on a bottle of champagne crochet Description for knitting Description for knitting Description for knitting Description for knitting Description for knitting Description for knitting Description for knitting Description for knitting
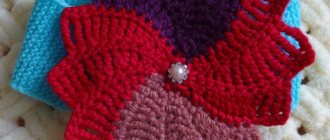
- Here is another option for tying Santa Claus and Snow Maiden onto a bottle of champagne.
- Guests will be impressed by this decor throughout the coming year.
- For knitting you will need a hook, as well as red and white threads.
- For the Snow Maiden, prepare white and pale blue threads, as well as a satin ribbon for a decorative bow.
Santa Claus and Snow Maiden on a champagne bottle crochet Description for knitting Description for knitting
Look in the video how else you can crochet such a cover for a bottle. The craftswoman tells everything in detail.
New Year's hat (crocheted)
Cockerel using quilling technique style= background: transparent url(//podelki-doma.ru/wp-content/uploads/2016/11/petuh-kvilling18-150×150.jpg) no-repeat scroll 0% 0%; width: 150px; height: 150px; >
Cockerel using quilling technique
We continue the series of New Year's master classes by Tatyana Yablonskaya. This time using the quilling technique - a rooster...
Christmas tree toy The Engine from Romashkovo style= background: transparent url(//podelki-doma.ru/wp-content/uploads/2017/01/parovozik-na-elku09-150×150.jpg) no-repeat scroll 0% 0 %; width: 150px; height: 150px; >
Christmas tree toy “Locomotive from Romashkovo”
Master class for the competition “Pantry of Winter Fantasies”, nomination “Children’s Crafts. Together with mom." ...
New Year's vytynanki. Templates for cutting style= background: transparent url(//podelki-doma.ru/wp-content/uploads/2017/11/moroznyie-uzoryi-i-vyityinanki-01-150×150.jpg) no-repeat scroll 0% 0%; width: 150px; height: 150px; >
Knitting Santa Claus and the Snow Maiden with crochet and knitting needles: ideas
If you are no longer a beginner, but have experience in knitting, then you almost always do not need diagrams and descriptions. Just by looking at the product, you already know how to knit it. If you don’t have enough ideas for inspiration, then below you will find several options on how you can crochet or knit Santa Claus and the Snow Maiden. They are all beautiful, interesting, cute and funny.
Knitted Father Frost and Snow Maiden Knitted Father Frost and Snow Maiden Knitted Father Frost and Snow Maiden Knitted Father Frost and Snow Maiden Knitted Father Frost and Snow Maiden
Knitted Snow Maiden Knitted Father Frost and Snow Maiden Knitted Father Frost and Snow Maiden Knitted Father Frost and Snow Maiden
Patterns, techniques, descriptions and explanations, knitting density
- Facial surface (lgl): in hl it is used sl hl, and in ir - ip in cases of elm in straight/reverse eg. if we are talking about elm in a circle, all PP sl vy LP.
- Garter stitch (plv): both in LR and IR elm you need to exclude un.
- Adding with a jumper in LR: is carried out by knitting two sts behind the front and back walls of one st. On the LS PP image there is a small jumper at the main new st. From the front walls of the p with a knitting needle, cut out the lp, which is layered on the left knitting needle. From the same p to the left knitting needles, drop rp from the rear walls and drop p from the left knitting needles.
Having added to ir also, but knitted un. Adding sts from the stretch between sts is also a simple way: left knitting needles under the stretch so that it lies in the same direction as all sts, then knit an elongated stretch from the back walls in lp or sp.
- Decrease loops. It is also possible in two ways: knitting two pp vm lp or sp with knitted right/right. Decrease with the knuckle to the right, use knitting two pp VM with knuckle to the right, the second p should always be on top of the first. You need to insert the right needles in two sts on the left knitting needles, grab the slave thread and pull out a new st. Or you can simply reset the knitting sts from the left knitting needles.
When decreasing stitches with a tilt to the left, the first stitch should lie on top of the second. Using a right knitting needle without knitting, you need to remove the first stitch. And the second stitch is knitted in a rib. Then lift the left knitting needles of the first unknitted st onto the right knitting needles and remove it from the knitting needles through the second knitted st.
The knitting density in this toy is 10x10 cm on the control sample using knitting needles No. 3:
- 12 pp x 10 pp