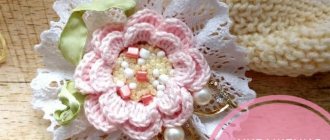
The simplest hat, panama, or headband can be decorated with a large or small flower. The headdress is transformed beyond recognition, and the owner immediately stands out. You can crochet a wide variety of flowers; your image will constantly change when you change such a removable decoration. Crochet flowers quite quickly. It takes very little yarn. By changing even a small detail (the button in the middle of the flower, for example, as in the photo below), the decoration changes noticeably.
Volumetric crochet flowers.
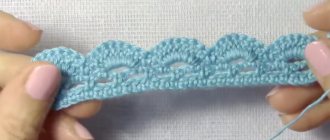
This flower is crocheted from YarnArt Acrylic yarn with size 1.5. Flower diameter 7.5 cm.
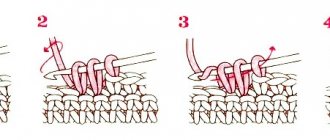
We collect 6 VP. We close it into a circle with a connecting column. We knit 24 dc in a circle. We knit another DC into each DC behind the back wall.
We knit the next 2 rows *Dc, 2 Dc*.
Then a row of sc, clinging to both walls of the loops of the previous row. Next we will knit the petals. *In the third loop we knit 11 C3H, RLS.* We break the thread and return 2 rows below.
We knit a row of sc behind the front wall. We knit the petals almost the same way. *In the third loop 9 C2H, sc.* Break the thread and return to the previous row.
Again we knit a row of sc behind the front wall. And petals. *In the third loop 9 C2H, RLS.* Break off and fasten the thread.
We will knit the last row of petals from the front wall of the first row. *In the second loop 7 dc, sc*. We cut the thread and hide all the tails.
You can insert a bead or sew a button into the middle of the flower.
Video master classes. How to crochet flowers.
Where can you use knitted flowers?
Homemade flowers can be used as decoration in a variety of areas:
- decorate hats and hats.
- decorate sofa cushions;
- add as jewelry elements;
- design homemade bags;
- Use as bookmarks or napkin clips;
- create wall panels;
- use when creating cards or gift wrapping;
- collect bouquets to decorate your home interior.
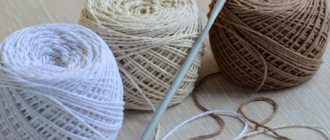
The thread for creating flowers must be chosen that does not break up into individual fibers; it can be cotton, synthetics, silk, darning, wool or a mixed thread.
Crochet tulip flowers
The video should load here, please wait or refresh the page.
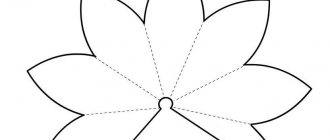
The crochet technique involves making flowers of various shapes and sizes. Volumetric flowers can be knitted from several tiers of different diameters. From the semicircular petals located around the center, you can knit simple flowers with five petals.
Petals with sharp corners make daffodils, elongated petals make daisies or lilies, and narrow petals make carnations. Small cups are suitable for making lily of the valley or bells, and wide petals make orchids and poppies. You can make tulips from oval petals.
Flowers knitted like a ruffle look beautiful, when in each row the number of loops is significantly increased and the petal goes in a wave; if you gather such petals tightly from below, you will get a real carnation; it’s easy to assemble a rose from straight lace.
Video tutorial on how to crochet the simplest flower
The video should load here, please wait or refresh the page.
Poppy flowers, I couldn’t pass by. Very good!
Knitting patterns for voluminous flowers in pots
I saw these diagrams on the website of a Japanese master, I won’t make a detailed description, there are also small microcontrollers with photos, so I hope everything is clear.
Lilies
The pattern for the earth clod is the same for all colors; I didn’t duplicate it every time.
Lotus
Anthurium
Daffodils
Pansies.
Another option for pansies.
Assembling compositions
After the flowers are created, they need to be collected into a single composition. You can use different methods for this:
- Crochet the flowers with the same yarn using half-columns. Such a connection will be the most natural and unnoticeable.
- Sew flowers with sewing threads or the same yarn. It is better to choose yarn, since such a connection will be the most invisible.
- Connect the flowers using wire. You can use regular steel yarn, wrapping it with yarn, or you can take a special floral yarn.
Hydrangea.
Great selection of color schemes.
Small crochet flowers. With diagram and description.
How easy it is to knit them!
Description.
We collect a chain of 5 air loops. We close it with a connecting post. This is the middle of the flower.
From each loop we knit 2 single crochets. Connecting loop.
Move to the next loop using a connecting stitch. *3 air loops. In the next loop we knit 3 double crochets, 3 chain stitches are attached to the same loop with a connecting stitch.
Move to the next loop using a connecting stitch.*
Repeat from * to * 4 more times.
Pull the last loop to the wrong side.
That's it, the flower is ready.
In the photo, a small flower is crocheted with “Iris” threads and crochet No. 1.25, a large one with “Children’s acrylic” threads and crochet No. 3. The photo is on a notebook sheet specifically so that the dimensions can be seen.
How to turn such a flower into a flower in a clearing?
It is enough to simply sew on a button of a suitable size so that the flower is fastened to it. Choose buttons on a stem with eyes, a nose and a mouth.
This way the flowers look more interesting and immediately become an educational toy. Fastening a flower onto a button develops fine motor skills of children's fingers.
Details about educational simple toys and how to knit them for beginners are described here.
Let's look at how to crochet a flower for beginners with a video, free of charge, so you can watch it again and again?
Small flowers.
In the amigurumi ring we collect 10 single crochets in yellow. Connecting post. We cut the thread. The center of the flower is ready.
Attach a thread of a different color anywhere. We knit *3 chain loops with it, then 8 double crochet stitches and a common top, and we knit 4 stitches from one loop, and 4 more from the adjacent one. We attach 3 air loops with a connecting post to the next loop.* Repeat 5 times. We fasten the thread and cut it. The petals will be lush.
______________________________
Incredibly beautiful crochet flower with a twist
- Make a sliding loop. That is, you do not knit a vp, but simply connect the thread into a ring, wrapping it. Next 2 ch. for lifting and knit 10 tbsp. s/n. But now you pull the same columns into a closed ring by the edge of the thread. Alternatively, dial 10 vp. and immediately tie them up. s/n. Don't forget to connect the columns together.
- Now dial 15 ch. in each previous loop. Connect them with half-columns. You will end up with a very thick chamomile.
Extremely easy to implement
- Tie an air chain from v.p. ten columns b/n. In the middle of our petal, create a small hole for bending from 2 ch. and another 10 tbsp. b/n. Do this with each hole. Please note that the curl of the petals will already begin to form at this stage due to their number and density. Connect with a simple column.
- Knit all rows of 10 tbsp. s/n., already connect 3 vp, which you insert into the first column of the previous row. You tie each petal, connecting them with a connecting post. Please note that in the first petal you will first have 9 loops due to the fact that there will be a rise from 3 ch.
- So the beautiful flower with an unusual twist is ready! If you wish, you can tie it with a thinner thread of a different color. Or replace Art. s/n in simple columns b/n.
Incredible beauty
Video: Unusual crochet flower
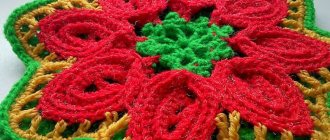
Rose.
_____________________________________
_______________________
_________________________
Fastening compositions
The finished product must be secured to clothing or an interior item. If the flowers are supposed to become a table decoration, then it makes sense to starch them or install them on wire. The wire will act as stems.
You can attach flowers to any smooth surface: a mirror, a refrigerator magnet, a photo frame using double-sided tape.
You can simply sew a flower onto your clothes. A large safety pin will look impressive, especially if it is decorated with beads or rhinestones.
If you use crocheted flowers to decorate your phone, you can use any thick viscose thread and use it to secure the flower to your phone. You can also sew it to a phone case, if the material of the latter allows it.
Bows.
2 parts are knitted and joined in the middle.
1 piece, top.
We cast on 22 air loops. We tie them on one side like this: 1 single crochet, 1 half double crochet, 2 single crochets, 2 double crochets, 2 single crochets, 1 half double crochet, 1 single crochet.
In the middle of 2 loops we knit 2 connecting posts.
Now again 1 single crochet, 1 half double crochet, 2 single crochets, 2 double crochets, 2 single crochets, 1 half double crochet, 1 single crochet.
We turn around and tie our air loops on the other side in the same way. Fasten and cut the thread.
Part 2, bottom.
We cast on 20 air loops. We tie them like this: 8 single crochets, 1 half double crochet, 1 single crochet, 2 connecting stitches, 1 single crochet, 1 half double crochet, 7 single crochets, 2 chain stitches in the last loop. We cut the thread and fasten it.
We fold the 2 parts with the centers and wrap them together with threads, making about 7-10 turns. We cut the thread and fasten it.
For longer petals
With a narrow center and longer petals
Step-by-step knitting instructions:
- Knit 4 VP and connect into a PS ring.
- 3VP, 3SS2N, 3VP (this is 1 flower petal). Connect with the PS ring. Repeat 4 more times for a flower with 5 petals.
- Finish knitting by cutting off the end of the thread and leaving the thread. Hide it in knitting.
Now you already know how to knit the lightest flowers. Did you manage to knit it in 5 minutes? If not, then most likely you just need to practice.
Bow.
This bow is even easier to knit.
In the amigurumi ring we collect only 16 double crochets (more precisely, 12 double crochets and 4 chains of 6 chain stitches) according to the pattern. Pull the ring tighter and wrap threads around the middle.
Beauty!
How to simply crochet a rose or flower using the spiral method
If you think that this is a very complex flower that only skilled craftswomen can create, then we will make you happy. Everything is much simpler! You just need to knit the roll according to the pattern, and then roll it into a tube.
Making a rose is now easy Making a rose with leaves
Lush flower.
We knit a chain of air loops (VP) of the required length. I have 47 VP.
1 row. In each loop we knit 2 double crochets, separated by 1 chain stitch, and between the resulting V we knit 1 chain stitch.
2nd row. In each V we knit 4 double crochets, separating them with 3 chain stitches.
3rd row. In each arch of 3 air loops we knit 9-10 single crochet stitches.
Scheme.
This turns out to be a spiral like this.
Iron the resulting piece and fold it into a flower shape.
I crocheted with Iris threads No. 1.25.
The width of the strip is 2 cm 2 mm, the length along the inlaid edge is 25 cm. 47 petals.
Flowers to decorate a warrior or bag.
How to crochet a flower: diagrams, explanation
Creating a crocheted flower is quite simple to do if you read the diagram correctly. In principle, it is based on simple combinations repeated one by one. And it always starts from a circle of air loops. But still, start small, don’t chase complex schemes - in the future this will help you achieve incredible results. It is also worth noting that such a creation does not take much time - on average, one flower takes about 10-15 minutes.
Important: You can knit from any thread - wool or alpaca, or maybe cotton or even linen. But still, for a flower, you should not take a thread that is too thick, like merino yarn. Angora and silk look very beautiful. Moreover, they can be combined with each other.
Basic crochet flower
Flower with 6 petals
- There are actually a lot of basic schemes. After all, the original number of v.p. will set the core, where you begin your knitting. And remember - the more there are, the wider the center hole will be. But it’s easier to just type columns on them.
- Now the columns themselves - it looks more beautiful if this is the initial ring of v.p. tie st. b/n. This way you can overlap that center circle. Moreover, their number should be 2-3 times greater than the number of vp itself. With this you already set the number of petals.
- Next comes their formation. To do this, do 3 vp for the first time. for lifting and 3-5 ch. to connect with the next column (depending on the pattern and width of the petal), then 1 tbsp. s/n and continue until completion.
- Then you knit the petals themselves. But there must be a smooth formation, therefore Art. b/n, semi-st. s/n and 3-5 tbsp. s/n. We offer you several options at once. So that you understand that the basis is based on one motive, just this number v.p. and art. affects the number and size of the petals and the core itself.
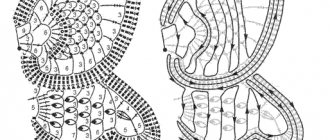
Schemes
But pay attention to the diagram when there is a larger set when creating petals. That is, the scheme that is taken as a basis does not change. But due to the large number of columns, the flower turned out to be more voluminous and wavy.
You can adjust the width of the petals
Another simple diagram, but a slightly different flower shape
Flower with pointed petals
Simplified crochet flower pattern
- If you need a large number of small flowers, then this quick method is exactly suitable for these purposes. After all, knitting one element takes about 5 minutes. The set according to the first example starts from 8 vp, and from the second - from 6.
- You also knit a ring from st. b/n. And then immediately make protrusions of the petals from Art. s/n. The second scheme, as you can see, is very simple - a rise and 3 columns.
- The first scheme will give more magnificent and dense leaves. But, although the diagram is shown without half-columns, it is still better to use them before lifting. That is, skip the first and last column in each petal by making a replacement. This will make for a smoother turn.
Note: As a little advice and a clear example, any flower in any pattern looks more beautiful with multi-colored threads.
Small flower according to a simplified scheme
Video: Simple crochet flower pattern
Leaves.
The leaves are easy to knit. Here are some diagrams. Let's take a closer look at them.
First, we assemble a chain of air loops of the required length. This is the middle of the leaf.
Then we tie it in a circle with single crochets, single crochets, and 2-4 crochets.
Then you can tie it with single crochets or *single crochet, 1 chain stitch*. With the latter option, the edge is made of small loops. If you don't tie it, the edge loops will be larger.
Chamomile
The middle of the chamomile is made with yellow thread
1. Sliding loop and knit 6 sc inside. Tighten the sliding loop and connect the last and first loops of the row using a connecting loop. 2. 2 sc in each loop (12 sc), sp.
3. 1СБН, 2СБН to the end of the row, SP (18П).
4. 1 sc in each loop, i.e. we knit without increments, SP.
5. Turn inside out.
Chamomile petals - white
We thread the hook under the back half-loop, grab the working thread and knit 11VP In 3 loops RLS, PS with double crochet, 1DC, 1DC, 1DC, 1DC, 1DC, PDC.
Insert the hook into the last loop and pull out the working thread, there are 2 loops on the hook.
We insert the hook into the back half loop and pull out the loop, there are 3 loops on the hook. We knit 3 loops together.
Turn the work over to the other side.
We skip the loop at the base and into the next one, i.e. We knit the 2nd loop with a joint venture.
We tie the SP to the top of the petal, 1VP.
We move to the 2nd side of the petal and tie the joint venture.
The last loop is knitted like this: we put the hook into the loop and pull out the loop (there are 2 loops on the hook), then at the base where the petal is attached, we pull out the loop and pull it through 2 loops.
Wrong side
Return to the beginning of knitting the petal using a connecting loop. To do this, insert a hook into the middle of the base loop and pull out the joint, i.e. for the half-loop of the yellow base inside.
We knit the next petal using the outer half loop of the base.
This is a finished petal, repeat until all the petals on the circle are connected.
2nd center of the circle - yellow
Knit 1 more part of the circle. Place a piece of cotton wool or padding polyester in the center of the flower, then attach the second center and sew it to the flower.
Chamomile is ready.
Detailed video on how to crochet a daisy, loop by loop:
Lesson number 6. Flower of a different shape.
- You need to start knitting from the middle.
- It’s better to start with a chain or an amigurumi ring. It came to us from Japan.
- You can make transparent petals. Then you should only tie the outline of the flower.
- When the cord for the core is knitted, you need to tie it with a ring.
- Then you should insert a hook into it and pull the thread through this ring. The result should be a small loop. You need to leave a hook in it.
- Then you need to pull the thread through the large ring and knit an air loop.
- The ring is then tied with sc (single crochet).
- To get 6 petals, you need to knit the appropriate number of columns. It can be more, but the amount must be a multiple of 6.
- Next you should make arcs using air loops.
- The first arc should consist of 4 air loops.
- You need to skip two stitches of the previous row into the third, then knit the connecting stitch and start knitting a new arc.
- A petal should be knitted in each arc. The beginning of each is a single crochet, as well as 5 double crochets.
- The end of the petal must be knitted with a single crochet or double crochet.
- Then the flower needs to be continued according to this pattern.
- The length of all arcs will gradually increase. The number of petals should remain the same.
In order to knit a flower, especially a complex one, you need to know the designations of the loops and their decoding. Such a reminder can be made by taking information from the Internet.
Lesson number 1. Simple flowers
You will need yarn of different colors - yellow and white. Yellow color will be needed for the middle, and white for the petals. You can, in principle, do the work in one color. You will also need a hook.
You can use leftover yarn. It is advisable to take a hook of the third size:
- First you need to tie the ring. This is made from 5 loops. That is, a “lace” of 5 loops is put on the hook, the outermost ones are connected.
- These loops are needed to form the beginning of the petal. If you want to make more petals than five, then you need to cast on a larger number of loops.
- Then you need to make a lace in the form of a column, forming the center of the flower. Then you can take a different color of yarn.
- Then double crochet stitches are made to form the petals. The petals of a flower should “come out” from one loop. Therefore, when you finish knitting one petal, you need to “loop” it, tying it to the loop from which it came.
- You also need to knit all the other petals.
- You can knit the petals using single crochet or double crochet stitches.
Lesson number 4 – Crochet rose
There is another interesting idea - to tie a rose. To do this, you need to use the colors of yarn that you like. The classic option is a red or pink rose.
- You need to cast on 48 air loops.
- Then the first row is knitted. Dc in 4 p.
- P. skip, connect dc, ch and dc. This is how it fits until the end.
- Row 2 is knitted differently: VP (2 DC, 2 VP, 2 DC) – in each arch.
- Then you need to turn the canvas over.
- The 3rd row is knitted like this: VP, 7 Dc, in the arch, RLS - between the parts.