To give a newly knitted item a finished look, you need to carefully tie its edge. At the same time, the knitted fabric will stop curling, since its edges will become rigid, and the old item will take on a completely new look. This fairly simple job can be done in various ways.
We bring to your attention video tutorials that tell you how to properly tie the edges of knitted items in various ways. They are not difficult to master, and soon you will be able to give your work the beautiful look that it acquires after binding.
Very simple edge binding, quite understandable for beginners. The first row is knitted with single crochets, in the second and third rows a French mesh is formed, and on the fourth row fans are made, consisting of eight double crochets. This row turns out to be the most beautiful. The result is an edging with a pattern made up of semicircular elements, the basis of which is connected fans.
For any fabric, it is enough to knit the first initial row, and then you can form the pattern. It makes a good edging for robe collars. It is simply sewn to the base material.
Edge binding “Rachy step”
The edge tied in this way becomes smooth and dense, reminiscent of a pigtail. This method is used to tie the armholes and necklines, the edges of the sides of knitted clothes created by knitting or crocheting. This seam is used to strengthen the edges of pockets and scarves. The method got its name because it is formed not in the usual direction from right to left, but on the contrary, as if moving backwards.
You can use the same thread for tying that was used to knit the item itself, but this thread can be taken in a different color: colored edging looks neat on any knitted item, decorating its overall design with an unexpected frame.
Trimming the edges with pompoms
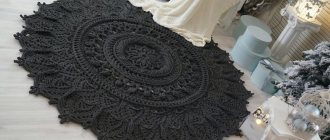
This beautiful trim consists of small pom poms, each of which is attached to the edge of the material with two posts. The result is a zigzag pattern, with a neat pompom at the top of each zigzag. The pattern looks very beautiful and formal. It can be used to decorate large items such as knitted blankets, shawls or pillows.
The use of pom poms creates a design that complements and highlights the knitted pattern that was used on the base item. Despite all the apparent complexity of the pattern, it is created very simply and is quite accessible even to beginners.
Openwork inserts for dresses
The dress with an openwork insert on the back looks chic! And this beauty is available to knitters who own the fillet technique. In principle, the craftswoman can say that I combine different patterns and techniques in my work, not just fillet. Yes, imagination knows no bounds here!
The shape of the inserts can be different - oval, triangular, square, etc.
We offer you some schemes to work with.
Edge binding "Beads"
This method of tying the edges of knitted items is extremely simple, but looks impressive. From four single crochets a small bead is formed, dense and neat. A whole row of such beads, located close to one another, can decorate tightly knitted items, but they can also be suitable for patterned blankets or shawls.
The binding is not necessarily done along a straight edge; you can also tie patterned surfaces and even wavy edges. The resulting voluminous edge binding looks very beautiful if it is made in a different color, contrasting to the color of the main knitting thread.
Processing the bottom of dresses, skirts, sweaters
To decorate the bottom of a dress, skirt or sweater, you do not need a special special openwork crocheting of the edges of the products with diagrams and descriptions. In this case, you can use any universal pattern:
- lace ruffles;
- patterned frills;
- lush flounces;
- wide border.
The hem of a dress or skirt, decorated with several tiers of a wide border, looks especially beautiful. In this case, openwork crochet is performed using a pre-knitted fillet mesh through an equal number of rows. Each new layer of border should lie on top of the beginning of the next one.
Do not forget that the length of the product will increase by the processing height. The wider the openwork strip, the heavier it is. This means that the lace will stretch under its own weight: then the hem of the dress or skirt will become even longer.
Beautiful and simple harness
If you want to not only strengthen the edges of a knitted item with a binding, but also decorate them with an interesting pattern, try this knitting option. Simple columns are used to form their interweaving, resulting in a pattern with arches and openings repeated in two tiers.
Despite the complexity of the pattern, it is quite simple to obtain it - you just need not to get confused in the alternation of loops and in the arrangement of repeating columns. The pattern can be based on a completely arbitrary type of knitted loops; you can use it to edge any knitted item, regardless of whether it was crocheted or knitted. It will still turn out beautiful.
Pattern schemes for children's products
How to crochet children's clothes depends on their purpose. If we are talking about a small baptism blanket that will not be used for long, while the child is still very young, then you can choose a wide lace finish.
For clothes that are intended for slightly older children, a denser openwork crocheting of the edges of the products with diagrams and descriptions is suitable. This is explained by the children's interest in holes and holes in the canvas, where they can stick their fingers. Because of such treatment, the lace will quickly deteriorate: all the work of the needlewoman will go down the drain.
It is better to tie children's clothes with a narrow border of 2-3 cm, as in the photo below. Such drawings are not too difficult to perform; even a beginner can handle them.
Simple models of children's dresses with knitting patterns here.
"Sink" edge
Five single crochets crocheted in the same stitch form a neat little shell, with the loops making up the edge and the stitches making fan-shaped waves, just like on a real shell. This is a simple and interesting way to crochet the edge of a product, giving the edge of any knitted item an interesting look.
It is especially impressive if the shells are knitted from a thread of a different color than the main product; the resulting contrasting pattern perfectly frames any knitting. Even if the product is obtained by the simplest knitting method, its edging in a similar way gives it an interesting and unusual look.
Description of knitting a shawl from the corner
This shawl in the magazine where it was published is called “Lyudmila”. The “dragon’s eye” has also become popular among people due to some similarity in the pattern.
Yarn - cotton in this case, 50g/125 m, 400 g will be required for a size of 95x190 cm. Take hook number 3.
Chain of 6 ch, in the 6th from the hook, make 4 double crochets and 1 double crochet.
Next, we knit according to the pattern to a height of 95 cm, which should be measured along the middle line from the bottom corner.
The diagram can be supplemented in a similar way; the pattern in it is repeated.
The finished product is stretched, moistened and left to dry.
For fringe, cut threads 48 cm long and attach 3 pieces to the arches of the side edges.
Shawls and spiders are knitted from the corner; I will give two variants of the pattern, but in general there are many of them, of course.
As well as patterns with the famous “shell” pattern.
The pattern in the form of bunches of grapes is interesting.
Binding the edges of napkins
Crochet edges for napkins or handkerchiefs are offered in several options. Napkins can be any kind, linen or silk; depending on the thickness of the fabric, the thickness of the thread used for edging is also selected. It is quite possible to use spool thread number 20-30 to match the napkin or in a contrasting color.
The scarf is cut from fabric strictly in the direction of the threads. One thread is pulled out one centimeter from each edge, and using the resulting grooves we begin to make a binding. A chain of loops is created along the edge of the napkin, which become the basis of the pattern created from threads.
Edge tying with caterpillar
By periodically turning the knitting over and using the instructions for creating the pattern, we get a fairly thick cord along the edge of the knitted item, resembling a caterpillar in appearance. A method is also proposed for knitting such a pattern without turning over the entire work, with intercepting the hook, which is convenient if you are knitting an oversized shawl or blanket that is inconvenient to turn over.
It describes in detail how to get a “caterpillar” on indirect, rounded knitting edges, both convex and concave. In this way, sleeves, collars, the bottom edge of the product and even the edges of hats are tied. The result is a very decorative pattern.
Same column, different methods
Using just these three basic elements, but knitting them in different ways, you can get many different patterns
- The columns are knitted behind the back half-loop of the previous row, and the fabric turns out to be voluminous, with convex and concave rows.
- If you knit stitches in the front loop, the fabric remains smooth, with flat horizontal stripes.
- You can also knit stitches using purl loops: insert the hook behind a horizontal jumper located slightly below the top of the previous row. With this method, a pigtail is formed on the wrong side.
In addition to these methods, you can knit stitches in splits, from the bottom rows, on air loops. Deciding on the most suitable option is quite difficult, especially for those who have just begun to master crocheting. Diagrams and descriptions will always tell in detail all the nuances of manufacturing a particular product.
Small border from one row
A small pattern is knitted from half-stitches, fastened on every third stitch of the row, and two loops are skipped. The result is an edging of repeating small semicircles, following one after another. This border can also be knitted in the round; detailed instructions are also given for this.
A large border will not come in handy for every item, but I still want to somehow improve the appearance. In this case, a small border is ideal, which can be knitted from the same thread as the item itself, or from yarn of a contrasting color. It is quite possible to decorate even a patterned knitted item with such a border.
The simplest picot-based border for beginners
One of the simple techniques for knitting borders is patterns ending next to the presence of various types of pique.
Knitting such braid is not difficult.
Its width varies within different limits. This depends on the model and type of finish.
When performing this design on the edge of a product, it is advisable to use cotton yarn with a small amount of synthetic additives. This ensures that the associated work remains in its original form after washing.
You can also use pure cotton threads, but you should remember that such items must be washed strictly at a certain temperature. Otherwise, using a higher degree of water, the border is in danger of shrinking. This will result in unwanted deformation of the finished product.
The numbers of selected hooks can also vary from 1 to 3.5.
Some of the patterns for making such a border, shown next to each other, differ from each other. But one thing generalizes them, the presence in the outermost row of teeth (“pike”), connected in various ways. In the first diagram, they are implemented by performing a chain of several air loops closed in the same loop with which the “pique” begins.
In the following pattern, the pique consists of small arcs of air loops connecting the tops of the columns, creating the appearance of triangles. The 3rd diagram shows a “pique”, made under the broach between the double crochet stitches of the previous row.
As a result, using the same knitting element, you can get quite a variety of pattern configurations and cut designs for finished items.
Video lesson:
Border patterns
We offer a master class on knitting borders. In every third loop of the item being tied, a set of stitches is made, which forms small neat semicircles. The result is a simple, but very pretty edging with a pattern of small semicircles.
This pattern can border both continuous and patterned knitting, and organize the edges of blankets and shawls, sweaters and cardigans. It will add elegance and airiness to any pattern of the main fabric, harmonizing perfectly with any basic knitting pattern. The border has a wave width of three loops, is not too conspicuous and serves as a modest decoration.
Sirloin
One of the ancient techniques presented below is fillet. A border crocheted from a regular mesh with a knitted floral or geometric pattern of various configurations serves as an excellent decoration for bedding and kitchen utensils: sheets, capes, bedspreads, tablecloths, napkins.
Basically, the binding in this technique is monochromatic, since the use of several colors will be too noticeable when transitioning from one to another. Although experienced craftswomen, using such a labor-intensive process, can create truly exclusive color masterpieces.
When filling out the fillet mesh cells required for the pattern, it is recommended to knit 2 double crochets instead of one. Tighter knitting of the ornament itself will allow it to stand out clearly against the main background. When performing this process, it is necessary to ensure that the top of the 2 stitches being knitted is the same.
If this is not observed, extra loops will form in the pattern, which will lead to distortion of the pattern and the entire canvas as a whole. The most difficult thing in the fillet technique is knitting several initial rows, when the composition of the pattern is laid out. In the future, the already partially formed ornament will itself suggest the direction of work.
When performing circular binding using the fillet technique, you should carefully connect the initial and final loops of the row without creating unnecessary voids.
If the border needs to be knitted in straight and reverse rows, then pay attention to the pattern in the opposite direction.