It's a wonderful winter time of tangerines, Christmas trees, fireworks and good mood; it's rare to go without decorating your home. On the eve of the New Year, stores are bursting with all kinds of garlands, balls, tinsel and other themed trinkets of varying quality. Of course, most products are very beautiful and are a welcome element of holiday decoration, but not every decoration can be as memorable as something made with your own hands.
In this article, we have collected the most pleasant and original options for cutting crafts. And to make the DIY Christmas crafts made from plywood with a jigsaw a success, we added easy drawings that can make very beautiful decorations, even for a person without special skills.
Christmas trees made of plywood and boards
A Christmas tree made of plywood or boards is a decor that will last for years. From these materials you can make a large, main New Year tree in the house. But you can make several small tabletop Christmas trees to decorate each room.
You will need:
- plywood or board;
- saw or jigsaw (preferably electric);
- sandpaper (sandpaper) or sanding machine;
- paints, stain, varnish - depending on the chosen decor.
A Christmas tree of an interesting shape can be made on a stand. In a thick block we make a slot in which we fix the trunk of the tree.
Christmas trees cut from single pieces of plywood are primitive, but effective due to their dark green color.
Small Christmas trees made from pieces of board are good for a New Year's table composition. But you can cut a large spruce by first knocking down a shield from boards.
We fix miniature triangular Christmas trees in the slots of round stands. We glue small flat toys. They can also be cut out of plywood or bought.
Volumetric 3D plywood Christmas trees are actually easy to make. First, we cut out the flat elements of the New Year’s craft and make slits in it (see template). We assemble the Christmas tree by inserting the elements into the slots. You can additionally secure it with pins, but even without them the Christmas tree will be strong.
How to make a Christmas tree as a gift
On New Year's Day it is customary to give each other gifts. The master provides you with detailed instructions on how to make a Christmas tree as a gift with your own hands. An unassembled gift takes up little space and can easily fit in a small bag or envelope. The wooden craft was made from a photograph of one online store where you could buy this handmade miracle for $37...
How to make a Christmas tree as a gift with your own hands
How to make a Christmas tree with your own hands / Homemade gifts / Sekretmastera
Materials and tools
Christmas tree gift
To make this craft you will need a small piece of three-layer plywood. The master, as always, makes your work easier and offers to download a gift template for cutting. Tool for work:
- Hand jigsaw for figure cutting
- Scissors and glue for cutting out the Christmas tree template and gluing it to the workpiece
- Sandpaper. You can sand it manually with your own hands or using a power tool.
Step-by-step instructions for making a gift
- Download the template file for cutting with a jigsaw. The template is prepared for printing on an A4 sheet of two types of Christmas trees. You can change the scale and print the content in other sizes.
- We cut out the template with scissors and glue it onto a piece of plywood using glue.
It is important to place the tree and crossbar along the fibers of the plywood to maintain appearance and strength. The author also used a piece of OSB sheet as a base, the result is also excellent. See photos and videos. - We cut out two parts of the gift along the contour of the template. Pay attention to the width of the assembly groove on the tree and crossbar.
- Remove the template paper and sand the parts with sandpaper.
- At this stage, the work can be stopped, but it is still better to protect the gift Christmas tree from the influence of the external environment with varnish, wax or oil. The author covered the parts with 2 layers of varnish. In principle, you can paint your Christmas tree with paints, cover it with glitter and even place Christmas tree decorations on it. Everything is at your discretion or desire.
Template for cutting Christmas tree cut out Tool for grinding Grinding the details of the gift Christmas tree gift
The New Year's craft Christmas tree Gift from the Master's Secret is ready. This Christmas tree will definitely decorate the interior or New Year's table.
Don't forget to share the craft with your friends on social networks. Support the video portal Secret of the Master on YouTube by subscribing to the channel or just write a comment or like. See all New Year's crafts from Sekretmastera.
You may also like
Source: https://sekret-mastera.ru/podarki-2/kak-sdelat-elku-v-podarok.html
Christmas trees made of cardboard
Small tabletop cardboard Christmas trees are an excellent New Year's decor. To strengthen crafts, you can make them by gluing 2-3 layers of cardboard. The work process follows the same principle as with plywood Christmas trees, only instead of a jigsaw or saw we use scissors. We decorate the trees with miniature toys, ribbons, bows, etc.
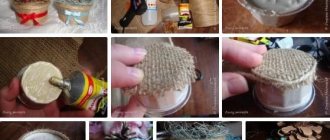
Wrapping with twine is a simple decoration. You can attach a magnet to the back of the craft.
Christmas trees made of cardboard, covered with burlap. Decorations - beads, lace ribbons, bouquets of artificial flowers. We attach the triangle to a straight branch that will imitate a trunk. We plant a Christmas tree in a pot.
You can cover Christmas trees with fabric of any color. It is important that the decorations contrast with the background.
An option for decorating a cardboard Christmas tree is cotton papier mache. It’s simple: we glue layers of cotton wool onto a cardboard base using PVA glue.
Christmas decorations in stained glass style
You can add a little variety to the standard cutting technology and make one of the proposed options for New Year's decor that imitates stained glass style.
The decorations in the foreground are made using pseudo-stained glass technique.
The essence of this technique is quite simple: you need to cut out two stained glass frames and place a sheet of cardboard between them, painted on both sides. In order to avoid the tedious adjustment of two parts, it is better to immediately cut them in series, placing the blanks in a stack one on top of the other. Of course, it is much more convenient to do such work on a jigsaw.
Cutting templates
Christmas trees made of slats and branches
Regular branches can be obtained anywhere. Reiki is also not a scarce material. The crafts are simple, the whole secret of their beauty lies in the unusual designs and brightness of the toys.
Towards the top of the tree, the branches become shorter.
We secure the branches to the trunk with carnations.
This Christmas tree can also be fixed in a pot.
Above are three wall-mounted Christmas trees made of branches. Although slats are also suitable for creating them. Branches or slats are tied together, the structure is hung on one nail in the wall (at the top).
Cute slatted Christmas trees are easy to make. We fasten the slats with screws. Various toys can be placed inside such structures. Complex fastening, as in the picture, is not necessary - you can stretch cords (rope, twine) between the slats of the triangle.
Sawing out voluminous toys from wood
The aerobatics of sawing wood is mastering the technique of making three-dimensional toys. Outwardly they look complicated, but in reality their creation is not so different from ordinary “flat” sawing. True, here you definitely can’t do without a jigsaw machine, since you will have to work not with sheet materials, but with thick wooden blanks that a manual jigsaw cannot handle.
Let's look at the features of this technique using the example of making a simple three-dimensional icicle.
- First we cut out the blank. In our case, it is a rectangular wooden block. After this, we transfer the pattern template to two faces. In the photo, the front and side projections are the same, but there are projects in which they are different.
- Using a small drill, we drill holes for the blade to pass through, and then carefully cut out the internal waste part. First on one side, then on the other. Carefully remove the waste from the center of the workpiece.
- Now you need to remove all excess material around the perimeter. This operation is done in two stages. First, the waste is cut off on one side (Fig. 3).
- Now the two cut parts need to be taped back together, as shown in Fig. 4. After this, we turn the workpiece 90° and sequentially cut off all the remaining waste parts. Manipulation with tape is necessary for two reasons. Firstly, markings remain on the cut pieces. Secondly, these edges have a flat plane and ensure stability of the workpiece when cutting the second profile.
- As a result of simple manipulations we get an elegant three-dimensional toy.
Now is the time to start putting these skills into practice!
Christmas trees from pots
The simplest New Year's crafts. You will only need:
- flower pots of different sizes;
- dye;
- small toys for decoration - stars, flowers, etc.
We paint the pots - not necessarily with green paint, because the Christmas tree is decorative. When the paint is dry, glue on the decor. To increase the stability of the Christmas trees, you can insert some kind of pin or thin round stick through the drainage holes in them.
If you don’t want to make anything (or don’t have time for it), we use the pot as a container in which we plant a spruce branch. It will be enough to decorate the top of a small New Year's tree with a star.
Montage demontage. Technical parameters of large fir trees
Stencils for cutting
A set of three ornaments inspired by traditional Christmas motifs. The set includes a pair of stylized angels and an openwork Christmas tree assembled from two halves. The latter can be used as a pendant or as a free-standing decoration.
Such toys look good in their natural form, with an open wooden texture. Therefore, linseed, mineral or any other non-tinted oil is best suited for finishing.
Christmas tree made of pillows
This is truly an original replacement for the traditional Christmas tree! The silhouette of the Christmas tree is created using improvised objects in colors close to green on the open shelves of the closet. Everything is in progress! It is ideal to fill the background with objects of the same color as the wall.
Expert opinion
Strebizh Viktor Fedorovich, leading construction foreman
And creating something like this is not at all difficult, because all that is needed is a cross-shaped base with a high metal pin in the center, onto which thin boards or branches of different lengths are strung in turn from bottom to top in descending order. If you want to clarify something, please contact me!
Christmas tree made of sisal
Sisal is often used in floristry. This fiber can be purchased at flower shops or craft departments. Christmas trees can be made from it in different colors.
We form a cone from sisal and secure it with tape. Decoration is at your discretion.
Volumetric pendants in an openwork frame
The main feature of these New Year's decorations is a beautiful openwork frame with a slight three-dimensional effect. This simple effect is achieved in a simple way. The oval center of the pendant is carefully cut out according to the template, moved back and fixed with glue. Thus, the openwork frame protruding to the foreground gives additional volume and makes the ornament more interesting.
The rest of the project assumes a standard cutting algorithm. Separately, we note that if you work on a machine, it is better to use #2 or #3 spiral files for this project; they will be easy to cut out not only the openwork frame, but also the main ornament of the decoration. As for the finish, the frame and middle look more beautiful in a contrasting design, painted in different colors. For such decorations, it is best to use alkyd or oil paints, which provide good coverage and color saturation.
DIY Christmas tree on a frame
This technique allows you to make a medium or large Christmas tree.
You will need:
- frame made of metal mesh or sticks, slats;
- branches of spruce, pine or other coniferous plant (for example, juniper);
- decorations - just like for a regular Christmas tree.
It’s not difficult to make a frame from a mesh, but you can simply buy a cone-shaped topiary mold at a garden and landscape supply store. If this is also difficult, we fasten even sticks or wooden blocks into a cone. They should not be too thin for the tree to be stable.
Ornamental decorations with geometric patterns
A series of sketches for making simple, but at the same time very expressive New Year's decorations. The through openwork pattern gives these toys a characteristic visual lightness and endows them with grace; at the same time, this feature puts forward a number of requirements for manufacturing. The wooden blank must be thin, but at the same time strong enough so that the fragile pattern does not break.
For a series of these projects, it's best to use hardwood (under a clear finish), or even better, thin plywood if you plan to do an all-over stain that will hide unsightly plywood edges. To make such jewelry, it is most convenient to use spiral saws, which allow cutting in any direction without the need to rotate the workpiece.
Felt Christmas trees
It’s good to make such a New Year tree if there is a small child in the house. It is also educational - the baby can hang toys on it independently.
Another option for a developing Christmas tree is a wall-mounted one.
And these are just tabletop soft felt Christmas trees that a child can play with.
Sawing snowflakes from wood
What kind of New Year's decor could there be without snowflakes?! Such decorations will always find their place of honor in the New Year's decoration of the house and bring a real holiday atmosphere to it.
Templates for cutting out New Year's snowflakes
Christmas trees on a cone
Options for cones for Christmas trees:
- cardboard cone;
- foam cone;
- metal mesh or ready-made frame for topiary.
We cover the cone with burlap and decorate the top with lace.
How to decorate a cone with burlap? One of the options:
How to wrap a cone with twine?
master class + drawing – Fair of Masters
I’m relatively new to the Masters’ Fair, not to say that I’m a great master, but I really fell in love with my work - artistic sawing. I have been doing sawing for 2 years, since childhood I dreamed of learning