The sheep is a symbol of the coming year! And now various crafts in the form of this animal are more relevant than ever! Images of sheep with their cute curly wool have always attracted craftswomen. And how the kids love them! So, a do-it-yourself paper sheep.
The sheep is a symbol of the coming year! And now various crafts in the form of this animal are more relevant than ever! Images of sheep with their cute curly wool have always attracted craftswomen. And how the kids love them! So, a do-it-yourself paper sheep.
We made the sheep together with the children! Such a sheep can be an excellent gift for grandparents for the New Year.
What gifts can you give?
- Key rings. Beads will make beautiful keychains. The sheep can be made voluminous or flat. In the last version, you draw an image on a sheet of paper, count the beads, weave with a fishing line and a needle, connecting the rows together like Easter eggs.
- Magnets. Embroidered, beaded or sewn sheep, New Year's scenes look great on the refrigerator. You can make unusual magnet toys. To do this, sew small sheep and glue magnets on their legs, then the lamb will be able to change the position of its legs.
- Cloth. Scarves, mittens, hats, and socks can be decorated with sheep in the style of a Norwegian pattern. If you knit for children, you can create colored lambs.
- Souvenirs (needle beds, biscornu, krivulka, zigugu). Find any cross stitch patterns with a New Year's theme, embroider and give an unusual shape to the souvenir.
- Origami. A modular sheep can become a decorative addition to any home.
- Amiguri. Small miniature amiguri toys are very popular. They knit very quickly and are used as decorative items, key rings, and car pendants.
Variations of New Year's symbols
- Pendants. You can make hanging toys for babies. Sheep can be made in black and white, but you can diversify them with colorful pom-poms, flowers, and birds.
- Stuffed Toys. Use pekhorka, pom-pom yarn, to knit sleep toys. You can sew them from felt. Tilda's lambs are especially unique (for them you should make a sheep stencil in advance).
- Postcards. Any material is used (paper, beads, accessories, paints, fabric, threads) to create sheep. Postcards can be made flat, voluminous, with a surprise, or decorative.
- Christmas decorations. Knitted or sewn lambs can hang on the Christmas tree and delight the eye with bright colors (use glitter paints for this).
- Covers. Bags, cosmetic bags, and cases for mobile phones can be sewn, knitted, embroidered with a New Year theme and given to anyone, regardless of their gender or age. Particularly original are the covers in the shape of a three-dimensional lamb, that is, the sheep’s head is knitted, stuffed and sewn to the bag. Also, don’t forget to sew on the legs of such a sheep.
- The New Year's symbol can be presented in any way. The main thing is that the gift is useful and practical. You can create a whole composition. For example, beaded trees, and under them a flock of sheep.
Original craft: sheep made from cotton swabs
Such a lamb can become an element of a three-dimensional postcard, a Christmas tree decoration or an independent souvenir. To create it we will need:
- white cardboard;
- cotton buds;
- glue;
- markers;
- Popsicle sticks or clothespin halves;
- scissors.
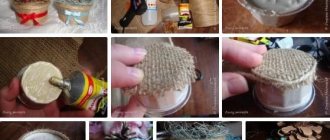
How to make a sheep with your own hands from cotton swabs? From cardboard, cut out a large oval for the body and a small one for the head. You cut the cotton swabs almost to fit the cotton base, only leaving centimeter lengths for the ears. One sheep can use more than a hundred cotton swabs. Cover the body in a circle with cotton scraps so that the sticks are not visible. Then the illusion of curls is created.
Then you make the head. First, glue on the ears, and then a few sticks of curls in the form of bangs. Draw eyes, nose and mouth with a felt-tip pen and glue them to the body. If the lamb is used for a card or Christmas tree decoration, then cut wooden ice cream sticks in half and glue them to the wrong side of the body.
You can decorate the craft with white cardboard or paste it with cotton swabs, creating a three-dimensional product. By adding halves of clothespins you can give the sheep stability. You can also glue white cardboard with New Year’s greetings on the wrong side.
How to make a sheep from cotton wool
Main material for manufacturing:
- newspaper sheets;
- plastic straws;
- cardboard;
- cotton balls;
- adhesive base.
Now let's look at the steps of how to make a sheep from cotton wool. The main thing is to take your time and be careful, this will affect the appearance of the toy.
Making crafts:
- We take several sheets of paper and begin to crumple them into a ball. This is what the base for our sheep’s body will look like.
- We cover the second sheet with glue, making the lines thin without observing geometry.
- It is important to strengthen the body and increase its volume. To do this, you need to glue a sheet of glue to the first lump. Just don’t press too hard; repeat the procedure at least 10 times.
- Leave the resulting workpiece alone for three hours. It is better to place it closer to the heating device. The body should not be wet.
- We make the paws from plastic baby drink straws. We make four holes in our coma, securing the limbs of the sheep in them.
- The ideal solution for imitating an animal's fur coat would be smooth balls of cotton wool. They can be purchased in the intimate hygiene department.
- There are two ways to glue the balls to the base. In the first, we apply the adhesive base to the cotton balls and press them tightly to the body. The second method is to apply a thick layer of glue onto a wad of paper and gradually apply cotton pompoms.
- We fill the entire space with cotton balls. It is important to fill in all the gaps, do not write them off, do it carefully.
- We cut out the muzzle in the form of an oval from black cardboard. Don't forget about the ears and expressive eyes. We combine all this into a single composition and glue it to the body of the New Year's symbol.
Agree that such a beauty can be placed not only under the Christmas tree, but also on the New Year’s table. You can create a whole family and move it around the apartment. An alternative would be sheep made from candy. You may ask how to make a sheep out of candy. In fact, the technology is similar to that presented above. Instead of cotton balls, you should use candy. Today, the market offers a huge range of sweet products of suitable shapes. Candy lamb can be used as a gift, especially for children.
In the next master class we will look at how to make a sheep from cotton swabs.
Christmas tree toys: DIY sheep
Small crafts are suitable not only for souvenirs, but also for decorating a Christmas tree. Consider a master class on creating a miniature sheep. You will need the following material:
- copper wire for the body, paws;
- wine stopper or float;
- glue “Super Moment”;
- jute twine or any other thick rope;
- white and black wool;
- paper clips for ears.
Making a sheep craft is not difficult, but it will require patience, since the work is jewelry. Use cork to form a sheep's head. You pierce it with a wire, the end of which you bend to fix the position. From other identical pieces of wire you make paws with part of the body.
Attach them to the wire coming from the head and solder them (in extreme cases, you can wrap them with thin wire in the style of a ganuteli). Wrap the neck and body with twine, increasing the desired thickness. Then you wrap the head, paws, and body tightly with black wool, coating the surface with glue.
Club activity. Craft using cotton wool “Curly Lamb”
Application “Curly lamb” made of cotton wool
Target:
develop precise hand movements through making cotton appliqués.
Tasks:
- Introduce cotton wool application;
- Learn to roll cotton wool balls;
- Exercise children in analyzing a sample, planning, and monitoring when doing their work.
Equipment:
craft sample, colored cardboard, lamb templates, cotton wool, PVA glue, colored pencils.
Progress of the lesson
- Organizing time
Guys, let's get ready for work - let go of emotions, breathe out and get started.
- Reporting the topic and purpose of the lesson
Once upon a time there lived a lamb. He was so white and curly that everyone called him Cloud.
The lamb loved to walk in the green meadow, listen to the birds singing and look at the sky. He also dreamed of flying with the clouds to see distant countries.
The owner of Cloud had two children - a boy Sasha and a girl Masha. They loved the lamb very much. Together with the dog Sharik, they grazed him in the meadow and often treated him to sweet carrots or apples.
- Bah, bah, how delicious. “Thank you, you are real friends,” the lamb always told them as he devoured the treat.
One day, at the end of autumn, the mistress came to the barn where a lamb, a cow and a pig lived.
-Can I cut your hair? - she asked Cloud. — Winter is coming soon, and I need wool for warm socks and mittens for Sasha and Masha.
“Bee,” the lamb shook his head, “I don’t want to give away my fur.” I'm afraid of freezing.
“Besides, if I get my hair cut, I won’t look like a cloud,” he thought.
- Don't be afraid. You will grow new fur. And without mittens and socks, children will not be able to leave the house in winter.
“No-no,” Cloud became stubborn. - No, I’ll give you my fur.
The upset hostess left with nothing.
“You did the right thing,” the pig, who heard the conversation, praised the lamb. – Never give to others what you yourself may need.
And pleased with himself, he grunted.
“And I think you should have agreed to the haircut,” said the cow, “to help your friends.”
“Don’t listen to the cow,” the pig grunted. - Just think, friends. You can live just fine without them!
This is how Sasha and Masha were left in winter without mittens and warm socks. One day, on a sunny frosty day, they could not stand it and ran out into the street. The children did not notice how cold they were and caught a cold.
Over the winter, Cloud grew even more. He was very hot in the warm stable. Its thick, long fur had become matted, and the lamb no longer resembled a light, delicate cloud.
“I don’t even know what to call you now,” the pig laughed at him. - Now you look like a gray felt boot.
“Moo, there’s no need to torture him,” the cow defended the lamb.
One day Sharik ran into the barn.
“Because of your stubbornness, Sasha and Masha went for a walk in the cold without mittens and socks,” he told the lamb. — The children caught a cold and are now sick. They love you so much, and you spared wool for them.
Hearing these words, the lamb became upset.
“Cut my hair, please,” he asked the mistress as soon as she entered the barn.
- Eh, Cloud, Cloud, why didn’t you immediately agree to help us? Okay, better late than never,” the woman sighed and went to get the scissors.
Seeing the shorn lamb, the piglet began to laugh:
- Oh, I can’t! Oh, how funny! How skinny you turn out to be. Just ribs. Now you look like some kind of bone.
“Don’t be upset, new wool will grow soon,” the cow consoled the lamb.
Soon Sharik said that from Cloud’s wool the hostess knitted not only mittens and socks, but also scarves for Sasha and Masha.
The lamb was so happy that the piglet’s teasing stopped making him sad at all.
Spring came, and the lamb was finally released outside. Ashamed of his appearance, he left the barn last.
- Look, our Cloud is coming! – the lamb heard the children’s voices.
Sasha and Masha ran towards him as fast as they could.
Cloud looked into the puddle and saw that it was again covered with white fluffy fur. Suddenly, somewhere in the distance, a church bell was ringing.
- Why do the bells ring? - asked the lamb.
- Today is the holiday of holidays - Easter! – the children answered in unison. We have a gift for you! - And they tied a bell on a smart red ribbon around Cloud’s neck!
- Thank you! I have always dreamed of such a bell. Now I will have a holiday too! – He shook his head, rejoicing at the cheerful ringing.
- Practical part
In our lesson we will make a fairy tale hero - a lamb from an unusual material - cotton wool. See what kind of lamb you get at the end of the lesson. (Demonstration of the finished craft)
Let's remember the rules for working with glue:
1. Handle the glue with care. Glue is poisonous!
2. Apply glue to the surface of the product only with a brush.
3. Do not let glue get on your fingers, face, especially eyes.
4. If glue gets into your eyes, rinse them immediately with plenty of water.
5. After finishing work, be sure to wash your hands and arms.
6. When working with glue, use a napkin.
Wash your hand before working with cotton wool.
1. Using paper glue, glue the lamb template onto a sheet of cardboard
2. Roll cotton wool balls of different sizes
3. Glue the cotton wool to the cardboard by dripping PVA glue into the desired place. Do not press too hard on the cotton wool - it will stop being fluffy.
4. Color the lamb with colored pencils or markers. Decorate with applications in the form of grass, sun, clouds.
- Summarizing
What beautiful clouds we made. Remember what the Lamb from the fairy tale overcame in himself?
- greed.
Thus, he helped the guys not to freeze in winter. It’s a shame that he realized his mistake after they got sick. But still he is great. Just like you all!
Creating curls
We continue to look at how to make a sheep with your own hands. Bend the sheep's legs to give it a stable position. You make the ears from paper clips or any wire. Wrap it with black thread, connect it into a loop and “increase” the volume with wool. Leave small ends of the wire to coat with glue and stick into the head.
Now you make curls. To do this, wrap white wool around a fork or metal plate, as when creating pompoms. On one side you fasten with a single-color thread so that when cutting the other end the threads do not fall apart. Cut the second edge with a utility knife. Lubricate the resulting bundles with glue and cover the entire body with the head.
If necessary, use scissors to trim the sheep's wool. Glue the eyes onto the face (you can find ready-made running small eyes on sale or use wooden beads). You can move away from the classic version and make multi-colored sheep.
LiveInternetLiveInternet
Quote from Melissa
Read in full In your quotation book or community!
In order to make a small sheep with your own hands, you do not need any expensive materials. Everything you need can be bought in regular stores found in any city. We will need copper wire with a diameter of 1.5 mm. You can buy a suitable wire from an electrical supply store and strip the insulation from it. A wine cork or, like mine, a fishing float for nets, is suitable for the head. Most foam plastics are not suitable for these purposes because the glue corrodes them. But in principle, the material is not so important. The main thing is to give it the desired shape and for the glue to stick to the base. I use “Super Moment Gel” and “Moment Crystal” glue in the following tubes:
These adhesives are clear and stick well. Again, the brand of glue is not important, use the one that you like and suits.
To wind the volume of the body you need some kind of thick rope. Mine is jute twine purchased at a hardware store. It doesn't matter either. Any rope will do.
Woolen thread will be needed for the final wrapping of the body and making the sheep's wool. The appearance of the sheep depends entirely on which thread you choose.
So let's get started.
First of all, you need to give the head the desired shape.
Then we pierce it with wire, which will be the neck and torso. We bend the end of the wire and secure it in the head. This way it won't turn.
We bend pairs of limbs from two identical pieces of wire.
This is how we solder the arms and legs to the body. If you don’t know how to solder, you can wrap it with wire, but this is less reliable and may dangle.
Next, having smeared the frame with glue, we wrap the required thickness of the neck and torso with twine. Secure the free end of the rope with superglue.
And now the most difficult part (especially if the sheep is white). We need to carefully wrap the head in one layer and without gaps. We start from the tip of the nose. We drip superglue. Glue the beginning of the thread. Then, in a spiral, spread a thin strip of superglue and wind the thread.
Gradually we reach approximately the middle. Then we do the same, starting from the top of the head. It’s unlikely to succeed the first time, so I recommend that you first practice on a similar head. It should look something like this:
Next we start wrapping the legs. It is necessary to bend the loops at the ends of the wire. Coat the wire with glue. And wrap tightly in one layer.
After this, bend the ends of the wire back. Again, apply glue on top of the thread and wind the legs to the desired thickness.
When all the limbs are wrapped, we wrap the torso, also first coating the base with glue.
Half the battle is done.
We make the sheep's ears from paper clips. In the same way, first we coat the wire with glue, wrap it, give it the desired shape and, after coating it with glue, wrap it completely.
It is necessary to leave free ends of the wire in order to later secure the ears to the head. When the ears are ready, apply superglue to the ends of the wire and insert them into place.
Now we need to make wool for the sheep. This is the most labor-intensive work that takes the most time.
You will need a stationery knife, a needle with a thin thread, a woolen thread and a smooth plate about 1.5 cm wide. The length of the future wool depends on its width.
We wind several turns of wool thread onto the plate.
On one side we tighten it with a needle and a thin thread (I have it black for clarity, but you’d better take a thread that matches the color of the wool). You need to stitch it so that the thread does not unravel later.
Cut the opposite end with a knife.
This results in a bundle like this:
You need a whole handful of such bunches to be enough for the whole sheep. When you have made the required number of blanks, you can start gluing them. We spread a drop of superglue where the bundle is wound with thread and glue it to the sheep.
Thus we glue it all over. The closer the tufts are to each other, the denser the wool will be.
The final touch remains. For the eyes you will need two pins with balls at the ends. First we paint them white. When the pins are dry, shorten them with wire cutters, leaving about a centimeter. Apply glue and insert into place. After that we draw the pupils.
So our handmade sheep is ready!
Author of the master class: Sergey Fedoseev (on LiR his nickname is Nemalenkiy)
SOURCE
I also invite you to admire Sergei’s other wonderful works
1.
2.
3. 4. 5.
6. 7.
8.
9.
10.
11.
12.
13.
14.
15. 16. 17.
18.
19.
20.
21. 22.
23. 24. 25.
26.
27. 28.
29. 30. 31.
32.
33.
34.
35.
36. 37.
38.
39.
Felt sheep
Such toys can be used for keychains, Christmas tree decorations, and decorative souvenirs. From white felt you cut out the body, tail, legs, head with ears, and from black material - curls and flowers. Instead of felt, you can take any other non-flowing material.
You start work from the head, sew the parts together and insert the padding polyester. You can use a solid filler, on which you cut out the same sheep stencil and sew all the layers together. Immediately embroider the mouth, sew on the eyes, curls. Then you work on the torso. First, sew decorative flowers onto it. Next, sew together the parts of the body, sewing on the legs and tail in the right places. Don't forget to fill it with padding polyester. This is a version of a whole lamb, but how to make a small colored lamb?
Cut out two pieces of felt for the body (like a round cloud), head, ears (like droplets), curls (like an oval cloud). Four oval stripes for the legs, one piece for the nose (heart). You sew the head together, sew on the ears, fill it with padding poly, then attach the curls on top. Glue on the nose, embroider the eyes and mouth. Next, sew the torso together, inserting the legs. Attach the head on top and decorate with a bow and the same ribbon.
How to make a sheep from pompoms
Material for creativity:
- light woolen threads
- scissors
- wool for felting
- felting needle
- cardboard
- wooden sticks
- glue.
Making a sheep from pompoms:
- We make a dense pompom from threads, this will be the future head.
- Glue the eyes or sew on decorative beads.
- Ears are made using patterns from cardboard or fabric, which hardens through the use of glue.
- We also make the body of a pompom, only its diameter should be three times larger than the head.
- A wooden stick is cut into four equal parts. Wrap wool around each piece and use a needle to form a tight shape.
- All parts are held together with glue. Using decorative ribbons and flowers, decorate the New Year's symbol.
Now each of you knows how to make a sheep craft with your own hands in a short time.
We suggest you look:
← Previous post
Next post →
Lamb-Tilda
Tilda sheep are adored by children because of their simplicity and softness. As a rule, terry cloth is used for fur, and linen material is used for limbs and face. At the moment there are many patterns, but you can create it yourself. The easiest option is to make a sheep like a doll for the New Year. Let's look at how to do this in detail:
- Sew together the paw parts. Sew the linen pattern on one edge. Fill with padding polyester.
- Sew the body from fur fabric. Sew on the arms and legs. Fill with padding polyester.
- Sew the head in three parts: two terry and one round linen face. Sew on the eyes and ears, embroider the nose, paint the cheeks with acrylic paints. Fill it with padding polyester and attach it to the body.
- Sew a skirt from multi-colored scraps and put it on the sheep.
Beaded lamb
How to make a sheep from beads? Today you can find a lot of patterns for weaving lambs, both volumetric and flat, from beads and beads. Flat ones turn out sketchy and are more suitable for keychains or postcards. Goats are braided from the head down, and sheep from the back of the body to the head. Then the parts are simply connected to each other and a denser product is obtained. Using this technique (brick weaving) you can make colorful animals.
But voluminous sheep look more natural. The very first option is to braid a ball and bead for the body and head. The braiding is reminiscent of strawberry braiding. For curls, make loops. You also weave the ears with a loop.
If you don’t know how to weave with beads, then combine two techniques (this will be the second method). For example, you sew the head and body from fabric and filling, and sew on the curls and legs with beads. You will get original souvenirs. You can also combine crochet with beadwork. For magnets, sheep are embroidered on canvas, cut and magnetic tape is glued to the wrong side.
Ram Stefan made from natural material - an interesting children's craft
This master class presents an interesting children's craft made from natural materials, which you can make together with your child or entrust him with independent work.
The irresistible Stefan Ram is made from something that is easy to find during walks in the park and on the beach. If you do not have any raw materials in stock, simply fashion the missing parts from plasticine or replace them with something else from home supplies. The lamb is suitable for home decor and gifts.
- Creative materials
- How to make Stefan the ram from natural materials and plasticine
Creative materials
We recommend that you get acquainted with the possibilities of natural materials in our article dedicated to this fascinating hobby.
Prepare the necessary natural and additional materials and tools to create a lamb:
- a large open pine cone;
- Walnut;
- snail shells;
- plasticine;
- pen rod;
- plastic stack;
- board (mat) for modeling.
Please note that we have master classes in similar techniques . Make an owl from a pine cone, a turtle from sea stones and a bear Potapych. The lessons are simple, and the toys are interesting and beautiful.
How to make Stefan the ram from natural materials and plasticine
Wash two snail shells thoroughly with soap and wipe dry.
Select a pine cone with open scales and a large walnut. Wipe off dust and debris with a damp cloth.
Roll out a long roll of brown plasticine with a diameter of at least 0.7 cm . Divide it into four parts, smooth the edges of each part with your finger. Insert the limbs between the scales of the cone, as in the photo. Place the body of the figure - it should stand confidently on its “legs”.
Now you need to create the lamb's face. Pinch off a piece from light pink plasticine. Spread a thin layer onto the bottom half of the walnut. Roll two small black balls and press them onto the pink face. Highlight the nostrils using a ballpoint pen.
Stick two white bases for the eyes into the top half of the walnut. On top of them add plasticine green iris circles, black pupils and small spots of white.
Roll out a thin red flagellum and give it an arc shape. Stick the mouth onto the pink half of the ram's face . Fill the inside of the shells with white and press the horns onto the natural material ram's head.
Connect the head to the body by placing a piece of plasticine between the parts.
Make a red cap and cover the edge with a white rubber band. Make notches in a circle with a stack. Attach a small white pompom to the end of the hat. Place the cap on the animal's head.
The cheerful ram Stefan is ready from natural materials and plasticine!
This lamb can easily be turned into a New Year's toy by decorating it with a bright cap. You can even hang it on the Christmas tree.
Check out our section on crafts from nature's gifts, there are not only children's lessons, but also master classes for adults. Make sure that you can create beauty without spending money on raw materials, natural materials are lying under your feet!
Postcards and panels
It's very easy to create greeting cards. The easiest way is to stick an applique on ready-made postcard blanks. On the outside you decorate the plot with beads, threads or other materials. Children like to glue a Christmas tree out of pompoms onto cards and decorate them with paper balls and stars.
If you want to make a card yourself, then fold the cardboard in half. Use scissors to shape the size and edges of the card. On the outer side, apply a schematic design, glue and a bead base or threads (it is better to take wool, crumble it finely and glue it). For the postcard, the first craft (a sheep made from cotton swabs) is suitable, which you glue onto a cardboard base.
If you paint white thick cardboard, and make the foreground or main details voluminous using paper appliqués, beads, threads and other materials, you will get the basis for the panel. Simply insert the story into a frame without glass and hang it on the wall. For example, you can make topiary this way.
Lamb applique made of cotton wool and colored paper
This MK is also simple to implement, but is used very often.
To begin with, draw a sheep on a sheet of colored paper according to the diagram, then you need to cut it out and glue it to the background.
A bit boring? Then add drawn and cut out trees, clouds, yes, whatever - develop your imagination, come up with something of your own. After you have glued all the details, you can start working on the sheep’s wool: make balls from small pieces of cotton wool and glue them to the animal’s body. For children in kindergarten, prepare stencils with painted details. If this is a middle, senior or preparatory group, then the children will be able to cut out and paste parts of the applique themselves. Below you can see more ideas for appliques with cotton wool lambs:
Panel options
Cut the foam ball in half and glue it onto cardboard. Draw a trunk, fence or vase. Cut a yogurt bottle lengthwise, wrap it with multi-colored threads, and glue it to cardboard. Cover the ball with flowers, pompoms, and decorative elements.
You can use foam balls to make the head and body of a sheep, which you will cover with pom-poms or beads. Or glue a finished animal created in origami style onto cardboard. A three-dimensional sheep is inserted into a frame without glass.
For preschoolers, another gift option is suitable. Print out the lamb template. Cover it in the places where the fur should be with a thick layer of plasticine. Then roll balls from napkins, crepe paper or foil. Attach them to plasticine. You can paint the head and legs with gouache or also cover them with plasticine.
If the balls are not large, then the craft can be placed under glass. Otherwise, buy special plasticine that hardens quickly and is not affected by temperature. Creating such crafts is as simple as making a sheep out of paper, but the result will be more interesting.
Cute lamb in the meadow
When doing creative crafts, children most often work with colored paper and cardboard. But there comes a time when it becomes necessary to diversify the process by adding other materials. Applications made from cotton wool will be especially interesting. These lambs look like real ones and look very cute. For beginners, this application option is suitable:
It's easy to do. It is enough to follow the instructions step by step. For young children, the technique of working with soft fibers is new, so the participation of the teacher and his assistance is of great importance.
First, prepare the lamb and cut it out. You can make the template yourself, or print it from the gallery. A cute pet looks like this:
Take a stencil. It can be a sheet of plain thick paper or cardboard. It’s good to use a green background for this - it will look like a sheep grazing in a meadow. Glue the lamb blank to the base.
To diversify the work, cut out other parts from colored paper. Sun, clouds, trees, flowers, grass. Let your child use his imagination in this matter:
Now that all the elements are glued, move on to the curls. They are done separately. Each one is rolled from soft fiber and glued.
Such a master class can be completed without the help of a teacher in the middle group.
We embroider a sheep
Depending on the plot and size, the New Year's symbol can be presented in the form of a picture or a souvenir. Let's consider several gift options.
- Pincushion. Embroider two identical squares, finishing the edges with a “back needle” stitch. Next, use these stitches to connect the two embroideries to each other. Sew a loop in the middle, stuff the product with synthetic padding, and drag decorative tassels along the edges. It turns out to be a beautiful souvenir pincushion. It can be used as a car decoration.
- Magnet. Embroider the lamb pattern, trim off the excess fabric, and trim the edges. Apply magnetic tape. The result was an original do-it-yourself sheep.
- Biscornu. Embroider two squares with New Year's patterns. You also process the edges with a “back needle” seam, but start sewing the parts from the middle. That is, you place the edge of one embroidery on the middle of the other half, and pull the needle through the stitches. You can string beads for decoration. Fill the biscorn with padding polyester and sew to the end of the edge. Decorate the middle of the product with a button and pull through a loop.
- Sachet. This embroidery can be designed in the form of candy or a bag filled with aromatic herbs.
Stuffed Toys
We suggest you consider how to make a small sheep with your own hands (about the size of your palm). Such toys can become a decorative element of a home, car or educational children's rugs. For the master class you will need the following materials:
- felt;
- two beads;
- threads;
- satin ribbon;
- padding polyester;
- knitting threads in the form of balls;
- black and brown floss.
On felt, schematically designate the body of the sheep, drawing an oval head, legs, and tail. Sew the parts together, cut the fabric so that when you turn it inside out there is an even seam. Stuff it with padding polyester and sew up the product.
Now, using threads that match the knitting thread, take the bump, sew its ends and sew it in a lump to the sheep, starting from the head in a circle. Then sew on the ears using satin ribbon loops. All threads, knots, tails are hidden under the “wool”. Next, use black thread to sew the beads onto the muzzle, and use brown floss to embroider the nose and mouth, bring the thread to the middle of the back and make a loop. It turned out to be a beautiful fluffy sheep with your own hands!
Making a volumetric applique “Lamb” together with the children
Before you start studying the step-by-step instructions, prepare all the materials that will be needed to make the craft during the process.
Find a picture of a lamb depicted without wool, which will serve as the basis for a cotton wool applique. It is better, of course, to find a drawing on the Internet and print it on a printer. Also, if you know how to draw well, it will be interesting to depict the figure of a funny animal yourself.
The technique is not complicated, and therefore the picture will be easy to make even for a novice master. Let's move on to the master class, carefully follow the step-by-step description and repeat simple steps.
Required set of materials:
- cotton wool;
- colored paper;
- a tube of glue;
- a pack of wet wipes;
- lamb applique diagram;
- drawing;
- sample.
Craft making process:
To work with glue, it is better to use a children's table; it is not only convenient, but it will also not be difficult to wash it after finishing the creative idea. Lay out all the necessary materials and arrange them so that nothing interferes. If the lesson is taking place in a kindergarten, then you need to monitor all the children so that cotton pieces do not end up in their mouths, especially if this lesson is in a younger group. In principle, these actions will not be difficult for one-and-a-half-year-old children, and children 3-4 years old will be able to cope even more.
- Tear a large piece of cotton wool into small pieces with your baby. This is to create a warm coat for the sheep.
- When you are done with the pieces of fur coat, lay out a drawing or applique made of paper on the table and teach your child how to smear cotton wool with glue and glue them along the contour of the parts. Tip! You can also use a stencil in your work; this is convenient for young children. Thanks to this device, kids will not crawl out of the drawing or appliqué. Maybe the first time it will turn out ineptly, nothing - all skills come with experience, help your child to make performing MK more fun.
- Dress the workpiece in a warm fur coat.
The lamb applique made from cotton wool is almost ready, all that remains is to process it and add some little details to your work - they will add volume to the picture. And here it’s not forbidden to dream up! If the cotton wool lamb is supposed to have a winter theme, then you can make snow from the remaining cotton pompoms. For a spring composition, make a blue background from colored paper and glue on a couple of beautiful fluffy white clouds. During the lesson, explain to the children what lamb’s fur is used for, tell preschoolers where this animal lives, what sounds it can make, and what it eats. Detailed instructions will help your child learn a new type of needlework step by step, and such a story will captivate him into the world of animals, which will be especially interesting in the middle group of kindergarten. There are a lot of ideas on the Internet, and therefore at the end of the master class you can look at the photo and come up with something of your own and create a unique cotton applique of a lamb. The main thing in the work is to enjoy the composition being created, then the child will want to make something else with his own hands. Below, together with the children, we will watch a video that will visually help you understand how to build such a cute miracle in a white fur coat.
Knitted lambs
Knitted toys are increasingly in demand among children. Sheep can be dressed up in different dresses and skirts, but if you use special yarn with different bumps, lumps, and long piles, you can knit original lambs with natural wool.
Let's learn how to create such a craft using small sheep as an example. Such amiguri are used as decorative decorations, and if you sew on a loop, you can hang it in your car. Let's look at how to make a multi-colored sheep. To do this, take knitting threads: cotton of three different colors and yarn with fibers or knobs for wool. You start knitting the sheep from the muzzle.
Crochet a circle, forming it into a hexagon. Next, you knit without any increases, getting a hat like an acorn. Then you narrow the number of loops to create a long pumpkin shape with a wide end. Having finished knitting the muzzle, fasten the threads with the bumps and knit the wool on the head. Create ears using a cotton hook and sew them on. You make the eyes from beads, and embroider the nose and mouth with a “game”.
Knit an oval or round body from threads with cones. Separately make the front and hind legs, adding multi-colored cotton. Finish knitting them with threads with cones. Sew the limbs and head to the body. Stuff all parts of the body with padding polyester. The result is a bright sheep made with your own hands.
Do-it-yourself sheep (lamb) from an egg
As you know, the husband of a ewe is a ram. So why not try to make a representative of the stronger half of the flock of sheep?
Necessary materials:
- egg;
- glue;
- plasticine;
- cotton wool
Manufacturing:
The first step is to prepare the basis for the future craft. Wash the egg and make two holes in it with a needle. One hole is at the bottom of the egg, and the other is at the top (see photo).
Allow the contents of the egg to drain out. Now rinse the egg again and after a while, after the egg has dried, you can start creating.
Coat half of the egg (its wider part) with glue and glue a bunch of cotton wool. Do not press too hard with your fingers so that the fur is fluffy and voluminous.
Make two thin sausages from dark plasticine and twist each of them (see photo) - these will be the horns for the lamb. If you decide to make a sheep, then sculpt two ears instead of horns, because sheep do not have horns.
Next, from plasticine of the same color, fashion 4 short thick legs and 2 eyes. Attach all plasticine parts to the craft.
And now the charming lamb is ready. If you want to hang such a lamb on the Christmas tree, then attach a loop to it or tie a thin satin ribbon around the body.
DIY sheep made from ear sticks
Such a cute sheep, made from ordinary sticks intended for cleaning ears, can become not only a souvenir or gift, but also an excellent decoration for the New Year's table. To do this, attach a name plate to the craft, and your guests will know where their place is at the festive table.
Necessary materials:
- cotton buds;
- glue;
- scissors;
- a sheet of thick cardboard;
- clothespins
Manufacturing:
From a sheet of thick cardboard, cut out an oval and a circle (the body and head of the future lamb). Now cut off only those areas from the ear sticks where there is cotton wool on them. Gradually overlapping each other, glue the fluffy parts of the cotton swabs to the body of the future lamb (see photo).
Use the pieces to make a forelock on the sheep’s head, and use two pieces of cotton swabs to make ears. Glue the head to the body of the sheep.
Be sure to draw the eyes, nose and mouth of the sheep with a felt-tip pen or pen, and also tie a cute bow on the top of its head.
Attach two clothespins and now the charming and cute sheep is ready and at the same time very stable.
DIY sheep made from eggs (kinder surprise) and cotton swabs
In those families with small children, there will definitely be more than a dozen plastic eggs from Kinder Surprise. Right now their finest hour has come.
Necessary materials:
- plastic egg (kinder surprise);
- cotton buds;
- glue;
- awl;
- candle;
- threads;
- cotton wool
Manufacturing:
If you want your craft to become a Christmas tree toy, then be sure to first attach a loop to the plastic egg.
Now, heating the awl over the candle, carefully make holes in the plastic egg in the place where the legs should be.
Cut off the fluffy parts from the cotton swabs and thread the plastic tube forward into the holes made from the inside of the egg.
In the end, you should end up with something like this: on the outside there are 4 legs made of plastic tubes, and inside the egg there are 4 fluffy parts. Before you insert cotton swabs into the holes, be sure to soak them in glue.
Now close the plastic egg and start decorating the sheep’s body. Use a heated awl to make holes and insert cotton swabs into them with the fluffy parts facing out.
The sheep's face needs to be made on a base consisting of three cotton swabs. Wrap a cotton ball around the sticks and moisten with glue, give the desired shape. After everything has dried, paint the face.
DIY sheep made from coffee beans
DIY ribbon sheep
Do-it-yourself sheep made of paper and thread
DIY polymer clay sheep
Such crafts can be not only a simple souvenir, but also a refrigerator magnet if you attach magnets to the sheep. These sheep will be an excellent souvenir or addition to a New Year's gift.
Follow the photo instructions and you will get beautiful and bright crafts.
Do-it-yourself sheep made of threads. How to make a sheep?
Children's crafts: Postcard with a sheep
Children's crafts: DIY paper sheep
Source: https://vtemu.by/novosti-v-temu/ovechka-svoimi-rukami-kak-sdelat-simvol-novogo-2015-goda-ovechka-svoimi-rukami/