No child will refuse to congratulate his father and grandfather on Defender of the Fatherland Day. Invite him to make an origami “Boat” out of paper. Such a gift will certainly appeal to men who have completed military service or are interested in the history of the navy. This craft can be kept as a souvenir or used for children's games.
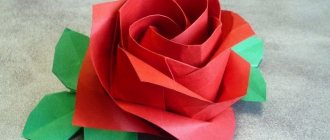
Model 1
To create the simplest version of a boat using the origami technique, you only need to complete 6 simple steps. But this is only at the beginning. After acquiring the appropriate skills, the product is crafted in just 2 stages.
This craft has 1 long fold and 1 outer reverse fold. By folding it, it is quite possible to practice the art of folding on the outside. If you wish, you can test the boat on the water - it will float, but for a short time. It is permissible to use any type of paper in your work. But the boat will look most impressive if the front and back sides of the paper sheet differ in color or texture.
Paper applique Ship using technology in 1st grade with templates
Who said that a boat must be voluminous? Excellent applications are made on this topic. The next master class, which we will look at, shows how to make a picture of a sailboat from colored paper.
Necessary materials:
- Colored cardboard and paper;
- Simple pencil;
- PVA glue;
- Scissors;
- Napkin.
Stages:
In essence, making an applique is a fastening based on previously prepared parts. The elements of this picture have a rather complex shape, so if you are conducting a master class with small children, it is better to draw and cut out the templates yourself for each of the children.
The templates are as follows: a blue boat, two white sails, a red flag, two white seagulls, two waves (blue and white), two suns (a large yellow one and a smaller orange one).
We glue two suns onto the colored base - one on top of the other.
Now, leaving a little space at the bottom, glue the blank.
We attach a white wave on top of the boat from below. And on her - blue.
Then it's up to the sails. First the small one.
Then the big one. We don’t glue it completely, but only coat one edge with glue to make the craft a little voluminous.
We attach the flag.
And the finishing touch is white seagulls. If desired, you can add black feathers to them.
This is such a beauty!
You can come up with many stories on this topic. Like the simplest ones:
And more complex ones:
Don't be afraid to use different materials.
And experiment with their use.
Model 2
Origami “Punt Boat” is interesting because you can put small toys in it and send them on a journey across open water. This design easily floats on the water surface. Algorithm of actions:
- Fold a sheet of paper in half along the short side, then fold it across.
- Carefully fold each corner of the workpiece inward.
- Fold the corners again according to the diagram. This is necessary to make the conical elements of the product even sharper.
- Bend the figure away from you along the central edge and turn it inside out, opening the middle “cleft.”
- Carefully straighten the craft and tuck the inner folds. The punt can be lowered into the river.
DIY submarine: origami diagrams with video
Every child wants to please their dad and grandfather with a nice gift for February 23rd by making a beautiful craft. A DIY submarine could be a great idea. Such a gift will certainly appeal to men who served in the army or are interested in military equipment. This product can not only be kept as a souvenir, but also simply played with with your child. The master class will definitely come in handy for those who want to please their loved ones with an original gift.
Model 4
Want to do some testing on the water? Make a light boat using origami technique. Folding such a craft only seems like a simple matter. In reality, the baby is unable to cope with it. It is recommended for production by elementary school students. The required material is a square piece of thick paper. Procedure:
- Fold the sheet in half.
- Fold the top and bottom edges to the central axis.
- Fold the sheet along the marked horizontal fold.
- Position the workpiece so that the folded edge is facing you. Turn the corners away from you.
- Make a board from the top paper layer, folding both sides of the layout twice along a narrow strip to the bottom.
- Push the bottom part of the craft inside. Carefully straighten the boat.
If desired, you can add a passenger – a small doll – to this water transport and play, transporting it from one side of a puddle or bath to the other. In such a situation, it is recommended to use glossy paper instead of regular paper - it does not absorb moisture.
In addition, taking this version of the boat as a basis, you can create a three-dimensional composition or create an appliqué. You just need to add auxiliary accessories and decorate the toy.
A similar scheme is appropriate to use for folding textile and paper napkins. They will keep their shape if you carefully iron the kinked areas. These boats are good for serving knives and forks. They can also be used to place portions of sweets on the holiday table.
Making a boat that doesn't sink in water
I offer you quite interesting models that are made of cardboard. Moreover, you can come up with such a miracle yourself. The main thing is that you need to find high-quality cardboard and have it be glossy on the other side. This type is usually not sold in stores; all kinds of souvenirs are packed in it.
Then ask your child to make decorations or decorate for him. In general, make it irresistibly beautiful.
Can be made from ordinary plastic cups or plates.
And, you can, hee hee, of course it’s a joke, and sail on such a creation on the lake yourself).
It’s also a good idea to take a milk or yogurt carton, i.e. a tetra pack, and use it to make a craft like this. Don't forget the checkbox.
An excellent option is to use a plastic bottle; it will never sink and such a boat will serve you for a very long time.
By the way, they also make structures from foam plastic and other available materials.
Catamaran
To make a catamaran out of paper, you need:
- fold it in half and unfold it;
- bend both sides towards the central fold;
- fold the bottom and top parts towards the center;
- unfold both folds;
- open the bottom along the dotted lines;
- open and straighten the pocket;
- open the sheet at the top in the same way as you opened at the bottom, and repeat the previous step;
- bend the layout in half, opening the sections of the catamaran upward.
DIY craft for Victory Day “Submarine”:
Use scissors to shorten the cocktail tube on both sides as shown in the photo. We take the eyelets and insert them into the tube on both sides - as a result we will get a periscope for a submarine.
We take a cap from a plastic bottle, heat the heat gun to the desired temperature and glue the periscope in the center of the cap.
Now we need to make the fins. To do this, take a plastic cap or bottle and draw with a marker the future fins in the amount of 4 parts.
Cut out the fin details with scissors.
We glue the periscope to the Kinder Surprise egg with hot glue.
Using spray paint, we paint the vessel silver.
We paint the fins and propeller golden.
We hot glue a screw to the back of the submarine and fins on the sides.
We glue the eyelets with the same hot glue around the periscope.
As a porthole, we will use gold-colored metal buttons, which we glue to the bow of the submarine with a heat gun.
We get an almost finished submarine.
All that remains is to decorate the underwater vessel a little and give it a festive look. To do this, cut off pieces of silver cord equal to the width and height of the egg.
We decorate the submarine with a cord, securing the ends with glue. Craft for Victory Day, ready! The submarine is ready to serve in the open waters.
Yacht
The process of making a yacht is in many ways similar to the process of creating a catamaran. The basic element is the gate fold. A gate is a folding method whose action is similar to closing a gate. There are two methods of bending gates - horizontal and vertical.
In reality, the same technique is used, so the only difference is the right angle. To create this craft, you do not need to have any special origami skills. Everything is quite accessible. Here's the procedure:
- Fold and unfold a sheet of paper.
- Fold in the center. You should have four rectangles and three folds.
- Repeat the action, but this time perpendicularly. Fold in half, unfold, fold towards the center.
- Fold in half again to form a triangle. Unfold and do the same, but at an angle of 90 degrees to what has already been folded.
- Having unfolded it, fold the corners of the workpiece into the center and bend it to form a rectangle.
- Bend the top corner flaps to the sides. Press on the lower part behind them and form a trapezoid. Do the same on the other side. Then bend one edge of the trapezoid along with the valve.
- Turn the workpiece over. Take the top corner and bend it diagonally to mirror the bottom. The yacht is ready!
Crafts for Victory Day, submarine
We owe victory in the Great Patriotic War and for the peaceful sky above our heads not only to the ground and air forces. The navy, where our submarines participated, also played a significant role.
Crafts for Victory Day (May 9) can consist of various materials and manufacturing techniques. You can create wonderful crafts from the most ordinary waste and seemingly unnecessary material. And the kids will happily take part in the creative process, helping to cut, glue and paint parts.
To make a submarine, we arm ourselves with the following materials:
- large Kinder Surprise egg
- cocktail straw
- eyelets
- metal shirt buttons
- heat gun
- scissors
- felt-tip pen
- plastic cap or bottle
- silver and gold paint in a can
- plastic bottle cap
- silver cord
- metal screw
Canoe
A canoe made from office paper can be an interesting toy. Here you will need a little more diligence due to the design feature - the bow parts of the product are closed. Progress:
- Fold the paper square twice, forming four even parts, and unfold.
- Fold each of the 4 corners evenly inward, toward the center. You should end up with a smaller square.
- Unfold the workpiece and fold the corners inward again, but now align the top with the nearest edge. This way, each corner will be folded twice.
- Turn the layout over and bend its upper part and lower quarter towards you.
- Bend the corners of the resulting rectangle inward. Additionally, bend both sharp edges of the boat inward. Bend the “obtuse” corners towards you as well.
- Open the craft and, holding the folds, turn it inside out.
- Straighten the bow of the canoe.
Maybe not the first time, but your child will be able to learn how to create boats using the origami technique. Perhaps your child will even surpass you in this type of paper craft. The Japanese art of paper folding is truly fascinating. In addition, it develops the brain and imagination, and also has a beneficial effect on fine motor skills. Therefore, creating an origami paper “Boat” craft for children is the best way to spend time.
Original version
To make a submarine out of cardboard you will need:
- cardboard;
- match;
- glue;
- awl;
- cotton buds;
- black paint;
- drink can;
- sharp scissors;
- plastic ball;
- firecracker;
- rectangular cap.
First you need to empty the contents of the cracker. Then trace the deodorant cap onto the surface of the cracker and cut it out. Glue this cap to the cracker, you should get a chopping block. Make holes in the cap with an awl and insert them into the antenna or periscope using cotton swabs.
Make a cone out of cardboard so that its base is equal to the diameter of the cracker. The cone will be the stern part of the submarine.
Next you need to cut out the blades for the stern from cardboard. They will act as rudders, as well as bow and stern rudders.
Glue the cardboard parts onto the cone, make slits so that the parts stick better. Glue the bow rudders to the bow of the boat.
Cut a propeller with six blades from a tin can and bend it. Make a hole in the center and insert a match into it. Secure the propeller to the stern.
Paint the finished craft.
It is best to use an aerosol can for this; acrylic paints are also suitable. You can also paint the product with raw or green colors.
Paint the tail number with white paint or a regular corrector. You can also simply print out the numbers. The submarine is ready!
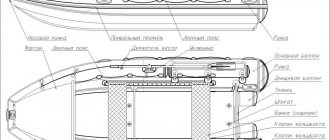
Layout
The boat measures 60cm in length and 7.5cm in diameter. Inner diameter 71mm. The plugs extend 2.5cm each.
Inside the case is divided into “compartments”.
- 1 - battery and receiver
- 2 - tank
- 3 - pump
- 4 - servos and speed controllers
- 5 - main motor
The tank must be in the middle so that the boat sinks horizontally (there is no trim).
The fastening elements are made of 5mm thick porous PVC sheet. Then they are tightened on iron pins located along the body. The rear plug should also be secured to studs to ensure the rigidity of the assembly with the motor and steering rods.
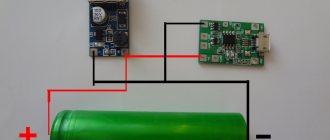
Initially, stroke controllers were used to control the motor and pump. But their reverse is much slower than forward rotation, which is not convenient for the pump. During testing, I did not install a separate UBEC power circuit and used the built-in 1 amp BEC. Because I received a defective servo that jammed, at that moment the current jumped and burned the entire regulator. Maybe not all of it, but it no longer worked as expected. So I burned 3 regulators and decided to make a circuit with micro switches. It is very simple and provides symmetrical forward/backward rotation. But it’s still better to install a 3-amp power stabilizer.
The 550 series motor is redundant for a model of this size; you can get a smaller one. It is attached with screws to a special bracket to the rear plug. Connection to the shaft through a brass coupling.
It is also worth installing Fail-safe modules on the pump and motor channels. The engine is set to turn off, and the pump is set to purge the tank.
All drawings are on a separate page.
Sealing
We need to ensure the tightness of 3 elements:
- robust housing
- motor shaft
- steering control rods
Durable Case
often called WTC (Water Tight Cilinder) or WTC (Water Tight Cilinder), it is a plastic pipe with a diameter of 75 mm and a length of 600 mm. Cylindrical plugs with a groove for the sealing ring are inserted into it at both ends. The pipe is bought at a plumbing store, the plugs will be made from several layers of PVC sheet 4-5mm thick, and the rings will be ordered from China (how to buy on Aliexpress is written at the end of the article).
The plug will consist of 6 layers. The internal diameter of the pipe is 71 mm, the thickness of the sealing ring is 3.5 mm. Then the main sheets have a diameter of 70mm, the small ones are 65mm and the outer large one is 75mm. It is very important and very difficult to maintain the alignment of the sheets so that the rings are pressed evenly against the pipe. For centering, a bolt with a diameter of 6 mm (or a construction pin) is used. First, we drill a hole, then we draw a cylinder of the required diameter and cut it out with a jigsaw with a margin. We bring it to the desired diameter on the axis clamped in the drill. I sanded it with sandpaper on a block.
We also glue the sheets on the axis, trying to maintain perpendicularity. The best adhesive for PVC “Moment-Gel”. Titan doesn’t take it, nor does the usual “Moment”. That's it, put on the rubber rings and go test for leaks.
Later I printed the plug on a 3D printer - I really liked the accuracy. Now I plan to print all the details. More on this in a separate article.
Deadwood
This is the name of the unit that ensures the tightness of the motor shaft. Bearings are soldered into the ends of the outer pipe. The shaft is inserted and a thick lubricant (for example lithol) is driven into the pipe. It must be added sometimes, because... the water gradually washes away.
I bought shafts and bearings on Ali, copper tubes and lubricant on the construction market. I found bearings 3mm internal and 6mm external diameter. Accordingly, we buy 3 mm stainless steel shafts, and a copper tube with an internal 6 mm (the external one turned out to be 8 mm). It is necessary to buy special shafts; ordinary wire is not symmetrical, and there will be beatings. First we solder the pipe, then drill a hole in it. For soldering you will need acid and a 3rd hand