Origami paper transport is especially attractive to children, so most schemes are aimed at ages 6 and up. You can fold everything: from a cruise ship to military equipment. The art of origami fully reflects the diversity of modern transport - air, water and land. There are two-dimensional models for cards or decorative tags and three-dimensional ones for pendants or games.
Features of cardboard crafts
To make cardboard crafts with your own hands, you can take ready-made diagrams from the corresponding Internet sites. But it’s much more interesting to use your imagination and invent something of your own.
In addition to cardboard sheets, you should stock up on multi-colored paper and PVA glue. You will also need markers and colored pencils.
funny bird
Any child will love this bird. There is nothing complicated in this work - even a preschooler can handle it. Here are the instructions:
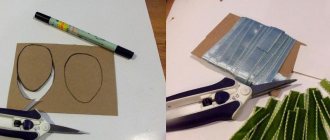
- Cut out all the details and color them to your liking.
- After the paint has dried, coat the blanks with hairspray for greater brightness.
- Glue each element of the work (eyes, head, wings, tail, body) with double-sided tape.
- Glue a wooden stick on the back side and stick it into a stand made of a block of wood or salt dough.
Step-by-step production of a trolley
To make a garden cart at home, you need to prepare the following parts and tools:
- The main material is plastic, wood, sheet iron.
- Fastening mechanisms.
- Wheel pairs.
- Wheel mounting axles.
- Auxiliary accessories: handle, guide structures, stop.
You should also stock up on ready-made drawings, but the design of the device will depend on the chosen model. The entire construction process can be divided into several stages:
- Selecting dimensions and creating a drawing.
- Arrangement of frame installation.
- Chassis installation.
- Handle attachment.
- Arrangement of the main building.
Each stage is performed sequentially, and with reference to the instruction diagram. As a master class, it is worth considering the instructions for creating a wooden cart for gardening.
Dimensions and drawing for trolley
Its stability in further operation depends on the size and shape of the trolley. The wheelbarrow has standard dimensions with the following parameters:
- The diameter should not exceed 60 cm.
- The maximum length of the frame installation is 100-110 cm.
- The height of the body is in the range of 55-60 cm.
If all size requirements are met, the garden wheelbarrow will be as stable as possible, even without taking into account the additional support.
Arrangement of frame installation
Previously, wooden blanks are subjected to special treatment: impregnated with antipyretic, antiseptic and antifungal solutions. This step will significantly extend the life of the structure, increase resistance to moisture, and protect against pests. The surfaces can also be further sanded using sandpaper. To fasten the frame, the bars are connected at the joints, using screws and metal corners to further strengthen the installation.
Houses
Hand your baby a strip of green cardboard, having previously folded it in a zigzag. Then let him cut out building elements from colored cardboard sheets and glue them to the given blank. He will also need to cut out the windows.
If you glue colored paper to the back of the house silhouettes, you can make the windows appear transparent.
Pecking chicken toy
This MK was taken from here https://knittochka.ru/bumaga/igrushki-iz-kartona-svoimi-rukami.html. All parts of this toy are flat. Made from thick colored cardboard. The main connections are movable, made using wire loops or spirals.
Templates of the main parts are transferred to cardboard of the appropriate color and cut out along the contour. Decorative and finishing elements are made of colored paper. All parts of the toy are connected to each other according to the pattern. Silhouette figurines of chickens are decorated with overlays made of colored paper or cardboard. “Undereyes”, breasts and wings are decorated with cut fringe and glued to the silhouette.
The basis of the toy is two parallel slats (slats) made of thick cardboard, onto which “Pecking chickens” are attached using movable joints. The holes in the movable joints are pierced with an awl and fastened with wire loops.
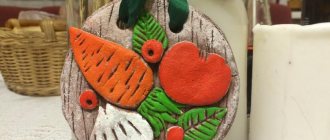
Kitten with a heart
Another easy DIY cardboard craft for children is a cat holding a heart in its paws. It is created simply. You need to cut out the figure of a cat from cardboard, cut the legs with a stationery knife, and place the silhouette of a heart in the resulting slits.
Such a thing could be a great gift for Mother's Day or March 8th. On the inside you can attach a leaf with a congratulatory text.
Racing car
Racing cars are often confused with sports cars. But if the latter, despite the name, are intended for ordinary roads, then the former are created exclusively for professional competitions. The designers' task is to maintain the stability of the racing car on turns and when driving at high speed. Therefore, the appearance of monoposts is noticeably different from sports cars and, especially, city cars, which is also reflected in origami models.
To create one of them you will need ½ sheet of A4 size.
Step-by-step instruction:
- Fold the rectangular sheet in half lengthwise. We bend the upper left and lower right corner along the dotted line. Let's reveal.
- We repeat the same action for opposite sides.
- We bend the right and left edges “mountainwise” along the crosshairs outlined in steps 2 and 3.
- Fold both sides of the workpiece into a “Double Triangle”.
- We bend the upper and lower edges towards the central axis.
- Fold the triangle on the left, as shown in the diagram. Rotate the workpiece 90° clockwise.
- Raise the lower part. We tuck the top of the triangle under the valves indicated by the arrow.
- Make a fold along the dotted line.
- We fold the same part in half.
- We lift it vertically.
- We do the same with the side triangular “ears”.
- The monopost is ready.
“Puff” cardboard products for children 5-6 years old and older
Such crafts look much more impressive. At the same time, they are created quickly and easily. To get a “layered” product with a 3D effect, you need to remember the principles of creating paper appliqués. The simplest example is a layered heart made from multi-colored cardboard hearts. The volumetric effect is provided by an increase in the thickness of the layers.
Do you want something more original? Make an Indian mask or a panel in the style of ethnic designs. Here you can use unnecessary cardboard packaging.
Using the technique of volumetric layers, you can make various paintings. The simplest option is animals. You can take any applique stencil as a basis and, using it, cut out the necessary details from cardboard. Next, you need to place them on different layers and cover them with gouache, not forgetting to draw accents. At the end, the work should be coated with hairspray - this will add depth to the color.
Having mastered in practice how to make crafts from cardboard with your own hands using the living volume technique, you will be able to create a real work of art that will win at any exhibition.
Cars
Cars are the most popular form of transport both in life and in the art of origami. For several centuries, humanity has strived to realize the dream of self-propelled vehicles. The first invention described in historical documents dates back to the 17th century. In 1672, the Flemish monk and missionary Ferdinand Verbiest built a toy steam cart for the Chinese emperor, which was fueled with coal and could move independently for an hour. A century later, Russian engineer Ivan Kulibin developed a velomobile - a self-propelled carriage with a pedal mechanism, equipped with a gearbox, flywheel and rolling bearings. The first gasoline-powered car was invented by Karl Benz, the founder of the world-famous company that bore his name.
The first horseless carriages were slow and clumsy. However, since the beginning of the 20th century, when the automobile industry became one of the leading industries, much has changed. And today's minivans, sedans or crossovers bear no resemblance to the mechanical carriages that drove along city streets in the past. Among the proposed models of origami paper transport, modern designs also predominate.
SUV
For the car you will need a 15x15 cm square and a marker to draw the details.
Step-by-step instruction:
- We outline the central axes: vertical and horizontal. To do this, bend the sheet in half in both directions and open it.
- Raise the bottom edge to the central axis.
- Bend the right corner along the dotted line.
- We repeat the same action on the left.
- Fold the figure in half “valley”.
- Fold the bottom edge up.
- Fold the right corner diagonally.
- Turn the workpiece over to the front side.
You can additionally bend the vertices of the triangles representing the wheels and the hood protrusion.
Second option:
This original SUV model is folded on the basis of the “Double Triangle”.
- We place the basic figure with the open side down. We lower the top to the base.
- We reveal the layer closest to us from the inside.
- Flatten the folds. Turn the product over.
- Raise the bottom edge. We turn the corners in the direction of the arrows, making reverse folds. In this case, the wheels of the car are formed.
- We lower the back part and repeat step 3 for it.
- We bring all the parts indicated by the arrows inside.
- We outline the headlights. Remove the sharp protrusion of the wheel.
- We open the folds from the inside where the headlights should be. Flatten it.
- The SUV is complete. Thanks to the double layer, the figure can stand on its own.
Hatchback
Roomy, maneuverable and stylish – cars with a short rear overhang confidently top the popularity charts. The hatchback can be called a favorable compromise between a sedan and an SUV, combining the advantages of both. And since many positive qualities have made this car a universal favorite, a collection of origami vehicles would be incomplete without it. A hatchback model is made from a 15x15 cm sheet of paper.
Step-by-step instruction:
- We outline the horizontal axis.
- Fold the top and bottom edges 1/3.
- We fold the corners obliquely, as we did in previous models.
- We turn in the tops.
- Fold the figure in half “valley”.
- We put the right corner inside.
- On the left side we make a cutout in the shape of a car hood.
- We draw windows and doors.
Sedan
A classic passenger car is assembled using the origami technique using the accordion principle. Folding begins not from the wrong side, as in most models, but from the front side.
Step-by-step instruction:
- Fold the sheet into the basic “Door” shape.
- We turn away the top and bottom edges as shown in the diagram.
- We bend the workpiece in half “mountain”.
- We bring the right and left corners inward, making a reverse fold. In this case, both peaks should be visible from the outside. These are the wheels of our sedan.
- We remove unnecessary fragments using the arrows.
- We bend the corners on the left, then open them from the inside and flatten them. Thus we get car headlights. On the right we simply make reverse folds. Rounding the wheels.
There is another sedan model with a more complex design. But experienced craftsmen are quite capable of handling it:
Volumetric folding crafts
Do-it-yourself three-dimensional folding cardboard products are also relevant today. They come in varying complexity.
Garden design options
The choice of basis for the manufacture of self-propelled garden wheelbarrows today is quite extensive for the buyer. The most popular and practically significant wheelbarrow options are:
- Wooden carts. An excellent natural material that even an inexperienced craftsman can work with.
- Metal. Pipes of sufficient diameter for the frame, sheet iron for the body. The only requirement is pre-treatment of surfaces and joints with an anti-corrosion solution.
- Plastic. Old PVC pipes are used for the frame, and plastic panels are used to form the body. The material is relatively inexpensive, and PVC tubes with corners allow you to make an original folding cart.
- Combined models. The most common version of do-it-yourself designs. Metal pipes are used for the frame, and moisture-treated wood acts as the basis for the body.
Cardboard crafts from volumetric puzzles
If you don’t know what to do with your child, invite him to assemble a three-dimensional puzzle. No glue is needed to create such crafts. They are assembled like a construction set: one flat element is inserted into the slot of another.
Here is the work “Baby Elephant”. Looking at the figurine, you can see a slot in the animal’s neck - the plane of the ears is inserted into it. This is one of the simplest ideas. More complex puzzles are made using a similar principle.
Game crafts made from corrugated cardboard
Do-it-yourself crafts made from corrugated cardboard include themed sets for games. You can make kitchen appliances - a microwave oven, an oven, a refrigerator. As an addition, it is recommended to make mock-ups of the products. So children can try themselves as cooks and cooks. Your child will remember all his life that happy day when he made all this game paraphernalia with you.
It is enough to look around and see what surrounds you. Any object can be embodied in cardboard. This is an excellent material for handicrafts, since there are no limits to the imagination of the master.
Types of garden wheelbarrows
Depending on the number of wheel pairs on the structure, the following types of wheelbarrows are distinguished:
- One-wheeled car. This design is less maneuverable and stable compared to two-wheeled models. The wheel is located centrally at the front of the cart, and a heavy handle and stop are used as a counterweight.
- A wheelbarrow with two wheels. The most common model. The symmetrical wheel pair creates additional support, so this type of construction is particularly stable.
- A wheelbarrow with four wheels. Not a very common model of garden cart. Two pairs of wheels create maximum support and allow you to work with heavy and bulky loads.
A significant disadvantage of wheelbarrows with two and four wheels is the need to modify garden paths. The axles of such wheelbarrows are much wider than a one-wheeled cart, so the width of the tracks must meet the requirements.
Pros of cardboard crafts
As children age, their interests change. If a child is happy with one toy at one or two years old, then, as he gets older, he will want to expand the range of items for games. For the family budget, such a desire of the child may not be possible. The solution is to make crafts from cardboard. Advantages of such products:
- exciting pastime;
- low cost of source material;
- saving the family budget;
- unusualness;
- no need to have work experience.
In addition, such activities contribute to the formation of children's imagination and imagination, as well as the development of fine motor skills, patience and perseverance. To create an interesting craft from cardboard, you only need to have desire and free time.
If you like to spend time usefully, then be sure to take a closer look at works made of cardboard. Be sure to involve your child in this matter. It's more interesting to work in a company. In addition, joint creativity brings people together. Invite your child, for example, to create decorations for his room. Time will fly by quickly and fun.