Popular publications
latest comments
This idea will appeal to all lovers of indoor plants. By bringing it to life, you will not only decorate your interior, but also free up precious space on the windowsill. We bring to your attention a master class on making hanging flower pots.
Hanging planter
YOU WILL NEED
- a piece of knitted fabric (you can take an old T-shirt)
- scissors
- roulette
- a flower pot
- metal hook
PROGRESS
- Cut the fabric into 8 identical strips at least 4 cm wide.
Tell your friends how to make a hanging flower pot , they will also want to make such a useful thing.
Did you like our site? Join or subscribe (you will receive notifications about new topics by email) to our channel in MirTesen!
Tags
No more space on the windowsill? This method will be interesting to those who cannot place their favorite flowerpots even on the floor!
I really like the idea of vertical gardening . And all because this method helps to save space when there is a lack of space and frees window sills and other horizontal surfaces from green spaces, and it also looks unusual, stylish and very beautiful.
And today the editors of “So Simple!” invites you to learn interesting ideas on how to make beautiful hanging flower pots using simple and affordable materials. Now this is not a balcony, but a real Garden of Babylon!
Plastic buckets
Instead of a bottle, you can take a mayonnaise or ice cream bucket. You won’t have to cut it and sand the top edge, which will significantly speed up the production of an elegant pot. Yes, and there is already a handle for hanging.
Note!
Macrame: diagrams, interesting projects and detailed descriptions of making crafts
- Crochet amigurumi - examples of how to make a beautiful toy with your own hands (75 photos)
Coffee topiary: step-by-step master class on how to make a small decorative tree from coffee beans
DIY hanging planter
- And I’ll start, perhaps, with the macrame technique , which, in my opinion, is most suitable for creating hanging flowerpots.
Flowerpots using this technique can be either very simple, which can be made in literally 10-15 minutes with your own hands, or complex - the result of many hours of work.
Therefore, I suggest you practice on easier ones first, honing your skills, and then move on to more complex ones.
Hanging pots made from metal baskets can be immediately filled with substrate, but in order to prevent moisture from passing through, coconut fiber must be laid on the bottom, and this will only improve the appearance of the pots.
Great idea for crochet lovers!
An old hoop, good glue, an unnecessary bowl - and in 20 minutes you are the owner of such an unusual and very stylish flowerpot.
To do this, place half of the hoop vertically, place a bowl inside horizontally and mark the points of contact on the hoop. Glue is applied to them, a bowl is placed and left until the glue hardens.
To create hanging planters, you can use a variety of materials available around the house: baskets, buckets, bottles and even old balls!
Here are some simple master classes on macrame weaving techniques.
I love these options!
And this is not even a flowerpot, but a real shelf for flowers! Arm yourself with an old cutting board and strong threads, and to prevent the flowerpots from falling and the board slipping out, make small grooves along the edges of the board or secure the threads with a drop of glue.
In my opinion, this is an incredibly simple and at the same time quite elegant idea!
Read also: Grapes ornamental trees and shrubs
This hanging planter will wonderfully complement your home interior. It’s quick and easy to do, and it won’t cost you a lot of money on materials either.
To see the process of weaving flowerpots using the macrame technique, I suggest watching this video.
This is a great idea for a hanging pot for orchids! A decent result, but everything is quite simple and easy, isn’t it?
Editorial Board
I also suggest you familiarize yourself with 6 wonderful ideas for using macrame products in interior design. I can’t stop looking at this openwork splendor!
What do you think about these great ideas? In my opinion, this is one of the most optimal solutions for landscaping an apartment with a small area. Although for a large home, especially for lovers of eco and boho styles, this is what you need!
Share these inspiring flowerpot planter with your friends on social media.
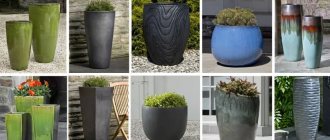
Hanging flowerpots, along with flowerpots, have long been used in landscape design and are popular not only with gardeners, because thanks to them you can easily solve several problems at once. You will not only be able to decorate your summer cottage and bring to life the most original ideas, but also easily cope with the lack of space. In addition, such products can be used not only in a country house, but also in a city apartment.
Original table flower pots made from tin cans
You can create an original mosaic flowerpot from an ordinary tin can. To do this, the container is coated with a plaster solution, on top of which a mounting grid is laid. Next, the mosaic itself is performed. To do this, you can use pebbles, pieces of tiles, glass or shells. After the pot has dried, all voids should be masked with grout.
Do-it-yourself low pots for flowers can be created from tin cans and wooden clothespins, which are attached around the circumference of the container. The decor can be left in its original form or painted in different colors. In a similar way, you can decorate a tin can with colored pencils, tying it with twine or ribbon.
The tin can can be slightly dented, so the pot will look non-trivial
The tin can can simply be coated with different acrylic paints. In this case, the container may be in its original form, or the jar can be artistically dented. Another original solution would be to tie the container with twine or colored thick threads around the circumference of the product.
A pot of flowers woven from twigs looks unusual and original. To make it you will need thin, even twigs, a skein of twine, a piece of burlap, a cylindrical tin can and glue. The rods are intertwined and tied with twine according to the mat principle. The jar is lubricated with glue, onto which the burlap is fixed. After complete drying, the product is wrapped in a mat, which is secured with twine.
Pots made from tin cans painted in different colors will add color and mood to the interior
Creation methods
Burlap plant pots
From burlap or any other dense fabric you can create flowerpots in the form of pockets for small plants. To do this, cut out two identical square or semicircular parts and sew them on three sides; you can also shape the product using wire. Such pots look great on the fence of a country house or balcony.
Large shells can be used as hanging planters
You can also make an original flowerpot or hanging plant pot from coconut shells; to do this, make several holes, drain the juice and remove the pulp. If you cut a coconut in half, you get two products at once.
Photo source: www.happymodern.ru/kashpo-dlya-cvetov-svoimi-rukami
Products can be made of wire or forged metal
There are many different variations
Photo source: www.nashadacha.info/topics/lyubitelyam-podvesnyh-kashpo-dlya-sada
Caring for plants in hanging structures
- Hanging flowerpots without a tray can prevent stagnation of moisture in the soil, because the root system does not rot, but in this case there may be a lack of moisture, especially if the plant is located in a sunny area. If there is a tray, do not get carried away with watering and install the plant in the shade.
- The soil in hanging flowerpots and flowerpots should be fertilized periodically , because the minerals present in it are gradually washed out.
- Heavy and clayey soil substrates that are prone to rapid compaction are not suitable for hanging planting containers , as they can lead to insufficient air permeability , which will also impede the passage of moisture. To avoid this, add expanded clay or vermiculite to the soil.
- With vertical gardening, the soil dries out much faster, so the plants need to be watered much more often, and you must remember to remove the water that accumulates in the pan. Well-settled or boiled water is best for irrigation.
Read also: What can be done with mushrooms for the winter
Planters made from sphagnum fibers and wicker baskets
Necessary materials:
- woven wire basket;
- sphagnum (peat moss);
- a piece of polyethylene.
Stages of work:
- Soak sphagnum fibers in water (since it is used in both construction and gardening, you can buy it in the store), squeeze it lightly and place it on the bottom of the basket.
- Place polyethylene on top, after making several holes in it, it will help retain moisture.
- Fill the rest of the space with soil, then you can safely plant flowers.
Photo source: www.nashadacha.info/topics/lyubitelyam-podvesnyh-kashpo-dlya-sada
Pallets for semi-trailers
Pallets for semi-trailers pinned post
Pallets for semi-trailers photo updated in the community
Pallets for semi-trailers pinned post
Pallets for semi-trailers pinned post
Pallets for semi-trailers pinned post
There is airbrushing for taste and color
Our artist will create a drawing of any complexity. Your car (semi-trailer) will attract the attention of others.
Pallets for semi-trailers pinned post
Dima Kiselev
Pallets for semi-trailers pinned post
Truckers
“No one needs”: a Tyumen truck driver, whose truck was blown away by the wind on the highway, lives in the tundra for three days
A man cannot return home because he does not want to abandon the expensive truck he bought on credit.
A truck driver from Tyumen had a terrible accident on the northern highway and has been living in the tundra for three days. Dmitry Krivoruchko said that the truck overturned due to strong gusts of wind. Show in full. There were no casualties, although the driver suffered a stroke after the incident due to the stress he experienced. The man cannot leave the car and go home to Tyumen, since the heavy truck belongs to the bank, and there is no money to buy it. Now the driver’s family is urgently looking for help from caring people who can tow his truck. But so far no success.
Wicker flower pots
You will need:
- 10 long pieces of rope;
- several buttons;
- metal ring.
In this case, the flower pot will be braided like macrame.
Manufacturing process
Step one
1. Fold the pieces of rope in half and connect them with a simple loop.
Step two
2. Select two loops located next to each other and fasten their adjacent ends with a button (it is better to place the buttons themselves at a distance of 5-7 cm), when fastened, lay the threads crosswise and begin to weave the next row, maintaining the same distance.
Step three
3. You can make as many similar rows as you like; if you decide to complete the work, take the loose ends and tie them together.
See what other weaving patterns can be used:
Photo source: www.nashadacha.info/topics/lyubitelyam-podvesnyh-kashpo-dlya-sada
Leather plant pots
Required materials:
- pure water;
- tracing paper, as well as 4 pieces of strong rope (or leather laces);
- leather paint (optional);
- a piece of leather;
- stationery knife for cutting and pencil.
Work progress
- Prepare a template on a sheet of tracing paper, then apply it to a piece of leather to select a location for future markings.
- Soften the skin with a sponge soaked in water so that it is well saturated with moisture, this will help simplify further work.
- Place the template on the previously selected area; for greater convenience, you can secure it with tape; now trace the lines marked on the tracing paper, so your design will be imprinted on the surface of the leather.
- Cut out the leather according to the resulting pattern.
- Once the leather is dry, you can paint it any color you choose (you need to apply the paint with a sponge), but this is not at all necessary. After painting, as it dries, give the product a three-dimensional shape, gradually pulling out the cut out elements.
- Make four holes at the top at the same distance from each other and thread four ropes or leather cords through them, tie a knot at the end of each of them.
- Now you can decorate the resulting product with any materials at hand (rivets, tassels, buttons or beads).
Photo source: www.kallibry.ru/kak-sdelat-kashpo-dlya-cvetov-svoimi-rukami/
Handy materials for decorative items
The individuality and special attractiveness of the interior can be emphasized with the help of original flower pots, made independently from old household items.
By combining things that have lost their original relevance with various building materials and types of finishes, unique works of home creativity are obtained.
Among the various available tools for making flowerpots, you may need construction waste such as cement and gypsum mixtures, tiles, clay, wood, plastic pipes and parts, as well as various ropes and coarse fabric scraps.
The finished container for flowers can be decorated with pieces of tiles, tree bark, moss, shells, processed leaves and flowers from the herbarium, ribbons, fragments of porcelain dishes and other decorative elements that will be at hand in the process of expressing your imagination.
Hanging structure for wooden flowerpots, master class
Such a stand allows you to solve the problem of placing flowers, and most importantly, you can make any number of tiers depending on your preferences.
You will need:
- wooden boards;
- rope and metal ring;
- saw, drill and sandpaper;
- paint (optional).
Process of creation
- Cut out the required number of square stands from the boards to determine their desired size, take one of the flowerpots you want to place, turn it upside down and make marks along the outline. If the volume of the flowerpot gradually increases upward, in the center of the already marked circle, draw another one with a smaller diameter and cut a hole along it.
- Using a drill, make holes for the rope in the corners of the sawn stands, then go over the surface with sandpaper; after the stand, you can paint or varnish. The flowerpots themselves can also be painted at your discretion.
- To connect the coasters, take four strong ropes and thread one through each corner hole, tying a knot at the end.
- Now, as you add the next tiers, tie knots under each of them, measuring the distance you need between them, it is very important that all tiers are strictly parallel to each other. The advantage of such a stand is that excess water when watering will fall into the flowerpot located below ; you will only need the tray for the very last one. If desired, water-absorbing material can be placed at the bottom of each flowerpot.
- It is advisable to glue the pallet of the last pot to the surface of the stand to prevent it from falling.
- Hang the finished structure by pulling all the ropes through the metal ring and tie a strong knot.
Read also: How to make macaroni and cheese casserole
Photo source: www.kallibry.ru/kak-sdelat-kashpo-dlya-cvetov-svoimi-rukami/
Several simple solutions for decorating flower pots
To get a beautifully designed flowerpot, you don’t have to create the product from scratch. You can transform an old pot with your own hands using one of the techniques.
Those who know how to draw beautifully can make a unique designer item by painting a flower vase with acrylic paints with their own hands. The work can be done together with children, resulting in unique and original products.
You can knit a beautiful thread cover for a flower pot.
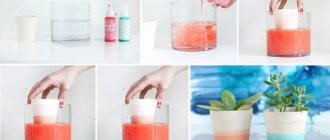
Using nail polish, you can create an interesting flowerpot design. To do this, pour several bottles of different colors into a bucket of water and dip the pot in the resulting mixture for a few minutes.
With the help of shells and pebbles, you can bring marine motifs to life. To do this, the surface of the pot and decoration elements must be degreased. The shells are fixed to the flowerpot using quick-drying glue. The resulting voids are filled with sand, which is applied to PVA.
You can decorate flower pots with your own hands using mosaic techniques. To do this, use buttons, pebbles, coins, broken glass, and elements of ceramic tiles. The decor made from wood rings of different diameters will look original. It is recommended to glue or fix the elements with a plaster solution that coats the pot.
You can also seal the gaps with cement mortar, to which paint should be added to obtain a more attractive appearance of the finished product. The composition is applied using a brush. Excess solution that gets on the shells should be immediately removed with a soft cloth. The final stage is to coat the entire product with varnish.
As decoration, you can use eggshells, which are pre-disinfected and dried. It can be white, brown or another color. The shell is glued to the flowerpot with the convex side. Varnish is applied to the finished product.
Important! It is convenient to correct the position of the shell elements using a toothpick or a needle so as not to damage the integrity of the products.
The flower pot can be painted or painted with bright colors
How and how to decorate a flower pot with your own hands
A common technique for creating flower pot decor is decoupage. To do this, you will need special napkins with beautiful patterns, glue, white acrylic paint and varnish, a flat brush and a pot. White paint is applied to the surface of the flowerpot in several layers. The top layer should be removed from the decoupage napkin. The design is transferred to the surface of the flowerpot and fixed in it using an adhesive composition. The canvas is leveled using a brush. After complete drying, the surface is varnished.
How to decorate a flower pot using textiles? For this you can use lace, scraps of fabric, threads, laces, and ribbons. The elements are fixed with PVA glue, creating original compositions. Fragments of burlap are glued in the same way. The combination of two textile options looks original. The composition can be supplemented with beads, beads and braid. Using the crocheting or knitting technique, you can create cute cases for flowerpots, which will bring coziness and comfort to the atmosphere.
The decor of a pot made using cereals in the form of buckwheat, rice, pearl barley or millet will look unexpected and original. The base is created from toilet paper, which is torn into pieces and glued to the surface of the pot. Using a wooden stick, you should form folds that are sprinkled with cereal.
Acrylic paints are applied to a completely dry surface. To create decor, you can also use multi-colored beans, peas and pasta, laying them out in unusual compositions, fixing them to the surface with glue.
There are many options for making pots and flower stands with your own hands from scrap materials. Each of them involves a creative approach when creating a product. It is not at all necessary to use expensive materials. An unexpected real masterpiece can come out of old unnecessary things that were about to go to the landfill.
Pot made of copper pipes
For this pot you will need the following:
- two meters of small diameter copper tube;
- small pipe cutter; strong thread or fishing line;
- leather cord or rope;
- flower pot.
Work progress
- Tie a knot at one end of the fishing line, thread the other through 5 small pieces of tube, you should get a pentagon, then thread the fishing line through another 4 pieces of the same size, and then through the tube of the previously obtained pentagon, as shown in the photos below.
- In the same way, create two more pentagons, there should be 4 of them in total.
- Do the second row as well.
- After completing the second row, the structure will resemble a bowl; now, one by one, put long pieces of tubes on the fishing line from five sides, after placing a flower pot inside.
- Connect all the tubes together.
- Take a piece of leather cord or string and attach it to the point where the long tubes meet, then you can tie a knot or use glue to secure the end of the cord. To disguise the gluing area, take another small piece of cord, secure it and wrap it around it.
- Trim off any excess fishing line and cord and hang the finished product.
Photo source: www.kallibry.ru/kak-sdelat-kashpo-dlya-cvetov-svoimi-rukami/
Planters made of wooden slats
You will need:
- wooden slats;
- small nails;
- rope;
- self-tapping hooks.
Work progress:
- Make markings on the slats and cut them into small pieces;
- Lay out six pieces so that they resemble a hexagon;
- Lay the second row on top, slightly shifting the segments, and connect to the first with nails;
- Continue laying out the pieces, fastening the rows together until the product reaches the desired height (it will depend on the size of the pot you choose);
- When finished, secure three hooks at equal distances from each other and tie a rope to them, with which you will hang the flower pots.
Photo source: www.lubimaya-dacha.ru
Photo gallery: + 150 photos for your ideas