Old things that are always available in every summer cottage or country house can be put to good use and turned into not only a practical household item, but also an unusual decoration. In this article we will continue the topic of making products from concrete mortar and cement, but this time we will look at how to create them using ordinary fabric. Such products, unlike pots completely cast from concrete, can be easily moved around the garden, they are light in weight and will also fit perfectly into any design you choose.
Flowerpot made of fabric with a smooth surface
Required material:
- 15% silicate glue;
- a large piece of thick cardboard;
- polyethylene.
Stages of work
- Prepare a solution of cement, sand and silicate glue (in this case it will be used instead of water) and dip a rag into it. For preparation, use fine sifted sand; you can also add a little plaster to the mixture.
- Lay the cardboard on a flat surface and cover it with plastic.
- Remove the fabric soaked in the solution, lay it on top of the film and carefully level it. Place a container wrapped in polyethylene in the center and carefully turn the resulting structure over, the fabric itself should be in contact with the container. You can now remove the cardboard.
- Leave the product until completely dry, after which you can remove the container from the finished flowerpot. If you find any defects, cover the product with silicate glue; if desired, you can add any dye to the glue, this will add brightness and unusualness.
You can also use colored fabrics, as in the photo below, this will add additional variety, and this way you won’t have to waste time on dyeing
Photo source: www.diyprojects.ideas2live4.com
On a note!
- It is advisable to prepare a mortar with cement and sand for each product separately, even if you plan to make several, but it is quite possible to use the remains of the previous one.
- You can prepare a drainage hole in advance, just before lowering the fabric into the solution, fold it several times and cut off a small corner.
- In order to get a flowerpot, use the same manufacturing technique; in this case, there is no need to make a hole in the bottom.
- You can also pour the soil into the plastic bucket itself, then at the end of the work you will not need to remove it.
Types and advantages of cement vases
The plasticity of the cement mortar and the high strength of the hardened material make it possible to create from it products of various shapes and sizes, from modest and simple pots for succulents to huge park flowerpots in the form of an open flower on a high leg and stand. And between them are pots, flowerpots and floor vases for indoor plants, garden flower beds, sculptural forms with recesses for planting flowers, solid fences in the form of a container without a bottom for installation directly on the ground.
But cement vases differ not only in size and appearance, but also in the quality of the solution, the presence or absence of reinforcement, and methods of manufacturing and decoration. There are a lot of them known, and designers often use them. But anyone who is not afraid to imagine and work with their hands can come up with their own version or improve the one they like.
Examples of simple outdoor flowerpots Source birchhilldam.com
Any plants - both indoor and garden - feel much better in a container made of concrete rather than plastic or metal. It does not heat up so much under the sun and retains moisture in the soil well. These flowerpots are especially convenient outdoors:
- they are durable, resistant to mechanical stress - shocks, scratches;
- concrete does not corrode and is not destroyed by humidity, frost, or sunlight;
- In each separate decorative container you can pour a soil mixture of the composition that is necessary for the plant grown in it;
- flowerpots, if they are not too bulky and heavy, are mobile and allow you to modify plant compositions on the site, transfer individual specimens to a warm place when cold weather sets in;
- they can be given exactly the shape that best fits into the landscape design.
This composition is suitable for a site in a rustic or eco-style Source kontakt-keramika.ru
The easiest way to make flowerpots with your own hands is from cement and fabric, and the most difficult to make are sculptured products, but this technique allows you to create the most interesting and unusual containers from antique amphorae to animal figurines.
Flowerpot with print
The principle of making such a flowerpot will be the same as in the case of creating a flowerpot with a smooth surface. The only difference is that paper with a pattern will be used here (it should not be glossy) or printed fabric.
Scheme of work:
- cover the cardboard with film and choose the place where the print will be located, grease it with silicate glue, put a piece of fabric or paper on top and also cover it with glue, leave everything for 10 minutes;
- lay out the cloth soaked in the solution, place the bucket in the center and turn it over, check that there are no creases at the bottom of the flowerpot;
- leave the product until completely dry.
Photo source: www.pinterest.com
On a note!
- If you want to create a flowerpot with high sides, use a rectangular shape.
- For sharp, symmetrical edges, shape the material into a square shape.
- If you prefer smooth lines, carefully cut off the edges, then they will turn out rounded.
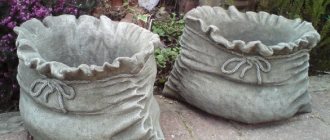
Decorate the finished product with various fabric elements
Instead of fabric, you can use burlap; adding flowers along the edge will help you create an original design.
Photo source: www.pinterest.com
What you need for creativity
The set of materials and tools will differ depending on the chosen method of making a flowerpot.
Solution
The main ingredients for preparing the solution in all cases are grade 400 or 500 cement, sand and water. Their proportions vary depending on the consistency needed for the job. As a rule, they take 2 parts cement and 3 parts sand, and the density is set by adding more or less water.
For example, to pour into a mold, the solution should have the usual consistency of thick sour cream. For sculptural modeling, a more stable, non-flowing mixture will be required, and a vase made of cement and fabric on a bucket can only be achieved using a liquid solution that can completely saturate the fabric.
The consistency of the solution is selected in accordance with the manufacturing technology Source buy-brick-moscow.rf
The smaller the size of the pot, the more uniform the sand should be, so it is sifted to remove large inclusions. And vice versa: it is better to make large containers with thick walls from concrete with a large filler - gravel or crushed stone. Expanded clay is also suitable, which will also reduce the weight of the product and make it more mobile.
See also: Catalog of companies that specialize in the reconstruction and rebuilding of houses
Available materials
It is not at all necessary to have special tools and ready-made molds to make garden or indoor vases from cement. If you have empty plastic cylinders and canisters, old buckets and basins, unnecessary glass jars and bottles, they will all serve as molds for future products. In addition, unique shapes can be made from cardboard, plywood, foam plastic or scrap boards, creating original frames according to your own drawings and sketches.
Thick rubber gloves, worn-out shoes, bags, suitcases, balls, children's toys, old towels, bags, plastic boxes, baskets can also be used.
Decorative flowerpots from old things Source segodnya.ua
In addition, you will probably need the following auxiliary materials:
- polyethylene film;
- wire;
- plastic or metal mesh for reinforcing large products;
- short pieces of plastic pipes or wooden dowels for making drainage holes;
- oil or other lubricant for treating the mold before pouring concrete.
To prevent the solution from sticking to the mold, you can spray it with WD-40 Source userapi.com
Video description
How to make a vase from cement and waste fabric, watch the video:
Method 2 - from various containers
There are a great many options for making flowerpots using containers of different sizes. The algorithm is like this:
- select two containers so that one fits into the other, and between them there is free space of sufficient thickness for the walls of the pot;
- containers of larger volume are lubricated from the inside with any oil or special non-stick agents or covered with film;
- the smaller container is treated with lubricant from the outside;
- prepare a solution of normal consistency - not runny, but not too dense;
- a solution 3-6 cm thick is laid in an even layer at the bottom of a large container, depending on the load-carrying capacity of the flowerpot;
- insert a piece of tube of the same length wrapped in film or greased with oil into this layer in the center so that after its removal there remains a hole for water drainage;
- insert a smaller container inside, aligning it with the larger one so that the distance between the walls is the same;
- place a load in it to fix it in the desired position;
- the solution is poured between the walls, compacting and piercing with any suitable rod to remove air bubbles;
Manufacturing process and finished result Source kamburg.ru
How to make a flower bed
Before you start creating a flower bed, you need to think carefully about where it will be located . To install a flower bed with perennial plants, you should choose a place at the entrance to the site, in the garden. In order for annual and perennial crops to grow and develop well, the place must be illuminated and protected from draft winds. Planning involves choosing a site and plants, resolving issues of flower garden design . It is recommended to make a sketch of the future design on a sheet of paper, which will include the dimensions and configuration of the flower bed, and the number of plants.
For the work you will need cement, small crushed stone, sand, plasticizers, coloring pigment, plastic film, thick cardboard, lumber for formwork, tape, a shovel and scissors. The next step is to transfer the contours of the structure to the chosen location : it is necessary to mark the area along the outer and inner sides of the future flower bed, form a trench 15 cm deep and 20 cm wide. The frame is made of chipboard or fiberboard sheets. Pegs are installed in accordance with the contour, which are recommended to be attached with screws to the formwork. For wavy flower beds, plastic is the best option. To fix the frame from the outside, supports are provided . To obtain a high-quality solution, it is necessary to observe the following proportions: sand (4 parts); cement (1 part); fine crushed stone (4 parts); water. The solution is poured carefully and evenly . After the solution has completely dried, the frame is removed. At the end, the flower garden is filled with fertile soil and decorated with ornamental crops.
Video description
An example of making a flowerpot from a stocking and a tin can can be seen in the video:
Method 3 - sculptural
This method of making a flowerpot from cement is quite complex and requires artistic imagination and experience in sculpting and carving.
Experienced craftsmen use wet fine sand as the basis for creating the mold. It is poured into a suitable container, compacted thoroughly, and then the container is turned over onto a flat surface and removed. If you made sand cakes as a child, then you understand the technology. After the concrete has hardened, the sand can be easily removed from the flowerpot.
The resulting Easter cake is carefully doused with the solution and spread with a spatula over the entire surface. It is important to choose the correct thickness of the cement mixture. When this layer has set, prepare a thicker solution and begin decorating the walls. If you have no experience, you can start by simulating masonry, making lumps of different sizes from the mortar, gluing them to the walls and giving them shape. Then the excess mixture is selected between them, forming relief depressions - seams. When decorating, they are highlighted with color.
An example of a “stone” pots Source vkusnahka.ru
Let's sum it up
Instead of buying expensive flower pots, you can easily make your own. This work does not require special precision, skills, or equipment. An old bucket or pot found in the attic can start a new life as an unusual flowerpot. Concrete pots look good in the garden and are durable. Homemade flower pots can be imperfect, and that's the beauty of them. Plants grow well in them and look harmonious in modern gardens. Their small size fits into some modern styles.
Caring for concrete pots is as easy as caring for plastic pots - just wash with water. Homemade pots are not only an easy way to create a functional, original decoration, but also a lot of fun from the work done!
Amphora for the garden. Master Class
Garden design is almost complete without the use of decorative elements. Let's add antiquity to your garden. Let's create an amphora from a plastic bottle using papier mache and cement mortar.
Cut off the bottom of a 5-liter plastic bottle. Remove the handle from the bottle.
Divide the bottle into 8 equal parts vertically (cut strips to the middle of the bottle).
We form a cone from plastic strips. Secure with tape. Wrap tightly with cling film.
We wrap the handles with toilet paper and coat them well with PVA glue.
We wrap it with serpyanka (from fishing line). Fix with polymer glue.
And plus cement mortar for the floors (in the ratio of 1 part cement + 2 parts sand). Or you can use ready-made outdoor tile adhesive.
Add a decorative element - a lizard!
We dry it. Cover it with street putty and sand the product.
I impregnate it with an acrylic primer. We add liveliness to the composition through bright colors. On top we cover the work with a second layer of acrylic primer.
The created composition using amphoras will create a fascinating atmosphere of comfort and relaxation.
Did you like the article? Subscribe to the channel to stay up to date with the most interesting materials
DIY amphora: master class
I admired and admired the amphorae on the Internet, and decided: I’ll do it myself, just think! There are deception things. For example, fireplaces. So why not be a fake amphora? No sooner said than done! Height 67 cm, diameter 30 cm. Well, you already know me! Easy to do. Let's try it together?
So, let's inflate the balloon. We tie it with a long thread. We find a piece of plastic pipe (left after repair). Simply insert the ball into the tube. The end of the thread should hang from the pipe. This is so that later, after piercing the ball, you can pull it out from the inside. Holds itself vertically.
Cut the plaster bandage into pieces. Place a wider cup of water nearby to make it easier to wet the pieces of bandage. The water is at room temperature, never warm. Otherwise, the bandage will very quickly become limp and lose its shape, which makes work difficult.
For convenience, we insert the tube into a three-liter jar and secure it tightly with a towel so that it does not wobble. Immediately seal the joint between the ball and the tube.
After 5-10 minutes (the plaster hardens quickly), we continue to stick around the ball, turning the jar along its axis.
Having finished sticking to the ball, we put a saucer on top (no matter what, because it will remain there), and stick to it, connecting it to the ball.
We estimate the length of the neck.
We saw off the excess length, and at an angle, using a watering can. At this stage, use a long wire or a sharp stick to pierce the ball through the neck of the amphora and carefully pull it out by the thread.
We twist the handle from strong steel wire, and pasting it with a plaster bandage, we attach it to the already dried vessel with the same bandage. We wrap the tube in the same way. We form the neck. I made a thickening along the edge by applying a bandage folded into a roll.
We dilute the dry finishing putty with water until it becomes liquid sour cream. Apply to the entire surface of the vessel. After drying, sand with sandpaper number 180. And so three times.
Here is the finished amphora. The next stage is treatment with acrylic primer (construction). I primed twice.
I applied the pattern with a simple pencil. The pattern was actually adopted from a real antique vase. But she brought in her fantasies. That is, it turned out to be a free copy. Then I went over the finished drawing with putty from a tube.
This process took me two days, since the vase is large, and while painting it I was spinning it on my knees. Therefore, it was necessary for the previously applied pattern to dry well. At the end of the volumetric painting, I went through the primer again.
I painted it with metallic construction paints. Immediately the bronze has an aged color, and then the bronze is brighter. There are different shades of bronze available in stores.
I wrote my logo here again.
The handle also has a pattern.
This was done by the label when I took the amphora to an exhibition dedicated to the Day of the City of Bogodukhov. I am sure that anyone who wants to do such a thing will succeed. Looks like real bronze. You can't tell them apart right away, even up close. I would like my master class to be useful. If someone does it, show me. I'll be glad.
Did you like the article? Subscribe to the channel to stay up to date with the most interesting materials