Even a child of five to eight years old can make this toy with his own hands, if, of course, you show him how to do it and give him the material. Moreover, a soft toy octopus is recognizable in any form, if it has a head with eyes and as many legs as desired.
Octopus
We will need:
- a square piece of plain fabric, preferably one so that its raw edges do not fray: fleece, thin felt, drape, and so on;
- a small ball, a ball, a ball of unnecessary thread or a piece of foam rubber to fill the head;
- scissors;
- beautiful thin braid;
- "eyes";
- small scarf made of colored fabric.
Sequence of work
- Determine the middle of the square flap and place a ball or a skein of waste thread in this place (the “brain” or what will become the insides of the head). Pinch the ends together with chalk or a felt-tip pen.
- Unfold the fabric, straighten it and cut the fringe on all four sides, 6 strips on each side, without crossing the “neck” line. Try to make them the same width. You should end up with a small square with brushes.
- Put the “brains” back into the octopus and tighten the “neck” with a strong thread. You can tie a scarf or bow tie.
- Use scissors to straighten the fringe.
- Make tight braids, tying them with a bow at the end.
- Glue or sew on the “eyes”, draw a smile with a felt-tip pen and tie a scarf.
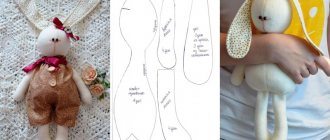
Making basic details
Our octopus will need tentacles and a torso, which will form the basis of the toy. Therefore, it makes sense to start with them. The legs can be made from any material, even from an unnecessary sheet. All the same, the base fabric will not be visible. Please ensure that your child is not allergic to this material.
- From a square meter of fabric you need to create 8 tentacles. Feel free to experiment with the length and width of your legs. Make them in a size that is comfortable for the child.
- If you make the tentacles a little longer than necessary, you can always trim them. You can use a 45 x 8 cm rectangle as a guide.
- Cut 8 such rectangles from fabric.
- Fold the piece in half to create a long, flat strip.
- Sew the two long edges together. You should end up with something like a pipe.
- Turn the fabric inside out and stuff it with filling.
- Sew top and bottom.
- Do the same with the remaining parts.
From threads
The same charming octopus with pigtails can be made from thick threads. It is better to use synthetic yarn or cotton with synthetics. It holds its shape and volume perfectly. The technique for making the toy is shown in the video.
A few additional tips
- Instead of a lump of newspaper, you can use a plasticine ball or Kinder Surprise packaging.
- To prevent the threads from coming apart on the octopus’s head, you can lightly grease the filler with PVA glue.
- To accurately calculate the number of legs, you can do a simple multiplication of 15 cm (length of the octopus) x 3 (number of threads in a strand) x 3 (number of strands in a braid) x 8 (number of braids) = 1080 cm. This means we take a bundle of 9 threads 120 cm and fold it in half three times.
INTERESTING: DIY fabric Christmas tree
Consumables
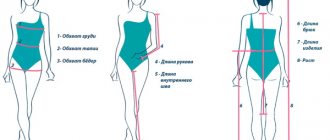
If you are making an octopus for a child, it is better to take his height as a basis. This makes the toy ideal for soothing cuddles. To work you will need:
- Basic fabric for tentacles (about 100 cm, depending on the child’s height).
- Filling: padding polyester.
- Needles or sewing machine.
- Velostat is a packaging material made of polymer foil.
- Arduino is software for building simple automation systems, aimed at non-professional users. The hardware is a set of mounted printed circuit boards that can be copied or added to.
- Alligator clips.
- LEDs.
- Two 1K resistors.
- DF Player Mini.
- Speakers.
- Micro SD.
- Soft fabric like plush for the body (about 2 m2).
Very simple
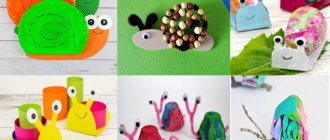
Even the smallest craftsman can easily make this toy. Give your baby a handkerchief or a square piece of fabric, slightly cut on the sides (as in the photo), and a small ball made of anything: fabric, foam rubber, crumpled newspaper, a ball, and so on. Let the child throw a rag over the ball and tie a ribbon around the octopus’ “neck”. Draw the eyes or glue them together.
Examination
Once you have made all 8 tentacles, check that they are not too big or small. It's better to do this together with your child. This toy should be as soft and comfortable as possible.
If the tentacles are the right size, good. You have created 8 strange soft pipes that will become part of your octopus. Now connect them together in 2 pieces. You can do this with threads and bobby pins - the main thing is that they hold together firmly enough. Use strong thread to sew the legs together.
Sock octopus
Required:
- two old socks, maybe different ones;
- any filler;
- wooden knitting needle;
- scissors;
- threads, needle;
- felt-tip pen.
Master class on making an octopus from socks
- Take two socks and draw lines for future cuts on them. From the toe to the middle of the foot, one of the socks will represent the head of the toy. From the heel to the elastic, we divide each sock into 4 parts lengthwise. These will be the tentacles.
- We cut out the details of the toy.
- We sew the legs, leaving them unstitched on one side, and turn them inside out.
- Using a wooden knitting needle, fill all the parts with padding polyester. Carefully sew up all the holes.
- We sew the tentacles to the head and tighten the “neck”. Let's draw a face. The toy is ready.
Cutting and sewing
- along the side sections – 5-7 mm;
- along the bottom cut - 1 cm.
All 6 parts must be duplicated on the wrong side with an adhesive lining on a knitted base.
Then any 2 parts of the body must be sewn together along the side sections with a seam 5-7 mm wide (depending on the processing allowance). The parts should face each other, and the seam itself should be laid along the wrong side of the parts.
For ease of stitching, the parts can be pinned or basted with hand stitches.
After this, the seam allowances must be laid out in opposite directions and set aside at a distance of 1 mm from the seam.
The third part should be sewn and delayed in the same way.
Next, you need to prepare the second half of the octopus’s body, consisting of the remaining 3 wedges.
The two halves of the body must be sewn together, as shown in the photo.
Then you need to cut out 12 tentacle parts (2 for each) from knitwear. Their length and width can be arbitrary. The approximate length can vary from 50 to 60 cm, the width at the widest point is 6 cm, at the narrowest point - 3-4 cm, you also need to add a processing allowance - 7 mm..
6 parts of the tentacles should be duplicated with an adhesive pad.
All parts of the tentacles need to be pinned together in pairs, one part duplicated, the other not, face to face, and stitched along the perimeter at a distance of 7 mm from the cuts.
After stitching, the allowance at the end of the tentacle should be trimmed to a width of 3 mm, so the part will be easier to turn out and will look beautiful when finished.
The prepared tentacles must be turned right side out.
Each tentacle should be loosely filled with holofiber. Due to the fact that one part of the tentacle is duplicated and the other is not, the stuffing will pull the latter more strongly. As a result, the tentacle will have a slightly curved shape, which will allow the octopus to look more realistic.
From white and black felt you need to cut out the details of the octopus's eyes. They can have any shape. They need to be sewn onto the body.
In the middle of each of the 6 wedges (along the lower cut) you should sweep the tentacles of an octopus.
After this, you need to cut out the lower part of the octopus’s body from knitwear - a circle. Its diameter can be calculated based on the circumference formed by the width of the lower parts of the wedges (circumference formula).
The allowance for sewing the circle to the body should be 1 cm.
This part should be manually basted around the entire perimeter onto a layer of thin padding polyester, which will give it rigidity.
From a glove
This version of the sea mollusk involves both 4 legs and 8. It all depends on how many gloves you don’t mind using in your work. Moreover, the gloves do not have to be the same.
- Hide one thumb inside and carefully sew up the mark from it. Wrap the elastic band inside. Fill the remaining 4 fingers and the glove with filler and sew the top closed. To be more convincing, you can pull the glove a little at the base of the fingers. Sew button eyes and mark a mouth. The four-legged octopus is ready.
- The toy made from two gloves is a little more complicated. We also remove one thumb inside and mask its presence. We make an incision at the base of the fingers in a fingerless glove and insert another one inside it, leaving 4 fingers “outside”. We fill all 8 fingers with padding polyester, stitch them at the base, while simultaneously closing the slot. We fill the double glove with filler, first tucking the elastic. We sew up and shape the face.
INTERESTING: Simple DIY fabric toys
Pressure meter
Now that your legs are ready, it's time to deal with the electronics. To do this, you will need a pressure sensor - it needs to be wrapped in a bicycle stat. This material will protect the child from possible electric shock. The pressure sensor should work as follows: when compressed, the LEDs become brighter.
- Take a piece of material measuring 30 x 5 cm.
- Cut two identical pieces of conductive fabric. As a result, you should have pieces measuring 20 x 3.5 cm.
- Place them together and sew them to the velostat.
- Now put the pieces together so that the conductive parts are facing each other.
- Connect the sensor to the positive LED and the other end to the resistor and then to the negative LED.
Doctor Octopus
Doctor Otto Gunther Octavius, a supervillain, star of comics, cartoons and television series, has recently become our children's favorite toy. The doctor has his own biography, his personal and public life. It's difficult to do, but possible. We offer several options.
- A Lego villain doctor, like the one in the photo.
- Doctor Octopus from an ordinary doll with four tentacles glued to the back from scrap materials: polymer clay, boiler tubes, wire wrapped in threads, etc.
Connecting DF Player Mini to the sensor
Connect DF Player Mini to Aurfini. The code below is not only for DF Player, so you can apply it to other LED indicators as well. The code uses the DFPlayerMini_Fast library, which allows you to play and stop sounds. Make sure you have a Micro SD inserted into the module for testing.
Rename your sounds as "001", "002", "003", etc. You only need one sound. In the code below, the analog input from the pressure sensor affects both the LED brightness and the volume of the DF Player Mini. Thus, both parameters can be adjusted using the pressing force. The library can change the volume from 0 to 30, play, pause and loop tracks.
After editing the code, be sure to check if everything works. Modify the code snippet below to make the octopus the perfect toy.
Even a child of five to eight years old can make this toy with his own hands, if, of course, you show him how to do it and give him the material. Moreover, a soft toy octopus is recognizable in any form, if it has a head with eyes and as many legs as desired.
Sewing master class “We sew an educational toy “Octopus” with our own hands”
Probably, many mothers of children have faced the need to sew some kind of educational toy for kindergarten.
For older children, they are usually asked to sew educational books, blocks or rugs, and for very young children - toys that help children develop physically - orthopedic tracks, rugs, as well as all kinds of toys with which you can perform simple physical exercises. One of these toys aimed at developing children’s coordination of movements is the “octopus”. Children happily jump over its tentacles, raise and lower them with their hands, while sitting on the floor.
Even a handicraft mother who is not very experienced in making toys can sew such an inhabitant of the seas. The materials needed for it are simple and affordable, and it is sewn quite simply and quickly.
How to make a soft toy with your own hands
Every mother would like to make a wonderful soft toy for her child with her own hands, but what should those who do not have a sewing machine or special talents in needlework do, especially in conditions of acute lack of time? And even in this case, any mother can make an excellent educational toy with her own hands!
In this master class you will learn how to make a soft toy with your own hands quickly, without sewing or patterns!
A wonderful octopus in a bandana with bows on the tentacles - undoubtedly, this DIY soft toy will delight your baby! And how many benefits for the development of fine motor skills! Tentacle braids with bows will develop your baby's fingers.
The toy, of course, can be “improved.” After all, no one forbids filling the body of a toy with rustling material, and not braiding some of the tentacles, but putting various beads or rings on them? In general, there is a lot of room for imagination, and the labor costs are small.
So, do-it-yourself educational octopus toy:
Simple do-it-yourself soft toys do not require large expenses or the presence of any rare expensive materials. For the octopus toy we will need soft fleece, a ball for the head, pieces of felt for the eyes, thread and grosgrain ribbons. Well, of course, you can’t do without scissors, needles, and a piece of fabric for a scarf (if you want) will also come in handy.
For the base of the toy, take a foam ball; if desired, you can wrap it in rustling material. You can also take a plastic detachable ball and fill it with dry material such as plastic granules or beads, then the toy will also rattle.
Categories
- Toy library (186) Indoor games (46)
- Outdoor games (39)
- Competitions (28)
- Folk (49)
- Educational games (28)
- Applique (43)
- origami 4-7 years (35)
- Master classes. Folk dolls. (69)
- Holiday scenarios (21)