Decoration of bottles for various celebrations
Wedding table decor
The wedding tradition of decorating the newlyweds' table with two beautiful bottles of champagne has been around for many years.
After the wedding, the so-called “bulls” remain with the newlyweds and are kept in a place of honor. The first bottle is opened on the wedding anniversary, and the second - after the birth of the first child. Given such a long journey of wedding bottles, special attention is paid to their decoration. Recently, all wedding decorations have their own unique concept, based on which the color palette and decor of literally every piece of furniture, table setting and all kinds of decor are selected
But there are also universal options for designing bottles for the newlyweds’ table. The best part is that you can transform simple bottles with your own hands, in a short time and without spending much on materials. Most often, bottles are designed similar to the appearance of the bride and groom - this is what is called a “classic of the genre”, time-tested.
Bottle as a gift
The best gift is a gift made with your own hands. Such a gift not only keeps the warmth of your hands and carries positive energy, but also indicates the exclusivity of the relationship and the special care of the donor towards the hero of the occasion. A beautifully decorated bottle can become a decoration for a festive table and bring originality to the interior of your home.
New Year holidays
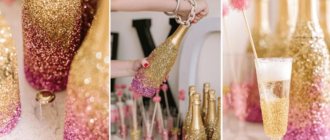
A bottle decorated in a winter, New Year's style can become both a decoration for a festive table and part of the decor of the room in which the holidays will be celebrated. This can be as simple as painting a bottle white and coating it with coarse salt to imitate a snowy surface, or painting the product in the manner of the patterns that frost leaves on the windows.
Not only glass, but also plastic bottles can be decorated in the form of a snowman or Father Frost and Snow Maiden. Here is an original version of decorating a plastic bottle in the shape of a penguin - the most “winter” bird.
Gift for Valentine's Day or wedding anniversary
The main theme of the Valentine's Day gift is the use of images and crafts in the form of hearts, the active use of various shades of red, and various ways of declaring love.
Bottles decorated to celebrate a wedding anniversary can be decorated in the form of the first letters of the spouses' names, the date of the wedding celebration or the number of years lived together. You can create a family coat of arms and use a stencil to apply it to the surface of the bottles.
No one will refuse a whole bottle filled with delicious sweets. Even a child can make such a gift. A funny inscription or a glued flower, beads or sparkles is enough.
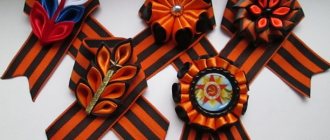
Bottle decoration with satin ribbons
Decorating with satin ribbons will require some skill and patience. Stores also sell ready-made clothes made from satin ribbons. It is reusable and has ribbons sewn onto the lining. It's easier to use.
You can use ready-made clothes made from satin ribbons.
Simple instructions for decorating with satin ribbons:
- Prepare materials: ribbons of different colors, PVA glue, scissors, needle.
- Measure out the required pieces of tape and try them on the bottle.
- The tapes are located on the glass in two directions: vertical in the upper part and horizontal in the lower part.
- Degrease the top of the bottle. Coat it with glue. Carefully place the ribbons on it. They are arranged in a criss-cross pattern.
- Let the glue dry. Treat the bottom of the bottle in a similar way. Here the tapes are arranged horizontally.
- Decorate with additional elements: rhinestones, buttons, braid.
Advice. You can braid a bottle not only with ribbons, but also with ropes. This bottle is suitable for lovers of a sports lifestyle, as it can easily be used as a flask.
You can use rope instead of tape.
Bottle decor with tights
For such an option as decorating bottles with nylon tights, you may need more than just napkins. This time we use nylon stocking instead of fabric. We saturate it with glue and put it on the bottle. We also create chaotic folds, while the cork can be covered with nylon, or you can stretch the stocking only to the neck of the bottle - after completing all stages of the work, it will seem that the bottle is in a kind of bag. We dry the glue and dry it again. Glue on a fragment of a napkin, let it dry, and paint the bottle in the main color.
We complete the decor with a ribbon, bow, braid, and sparkles. Decorating bottles with tights is a great option not to throw away a damaged item, but to use it in a new quality.
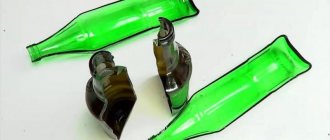
Ancient ship from book stories
The inventor of bottle ships was an ordinary school teacher, Harry Eng. He was full of ideas and figured out how to make unique souvenirs. His skillful hands created a large number of similar crafts, inside of which were not only sailboats. The bottles included: ships, books, tennis and baseballs, and unusually shaped padlocks.
Today there are a large number of similar souvenirs on store shelves. Many buyers have a question about how to put a ship in a bottle. Someone turns the bottle in his hands for a long time, trying to understand the secret. Some people are sure that the bottle is simply cut and then glued together. They are then very surprised if they find no traces of gluing.
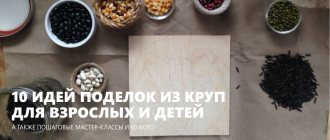
Decor of cereals and pasta
Decorating bottles with cereals is another interesting option for decorating a vessel. Main stages of work: remove all labels and degrease the glass with alcohol. We apply glue to the bottle and create several layers with a border in the form of a wavy line - glue peas below, use rice, lentils, buckwheat and any other cereals above. From shaped pasta (bows, shells, leaves, etc.) we create an ornament or a thematic design. We fix the pasta with glue on top of the layers of cereal, and also decorate the lid with pasta. We paint the resulting creation - here it is better to use aerosol paint with a metallic effect.
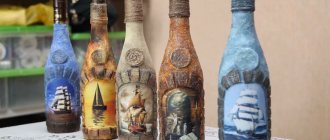
Option with decoupage of a bottle of cognac
The simplest and fastest option for decorating dishes is decoupage. Decoupage is an ancient method of decoration by transferring images from paper to an object. Images are usually cut out from napkins, special decoupage cards or from magazines.
For a man's gift, images in the form of ancient banknotes, castles, cars, guns, tanks or luxurious edged weapons or martial artists are suitable. You can choose a simple ornament for decoration.
Decoupage also allows you to age the dishes, as well as stylize them as metal or stone. This decor of a cognac bottle as a gift for a man with your own hands will look especially stylish.
Using decoupage you can age a bottle.
Important. If you plan to give cognac or another expensive drink as a gift, then the bottle is partially decoupaged. So to emphasize the brand.
Step-by-step decoupage technique:
- Prepare materials: paper images, PVA glue, transparent decoupage varnish, brushes, scissors, primer. For a more stylish design, you will also need two colors of paint: dark and light, or bronze, gold and candle.
- Clean the surface from stickers, labels, and glue residues. This can be done by placing it under running hot water for 40-50 minutes.
- Degrease the glass and apply primer to it. Let the primer dry. The primer should only be applied to the part that will be decorated.
- Cover the surface with glue and attach the paper image to it.
- After this, cover the bottle with dark paint in those places where it needs to be aged. Then partially rub the bends with a candle. Wax or paraffin will form beautiful creases. After this, cover the bottle with a lighter layer of paint. After the material has dried, clean the wax from the object. The bottom layer of paint will show through in the form of cracks and abrasions.
- Cover the bottle with clear varnish.
The bottle needs to be degreased and cleaned of stickers.
Advice. Finally, the bottle can be decorated with a wax seal. To do this you will need coarse rope, sealing wax and a seal. A rope is wrapped around the neck, the ends are left hanging freely. The sealing wax is heated, a little material is placed on the flat part of the bottle so that it covers the ends of the rope. A seal is placed on the sealing wax. After hardening, the sealing wax becomes brittle, so it is important to apply it to a flat part of the bottle, where it will hold tightly.
The bottle will be decorated with a wax seal.
Decorating the mirror
The bathroom will be transformed beyond recognition if you decorate the mirror with seashells. To create the background of a composition made in a marine style, use gold or turquoise acrylic paint.
Seashells, pebbles, small, beautifully shaped beads will be an excellent decoration for mirrors.
When gluing shells, you need to take care of the strength of such fastening. The glue should be suitable for damp rooms, because water and fumes will constantly fall on the mirror.
Popular articles Congratulations on March 8th. How to congratulate women on March 8 in an original way
Anyone can make such an original decor on their own.
Seashells in a bedroom interior will look no less impressive, but here it is better to stick to a pastel color palette.
The decor of the mirror should be more restrained and match the style of the room.
Shell decor is a beauty that is very easy to create. To decorate the mirror you will need:
- Seashells of different shapes and sizes;
- Thermal gun for needlework;
- Double sided tape;
- Imitation pearls;
- Pebbles;
- Clear varnish.
Decorate the frame with shells of different sizes and colors.
Before starting work, wash and dry the shells. Protect the mirror surface from damage by covering it with cloth or paper.
- Choose the smallest shells. It is desirable that they be of a similar size. Glue them along the inner rim of the mirror using a glue gun or double-sided tape.
- Proceed to decorate the second row with larger shells. The distance between them should be approximately the same. For better adhesion, apply glue to both the mirror frame and the shell itself.
- Fill the space between the shells with pebbles and pearls.
- Let the glue dry, then coat the resulting composition with colorless varnish.
Enjoy the resort atmosphere from the comfort of your own apartment.
Decoupage - what is it?
French words always sound beautiful and mysterious, although they sometimes mean the most ordinary things. So is the case with decoupage, which translates as “cutting.” In essence, this is an applique that is glued to a variety of surfaces.
Anything can serve as a material for decoupage, as long as it embodies the creative intent of the master. Most often, pictures cut out of paper are used. After all, it easily takes any shape and can be mounted on glass, wood, stone and any other surface that needs to be decorated.
For example, using the decoupage technique, you can turn an old porcelain teapot into a magnificent flower pot and complement your kitchen interior with it. An old sideboard, prepared for exile to the dacha, can easily compete with its antique counterparts if its doors are covered with a floral ornament in the style of the 18th century, artificially aged using a special craquelure varnish, giving the product an antique look. But the most popular is napkin decoupage, when an image you like is cut out of ordinary paper napkins and fixed on glass or stone with a layer of varnish.
Decorating bottles for the interior
Sea style
Decorating bottles in a marine style is one of the most popular options. And it’s not just that you can pour sea salt into a bottle and decorate the interior of your bathroom or collect a collection of sands brought from trips to various beaches. The marine theme invariably reminds us of relaxation, travel, pleasant emotions and new impressions.
To decorate bottles in a marine theme, you can use twine and pieces of fishing net, shells brought from travel and small pebbles. And, of course, no one canceled the images of waves, sea creatures, elements of ships and gear, and the use of all shades of blue.
For interiors in Provence and shabby chic style
Most often, decoupage and artificial aging techniques are used to decorate rooms decorated in Provence or shabby chic style. Not only are various images applied to the bottles (most often flowers and other plants, birds, insects), but also a coating is created that has cracks and even chips.
In an interior decorated in Provence style and some other types of country style, bottles completely tied with twine or twine look great. Most often, such products are decorated with decorative elements - flowers, letters, impromptu prints.
Universal option
One of the simplest ways to decorate bottles is regular painting. You simply choose the shade you need and, after preliminary cleaning and decontamination of the surface of the bottle, paint it. Most often, various pastel shades, silver or golden colors are used. A couple of such bottles can serve as a decorative composition or simultaneously act as vases.
If artistic painting is a simple technique for you, then a simple bottle can be turned into a work of applied art:
The composition of bottles painted using the amber technique looks beautiful. It is better to use a layout of shades of the same color on all bottles (but they can be of different shapes).
You can apply a design to a painted bottle using stencils or simply “by hand”, stick on lace, create a texture using droplets of glue, stick on decorative elements - flowers, beads, rhinestones, pieces of colored glass, sparkles.
Very often, in combination with dyeing, decoration with twine, burlap and other types of fabrics (lace, hand-knitted elements, pompoms) is used.
Black bottles are convenient because they do not need to be coated with paint. Black color itself is an excellent background for any decorative elements. A composition of several black bottles, decorated in one way or another, always looks contrasting, accentuated, and advantageous.
The metallic shine on the bottles is perfect for interiors in modern and high-tech style.
And finally: some creative and practical ideas
Bottles can serve not only as a vase, but also as a flower pot, or rather, as a container. By cutting off part of the bottle in the remaining container, you can grow small plants and decorate both the interior of your home and the landscape design of your site or private yard.
From the glass parts of bottles you can make something like bells, a device for the so-called “wind chime”.
The bottle can be used as a stand for a tabletop floor lamp if you make it yourself. The bottle can also be an independent decorative element for room lighting fixtures. You can lower a garland into a fragmentarily painted bottle or cut a “window” in the stele and place a small candle inside the bottle.
Bottles filled with food-colored rice can be a great addition to your kitchen or dining room. Color variety and originality of design will be provided to the room.
A similar effect can be achieved when creating decor for kitchen and dining rooms. Colored cereals, beans and any other bulk products look great in clear bottles. without requiring any additional decor.
Popular articles Solar battery
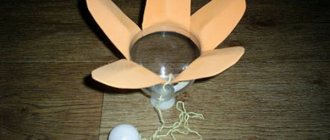
To serve a holiday table (with obvious savings in tabletop space), you can use bottles as a base for high stands for plates. This way you can place a larger number of dishes and snacks on the table, not to mention the original approach to traditional serving.
Don't throw away bottle caps - they're a great material for creativity. You can use them to create stands for hot dishes, lay out entire table tops, rugs, and make the following original decorative elements:
"Bottle" frigate
There are several ways to put a ship in a bottle. Let's look at the most popular ones.
The first option is quite simple. Materials you will need:
The boat can be purchased in a store (you need to choose a model with removable parts) or you can make it yourself. An important condition is the flexibility of the mast, which can be tilted to the sides. To do this, a hinge is placed at its base, providing sufficient flexibility. The rigging threads are attached to the mast. When folded, the boat can easily pass through the neck of the bottle. For clarity, all stages of work are shown in the picture.
Working with paints.
Selecting the appropriate colors, we will paint the picture. Here it is convenient to use an oval brush, or otherwise called a “cat’s eye”. This brush creates smooth transitions from one color to another. Just what we need.
We apply contrasting colors that are present in the picture to the sides of the box, then lightly wash it with a damp cloth. The color will only remain in the recesses. If you have sharp color transitions, add white paint to the borders of the transition. This will make the colors more shaded.
We covered the inside of the box with brown acrylic paint diluted with water.
And if you want the inside to feel more comfortable, cover this part with velvet fabric. You will learn how to decorate with velvet in the following articles. We cover the finished work with acrylic varnish, then, after complete drying, we stain the ends with bitumen wax or bitumen varnish.
Napkin bottle decoupage: step-by-step instructions
Preparing the glass surface
Any used bottle is covered on all sides with various labels and tags. Getting rid of them is not so easy, but it is quite possible. The bottle should remain in the soapy solution for some time, then all traces of paper and glue are removed from it using sandpaper. Only after this comes the turn of the solvent, which removes remaining grease from the surface of the glass.
Primer
In principle, you don’t have to prime the bottle, but choose a pattern so that the decoupage on the glass will look great on a transparent surface. But to enhance brightness and relief, it is better to cover the bottle with acrylic paint that matches the color of the selected pattern, and is at least one tone lighter. This is where you will need a foam roller or sponge. Dipping it into a wide jar of paint, carefully prime either the entire bottle or the part of it on which the design will be applied. To create a rich color, it is better to apply two or three layers of paint.
Carving the ornament
To work with thin elements of a napkin, it is better to use scissors from a manicure set or simply carefully separate the design from the rest of the paper. Then the image will turn out more natural.
Not only napkins are suitable for appliqué, but also magazine clippings on thicker paper. To get the effect of an image drawn directly on glass, a cutout of thicker paper needs to be coated with two or three layers of varnish, dried thoroughly, and then put this picture in water for about twenty minutes. If the layers of soaked paper are carefully removed, a transparent picture will remain on the varnished surface, which is glued to the base. Not every master class will teach you this type of bottle decoupage.
Gluing a picture to a bottle
The same dry cloth is applied to the prepared dry, grease-free surface of the bottle, and then a brush with pre-selected glue begins to “walk” along its surface. Very carefully and carefully, all air bubbles are squeezed out from under the napkin, and wrinkles that have inadvertently formed are smoothed out. If you are afraid of ruining your first masterpiece, then you can practice on a duplicate bottle.
If you use decoupage cards, you should first soak them in warm water and then lay them out on a towel to dry.
This work is painstaking and very careful, you can’t even accidentally tear the card. It is carefully smeared with glue, first on the back side, and then, laid on the glass, carefully straightened and coated on the outside, expelling any remaining air and eliminating wrinkles. If it was planned to use more than one picture to decoupage the bottle, then all other images are glued in the same way.
Fixing the result with varnish
After gluing the image to the bottle, enough time must pass for the paper to dry completely. But in this form, the drawing is completely defenseless against air, light, water and sharp objects. To keep the surface undamaged, it is secured with a layer of varnish. And so that the bottle is not afraid of water either inside or outside and is used for its intended purpose, this varnish layer must be applied at least three times. But the result will be something that you won’t be ashamed to show to your friends.
If you capture on a camera what the decoupage of bottles looks like step by step, you can then show the photo to friends or other needlewomen.
Decorating photo frames
Even the simplest photo frame can become a stylish and original accessory. Seashell decor will help you achieve this effect. In addition to sea shells, your assistants will be the same acrylic paint, as well as pebbles, sand, beads and sparkles. Details made from rope thread or starfish will also look interesting.
A frame made of shells will remind you of warm sunny days.
Arrange them on shelves, hang them on the wall or place them above the fireplace. Such frames are simply created to place photographs from the seashore in them and remember the happy moments of your vacation on cold winter evenings.
You will not see such a frame among your neighbors - it exists only in one copy and is a manifestation of your individuality.
Eggshell decor
The shell is often used in decoration; it creates irregularities and adds sophistication to a seemingly ordinary shell. You can glue it with PVA glue, but you shouldn’t be sorry, otherwise the whole picture will deteriorate and the shells will fall off. It is better to use hot glue or construction adhesive. Unusual shimmers are created with a brush and pearlescent paint.
Decor of bottles with salt
Decorating bottles with salt is a fairly popular option, since it does not require much money or time, but allows you to show your imagination to the maximum.
Decorating with salt - option No. 1
Pour salt into a heat-resistant bowl, add acrylic paint and mix, kneading the resulting paste with a fork. Place the mixture in the oven (100 degrees), take it out after an hour, knead it again with a fork and sift through a sieve. It turns out something similar to colored sand. We make several types of such “sands” - different colors.
Take a funnel and pour salt into the bottle, alternating colors
It is important that the bottle inside is completely dry. When the vessel is filled to the top, close the bottle with a cork and decorate it as desired.
Decorating with salt - option No. 2
Now we will decorate the outside of the bottle. We remove the labels and wrap an elastic band at least 5 mm wide around the body of the bottle - in the form of a spiral or in a random order.
We evenly cover the bottle with white paint, and after it dries, apply glue. Place a bottle coated with glue on the salt scattered on the paper and gently roll it. When the glue dries, remove the elastic band and get a bottle with patterns. You can dilute this bottle decor with sparkles and rhinestones. In this way you can decorate bottles with semolina or other, more original things.
Corrugated paper decor
Another simple design method is to use corrugated paper. At the same time, you can create very funny images for the bottle: a stylish tailcoat, an evening ladies' outfit, a vampire costume, Neptune or a military uniform.
Step-by-step instruction:
- Prepare materials: corrugated paper of different colors, PVA glue, scissors, tape measure and pencil.
- Create a pattern for decoration. To do this, just attach the paper to the bottle, make the necessary marks and cut it out.
- Cut out additional decorative elements.
- Cover the bottle with the base coating. Glue additional elements on top.
- Additionally, the bottle can be decorated with: rhinestones, fringe in the form of epaulettes, a stylish cord or string, or a wax seal.
Advice. It is not necessary to remove the label. If the bottle is partially decorated, then the inscriptions can be left. If the dishes are completely sealed, it is better to remove the label so that the paper lies more evenly.
Corrugated paper can also be used for simpler design. To do this, you just need to wrap the bottle in it. The paper can be secured on top with a ribbon of paper of a different color, using scissors to create curls at the ends.
Imitation of an “antique” map
Almost everything is ready, all that remains is to add a small element. Let's work a little with self-hardening clay. This material provides many opportunities for our creativity, and in this master class I will show how we made a roll of an ancient map from it.
Roll out the sheet to about 3 mm thick.
We cut off the required size and wrap the edges inward, as shown in the photo.
The finished card blank must be thoroughly dried. As it dries, it takes on a lighter shade. If the card remains dark after drying (depending on the quality and type of clay), then cover it with white acrylic primer. In this case, we simply applied acrylic varnish.
Glue a napkin with a card design and after drying, coat it with varnish again.
The finished work must be shaded along the edges with bitumen varnish or wax. We glue it to the inside of the lid, install the lock and voila.
List of materials for creating volumetric decoupage:
- in fact, the surface that we will decorate is a glass bottle;
- medical alcohol and cotton sponge;
- white acrylic paint (POLYCOLOR color 018) for primer;
- blue, black (ART STUDIO), cornflower blue (LEFRANC&BOURGEOIS) and silver (VAN PURE color 142)
- acrylic paints;
- foam sponges and various brushes (for decoupage, applying paint and varnish), palette knife;
- napkin with a marine pattern;
- glue for decoupage (LEFRANC&BOURGEOIS);
- acrylic varnish (HOBBY LINE), construction varnish for saunas (NEOMID);
- structural paste or construction putty;
- shells, coins, beads, laces and other small items.
Vase with shells
Even a simple glass vessel filled with seafood will look interesting. Pour some sand into a vase, aquarium or wide glass, add sea pebbles and shells. This is used for table setting for a holiday or simply placed on shelves, cabinets and bedside tables.
This vase will decorate any setting.
Flower pots decorated with seashells from the inside or outside look original. Unusually shaped shells can be placed inside the pot next to the flowers. And if you have many identical shells of the correct shape, then it is better to stick them on the outer walls or rim.
Popular articles Paper hyacinth flowers: assembly diagrams with video master classes
A vase decorated with multi-colored shells will add originality to the interior
Where to use decorative bottles
Bottles of wine, champagne and oil liquids can become excellent interior accessories. They can be used as vases and containers for storing spices.
The choice of design should be based on the stylistic direction of the interior space.
Professional designers recommend using decorative crafts in the children's room, kitchen, bedroom and bathroom.
It is recommended that their surface be made in the same color scheme as that used in the interior. This way the finished accessories will look original and elegant.
Bottle decor with leather
Bottle decor can be considered one of the most labor-intensive decoupage processes, which requires the greatest material costs, although if you have pieces of leather in your arsenal, the option will be economical. To work you will need a bottle, glue, scissors and leather. It is better to take thick but soft leather, then it will be convenient to work with it, and the effect will be the most luxurious. It is better to apply glue directly to the skin and place a piece against the bottle. Leather can be used to make patterns,
Bottle decor in a marine style. Master class with step-by-step photos.
Razumova Valentina Nikolaevna, teacher of the Municipal Preschool Educational Institution “Shukhobod Kindergarten”, village of Shukhobod.
Description: in this master class I offer options for decorating a bottle in a marine style.
The material can be useful to creative people who are interested in making crafts for the home with their own hands. Purpose:
the use of such exclusive bottles can be different: a gift, interior decoration in a marine style, a flower vase.
Goal:
making a vase from a glass bottle in a marine style.
Objectives:
* develop creativity and imagination; * find use for waste, natural, and any available materials; * introduce the technology of making a vase (decoupage with fabric, applique from natural and improvised materials); * develop the ability to work with various materials and tools.
Option #1
Materials for production:
Option number 2.
Materials:
For work we will need the following materials:
- bottle
- acrylic paints (colors burnt umber, ivory, gold. Or any others at your request))
- fine-grained texture paste or putty
- crystal paste
- shells, beads, coins and other “treasures”
So... let's get started!
First, the bottle needs to be cleaned of labels and degreased so that the black and white paint will adhere better. This can be done with alcohol or any other product (I use nail polish remover). Next, we prime our bottle (I have cognac) with burnt umber acrylic paint using a sponge, carefully sanding the entire surface:
We wait for the paint to dry; if the paint layer is thin, then you can cover the bottle one more time. The paint should lie tightly
The next step is to apply a texture paste, if there is none, then a regular construction putty will do. First, we apply the putty at random... we just spread it where we want it, so that later we get a relief (like silt and all that). I don’t like all kinds of designs on bottles, and therefore I cover them with putty:
We try on our “treasures” to the resulting relief. These can be various shells, pebbles, coins, beads, etc. and leave the putty to dry.
While my bottle was drying I managed to come across some beautiful shells and small dried starfish at a local store, so there have been some minor changes to my decor compared to the last photo
The next step is to apply crystal paste to the already dried putty (or texture paste with glass balls, I think with sand or just coarse-grained paste will also work), onto which we glue all our “treasures of the bottom of the sea”, pressing them into the paste. In some places we apply the paste over the “treasures”, as if they have grown into the silt and limescale growths on the bottle:
Again, we wait for the crystal paste to dry completely and begin to paint the resulting relief with the same burnt umber:
I didn't try to paint the entire relief thoroughly, because... this even creates additional volume and in any case will be covered with tinting.
Well, now we’re actually starting to tint.
Using a sponge and ivory paint we tint our bottle. To do this, put a small amount of paint on a sponge, dry the sponge on a piece of paper, and use an almost dry sponge to touch our relief:
The result was such a silted bottle, overgrown with limescale.
In principle, we could have stopped there, but I decided to decorate our old copy a little and literally gilded my bottle a little, tinted the stars, a coin and very lightly walked over the relief:
By the way... don't forget to prime and tint the bottom of the bottle
Well, that's all! We cover the whole thing with varnish, preferably matte, because... a bottle made from sea waters will hardly shine, but I didn’t have a matte one, so I had to coat it with a glossy aerosol varnish... aaaand... Here is the result
Internal filling
A glass bottle can be decorated not only on the outside, but also on the inside. Anything that can fit inside the container is suitable for filling. The following components have gained particular popularity:
- Salt. It needs to be mixed with acrylic paint, heated for an hour at 100 degrees, sifted through a sieve. Repeat this procedure with different colors. Using a funnel, pour all the resulting salt into the bottle one by one.
- Dye. To decorate, pour the desired shade inside the bottle and shake it. Then let the rest drain off. If necessary, the procedure is repeated until the desired result is obtained.
- Small pebbles or stones for an aquarium. They make an excellent filler for a clear bottle. They can be mixed with sand or colored salt. The vessel is filled randomly.
- Fresh flowers and dried flowers. They will help you create a colorful craft. To do this, you need to select small buds that can be lowered to the bottom of the vessel without damaging them.
You can fill the bottle with different objects, even models of ships and airplanes. Such work requires certain skills, since the elements are quite fragile.
Paint Krupa
Salt Flowers
Patination and primer
Now you can start patination of the surface.
Patina gives the decorated surface an antique look. With its help, the effect of contrast of individual elements is achieved, which makes the surface more expressive. We used a white water-based patina from Sayerlack. It's okay if you don't have one. You can use white construction paint slightly diluted with water.
Apply it in a thin layer to the brushed surface. It dries within a few minutes, after which it is partially removed with a damp cloth or Scotch Brite.
Apply acrylic primer to the surface on which we will glue the decoupage napkin.
Decoration with ribbons and beads
Apply acrylic paints (with a sponge or brush) to the prepared glass and wait until dry. Bows, flowers, etc. are made from ribbons. Beads are painted and glued. If you want to add an antique look, you should paint the entire beaded bottle a dark color and make an accent with white, silver or gold.
Another way is to wrap ribbons around the bottle and sprinkle beads on the glued areas. You can teach your child how to decorate bottles with ribbons; it’s a simple and quick way that doesn’t require much effort.
Gift of small bottles of alcohol
Miniature containers with alcohol do not lose their popularity. They are used to make bouquets, collect gift boxes and baskets with cognac and other strong drinks.
There are several reasons for this demand:
- relatively low price. High-quality alcohol has always been expensive. By beautifully decorating small bottles, you can show a sign of attention at a lower financial cost;
- mini containers allow you to assemble a gift box with several types of alcohol. Moreover, such a set will not smack of “alcoholism”, as is the case with the same number of full-size bottles;
- this volume of alcohol is suitable for comic sets (gag gifts);
- small bottles are good to use in decorative bouquets. They do not burden the composition and go well with the rest of the set.
Any of the miniature containers can also be decorated with ribbons, decoupage or candies. At the same time, other container proportions will allow you to bring non-standard design ideas to life.
Alcohol and candy
The classic set of alcohol and sweets is usually given to women, but there are also men with a sweet tooth. To turn sweets into a men's set with alcohol, you need to properly arrange the gift.
Motorcycle made from a bottle of whiskey and candy
If desired, whiskey can be replaced with any other alcohol, the main thing is to maintain the general idea.
For manufacturing you will need the following set of products and materials:
- a bottle of alcohol;
- candies of different shapes and sizes (the exact quantity depends on the shape and capacity of the container);
- black and gold corrugated paper;
- wire 1-2 mm thick (larger diameters are difficult to bend);
- glue gun;
- scissors;
- ruler;
- pencil;
- round blanks for wheels. They can be made from lids of suitable diameters or cut out ribbons and glue rings from cardboard or plastic bottles;
- base (a rectangular piece of chipboard, MDF or plywood with a thickness of at least 3-16 mm);
- triangular wedge stand (made of timber, foam plastic or thick cardboard);
- additional decor (braid, foil, etc.).
The master class on making a gift bottle is quite simple. Initially, the stand is decorated. To do this, it is wrapped in corrugated paper (like a box with a gift). If desired, the base can be additionally decorated with braid, sweets or painted.
Depending on the candy available, wheels can be made in different ways:
- make disks of the required diameter from foam plastic. Wrap them in corrugated paper, and hide the edges of the paper under glued round candies packed in metal foil;
- Decorate the round blanks and cover them with trapezoidal candies, as shown in the photo below. It is advisable to wrap such a blank on top with adhesive tape, so the candies will hold more firmly. If the final version is not very neat, the Wheels can be wrapped in corrugated paper and the joints hidden under additional candies;
- Cone-shaped candies are glued together with a “flower”. The edges are covered with double-sided tape, and it is hidden under a tape of black corrugated paper. The candy wrappers can additionally be wrapped in silver foil, so they will resemble light alloy wheels (distantly, but they will). If desired, the center can be supplemented with a round candy (coin).
Then the wheels are firmly glued to the base so that a bottle can be placed between them, acting as a frame. If it lies unstable, a wedge stand is installed under it, and all components are fixed with a glue gun.
The steering wheel is made of wire. To do this, it is bent in the desired way, having previously wrapped the base with a tape of corrugated paper or foil.
A “seat” and a “gas tank” made of candies are laid out on top of the bottle. All elements are fastened with a heat gun.
Small details are added: headlights, handles, exhaust pipe, mirrors, etc. They can be made from matching candies or rolled from foil and wire.
The process of making a motorcycle cannot be called too complicated; the main thing is to ensure that the structure is strong and stable.
This gift bottle is suitable for any event: February 23, anniversary, professional holiday, etc.
A cannon of sweets and cognac for February 23
The idea of the gift remains the same, but the execution is simpler.
To make it you will need almost the same set of items:
- decorated stand;
- a bottle of your favorite alcohol;
- round candies (they will act as cannonballs, so another shape is not very suitable);
- heat gun;
- blanks for wheels. In this case, two boxes of monpensier will work well (monpensier with cognac is, of course, an amateur combination, but the shape and size of the boxes are ideal);
- corrugated paper, twisted cord and any other decor.
The step-by-step manufacturing instructions are similar:
- candy kernels are glued onto the decorated base in a heap;
- wheel blanks are covered with corrugated paper, the joints of which are hidden under the decor of braid or twisted cord;
- The “wheels” are glued to the bottle with a heat gun (it is better to choose a flat or rectangular container). In this case, you need to ensure that the wheels are at the same level;
- the resulting “gun” is attached to the base;
- Additional decor can be added upon request.
Considering the specific theme of the decoration, this design is more suitable for February 23rd or as a gift to the military or law enforcement officers.
Cognac and sweets cake
This composition of cognac and sweets has already become a classic. This present is suitable not only for individual congratulations, but also as a gift for a male team (this decor would be appropriate for February 23, and for any corporate holiday).
If the cake is small, then all you need to make it is a container of alcohol, candy and a glue gun. For a massive multi-tiered craft, it is advisable to additionally stock up on a box of chocolates, which will act as a base, or a special base for the cake (they are sold in confectionery stores). Additional fixation around the perimeter may also be necessary. Not all men like satin ribbons; such decor can be replaced with decorative braid or hemp.
In the simplest version, a bottle of alcohol is placed in the center of the composition, and a circle is covered with sweets in several rows. In this case, choose narrow and long varieties of sweets, which are placed vertically.
To get a more original and beautiful cake decoration with a bottle of alcohol, you will need several types of candies of different shapes. In this case, it is desirable that the shades of the candy wrappers match the color of the bottle label.
A box of chocolates or a base is placed at the base of the “cake”. A composition of sweets and cognac is harmoniously placed on top of the base. After that, the resulting gift set is decorated with braid or twisted cord (the main thing is not to put too much on flowers, beads and ribbons - after all, this is a gift for a man).
Grenade made from sweets and cognac for February 23
A very simple DIY gift with cognac. To make it you will need a minimum set of materials:
- a bottle of alcohol resembling a “lemon” in its shape;
- protective or brown ribbon for decorating bouquets (sold in office supply or flower shops);
- wire;
- heat gun;
- candies (preferably in green packaging).
It is very easy to wrap such a gift beautifully. The glass surface is completely covered with candies. The neck is wrapped in tape, and a “lever” is made from it. The “check” is rolled up from wire and wrapped with the same tape.
In order to decorate a bottle with decoupage or kanzashi for February 23, it will take several hours or even days - such decoration can be completed in 20 minutes. At the same time, the gift will look original and interesting.