Everyone knows that lately various techniques for manually creating elements and decorative items have become very popular. For this purpose, ordinary available means are used, which do not require additional financial costs. Glass bottles and plastic products have gained the most popularity.
Glass has firmly strengthened its position compared to other materials among those who like to create their own jewelry due to its strength, stability, affordability and ease of use.
But along with the advantages, glass objects have a significant drawback - their shape is difficult to change. Therefore, not everyone will take up cutting glass.
But coping with this task with the right approach will not be difficult. So how to properly cut a glass bottle?
Methods for cutting glass objects
In practice, there are 4 main methods of cutting glass that are most widely used, but there are many more.
- cut using a glass cutter;
- apply thread;
- use vegetable oil;
- split with nichrome wire.
Safety precautions
Proper handling of glass containers is safe. When heated, no chemical elements are released, and when cracked correctly, small pieces do not fly off. But following safety precautions is necessary to prevent possible injuries.
Work only with gloves so as not to cut your hands on the sharp edges of the finished product. In case of an unsuccessful attempt, it is easier to collect the fragments without cutting. Safety glasses will protect your eyes from broken pieces of glass. Clothes should not dangle, especially if work is carried out using power tools. After the procedure, all items are thoroughly cleaned and washed, glass dust is removed with a stiff brush.
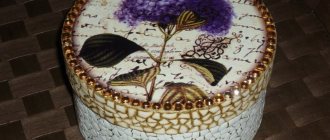
A beautifully cut bottle looks interesting and modern. It can become a vase, a decorative element, a workpiece for needlework, a stand for brushes and pencils. You can create a product at home using available materials. The main thing is to study the process, follow the instructions and not neglect safety precautions.
Cutting glass with a glass cutter
Main stages:
Make a cut on the glass. Heat the candle material or a lighter. You need to heat the cut made with a glass cutter.
For more uniform heating, you need to smoothly rotate the bottle over the fire along the cut line. It is enough to hold it over the flame for 5 minutes.
Place the part of the object that needs to be cut into a container of cold water.
Repeat the procedure if necessary. Part of the bottle may not break off the first time. Therefore, the procedure must be continued until the glass bottle is divided into 2 parts.
Trim the edges. Using coarse sandpaper, you need to sand the edges without wasting time, otherwise you may cut yourself.
Now you can decorate the bottle using the necessary materials. The decorative element is ready.
What errors might there be?
- Insufficient temperature difference.
A crack is formed due to stresses that appear at the moment of a sharp change in temperature. If the water was not cold enough or the chrome was not hot enough, the glass may not crack, or it will only crack somehow. - Holding time
. If you heat a bottle for too long, it will burst even without water, but the crack will only develop as soon as possible. If the bottle is not heated enough, it will not burst even in water. How long to heat? It must be determined empirically. For beer bottles made of thin glass - 20 seconds. Wine bottles - 30-40 seconds. From under champagne - the time can reach up to a minute.
Remember when I wrote about the importance of markup? So, until you know exactly how much you will have to heat, several approaches may be required. If the bottle has not burst, the markings will allow heating to be carried out in the same place
I wish you success!
To be honest, I don’t know who this information could be useful to. But judging by the heated discussions of the article, where I saw a sea of broken bottles, someone still needs it. Therefore, if the material was useful, you know what to do. Subscribe to the channel here
.
Using Cotton Thread
The first method uses a glass cutter, but if you wish, you can do without a glass cutter. Helpers in this will be ordinary thread, alcohol, cold water and a lighter.
Basic cutting steps:
- mark the desired line on the bottle with a marker or felt-tip pen;
- moisten the thread in acetone or alcohol;
- wrap the thread around the line several times;
- tie a rope and cut off the ends;
- bring the bottle horizontally to a container of cold water and set fire to the thread;
- after the thread completely burns out, dip the bottle in water, after which the unnecessary part will break off due to a sudden change in temperature;
- sand the edges with sandpaper.
Method 3 – nargev from friction
Another way to break off a bottleneck is to use frictional heating on the glass. To do this, two plastic ties are put on the bottle, which serve as limiters. Three turns of twine are wound between them, after which the twine begins to move forward/backward by the free ends.
After 2-3 minutes, when the glass is sufficiently hot, the bottle is placed in cold water, and when lightly tapped, a chip occurs along the heating line.
If you make a small cut on the bottle with a glass cutter before rubbing with twine, then you do not need to use cold water: the glass will crack when heated on its own.
Oil is another helper in cutting a bottle
A great way to chip off unwanted parts of an item is to use vegetable oil.
Basic actions:
- fill the bottle with cold water to the desired level;
- place in a container with cold water filled to the same level;
- add vegetable oil until a thin layer forms (do not pour the oil directly from the bottle, otherwise you won’t get an even layer, the water will be covered with oil in patches);
- select a piece of metal (the wider the glass of the object being cut, the thicker the metal you need to choose, and vice versa);
- heat a metal object to the limit using a gas stove or burner;
- lower the blade to the oil level, while protecting your eyes and skin from splashes of heated oil;
- the oil will heat up and the glass will quickly crack as a result of the sudden temperature change.
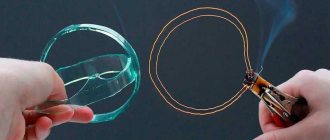
Application of nichrome wire
For this method, you need to acquire nichrome wire, a 12 V battery and cold water.
- Apartment renovation in Odessa at a reasonable price from an experienced company stroyhouse.od.ua with experience
Bedroom furniture from the manufacturer - its advantages
- Sony PlayStation 5 repair
Determine where to cut (wrap the bottle with a sheet of paper, connect the edges so that the edges are even, and circle with a marker or felt-tip pen, remove the sheet). Take a piece of nichrome wire 0.5 mm thick, attach the first tip to a heavy object, then attach the battery wire here.
Wrap the wire around the bottle along the drawn line. Take the wire with pliers to avoid burns, pull it slightly, apply tension to the other end of the wire, holding for about 30 seconds. Dip into cold water.
After a sudden change in temperature, part of the bottle will break off. All that remains is to sand the uneven edges.
In addition to glass objects, another material that is accessible in all respects is used for decoration and decoration - plastic.
There are probably plastic bottles in every home, so why get rid of them when you can decorate your home with them.
How to cut lengthwise
A designer item can also be obtained from a bottle cut longitudinally. The following materials are required for work:
- a bottle of ordinary water with a spray nozzle;
- a piece of nichrome wire;
- a piece of heat-resistant material (asbestos, paronite);
- rubber bands;
- a power source that can provide 30-40 V and an electric current of 3-4 A.
The nichrome wire is carefully straightened, since this determines whether the edges of the cut will be smooth. The bottle is wrapped lengthwise with wire and secured with rubber bands in several places - this will be the cut line. Asbestos or other material should be broken into small pieces and placed under the rubber bands on all sides. Thus, when the wire heats up, it will not damage the rubber bundles.
If there is no asbestos at hand, you can use small wooden slats. A lump of heat-resistant material is also placed in the neck of the glass container, due to which the wire is pressed against the edges of the hole. It is also necessary to press the asbestos to the bottom, since it, like the neck, is thick. It is best to place the container on a piece of asbestos or a wooden plank.
An electric current is connected to the ends of the wire - it does not matter whether it is constant or alternating. Electricity is applied for 30-60 seconds until the wire turns red. The current source is turned off, and the places where the glass comes into contact with the wire are intensively sprayed with water from the prepared bottle.
After a loud click is heard - the crack of a bottle - the rubber bands are carefully removed. The result was two absolutely equal parts of the container, ready for use.
The wire is fixed with rubber bands.
Asbestos pieces.
Place pieces of asbestos under the rubber bands.
We put a piece of asbestos into the neck.
We connect the electric current.
Turn off the source and use a spray bottle to vigorously spray the areas where the wire comes into contact with the glass.
Two parts of the bottle.
Working with plastic
Many fans of plastic items and decorations often wonder how to easily cut a plastic bottle to get an item of the desired size.
How to prepare for the casting?- Transportation and storage of fittings
- The Brazilian Carnival is the hallmark of Rio!
To work with plastic, you will need scissors, a knife, a marker and a stand for a marker or felt-tip pen, which can be used as a book or any box.
Basic steps:
Place the bottles on the table and make a stand next to it for the felt-tip pen. You need to add books or boxes until the marker is at the required height. Hold the marker with one hand and rotate the bottle with the other to draw a circle.
Make a cut a few centimeters above the outlined mark, insert scissors and cut off the desired part. Carefully straighten the cut with scissors.
In fact, each method is convenient in its own way, which is why it is already widely used among craftsmen and lovers of “Hand Made” equipment.