Shurikens, or in common parlance - throwing stars, are full-fledged throwing weapons with a serious damaging effect. Throwing stars became widespread in our area thanks to feature films about ninjas.
Shurikens are a flat polygonal metal plate with sharp edges. The shape of this throwing weapon can be varied: stars with a different number of rays (from 3 to 10), triangles or circles. An impressive appearance is achieved by patterned perforation of the plate. The hole in the center allows you to wear throwing stars on a rope or strap, which is very convenient.
The most widespread are street shurikens, which look like a simple star with 6-8 rays. The dimensions of street throwing stars have the following parameters: diameter from 5 to 12 cm, thickness 3-4 mm and weight about 300g.
What beginners need to know
Folding such paper star blades is very useful, developing motor skills, memory and concentration. However, while working, beginners need to follow some rules:
- If you have made a product and wrapped it with tape to make it rigid, do not leave it in areas accessible to small children. This craft has very sharp and hard edges.
- Throw carefully, try not to harm yourself.
- To make shuriken you need sharpened scissors; be as careful as possible when working with them.
- Sheets of paper also have sharp edges; do not run your finger over them.
- A paper star should not be thrown at people or animals. It is especially prohibited to aim at the eyes.
Eight-pointed star-ring
There is a more complicated option, the result is an original star - 8-pointed. To make it you will need 8 identical squares. Make them small, otherwise the star will turn out too voluminous:
- We bend the first square diagonally (diagonally) from corner to corner and unfold it back. We do this from left to right and from right to left. Then in half. It turns out to be a snowflake made from fold lines.
- Then we bend two corners towards the middle. This is exactly how we make a paper airplane.
- Bend the triangle remaining below inward and fold the element. You can do this easily, using the grooves you have already marked. As a result, we have a small parallelogram.
- We need 7 more of these.
- We take one of the blanks by the sharp edge and insert another blank into its forked part. We bend the protruding tails inside the second part. We bend the edges of the first into its bifurcating part. So that nothing sticks out anywhere.
- Then we insert the third into the second blank using the same method.
- When all the parts are in place and you have a ring, carefully pull the free ends outward, moving the rest towards the center.
Now the shuriken is ready. If you take multi-colored paper, it will turn out bright and original.
In this video, Anton will show how to prepare such a star from ordinary square pieces of paper for notes:
To create, you will need beautiful scrap paper that you will like.
At the first stage, you need to make paper blanks. Prepare 8 squares measuring 10*10 or use a ready-made blank.
At the second stage, we prepare the parts. The square is bent in half. One half is also bent in half and left in that position. On the other side, bend the sheet vertically and bend the top corner into a triangle.
Fold the remaining part inward. Bend the upper part of the workpiece, and straightening the part, turn it to the other side. Open the right side of the workpiece.
Note!
How to make paper claws - detailed instructions with simple origami diagrams. Creative creation ideas + photo and video reviews for children
Cardboard crafts - TOP 130 best photo instructions for children. Master class with a clear description of the stages of work + reviews of creative cardboard products
Paper applique: TOP 100 photos and detailed diagrams of simple crafts for children. Options for unusual DIY paper applications
At the third stage, we begin assembly. Turn the part to the right so that the large protruding triangle looks down. Place one piece inside another. Turn them over to the other side. And bend the corner of one part inward.
Do the work with the rest of the blanks. These stars look beautiful from every side.
The dream of boys and criminals
The art of using these weapons has been cultivated in Japan for years. Russian teenagers learned about it from films in which heroes skillfully defeat enemies by throwing a star at them. Of course, after watching such films, every boy wanted to have his own shuriken. No one knew how to make it, so gramophone records, pieces of tin in the shape of stars, and sometimes even ordinary plates were used. During the troubled perestroika years, weapons attracted the attention of criminal elements. And although only a few knew how to throw this terrible weapon correctly, almost every “boy” or “brother” dreamed of having a shuriken. We figured out how to make it ourselves. They sharpened knives and spoons, flattened nails, threw bicycle gears, pieces of reinforcement, and made something from steel that vaguely resembled a throwing weapon. By the way, this item is considered a bladed weapon, and you can receive a significant punishment for wearing it. Today in our country even teenagers make shurikens. The most suitable material for them is computer disks.
Video lessons
And so, gentlemen craftsmen - homemade craftsmen, you and I have learned how to make various ones, now it’s the turn for such an original throwing weapon as the Japanese shuriken
or in the common name - an asterisk. Shuriken (shaken) translated means: “blade hidden in the hand.” In close combat, shuriken is a rather formidable weapon and, if wielded skillfully, can disable a significant number of enemy man-units. Classic shuriken
really resembles an asterisk and can be with two, four six and eight sharply sharpened rays. However, as shuriken, Japanese ninjas could use: nails, coins, knives, needles and similar small objects that could be hidden in the hand.
We will make a classic, that is, a beautiful star with six rays. To do this, we need to purchase a metal plate with a thickness of two to four millimeters. If you find a stainless steel plate, it will be even better: it will only be possible to process it properly once. Plain steel will rust at times and you will have to start sanding again.
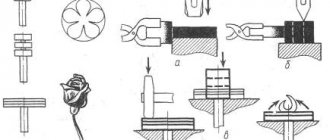
Drawing the outline of the future shuriken
on the plate, you can use a stencil. We knock out points along the perimeter at a distance of five to ten millimeters (depending on the thickness of the drill) and drill holes along them. To do this, you can use a drill press or a powerful drill.
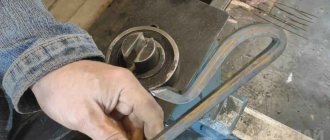
The next stage will be processing with a file, here of course you will have to work hard, the work is not easy. After we have processed the star to your liking, we begin sharpening.
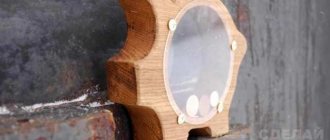
Here you should decide why you need a shuriken: if for beauty, then we carefully sharpen the stainless steel star, or rather its rays, on both sides and place it on a shelf. If you want to practice throwing at targets, you should sharpen only the ends to avoid serious cuts due to inexperience. So we received our first combat shuriken. In general, there are tools that allow you to turn your product into a real work of art.
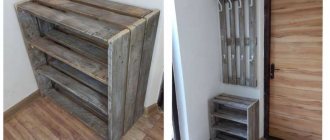
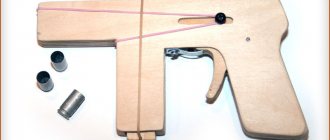
You can sew a special belt bag for them, similar to the one in the picture, but more careful. It will turn out beautifully from leatherette, not to mention the leather itself.
If you used simple mild steel, then the ends of the shuriken can be used, then they will bend less when hitting the target
Shuriken is the hidden weapon of the ninja. There are a large number of varieties of this weapon. Shuriken can be in the form of a star, square or simply round. Such devices are edged weapons, so before you learn how to make shuriken, you should take this fact into account and not use these weapons to cause harm in the future. Also, you should not use shuriken for fun, to fool around, since the risk of causing damage to yourself and others is very high.
Shuriken can be created from paper, various types of metal and wood. You can make such a weapon yourself from improvised means, for example, from an ordinary disk. There are many ways to make shurikens. The most difficult, but interesting one is creating shuriken from metal.
We will need the following:
- Metal plate. You can choose any one, but it is best to take “stainless steel”, since it is easy to process and practically does not deteriorate. The thickness of such a plate can be from 3 to 5 millimeters;
- Drill;
- Hacksaw (for metal);
- File;
- Stone for sharpening blades.
Symbolism
Shuriken is one of the most famous types of Japanese throwing weapons used by samurai and ninjas. Shuriken has long been a symbol of courage, composure and endurance, protecting against surprises and enemies. Shuriken literally translates to “blade hidden in the hand.” Shuriken is often used as a talisman, which gives the owner courage, stamina, endurance, and the weapon can be made from a sheet of paper. Wait to refute this statement and share your skepticism! The Japanese art of “origami” and martial traditions in the manufacture of weapons combined into an almost mystical action and solved the problem of how to make paper shuriken.
Shuriken (also called “shuriken”, “shuriken”) is a Japanese throwing weapon of ninja spies, used for a surprise attack and disorientation of the enemy. In some countries, real steel shurikens are dangerous weapons and are prohibited from being owned. Or a paper shuriken, which you can make yourself at home, and not be afraid that someone will judge you!
“Peaceful” origami and combat shuriken are things that are far from each other, but opposites attract. So, today we will try to tell you how to make an origami shuriken that can be thrown over a decent distance.
To create origami shuriken, square sheets of colored paper are usually used.
So, to create a “killer” ninja weapon we will need:
- 2 square sheets of paper (can be multi-colored);
- hands growing from where they are supposed to grow;
- 5-7 minutes of free time.
Have some paper and patience? Now you can go directly to an explanation of how to make shuriken from paper. Consider the fact that 2 parts are made, which are then connected to form a ninja “flying star”.
When you don’t have paper on hand, but want to make your own “ninja star”, use banknotes!
To become the owner of your own paper shuriken in just a couple of minutes, follow these steps:
- Fold the sheets in half and then unfold them back to their original shape.
- Bend both sides to the center where the fold line is marked.
- Bend the corners so that you get sharp-angled sides (the parts should mirror each other).
- Bend the pieces diagonally on both sides.
- Place the part resembling two “soldered” triangles on top of the zigzag part.
- Thread the corners of the lower part into the triangle “pockets”.
- Turn over the semi-finished shuriken and do the same with the other corners.
- Paper shuriken is ready for battle!
This simple pattern will allow you to make the coolest paper shuriken ever!
Don’t rush to throw away “broken” CDs! They can also be adapted for making shuriken. Want to know how to make shuriken from a disk? Very simple! To do this you will need a disk, a ruler, sharp scissors and a black marker.
“Bae, Naruto... Remember where else you can see shurikens?
The principle of making shuriken from a CD is extremely simple.
Shuriken is a Japanese throwing weapon used by ninjas. It is a small star with sharply sharpened corners. Children can watch the use of these weapons in their favorite cartoons; they were used to arm Batman, Naruto, Raf, as well as anime characters.
To imitate their favorite heroes, boys make these weapons with their own hands from construction toys, paper or other available materials. But you can make origami from shuriken paper, and the craft will fly just as well as a real weapon, but will not harm the enemy.
Not every parent has any idea what shuriken is. In Japan, many types of throwing weapons were invented, among which small stars occupied a special place. They were made of metal. There were two types of such weapons:
- small peaks with a point at the end;
- four-pointed stars, each corner of which represented a sharpened blade.
It is believed that they gave one of the ninja schools an advantage over their rivals. Now these throwing weapons are sold in some stores in Japan and Europe and are kept in collections. Various hieroglyphs and mystical signs were often applied to their blades, which, according to the Japanese, brought good luck to their owners. Today, such signs are copied from ancient weapons, but are applied only to collectible items.
Although throwing stars often played a decisive role in battles, they were not used as the main weapon, which were the katanas and yari spears. Shurikens were only an addition to equipment that played an important tactical role.
Ninja throwing weapon
Shuriken translates as “blade hidden in the palm” and is a Japanese throwing weapon. It was easily hidden in clothes, without creating discomfort for the ninja, and when necessary, they struck. Shurikens are small in size and look like ordinary everyday things.
Shurikens were made from iron or steel; they could be made to fit almost any object - an asterisk, a needle, a nail, a knife, a coin.
Often, various ritual symbols were embossed on them, which indicates the Japanese belief in mysticism. The craftsmen who made weapons and the ninjas who used them believed that higher powers were able to help in the right situation.
Shurikens were an addition to the ninja's main weapon, but sometimes thanks to them the battle was successfully resolved.
The ability to use shurikens is called shurikenjutsu, it was taught by many schools:
- Yagyu-ryu;
- Katori Shinto-ryu;
- itto-ryu;
- kukishin-ryu;
- Togakure-ryu.
The main types of shuriken include:
- Bo-shurikens.
- Shakens.
There are also different types of shaken, hira-shuriken, semban-shuriken, tepan-shuriken. Historians have conducted a lot of research, but they have not found out exact information about the origin of bo-shuriken (the Japanese word “bo” means needle). This is due to the fact that the skill of shurikenjutsu is shrouded in mystery; in the country at that time there were many craftsmen making throwing weapons. Bo-shuriken reached 12-21 cm in length and weighed 35-150 g.
Basically, they had one end sharpened, although there are samples sharpened at both ends. The tip could be quadrangular, octagonal, or round.
The metal plates were thin, they were obtained from ordinary things: coins (hishi-gan), carpentry tools (kugi-nuki), and hira-shuriken were made from them. They were made in the shape of a star with a hole in the middle, and were put on a rope for easy carrying and pulling out.
Step-by-step instruction
The principle of making shuriken is quite simple. Even a teenager can cope with such a task. This instruction suggests making an easy-to-make, classic and most common four-pointed hira shuriken. The whole process takes no more than half an hour and allows you to get a fairly high-quality copy of an exotic edged weapon.
- 1. The disc must be wiped and carefully checked for cracks and splits. It should be intact, and preferably slightly springy when squeezed.
- 2. Using a ruler and marker, apply basic markings to the disc. This is quite easy to do if you remember a little about your school geometry lessons. On the surface of the disk you need to draw two perpendicular lines intersecting at the center at a right angle. From each resulting right angle, produce a bisector of arbitrary length, which depends on the desired bending of the edges of the “asterisk”. Connect the end points of all lines with a smooth line. The marking is ready.
- 3. Carefully, using household scissors, cut off the parts of the disk cut off by markings. You need to act as smoothly and carefully as possible so as not to accidentally split the disk. If necessary, lightly polish the edges of the shuriken, sharpening or, conversely, rounding. Using scissors that are too small, such as nail scissors, can result in jagged, jagged edges.
The last stage of creating a shuriken from a disk is purely decorative in nature, allowing you to give the model a finished and full-fledged look. The silver surface must be covered with acrylic, stained glass paint, dark nail polish, or simply sketched with a marker of the desired color and allowed to dry thoroughly. To give the “star” an oriental flavor, it is worth additionally applying fancy ornaments or hieroglyphs to the surface of the disk.
Brief industrial and economic overview
The city lives a measured life and develops in industrial, agricultural and tourism areas.
Industry of Pskov
Products produced at diversified industrial enterprises are important not only for the city, region, but also for the country.
- . Produces electrical equipment for complete electric trains. The only one in Russia.
- CJSC Electrical Equipment Plant. Provides enterprises in the oil and gas industry, railway transport and metro with the necessary equipment. It is a complex of 19 enterprises.
- PJSC "AVAR". It produces spare parts for trucks and cars and supplies them to Russian and Minsk automobile plants.
- The Pskov Automobile Plant produces highly maneuverable buses for city routes. Tent semi-trailers for cargo tractors and dump semi-trailers for transporting bulk materials are also produced here.
- JSC "Pskov Boat Shipyard" produces rowing and motor boats, boats and yachts, floating houses. The length of the vessels is from 3 to 15 m. Here you can also purchase a trailer for transporting watercraft.
Other Pskov enterprises produce cables and wires, equipment for car services and elevators, batteries and many other industrial and household goods.
The Slavyanka clothing factory and the Pskov Polymer shoe factory contribute to the development of light industry. Nordman brand rubber shoes are supplied to 85 Russian cities and more than 20 foreign countries.
In the food industry, the leading role is given to meat and dairy and bakery plants, and the Nadezhda confectionery factory.
Turnkey construction of houses and baths
In Pskov, houses of different heights and frame baths, made of timber and logs, are being built. In conditions of healthy competition, some construction organizations hold promotions, offering the customer the purchase of a house on favorable terms. This could be free installation of water supply, free fireproofing of wood, and even a free bathhouse. Houses and other outbuildings are delivered to the customer or built on a plot of land already purchased by the organization.
In the traditions of folk crafts
In recent years, the craft of artistic forging has developed. Private individuals and artistic blacksmith workshops in Pskov offer openwork metal products from small decorative elements to large household items. Elegant door handles, stair railings, and awnings are in demand. The estate is decorated with wrought-iron fences and gates, and garden benches. The facades of multi-storey buildings are transformed with the installation of wrought iron balconies. Buyers are even offered wrought-iron beds.
Eight-pointed complex design
One of the models that was obtained by modifying the basic modules is the eight-pointed throwing star. It is called transformative. In appearance it bears little resemblance to Japanese throwing weapons, but is still loved by children. Many boys believe that a star with eight sharp corners is “more dangerous” than the standard one, so they often make this model for games.
There are several options for folding such a craft. They can only be mastered by those who are fluent in the art of origami. Here are step-by-step instructions for one method.
Make 8 modules from square blanks of the same size:
- Place the sheet at an angle facing you. If you took colored paper, then the white side should be facing up. You should not take the double-sided option, since the unpainted part will help you during assembly of the structure.
- Fold it diagonally and unfold it.
- Raise the lower corners to the marked line in the middle of the sheet.
- Bend the top sharp corner down.
- Fold the bottom corner in the same way.
- If you did it correctly, the tip will be flush with the tip of the valve assembled earlier.
- Fold the module in half vertically.
- Make 7 more elements to assemble a circle of modules.
The model folds very simply: the lower left corners of each module need to be placed in the white pockets of the other.
Using this pattern, assemble the entire eight-pointed star. After the circle closes, you will get paper origami “Eight-pointed Shuriken”.
The described elements can be used to create other crafts, it is only important to use your imagination and understand the basics of fixing them without using glue.
Transformer
If you were able to cope with a simple model, you can complicate the task for yourself. For this model you will need to take eight sheets. Step-by-step instruction.
Note!
Paper star - TOP 110 best photo instructions for children. Master class with a full description of the stages of work + reviews of creative craft ideas
Paper craft templates - TOP 100 photos of the best templates. Master class with simple diagrams and drawings for creating with your own hands
How to make a paper swan: simple instructions with step-by-step guide for beginners. Secrets of craftswomen + photos of finished works
- Fold the first sheet in half.
- Bend the side corner towards you and smooth out the resulting element.
- Bend the corner inward.
- Unbend the resulting element and turn it over, then work will proceed with the resulting square.
- Move the corners to the center of the workpiece.
- Fold in half and bend the first triangle.
- The workpiece will look like a parallelogram. At this stage, you can check whether you did everything correctly.
- At this point you can finish and make an octagonal shuriken star. We can continue further.
- Each part must be nested inside each other so that the bent part is inside the circle and the corners look outward.
- Each subsequent element is secured with the corners of the previous one, pushing them inside the element.
- The last part of the workpiece is inserted into the first.
- If everything is folded correctly, it will probably stretch.
- It will become similar to the Indian military weapon "Chakra".
A little bit of history
Not everyone knows that the product can come in two types. In the first case, it is bo-shuriken - an elongated weapon, more like a spear for throwing. And in the second - hira-shuriken. How to throw:
- Bo. During a throw, the direction of flight and the trajectory of rotation are adjusted with the middle and ring fingers. The blade must be directed away from itself; it can rotate during flight with the blade or around its axis.
- Hira. This is a weapon that resembles a star with sharp rays. Here we will look at how to build such a shuriken from paper. This product must be thrown with the edge away from you and the sharp edge away from the palm. Throw straight ahead so that the paper blade flies in a straight line and quickly. It must also rotate quickly around its axis, which is why a small hole was previously made in the center of the weapon.
Materials for work
If you undertake to make weapons from paper for the sake of training safety, then only this material will be used. The origami technique itself eliminates the use of glue, staplers and other connecting devices. It is better to work with thick colored paper or semi-cardboard so that the weapon has weight and can rotate well in the air.
To cut the required part of the paper for work, you will need scissors or a stationery knife.
To better smooth out the curves of paper shuriken parts, it is good to use a ruler. She will become the “arbiter” when it is necessary to accurately cut off identical squares for the rays of the future shuriken.
How to make shuriken with your own hands?
To practice throws you will need a four-pronged weapon
eternal stars. For the “stars” you need to find a hard metal that cannot be bent. Only such shuriken will fly. How to make it at home? You need to follow the instructions.
- To begin with, draw a blank on paper. Its shape must fully correspond to the finished product.
- The pattern is glued to the metal and shuriken is cut out using a hacksaw.
- The finished product is polished, and its tips are sharpened so that they stick into the target.
Warning: practicing throws with real metal shurikens can only be done at home: carrying and using edged weapons is prohibited in Russia.
Let's experiment
Firstly, once you get the hang of making a classic four-pointed shuriken, you can safely play with its shapes. There are many ideas for creativity both on the Internet and in specialized magazines. Along with the shape of the shuriken, for example, sharper corners or rounded shapes, both the range of its flight and the depth of penetration into the target will change.
Secondly, shuriken from a CD has a fairly low weight, which can be increased using polymer clay or an adhesive plaster glued in several layers in the central part. This will significantly increase the lethality of the model.
Throwing technique
Homemade structures fly well if all the nuances are observed when creating them. As a rule, a shuriken in flight must rotate masterfully around its axis.
3 main throwing methods:
- From the hip. You need to throw with one hand from bottom to top.
- From the chest. The throw is carried out with one hand in the direction from the chest. The hand movement resembles dealing cards.
- Because of the back of the head. The hand is placed slightly behind the ear of the opposite side, and the throw itself is similar to a throw from the chest.
It is not at all necessary to throw paper stars one at a time; you can throw several at once. For this purpose, the products are stacked together in a small deck, and the throwing technology can be chosen at will, whichever is most convenient for you. How you can make a samurai shuriken from paper is shown in the video with a diagram.
Throwing this origami will help your child train dexterity, accuracy and coordination. You can also learn to calculate throwing distances, perfect hitting the target and improve hand motor skills. To ensure safe training, teach your children not to aim at people or animals. Especially in the head and neck, otherwise you can get a small wound if the throw was strong.
Schoolchildren love to make paper shurikens because it is a quick and beautiful origami. As a rule, these are modular-type structures, assembled from several elements into one product of an interesting shape. To create it, you can use any available materials, but the most convenient is paper or cardboard. Be sure to try collecting these little stars with your child and have a competition to see whose will fly farthest.
Children can also play with them in the yard, competing to see who has the more complex model. You can decorate such toys with oriental inscriptions and patterns, which is very symbolic of the paper weapons of real samurai. The creation process itself will not take much time, just 15 minutes - the craft is ready!
How to make a ninja weapon in the form of a shuriken out of paper is shown step by step in the video master class.
The best posts
- Installation of shower drains
- Incredible design from the comedy "Fuck Love"
- Crochet coat: diagrams and descriptions for beginners with photos and videos
- Features of the home of the main characters from “Game of Tables”
- Do-it-yourself film stained glass window: master class with photos
- Decorating a wicker basket for gifts for the New Year
- Soundproofing plaster is a great way to get rid of extraneous noise
- What you can save a lot on when decorating a room [we reduce the cost of finishing]
Related article: Do-it-yourself traffic light made from cardboard and disks
Assembly diagram
Below is a diagram of the assembly of origami shuriken from the famous Japanese origami master Fumiaki Shingu. If you strictly follow the instructions, then assembling the origami shuriken will not take much time, and the result will be the same as in the picture. After doing what is described in the diagram several times, you will understand how to make origami shuriken quickly and without looking at the diagram.
Making shuriken using the origami technique in a simple master class for beginners
Shuriken have different collection patterns. We will now describe the most common one in this article. Initially, it may seem that the method is complicated and origami is not your destiny, do not give up in advance, because ahead of you awaits a lot of amazing and beautiful paper origami, made by yourself.
What you will need:
- Paper, 1 sheet of A4 format
- The desire to create.
- Make a bend horizontally and bend 2 halves of the sheet towards it. Cut the leaf in half. It turned out two identical sheets.
- Fold one piece of paper in half.
- Fold the corners.
- Bend the sheet diagonally on both sides.
- Repeat steps one through four with the other sheet. Just bend the corners opposite to those folded on the first piece.
- Turn over and place the first piece on top.
- Thread the corners into the gaps.
- Turn it over.
- Re-thread the corners into the gaps.
- Your beautiful origami shuriken is ready! The result is a 4 carbon ninja throwing star!
After looking at this picture, you can learn something new for yourself. As you can see, the shuriken craft is simple and easy to implement. And everyone will find a use for it themselves. Since shuriken has become widespread among origami lovers, there are, accordingly, plenty of schemes for its implementation. There is another way to create shuriken, which symbolizes the 8-pointed ninja throwing star. Usually such shurikens are called transformer shuriken. Let's talk about it in more detail.
There are two variations of this eight-pointed star:
- Place a sheet of paper with the white side up, bend and straighten it diagonally.
- Fold the bottom sides towards the middle line upwards to create a cone.
- Bend the top points down.
- Bend the bottom point down. This fold should be at the level of the tip of the valve that you assembled in the third stage of the diagram.
- Fold in half vertically.
- The element is ready. You will need 7 more similar elements to create an eight-pointed samurai throwing star.
Actions to connect elements with suriks:
- Slide the lower left corners of one item into the white pockets of the other;
- Do the same with the remaining elements.
- The star is ready!
Enjoy your craft and the work of an origamist. There is not a child, and sometimes even an adult, who has not seen anime at least once in his life. This Japanese culture has become firmly entrenched in TV announcements and children happily watch these Japanese cartoons and anime series. We are talking about a throwing star from a Japanese cartoon about a ninja - the teenager Naruto. In addition to the fact that people all over the world revere and try to imitate this character, they also make attempts to build his throwing weapon. In this master class we will show you how to make origami shuriken Naruto from paper. A special feature of Naruto shuriken is its black color. Therefore, to make this shuriken you will need black paper. It is assembled in the same way as a regular shuriken, which has the shape of a 4-pointed star.
I would like to note that you should not throw such crafts at people and animals. You never know how dangerous such an action can be.
Putting it together
So, let's remember the technology of folding flying paper shuriken!
You will need:
- Two sheets of paper (you can take regular notebook paper or thick colored paper);
- Scissors.
How to make shuriken from paper:
- Give the leaf a square shape. To do this, you can bend it diagonally and cut off the excess;
- Fold the square in half lengthwise;
- Fold both halves towards the center fold line;
- In the resulting rectangle, bend one corner up and the other down. A parallelepiped with beveled sides should come out;
- Fold both bent corners towards the center again. A figure similar to S should appear;
- Repeat steps 1-5 with the second sheet, but so that it looks like a mirror image of the first (fold the corners in other directions, etc.);
- Center both pieces together. It should look like a swastika;
- Slide the corners of each piece into the gaps of the other, as shown in the diagram.
Made with your own hands, paper shuriken is ready!
Now you can make a few more pieces and play ninja with your child - or compete to see whose craft will fly away the furthest. Paper shurikens are launched with a twisting movement of the hand, or with a snap of the fingers, placing the star on a plane or on the fist of the other hand.
And if you make paper stars from colored paper (you can combine parts of two colors), and also use our pattern of voluminous paper snowflakes, then together they will become an unusual decoration for your home or classroom for the New Year or February 23rd.