You can't carry much on a bicycle, but sometimes there are times when you need to transport a fairly large load. It is not always possible to use a car for these purposes. You can get out of this situation with the help of a bicycle trailer, which can turn an ordinary bicycle into a cargo model. But bicycle trailers cost a lot of money, which is especially a pity to give away if the need to use them rarely arises. All that remains is to make a similar design yourself. Let's learn this business together.
Since bicycle trailers are not cheap, you can try to make this product yourself
Why do you need a bicycle trailer?
A bicycle trailer is required to transport goods. You can freely put an object weighing up to 60 kg in it. The advantage is that it can be one large box or several small ones.
Anyone who made a bicycle trailer with their own hands without welding is able to transport food from the market every day in this way. The device requires absolutely no fuel and is very easy to maintain. This means it can be removed.
A bike trailer is a quick way to transport cargo over short to medium distances.
Brakes, hitch, hubs and other components
When assembling a trailer for a walk-behind tractor with your own hands, you will inevitably have to make a decision on the design of the brake system, coupling device, parking stop, and other things. We will evaluate possible solutions and select the appropriate ones.
A trolley with a carrying capacity of more than 350 kg must be equipped with brakes, otherwise the load may push the walk-behind tractor at the most inopportune moment.
For a heavy cart, a parking brake is a must. It will also fit any passenger car and should be attached to the frame next to the driver. If there are standard mechanical brake drives in the rear suspension, all that remains is to connect them to the handbrake lever with a cable of the required length. The hydraulic and mechanical brakes should be thoroughly tested before loading the trailer.
The hitch is another important component of the trailer. In the simplest case, a pipe is welded to the drawbar, in which a hole is drilled for a finger. For motorized towing vehicles with an air-cooled engine, its diameter is usually 16 mm, with water cooling - 20 mm. In this example, the safety net is very correctly arranged in the form of a chain, which is attached to a finger in the side hole of the hitch.
Often, a cardan is used as a rotating element of the hitch. In this case, the side elements of the cross must be welded so that the drawbar of the cart does not sag.
When using a 4 wheel trailer, it is possible to use a factory hitch. In this case, you will need an adapter with a ball attached to the walk-behind tractor.
Let's consider several possible options for adapters for connecting a trailer. The first one is the same ball we mentioned and it works with a 4 wheel trailer. The other two are a sleeve welded to a rod that can rotate in the tube. The bushing is inserted into the hitch of the walk-behind tractor and secured with a finger. The tube is welded to the trailer drawbar. Thus, the cart has the ability to turn in both directions when moving, as well as freely tilt on uneven roads. The height of the bushing is 60-70 mm (depending on the version of the walk-behind tractor).
When parked, the cart may need to be supported. The spring design is reminiscent of a bicycle stop and allows the bar to be fixed in two positions.
Reliable tailgate latches can be made from strip, rod and pipe. You can’t do without a grinder and welding here.
On a small trailer you can weld regular bolts. In this case, the side sides should not tilt, otherwise the connection will spontaneously fall apart.
If the sides are intended to be extended, it is necessary to provide eyelets for the vertical posts. They are conveniently made from a 40x60 mm profile pipe.
Sometimes it is enough to weld small eyes on the bottom of the body. Through them you can tie an awning or cargo in a trailer.
You can weld the hinges for the tailgate yourself from a rod and tube. However, it is easier to weld regular door hinges.
To fasten corrugated sheeting, it is convenient to use self-tapping screws with a drill. Regular ones with a press washer or roofing ones with a seal will do.
We have already seen how a car seat or an office chair is used as a seat. You can make a simple bench for sitting yourself from a piece of chipboard, foam rubber and leatherette. The covering is attached to the base using a staple gun.
I tried to collect in this article the most useful information for those who decided to make a trailer for a walk-behind tractor on their own. A detailed story about the features of homemade trailers is offered by their owners in the following videos.
Main types of bicycle trailers
Before making a trailer and carrying cargo, it is worth considering the types of structures:
- with one wheel;
- with two wheels;
- with three wheels.
Types of trailers for bicycles
Plus, there is a division by material:
- tree;
- plastic;
- metal.
There are home, children's, and cargo options.
Do-it-yourself bicycle trailer or working on mistakes and running tests
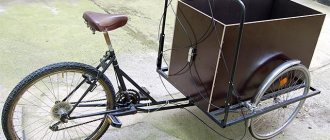
It so happened that within the walls of our workshop a man who was passionate about bicycles appeared, seeing a small empty space in our place, he did not modestly offer to settle there with the aim of opening a small, as some clients of the “Soviet” bicycle workshop are now calling it.
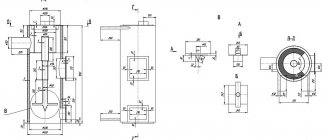
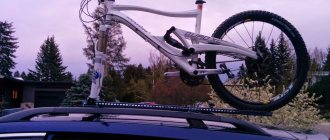
We responded in the affirmative to this proposal, and now cyclists come to us from all over the region. Then the idea of making all sorts of useful accessories for bicycles arose. Having argon welding at hand, we decided to start with bicycle trailers. Currently manufactured: Bicycle trailer for transporting a dog, Bicycle trailer for transporting light loads (it fell in an unequal struggle with off-road conditions, as it was made on a 25 pipe that could not withstand the loads), Bicycle trailer for transporting significant loads, 2 pcs. I’ll tell you about the latter today. Taking into account previous experience, we immediately abandoned 25 pipes; the supporting structure was made from 45.
Perhaps we overdid it a little and made the design bulky, but as shown by driving tests with a transported load of about 35 kg,
such a strength reserve in this case does not seem unnecessary (which was further confirmed by tests on bad roads). Considering that the trailer is made of aluminum alloy, the total weight of the trailer is only 8 kg.
Due to the appearance of the trailer, the working name was given to “Swan”.
Taking into account previous operating experience, the coupling device was slightly modernized. By adding several solutions from the auto world, we got a fairly reliable working unit. After completion of the installation, the trailers immediately went for sea trials with a full load. Sea trials. Both trailers were loaded to the top,
We gathered a small group of cyclists and went to Zhostvo. The route ran along the embankment of the Yauza River, along the bike paths of Mytishchi, clearings in the forest
and Ostashkovskoe highway. The total mileage one way was about 26 km. In places with a complex profile, the trailer clearly followed the leader,
Tomorrow, with the trailers described above, we are moving out at SIX o’clock in the morning from the Sviblovo metro area to Krylatskoye. We pick up 2 barrels on the spot and go back. If anyone wants to take a morning bike ride of 50 km, we will be glad to have fellow travelers...
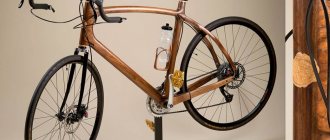
Design features of a side stroller for a bicycle
If we consider a homemade version of the stroller, it can withstand weight up to 50 kg. Users are able to make a side frame. Straps are often installed to protect the load.
There is a simple type of assembly, it stands out for its low weight. The size of the structure can reach 60 by 30 cm. The advantage is that the length of the frame can be changed.
Children's options can be made with retractable stands. With this design, the child will be able to carry toys. For adults, this option is interesting due to its compactness.
Side stroller appearance
Key Design Elements
The trailer includes the following elements:
- frame;
- board;
- longitudinal stop;
- fork;
- strut;
- wheels.
The frame is considered to be the load-bearing element. The board acts as a balancer. A longitudinal stop is required to withstand sudden stops and starts. Next comes the fork, to which the wheels are fixed.
To prevent the structure from tilting, it is important to install a strut.
Installing the seat belt
If you still plan to ride your child in such a stroller, you need to think about safety. At a minimum, it is necessary to purchase a helmet for your child and equip the stroller with seat belts. You can use regular straps from a denim sundress or something similar for these purposes.
What equipment is used in tire fitting?
To create a bicycle trailer at home, you should follow the plan:
- preparation of materials;
- tools;
- bracket;
- plug installation;
- frame equipment;
- wheels;
- painting.
A single-wheel trailer can be made with a single or double frame. The transportation will be smoother if you install a shock absorber.
Bicycle trailer at home
What basic materials will be required for the work?
The following materials are used to assemble the trailer:
- metal frame 30 by 40 cm;
- wheels 16 inches;
- fastening;
- metal bracket and beam;
- angles, channels and steel plates.
Tool preparation
A bicycle trailer can be made with your own hands if the following tools are prepared:
- welding inverter;
- drill;
- saw;
- screwdrivers and cutters;
- Bulgarian;
- a set of keys.
Assembly tool
Approximate scheme of work
Make a trailer according to this scheme:
- Preparing the work site.
- A tool is being used.
- Take the frame and attach a plastic casing.
- Fork equipment.
- Frame processing.
- Installation of wheels.
- Finishing.
According to the scheme, the trailed subframe can be made with lateral or longitudinal stops.
Site preparation means that a person will remove debris. There should always be a bicycle nearby. It is important to compare the mounting height and estimate the length of the stand.
It makes sense to use a professional grade tool. Thus, the master will not spoil the materials and will be able to make high-quality cuts, holes, and fasteners. The casing in the design is used for protection.
The fork can be purchased or you can also make it yourself. The advantage is that experts consider parts with ready-made shock absorbers. Even a conventional spring type has a positive effect on design parameters.
The frame is the main load-bearing element. The structure experiences the greatest overloads in the central part. When stopping and starting abruptly, the side stops suffer. This means that fasteners must be made to the highest standard.
Swivel bracket
Attaching the trailer to the bicycle (drawbar)
You can make a DIY bicycle trailer if you provide a reliable fastening. Professionals recommend choosing a swivel bracket. It is good if the part is painted immediately.
Accessories with polymer protection are sold on the market. The kit must contain parts for installation. These can be bolts or ties.
Making a platform
Creating the platform will also require a lot of time. To make it, you need to take a durable but fairly light material that will not make the entire structure particularly heavy, but will also be able to withstand the considerable weight of the cargo being transported. MDF, which is best taken with water-repellent properties, meets these requirements. You can also take metal rods and weld them together to obtain the required structure. This option will be more reliable than using MDF, but the weight of the trailer with such a platform will increase.
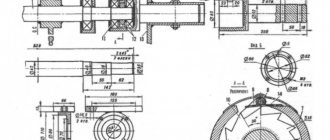
Approximate scheme of work
To create a trailer, you can use a not very thick pipe, the length of which will depend on the desired dimensions. An M20 bolt should go inside this pipe. Using a welding machine, M20 nuts must be secured to the ends of the existing pipe. As mentioned earlier, there can be two or one wheels. When deciding this issue, you need to carefully consider the area of use of the future trailer, what roads it will have to travel on, in what conditions (city, suburb, village, hiking) and how maneuverable it should be. Wheels can be taken from an old teenage/children's bicycle or bought new ones.
The axle found in most bicycles is not strong enough and therefore needs to be strengthened. You can install two supports for it, but this is labor-intensive and looks unaesthetic. It is better to increase the diameter of the existing axle using an M20 bolt. It may be necessary to turn the head on the bolt and the nut where it contacts the bearings on a lathe. After installing the axle bolts on the wheels, you can proceed to installing the wheels or wheels on the main axle, which was made from a pipe.
The platform, as already mentioned, can be made of various materials. If you choose MDF, then the sheet needs to be given the desired shape and size. For the completed workpiece, you will need to build a frame from a corner. There are no problems with this process. If MDF does not suit you, then we take the rods and weld them, forming the necessary structure.
From a half-inch pipe you will need to create a guide with which you can connect your bike to the trailer. A good solution would be to place the hinge joint on the mounting axle of the bicycle saddle. But you can consider other options that are not without meaning. The guide must be bent appropriately to ensure the trailer stays upright.
The hinge on the mount must be designed in such a way that the trailer does not interfere with the cyclist when turning, is able to smoothly overcome uneven roads and remains in its place when parked.
Still, homemade bicycle trailers have a number of advantages, among which it is worth highlighting their low cost, versatility and original design. When creating such an addition to your bicycle, you can take into account your needs and make changes to the size and shape. And no factory-made bicycle trailer can boast of such advantages.
Gravitex in a can: what is it, where to buy, how to apply
It is interesting to know how to make a trailer for a bicycle; the work flow looks like this:
- Preparation;
- tool;
- frame and casing;
- trailer forks;
- pipe and post treatment;
- wheel installation;
- finishing.
For assembly, boards 15 by 40 mm and metal tubes with a diameter of 13 mm and a length of 1 meter are prepared. The most important tools to have are a grinder, a drill and a hammer. Measurements are taken and marks are made on the material.
Next is to work on the frame and racks. To do this, the boards are first laid in a row on the ground. The master checks the length and then prepares the fasteners. After this it’s time for the fork. It is taken with or without a shock absorber.
The good thing is that frame length has nothing to do with the fork. The racks will need to be further strengthened in the future; here you need to understand the length of the frame and the maximum load that will be exerted.
Construction from scrap materials
Wheels can be taken at 20 inches. A regular or studded version is suitable. It is worth preparing the seats on the fork for fastening in advance.
Making the fastening
- cut the profile to the required length;
- add a jumper;
- add another part (smaller in size) and add a small jumper, as shown in the photo;
- After all the above, you need to get rid of sharp corners so that you don’t cut yourself or cut your child while driving.
How to make a bicycle trailer from plastic pipes
To drive a trailer safely, it’s not enough to just hammer in a nail; you need a whole system of fasteners. Plus, it’s worth considering a step-by-step assembly plan from pipes:
- soldering pipes for the frame;
- fork pipes;
- treatment;
- trailer wheel;
- finishing.
An industrial hair dryer is required to work with pipes. The craftsmen warm up the workpieces and only then begin work. It is easier to prepare the base using blanks with a diameter of 1.5 mm. Pipes with a diameter of 20 mm are used as supports. The advantage is that the fittings can be found at any plumbing store.
Plastic trailer
Craftsmen use squares, straight adapters and T-shaped fasteners for assembly.
It is worth screwing a metal washer into the fastening area. After this, you can fix the swivel bracket.
Privacy Policy
General provisions
Some objects posted on the site are the intellectual property of StoreLand. The use of such objects is established by the current legislation of the Russian Federation.
The StoreLand website contains links that allow you to go to other sites. StoreLand is not responsible for the information published on these sites and provides links to them only to provide convenience to visitors to its site.
Personal information and security
StoreLand guarantees that any information received from you will never, under any circumstances, be provided to third parties, except in cases provided for by the current legislation of the Russian Federation.
In certain circumstances, StoreLand may ask you to register and provide personal information. The information provided is used solely for official purposes, as well as to provide access to special information.
Personal information can be changed, updated or deleted at any time under Account > Profile.
In order to provide you with certain types of information, StoreLand, with your explicit consent, may send informational messages to the email address specified during registration. At any time you can change the subject of such mailings or refuse it.
Like many websites, StoreLand uses cookie technology, which may be used to promote our product and measure the effectiveness of advertising. In addition, with the help of this technology, StoreLand is configured to work with you personally. In particular, without this technology it is impossible to work with authorization in the control panel.
The information on this website is for informational purposes only and is subject to any changes without any prior notice.
in order to refuse further communications with our company, change or delete your personal information, write to us via the feedback form
Source
How to make a bicycle trailer out of wood
The drawing of a wooden trailer looks as simple as possible. The optimal frame size is 55 by 40 cm. The main condition is to look at each point of the instructions:
- preparation of bars;
- frame made of boards;
- treatment;
- trailer wheels;
- final finishing.
Wood is a material that forgives many mistakes. When working, you should use 15 by 15 mm bars. For the main frame, 25 by 25 mm bars are suitable. The length of the blanks can be 1, 1.5, 2 meters.
Nails, metal corners and screws are used as fasteners. They screw on with washers. When the frame is ready, it’s time to move on to fastening. The swivel bracket is the ideal solution.
Wooden trailer
Varieties
Everything here is extremely simple. If you decide to buy a ready-made bicycle trailer, then be sure to take a look at its design features.
The division is based on the number of wheels used. As a result, the bicycle trailer can be:
- Single wheel. The design is most widespread in the field of tourist bike travel. Single-wheeled models are the most maneuverable and compact, which allows you to drive with them even on the narrowest paths and difficult areas;
- Two-wheeled. A more massive design, aimed at transporting heavy loads, animals, children, etc. At the same time, it is no less popular precisely due to its cargo capabilities. Maneuverability is not so ideal, but it all depends on your route and the amount of things you need to take with you.
That's the whole classification for you. Other principles for separating bicycle trailers are not yet used.
Advantages and disadvantages
Four-wheeled bicycles are not so popular that it’s so easy to visit their owners and ask about the pros and cons of the design. Let's look at the key factors that influence the transition to a “four-wheeled friend.” Pros:
- The most stability of any bike currently available.
- Convenient location of the rider.
- Large load capacity and loading volume.
- Interesting and unusual design.
The disadvantages are also obvious:
- Complexity of design - a velomobile is difficult to assemble on your own and not easy to repair.
- Less reliability - 4 wheels, a complex drive mechanism, additional steering elements, many welded joints - units that can break and are subject to increased load much more than in a regular bike. Accordingly, the chance of failure is much higher.
- High price - few people will decide to buy a ready-made trike or velomobile - the cost is high, and there is practically no mass production. Do-it-yourself manufacturing will spend a lot of time and money on non-standard custom parts.
- Dimensions - it is difficult to put such a bike on a balcony or carry it up a mountain - you will have to work with the transport as with a full-fledged car.