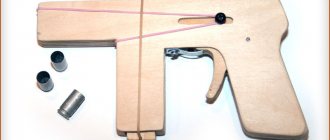
EMP (electromagnetic pulse) is quite popular in the world of science fiction. Wouldn't it be cool to have your own EMP gun rig? That's what I thought before I started assembling the electromagnetic emitter with my own hands.
I wanted to make an EMP generator that was portable and could be hidden under my sleeves. If you have the right components, you can assemble it in no time.
WARNING: This project is not for children.
Seriously speaking, you might get a shock. Capacitors are really powerful and therefore please be careful when handling the circuit.
I take no responsibility if you destroy anything with this weapon.
Electronics Destroyer - DIY
Discussion with an engineer from an NPO
I wish you good health! I found a video with technology that may help us disrupt the offensive of the Armed Forces of Ukraine and take advantage of the moment to go on the offensive and again drive the bastards into the cauldron. Unfortunately, my knowledge is not enough and I am trying to find out from the author and my friends how to increase the range of this gun. I would be grateful for any information. I’m ready to solder and assemble such installations if they really help. Write specific proposals in a personal message, without water. The author of the video logged into his account twice during this time from different devices, but did not respond to the requests. Let's wait. A friend (possibly an ex-friend) answered. I won’t go into all the discussions about politics and the rest of the water, that they will strangle us, etc. (This is understandable to a moose too). I will publish only its technical part. No matter what, I will solder the circuits and try to help the Brothers (even though I’m a simple electrician, I don’t forget that I’m a reserve worker). We listen and Help if possible. Publication of communication: Andrey, hello! The range has already been increased. Repeatedly, up to tens of kilometers. More than a hundred years ago, Professor Mikhail Fedorov lit light bulbs in Tsarskoe Selo from a laboratory in St. Petersburg. Nikolo Tesla did the same thing in Western Europe at the same time.
Nowadays, radars with active antennas work - essentially the same as in video recording, but many times more powerful. They consume huge amounts of electricity. Airplanes are irradiated at a distance of many tens of kilometers. But they cannot burn electronics at such a distance. By the way, the box from the video recording also cannot burn anything metal or electronic. It can only burn the internal organs of a person, they are much more sensitive - there are quite a lot of accidents at radar stations, and quite a few fatalities. And the guys also forgot to tell us that after each “impulse” they need to recharge their toy.
It is easy to check the effect of this “toy”. — Place some electrical appliance you want to burn inside the microwave and turn on the microwave. (The stove door must be closed. - Nothing will happen to the metal, but I feel sorry for you.) For the guys, the impulse lasts for a split second. You can irradiate for at least a minute, to be sure. “Then tell me what metal you burned.”
Andrey Volt
The proposed high-frequency signal generator is attractive due to its simplicity of design and provides output voltage stabilization over a wide frequency band. The requirements for a wideband signal generator are well known. First of all, this is a sufficiently small value of the output resistance, which makes it possible to match its output with the characteristic impedance of a coaxial cable, usually 50 Ohms, and the presence of automatic adjustment of the output voltage amplitude, which maintains its level almost constant regardless of changes in the frequency of the output signal. For the microwave range above 30 MHz, simple and reliable band switching, as well as rational generator design, are of great importance. The schematic diagram of the device is shown in Fig. Transistors VT1, VT2 together with a variable frequency setting capacitor C1 and inductances L1 - L4 form a master oscillator frequency range
A generator is a self-oscillating system that generates electric current pulses, in which the transistor plays the role of a switching element. Initially, from the moment of its invention, the transistor was positioned as an amplifying element.
digital electronics computing embedded systems
How to make an electromagnetic pulse generator with your own hands
Are you fed up with your neighbors' loud music or just want to make some interesting electrical equipment yourself? Then you can try to assemble a simple and compact electromagnetic pulse generator that is capable of disabling electronic devices nearby.
An EMR generator is a device capable of generating a short-term electromagnetic disturbance that radiates outward from its epicenter, thereby disrupting the operation of electronic devices. Some EMR bursts occur naturally, for example in the form of electrostatic discharge. There are also artificial EMP bursts, such as a nuclear electromagnetic pulse.
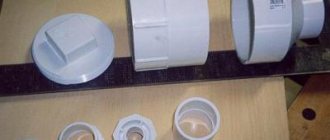
This material will show you how to assemble a basic EMP generator using commonly available items: soldering iron, solder, disposable camera, push-button switch, insulated thick copper cable, enamel-coated wire, and a high-current latching switch. The presented generator will not be very powerful in terms of power, so it may not be able to disable serious equipment, but it can affect simple electrical appliances, so this project should be considered as a training project for beginners in electrical engineering.
What you will need
- Copper wire (EM emitter)
- Disposable camera (EM emitter)
- Iron rod (EM emitter)
- Solder and soldering iron (EM emitter)
- AA battery (portable EMR device)
- Battery compartment (Portable EMR device)
- Copper Wire (Portable EMR Device)
- Cardboard box (portable EMR device)
- Disposable camera (with flash; portable EMR device)
- Electrical tape (portable EMR device)
- Iron core (preferably cylindrical; portable EMR device)
- Rubber gloves (recommended for both devices)
- Simple electrical switch (portable EMI device)
- Solder and soldering iron (handheld EMR device)
- Radio antenna (portable EMR device)
Electromagnetic pulse generator (EMP gun) or how to make a weapon with your own hands
EMP (electromagnetic pulse) is quite popular in the world of science fiction. Wouldn't it be cool to have your own EMP gun rig? That's what I thought before I started assembling the electromagnetic emitter with my own hands.
I wanted to make an EMP generator that was portable and could be hidden under my sleeves. If you have the right components, you can assemble it in no time.
WARNING: This project is not for children.
Seriously speaking, you might get a shock. Capacitors are really powerful and therefore please be careful when handling the circuit.
I take no responsibility if you destroy anything with this weapon.
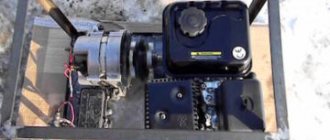
Designing a microwave cannon
Today we will tell you how a microwave gun is constructed from a microwave oven, described by Kreosan on YouTube. So, we will need:
- Microwave oven (working).
- A coffee can or tin can, or even better, a loudspeaker housing (bell).
- Wire.
- Necessary little things.
The main element found in a microwave is the magnetron. Its purpose is to generate waves of ultra-high frequency and enormous power. We must remove the required device. For those who don't know, it looks funny. A pin sticks out from the top of the iron thing, which is a high-power radiator. It is a microwave emitter. The radiation power is about 700–800 W.
Magnetron gun diagram
Therefore, it is necessary to work with extreme caution. Once in the focus of radiation, this power can harm health, especially the eyes. I am glad that the radiation emanating from the pin is diffuse and more or less safe. In any case, you should not take risks and come very close.
Antenna
In order for the microwave gun from a microwave oven to operate purposefully with your own hands, Kreosan recommends making an antenna. Now you will need a coffee can. You will need to cut a hole in it.
Cannon with antenna
The slot diagram is as follows:
- With a can height of 175 mm;
- Diameter - 75mm;
- We make a hole with a diameter of 20 mm, on the side wall, retreating from the bottom - 37 mm.
All that remains is to remove the magnetron from the microwave. We simply extend the wires connected to it, and attach the antenna to the body of the product using wire. Our microwave gun is ready and made by hand!
Rod devices
The rod type circuit includes a conductor with a winding. Capacitors can be used with different capacities. However, they may differ in conductivity. If we consider a simple model, then the stand is prepared in a round shape, and the terminals are set to 10 V. The solenoid winding is wound last. It should also be noted that the magnet selected is of the neodymium type.
The rod itself is applied to 2.2 cm. The terminals can be installed on the lining. It should also be mentioned that there are modifications for 12 V. If we consider devices with high-capacity field capacitors, then the minimum diameter of the rod is allowed 2.5 cm. In this case, the winding must be wound to the insulation. A protective ring is installed at the top of the emitter. Stands are allowed to be made without an overlay.
Modifications for fish finders
Devices for fish finders are assembled only with wired capacitors. First you need to install the stand. It is more advisable to use rings with a diameter of 4.5 cm. The solenoid winding must fit tightly to the rod. Quite often, capacitors are soldered at the base of the emitters. Some modifications are made for two terminals. The ferrite rod must be fixed to the insulator. Electrical tape is used to strengthen the ring.
High impedance devices
High impedance ultrasound emitters are well suited for short wavelength receivers. You can assemble the device yourself only using transition capacitors. In this case, the terminals are selected for high conductivity. Quite often the magnet is mounted on a stand.
The stand for the emitter is used at a low height. It should also be noted that one rod is used to assemble the device. To insulate its base, regular electrical tape is suitable. There should be a ring at the top of the emitter.
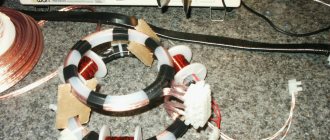
Microwave heater
An old broken microwave lay idle in the pantry for a long time. I decided to make something useful out of it. The microwave has a powerful transformer, if properly modified, you will get a powerful resistive heater for heating rusted nuts and other small metal parts.
Almost any transformer from a microwave oven, even a faulty one, is suitable for this homemade product, the main thing is that the primary network winding is intact. I got a 700-watt copy, but the more powerful the better.
Remaking the transformer involves removing the secondary winding. And winding two turns of large-section copper wire. That is, we need to rewind the transformer in such a way as to lower the output voltage to 1.2 volts and increase the current to 600 amperes.
Let's get down to business, take a hacksaw and cut the secondary winding. You need to cut from both sides and very carefully so as not to accidentally damage the network winding.
Now you need to secure the transformer in a vice and use a hammer to knock out the inner part of the secondary winding through a metal attachment.