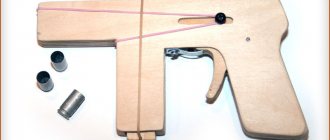
Make some awesome lightsabers for under five dollars apiece! Step-by-step instructions on how to make a lightsaber with your own hands.
The method described here allows you to assemble a real lightsaber at minimal cost and is easy to manufacture.
Read this article to the end and you will learn how to make excellent Jedi laser swords!
Making Jedi weapons
To make your own lightsaber, you will need to purchase LEDs and an LED flashlight, plastic rods, resistors, aluminum foil, tape, glue, sandpaper and heat shrink tubing.
Disassemble the flashlight and remove the board from it, removing the LED. Attach your own LED and resistor to the board. Place heat-shrink tubing on the resistor to keep it in place more tightly. How to make a real lightsaber? Of course you need a blade.
It is made from a transparent plastic rod of the required length (if necessary, cut off the excess). Attach the rod to the screwdriver, sharpening one end to do this. Adjust the other end to the diameter of the flashlight body using a file.
Where would we be without effects?
In addition to this, difficulties will arise in the practical use of light weapons. First, two laser swords can never collide with each other. They simply pass through each other, without leaving that amazing effect that appears in the films.
Moreover, laser light is focused in a specific direction so quickly that the human eye simply does not have time to catch it. This is why fog is used in nightclubs. Smoke particles flying around the room act as tiny diffusers. They break the laser light into many pieces and thereby make the beams noticeable.
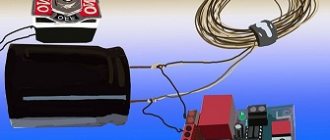
COMPONENTS
Directories of links to Aliexpress on this site:
I try to leave links only to trusted large stores from which I order myself. Also, the first links lead to the minimum number of stores possible in order to pay a minimum for delivery. If some links do not work, you can look for a similar piece of hardware in the Arduino modules catalog. You can also try to assemble the project from the components of my GyverKIT.
- Arduino Nano buy in Russia, aliexpress, aliexpress, search
- Address strip. Chip WS2811, voltage 12 Volts. We take 2 meters of tape, on a white backing, without moisture protection, 60 LEDs per meter https://ali.ski/s4CGU
- https://ali.ski/qGkmEj
Assembly
The size of the neon strip should be slightly larger than that of the tube. Use hot glue to secure one end to the cap that will cover the top of the weapon. The tape should be inside the polycarbonate tube. Jedi swords glow evenly along their entire length; cold neon will give you this effect.
To connect the tape to the inverter, you just need to insert the connectors into each other. No soldering or additional manipulations are required, which is very convenient. Check the lighting operation.
To ensure that the sword serves you for a long time, carefully fix the inverter inside the tube using hot glue. This way it will not dangle and hit the walls of the case.
All that remains is to carefully insert the tube into the base of the handle and secure it with glue. The lightsaber is ready! This option is suitable for both role-players and children.
CONTROL
Interaction with the sword
- Turn on/off by holding the button
- Triple press – change color (red – green – blue – yellow – pink – cyan)
- Press five times – change the sound mode (generation mode and sound mode from the memory card)
- The selected color and mode are stored in memory and are not reset upon reboot
Assembly and launch order:
- Open the firmware, configure: Number of MICROCIRCUIT on the tape (black things like that. One microcircuit is responsible for 3 LEDs ). If you want to make the sword longer, no problem, the main thing is not to forget to adjust it.
- Enable or disable blade flickering (for epileptics)
- IT IS DESIRABLE to measure the real resistance of the divider resistors and also indicate them (in Ohms). If you do not install a divider, then you need to disable the BATTERY_SAFE parameter. But I highly recommend not doing this!
- Size up to 4 GB
- ATTENTION! If a COMPLETELY ASSEMBLED SWORD is being flashed/debugged, then you need to turn on the power, otherwise the Arduino will constantly reboot! This is related to power supply, since we have a converter hanging on.
To those on the dark side
Fans of insidious images also need Jedi swords. After all, the Sith simply switched to the dark side of the force and created their own order. Darth Maul wielded dual weapons, which provided an element of surprise in battle. His red lightsaber frightened everyone who came across the dark lord on the way.
As you may have guessed, it will not be difficult to make. You just need to collect two swords with a red neon ribbon. Please note that their blades should be slightly shorter. Connect the flashlight handles together using black electrical tape. Make the winding strong so that the parts do not dangle. You can first fix their bases with “second glue”, and then go over them with black insulating tape.