The summer season is approaching and it's time to think about creating a chaise lounge with your own hands. It will allow you to enjoy your outdoor recreation to the fullest.
Chaise longue in French means long chair. This is a chair for relaxing. It can, at the owner’s request, change the position of the backrest.
DIY chaise longue
- 1 General recommendations
- 2 Monolithic chaise lounge made of wood
- 3 Assembling a chaise lounge on wheels
- 4 Simple lounger
- 5 Video of DIY garden lounger
- 6 Fabric chaise longue
- 7 DIY fabric chaise lounge. Model 2 7.1 Manufacturing process:
- 7.2 Model installation
- 9.1 Pay attention to another interesting chaise lounge model in the video.
- 10.1 Installation of the Kentucky chair
- 12.1 Unusual do-it-yourself deck chair
- 13.1 DIY pallet lounger video.
Sun loungers are widely used on beaches and by pools. On personal plots, dachas.
Sun loungers are made from various materials:
- wood;
- plastic;
- aluminum;
- rattan;
- PVC pipes;
- durable fabric.
Wooden sun loungers are the most popular and environmentally friendly. They come in a variety of shapes and designs. The disadvantage of monolithic wooden sun loungers is their weight. But this problem can be solved with the help of wheels.
Plastic sun loungers are characterized by easy mobility, ease of maintenance, and relatively low cost. Their minus is their fragility.
Fabric loungers are versatile and comfortable. Their frame is made of wood, metal or PVC pipes. They fold easily and do not take up much space.
Rattan sun loungers look great in the lap of nature. They are environmentally friendly. However, purchasing them is expensive. If you have sufficient skills, you can simply weave a rattan lounger yourself.
In this article we will tell you how to create wooden sun loungers with your own hands.
General recommendations
To ensure the longevity of the effort expended, the materials used must be processed.
Antiseptics and special impregnations will help protect wood from moisture, harmful insects, rot, and mold. It is better to carry out processing before assembling the structure.
After installing the sunbed, the wooden parts should be coated with primer, drying oil, varnish or paint. This will extend the life of your masterpiece.
Fabrics should also be protected from rain and sun. Water-repellent impregnations will help preserve their brightness and service. Their effect lasts 2-4 weeks.
And, of course, remember the famous Russian proverb when working. Measure seven times, cut once.
Requirements for homemade furniture
Any furniture intended for outdoor use must meet a number of requirements:
- Sufficient size. When developing a drawing, it is imperative to take into account the anatomical features of the future user. To calculate the angle of the backrest, it is better to use furniture construction standards. Correctly selected parameters will allow you to avoid pain in the back and neck, while ensuring normal blood circulation and comfort during rest.
- The height of the sun lounger should be optimal, especially for young children.
- Almost all models of sun loungers have a rigid frame (most often made of wooden boards). However, you should take care in advance about sewing a soft mattress or pillows.
- The safety of homemade furniture is one of the most important requirements for a craftsman. During the final assembly of the structure, it is necessary to carefully inspect all parts for defects, chips, cracks, and signs of surface damage by pests. All existing irregularities should be removed by grinding the parts.
- Particular attention is paid to pre-impregnation of all wooden surfaces with an antiseptic, antipyrine and moisture-resistant composition. As the main impregnation, you can use a production solution or a mixture of drying oil, turpentine, and melted paraffin.
When assembling folding models, sufficient attention is paid to the condition of the rotary fittings (reliability of fastening, absence of manufacturing defects, possibility of subsequent replacement).
During operation, preventive inspections of fittings and fasteners should be carried out at regular intervals.
Monolithic chaise lounge made of wood
Solid models are heavy. Therefore, to make it easier to carry, wheels are added to the headboard. The following instructions will help you make a chaise lounge on wheels with your own hands.
You will need tools:
- electric jigsaw or hacksaw;
- drill;
- screwdriver;
- self-tapping screws;
- fine grain sandpaper;
- spirit level;
- roulette.
When choosing a tree, pay attention to coniferous species. They are sold at affordable prices and are characterized by increased water resistance. Materials needed for a sun lounger:
- glued slab made of wood, its thickness should be 2 cm or more; at least 2 cm thick.
- boards 0.25 cm thick.
- wooden beam with a square section of 50x50 mm;
- 4 wheels with a diameter of 10cm;
- corners for strengthening the bed;
- door hinges;
- varnish or paint.
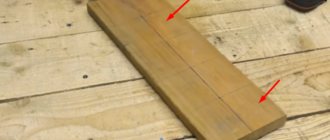
We suggest you make a chaise lounge according to this pattern.
Legend:
- Front legs.
- Hind legs.
- Bearing longitudinal.
- Back support.
- Back support.
- Bearing transverse.
- Fixing bar.
- Backrest support.
- Wheels.
- End beam.
- Back slats.
- Seat slats.
- The support beam is transverse.
- Fixing bar.
You can independently determine the size of the desired sun lounger and make calculations. Or use the standard size 60x190 cm. It is the most optimal and ergonomic for the average adult.
Assembling a chaise lounge on wheels
We assemble the base frame from the bars. We secure the load-bearing parts with corners similar to those that secure the base of the bed.
We sheathe the resulting frame with pre-prepared and sanded boards.
We make blanks for the legs from timber. Their height usually ranges from 5-10 cm. Choose one that is comfortable for yourself and your household.
We drill holes with a drill, retreating 5-7 cm from the ends of the longitudinal sides. We secure the legs with long bolts. We control the horizontal side with a spirit level.
We screw the wheels to the center of the legs with bolts with a diameter of 30mm.
Let's start cutting the lattice elements. Use a hacksaw or jigsaw to cut 8x60cm boards.
Using self-tapping screws and a screwdriver, screw the slats to the chaise lounge frame. Since the boards are not screwed tightly, we use spacers to obtain even gaps.
We should have two parts. The smaller one is intended for the headboard. We connect both grilles with door hinges. We install a support bar under the opening part.
All that remains is to sand off the production flaws. Apply wood primer. Paint it in your favorite color and the chaise longue with your own hands is ready.
For a more comfortable stay, you can sew additional mattresses that fit the size of the bed.
The final stage of manufacturing frame elements
7. Using a combination square and pencil, mark 45° lines on the inside face extending from the corners of the side rail. Cut out the shape with a jigsaw, extending it slightly beyond the center of the circle. See the picture on the right. Sand the edges with 20-grit sandpaper according to GOST (80 according to ISO) using a sanding block.
8. To make the handles at the heads and feet of the chaise longue, a dowel blank was used. Using a Forstner drill, drill a hole 20 mm deep at the intersection of the lines drawn at 45°. Select a drill so that the hole matches the size of the dowel.
9. Cut four legs 300mm long. Make the ends perpendicular and, using a square and thicknesser, mark a groove in the upper corner of each leg at a distance of 30 mm from the edge and 70 mm from the top (see the figure below). Securely secure the leg with a C-clamp or in a vice and use a circular saw to cut along the leg to a transverse line, and then use a hand saw to cut along the markings across the grain to remove waste. Complete the longitudinal cut with a hand saw.
Simple sun lounger
To create a wooden chaise lounge with your own hands, you need the following materials, as well as tools:
- tape measure and square;
- pencil;
- saw;
- electric drill;
- screwdriver or screwdriver;
- screws, self-tapping screws and studs for fixation;
- sandpaper or grinder;
- wood putty;
- dye.
Wooden beams used in the work:
- for the back of the chaise lounge, take boards 5×10 with a length of 88 cm - 2 pieces, 39 cm - 3 pieces, 60 cm - 1 piece;
- 2 longitudinal bars for a frame 215 cm long;
- 2 cross beams -50 cm;
- 6 legs -35 cm;
- 13 slats for a seat measuring 2.5 x 8 x 60 cm;
- 6 slats for the back - 2.5? 8? 88 cm.
The first priority is to create a very strong frame. We take two parts 215 cm long, connect them with screws to half-meter transverse parts.
Let's move on to sitting. Take all the 60 cm slats. Attach them to the frame with self-tapping screws, leaving small gaps. To ensure that the gaps are even and uniform, use spacers 1 cm thick.
We create the legs of the lounger. To give maximum stability to the chaise longue, two legs are nailed at once at the legs. One at a time at the head. The instructions indicate bars with a height of 35 cm. But you can choose a height that is comfortable for you
We make the back from 2 boards measuring 88 cm and 3 boards measuring 39 cm. The resulting frame should easily fit into the base, leaving a small gap between the structures.
We securely fasten the longitudinal strips. We round them for a more beautiful look.
Attach the backrest to the base of the lounger. To do this, you need to drill holes at a distance of 9cm from the edge of the seat. Secure with pins.
We make 2 grooves at the base of the sun lounger for the support bars. The first 5x10 cm notch should be approximately 9 cm from the stud. The second is 20cm from the first. But its depth will be only 5x5 cm.
A 60cm beam is inserted horizontally into the first recess. To change the position, the board is transferred vertically to the second recess.
Sand all rough edges and imperfections. Process it. Cover with paint or varnish. The chaise lounge is ready with your own hands.
Chaise lounge for a summer residence - description of the design, types of products and their characteristics
Sun loungers have their own special design, the frame of the back, seat and armrests, so that a person feels as comfortable and comfortable as possible. We are talking about both semi-reclining and semi-sitting versions of the chaise lounge, which contribute to maximum relaxation of all the muscles of the human body.
These are the qualities that a classic rocking chair has, which you can make yourself if you have all the necessary drawings with calculations and design sketches.
Classic wooden chair - rocking chair for the garden
Thanks to the lightness of their design, country sun loungers can be moved to any place in your garden plot, depending on whether you want to lie in the sun or in the shade. Folding products made of wood and fabric are very convenient, as they can be put indoors when it rains, and they will not take up much space.
Folding wooden chaise longue with fabric seat
Wooden sun loungers have a high level of durability and are renowned for their long service life if properly cared for.
Today, having a competent and accurate drawing in your hands, you can make your own folding or light hanging chaise lounge, which will fit quite aesthetically into the exterior of the entire garden plot.
Types of sunbeds and sun loungers
Depending on the type of construction, sun loungers can be divided into several types:
- Monolithic frame. This is an outdoor chair in which all elements are “tightly” connected to each other. This product is very durable and can withstand even the heaviest loads. It is absolutely safe even for small children under 1 year old. But, meanwhile, such a product during its operation may create some inconvenience. It is impossible to make your own adjustments to such a chaise longue and change the angle of the backrest; it does not fold and therefore is inconvenient to move from place to place, as well as to store in small rooms (pantries, closets, etc.).
- Monolithic chairs with special inserts have a beautiful appearance and are characterized by a high degree of decorativeness. They are equipped with additional inserts, which are made of materials with different characteristics, which reduce the strength of this design. But, meanwhile, they look very aesthetically pleasing and impressive.
- Portable folding sun lounger designs have special movable mechanisms that allow you to quickly change the position of the backrest at your discretion. This applies to the entire sun lounger as a whole. If necessary, a person can easily change the degree of inclination of the backrest, headrest, and lower footrest. You can take portable folding lounge chairs with you on a trip thanks to their extremely compact folded dimensions. They practically do not get dirty during long-term use.
Gallery of sun loungers and their types
Designer chaise lounge - rocking chair with durable metal hoops instead of legs Original chaise lounge for a country house Folding chaise lounge with canvas seat, plastic handrails and metal frame
Plastic folding chaise lounge with a soft mattress Wooden chaise lounges for the garden Original chaise lounge made of wood with soft mattresses in the form of a spiral
Country chaise lounge made of rattan with adjustable backrest
An original designer chaise lounge that you can make yourself from a sheet of chipboard
Chaise lounges with a spring seat on a metal base
Fabric chaise lounge
A chair with a frame complemented with fabric is one of the most comfortable, budget types of chaise lounges. It is convenient to fold and easy to carry. Can be stored flat. It takes up little space.
To create a sun lounger with your own hands you will need:
- bolts, nuts with a diameter of 8 cm;
- small nails with round heads;
- round sticks (1 piece -65cm, 2 pieces - 50cm, 2 pieces -60cm);
- rectangular bars 25x60cm thick (2 pieces 120cm, 100cm and 60cm long);
- needle file, fine-grain sandpaper;
- glue;
- durable material measuring 200 by 50 cm.
Choose materials carefully so that your work is not in vain. Hardwood blocks are perfect for a sun lounger. Choose:
- birch;
- oak;
- beech.
Choose fabrics with maximum strength. Great fit:
- teak for mattresses;
- tarpaulin;
- canvas;
- camouflage;
- denim
These materials have increased wear resistance and will last you a long time. Let's move on to creating a sun lounger with our own hands. The base consists of three frames:
- A.1200x600 mm.
- B.1100x550 mm.
- H.650x620 mm.
Cut the boards to the required length. We sand with sandpaper.
In the longitudinal bars we make indents of 70 and 40 cm, and drill holes with a diameter of 8 mm with a drill, just like the bolts. Sand with a round file.
We make cutouts in part B. They will allow you to change the position of the back later. To do this, retreat 7-10 centimeters. It is necessary to cut 3 or 4 recesses. We polish well.
According to the diagram, we drill holes in the bars to connect the parts.
Assembling the base of the lounger. We connect frames A and B using screws. Then we connect frames A and B. For greater reliability, we lubricate the ends of the round slats with PVA before assembly. The frame of the sun lounger is ready.
Now you need to sew the seat. Place the material on the bed in the folded position. The fabric should be slightly stretched. Measure the desired length. Hem the edges. This way you will increase the wear resistance of the material. The chair will look neater.
We attach the fabric base to the lounger. We wrap round slats on parts A and B. We nail them with small nails with round heads. The chair is ready.
ADVICE. The edges of the fabric base can be made in the form of loops. In this case, the seat is simply strung on slats.
Sewing a soft cover
Having a soft pillow or mattress on a wooden chaise lounge will be a definite advantage.
- For tailoring, you should choose textiles very carefully.
- For ease of subsequent care, it is better to sew two covers: an inner and an outer removable cover.
- When dirty or before the winter season, the outer part can be washed without damaging the filling.
- The size of the pillow or mattress can vary, but as a rule, it should completely cover the lower and upper bed.
DIY fabric chaise lounge. Model 2
For this chair you will need:
- wooden slats measuring 2x4 cm. Two slats each with a length of 122cm, 112cm, 38cm. One piece each 61 cm, 65 cm, 57 cm. And four slats 60cm long;
- slats measuring 2x6 cm. One each 61 and 57 cm;
- 65cm wooden rod with a diameter of 1.2cm;
- a piece of fabric 137 cm long and 116 cm wide;
- bolts, washers, nuts, screws;
- glue;
- round needle file, sandpaper or grinder;
- electric drill.
Manufacturing process:
Process all the details of the future chair in advance. Sand them using a machine or fine-grained sandpaper. Cover with special impregnations that protect the wood from corrosion. Appreciate your work.
Pay attention to the drawing. The crossbars at the bottom of the legs help fix the position of the backrest. Make them. Or cuts, retreating from the edge by approximately 20, 25, 30 and 35 cm.
Drill holes for the bolts in the back frame. To do this, measure 41cm on each side.
On the seat frame, step back 43cm from the top. Make holes.
On the piece supporting the back, drill holes in the center of the edges.
Process all holes with a round file.
Model installation
First assemble the back frame. A beam 61 cm long will carry a large body load. Secure it as securely as possible. Leave a small gap between the two slats. The tissue will be fixed through it.
Assemble the seat. Fold it with the back frame. Be sure to place a washer between them. Bolt the frames together.
ADVICE. To prevent the nuts from loosening quickly, tighten an additional lock nut on top. For greater reliability, attach the nuts to glue, varnish or paint. First tighten the nut. Then loosen it slightly so that the parts rotate freely.
Install the back support piece using washers and bolts.
Sand away all imperfections. If desired, varnish or paint.
Fold the fabric in half, sew, retreating 1.5 centimeters from the edge. Turn it inside out. Fold the edge of the material for the rods that secure the panel between the slats. Sew.
Now insert the material between the slats. Secure with a rod. This installation model allows you to remove the fabric for washing without much effort.
Chaise lounge made of polyvinyl chloride
Another example of a lounger with a fabric base. Only in this case, wooden slats are replaced with PVC pipes. Chair sizes may vary.
In this do-it-yourself chaise lounge model we used:
- 2-inch polyvinyl chloride pipes;
- L-shaped connectors – 8 pieces;
- T-shaped connectors – 6 pieces.
First, connect 30cm and 45cm long PVC pipes for the vertical strip using a T-connector. Place L-shaped connectors on the ends. Connect the second vertical in the same way.
Now you need to connect the two sides together. Please note that one horizontal crossbar is solid. Its length is 66cm. It is attached closer to the T-shaped connection, which in turn should be directed into the structure. The second side consists of two 30cm pipes, combined with a T-shaped adapter, turned at an angle of 45 degrees from the long side of the strip.
Do not hurry. Measure pipes accurately. As a result, you should end up with a rectangular structure.
Now is the time to make the connection on which the seat will rotate. To do this, insert a 5cm long pipe into the T-shaped connector and secure it with another T-shaped adapter. It will become the basis of the horizontal frame.
Make the long sides similar to the vertical section, using 30 and 45 cm pipes with an L-shaped connector. For crossbars, use a solid tube 30cm long. And also consisting of 2 x 20 cm with a T-shaped adapter.
You did everything right if you get a rectangle within a rectangle.
The seat is located between a long section of the vertical section and a short section of the horizontal section. Adjust the level of inclination that is comfortable for you. Measure the distance between the two free T-pieces. Cut the pipe to the required length. Insert the rear support.
Take measurements of the fabric consumption for your chair. Use thick fabric. For example, canvas, tarpaulin, jeans. Hem the edges and secure the fabric to the chaise lounge. Enjoy your holiday.
Preparing for creation: choosing a drawing and deciding on dimensions
Before you start making a sun lounger for your home, you need to decide on the optimal design and choose the most optimal and simple option that you can easily make yourself without the help of craftsmen.
The main thing is to find accurate and competent drawings that will allow you to easily cope with such work and ultimately get a convenient and most reliable design for a summer holiday in your garden, as well as near a river or lake.
Drawing of a folding country chaise lounge with a fabric seat
Portable lounge chair
The durable, lightweight chair is quickly assembled and disassembled. It is convenient to take it with you outdoors. The model is so easy to make that it is suitable even for novice craftsmen.
The collapsible chair consists of 2 parts:
- backrest covered with dense, wear-resistant fabric;
- wooden seat.
To create a chair, it is recommended to take cherry boards for the upper crosspieces and seat, as well as maple for the legs and supporting parts. You can also use pine wood.
In addition to tools, the following materials are used:
- 2 legs for the backrest measuring 20x40x800mm;
- 2 legs for the seat - 20x40x560mm;
- 2 lower crossbars - 10x50x380mm;
- 1 top crossbar - 10x40x380mm;
- 1 seat crossbar - 20x40x300mm;
- 5 slats - 20x40x400mm;
- piece of material - 600x500mm.
The procedure for assembling a portable sun lounger is shown in the diagram.
First, the parts are connected using self-tapping screws and a screwdriver.
The workpiece is processed and varnished.
While the frame dries, the fabric is folded and stitched. Then it is nailed using staples and a construction stapler to a wooden piece.
We connect the back and seat of the chaise lounge.
Enjoying your holiday in your new armchair.
Pay attention to another interesting chaise lounge model in the video.
Drawings and diagrams
At the first stage of creating a Kentucky chair, it is necessary to make a drawing of all components and draw up an exact assembly diagram.
First, you need to decide on the height of the backrest and the depth of the seat, taking into account the individual characteristics of the body, so that the person feels comfortable during use. In addition, the height of the seat is determined to calculate the length of the legs. Associated with the design, when the chair is unfolded, they are located at an angle to the horizontal plane.
Kentucky chair
You can make the original look of a chaise lounge with your own hands. A sun lounger is assembled from bars. Convenient, easy to fold. Takes up minimal storage space.
For the chair you will need:
- 4mm galvanized wire;
- 16 staples;
- bars 30x55 mm.
Before starting assembly, it is recommended to treat the bars to protect them from ultraviolet rays and moisture. Choose an oil- and wax-based stain. Beitz is good. You can use parquet oil. Apply the product using a spray bottle or brush.
Kentucky chair installation
Drill the holes. Their diameter should be slightly wider than the thickness of the galvanized wire. Sand all rough spots and imperfections.
Fold the parts according to the photo and start stringing the boards onto the wire.
Secure it with brackets.
ADVICE. Instead of wire, use galvanized studs. They are secured with nuts and washers.
Raise the planks. The Kentucky chair is ready for use.
Original chaise lounge
Design Koalition has developed an unusual chaise lounge with a fabric canopy that will allow you to enjoy outdoor recreation even on a hot day, protecting you from the scorching sun. The cost of such a sun lounger is 5970 euros. We will tell you how to save money and make an original chaise lounge with your own hands.
To create a lounger you will need the following materials. And also tools:
- 2 sheets of plywood 2cm thick with a size of 160x180cm;
- 6 round strips with a diameter of 30mm and a length of 92cm;
- 12 planks made from leftover plywood measuring 94x10cm;
- dense fabric with a width of 92 cm;
- construction adhesive;
- screws;
- roulette;
- cardboard for layout;
- Circular Saw;
- electric drill.
Let's start creating a sun lounger.
Transfer the diagram onto cardboard or thick paper. To make the task easier, you can first draw it into squares of 10 by 10 cm. The template makes it easy to correct all the shortcomings on paper. Subsequently, you will only circle it 2 times. Or maybe you’ll get the hang of it and make a few chairs for relaxation.
We transfer the drawing onto sheets of plywood and cut out the side parts with a circular or band saw. At the junction with the round beam, we cut out recesses with a diameter of 30mm.
We sand all the unevenness and cutting defects.
We assemble a rigid structure. Lubricate the ends of the beam with wood glue or PVA. We insert the timber into the recesses and fasten it with screws. The joints can be additionally treated with glue for maximum reliability.
Now you need to put the structure on its side. Place weights on the gluing areas. And let the chaise longue dry completely.
We begin to screw the planks to the ribs of the structure. At the same time, we make a 10-12 cm long indentation between them. Tighten the screws deeper so that their heads do not cling to the fabric and tear it.
We sand the product again. Now we hide the assembly flaws.
Use wood putty to hide all the screw heads in the places where the fabric is tensioned. We paint the chaise lounge.
You probably noticed that the description only gives the approximate width of the awning. The fact is that you can decide to cover the chaise longue entirely with fabric, or just make a canopy. Decide for yourself. Measure the dimensions and sew the awning.
ADVICE. It is better to fasten the awning with ties or Velcro. This will allow you to remove the fabric at any time and wash it without problems.
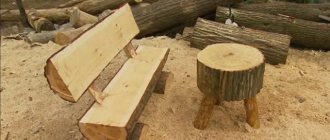
Birch lounger
It must be said that our Russian craftsmen are distinguished by their ingenuity and creative approach. This chaise lounge is made by hand from birch logs. It is distinguished by Russian folk flavor. Perfect for garden plots.
The work uses:
- logs with a diameter of 75-120mm;
- drill and set of drills;
- electric saw;
- staples and screws;
- marker;
- electrical tape or chalk for drawing.
Let's start creating a sun lounger.
We saw the trunk into logs 45 cm long.
On the floor we draw a line for the future sunbed using chalk, or glue it with electrical tape.
We lay the logs according to the diagram. We drill holes with a drill and connect the logs using long self-tapping screws. We use a socket wrench for this.
Turn over the almost finished product. We are testing. We eliminate shortcomings.
For greater stability, we fix the back side of the lounger with brackets.
A monolithic birch chaise lounge is ready to delight you and your guests.