From this article you will learn how to make from, literally, pasture lumber:
- several options for simple but stylish shops;
- two options for benches;
- stool;
- table.
In addition, you will receive plenty of food for the development of your own design fantasies, the implementation of which depends only on your skills in handling tools and the availability of free time.
All garden furniture products that will be discussed are made in a “wild” or rustic style, or in country style. They are perfect for furnishing a relaxation area outside the home. And if you have a “wild log house”, then even more so, you can’t think of anything better to tastefully “furnish” the area around the house for summer outdoor recreation or gatherings with barbecue.
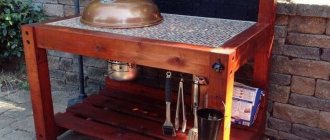
To immediately understand what we are talking about, here it is:
Bench and table without a single nail. With some skill in using a chainsaw, such a kit can be quickly made without a single nail.
... and about this:
The bench option is more complicated.
Such a product will require more time due to the larger number of parts and the need to fasten them together.
If you don’t mind, you can leave the log bench without protective treatment. But if durability is important to you, then the products should be protected with antiseptic compounds, treated with stain, or varnished.
Assembly
Step-by-step instructions for assembling a garden table are as follows:
- Marking lines are applied on the log and sawed with a chainsaw (when making parts for the table top, it is better to use the services of sawmill workers).
- The parts are cleared of bark using a sharp ax or a chisel and hammer.
- Clean the surfaces with a grinding machine.
- The parts are assembled into a single structure.
- Self-tapping screws are used to connect products; they are screwed into the workpieces using a screwdriver.
After making the frame of the stand, they begin to secure the table top.
Fastening the table top
In practice, there are two options for securing the table top. In small-sized furniture with minimal load on the upper part, the frame is covered with a sheet of chipboard and the element is secured with self-tapping screws. The tabletop is covered with self-adhesive paper. The lid fastening option is suitable for furniture with top dimensions of no more than 1 x 1 meter.
In another case, longitudinal cuts of logs or wooden beams are used to make the tabletop. It is necessary to carefully process the front surface with a plane so that all parts acquire a uniform structure.
Important! Make the surface of the tabletop as smooth as possible, which will prevent injury when using the furniture.
Table finishing
After assembling the furniture, they begin to coat the structure with protective compounds. It should be remembered that the working solution must be applied to a surface that has been previously cleaned of debris and dust. When the protective layer is completely dry, the table is covered with transparent varnish.
The nuances of using a chainsaw when building garden furniture with your own hands
Here is a wonderful example of a garden bench that is as designer and unique as it is simple:
Exclusive bench carved from a single curved log
But the simplicity is only apparent. Indeed, its design is elementary - just one log, no other parts or fasteners. The entire structure - seat, back - was cut out with a chainsaw. However, to cut such a shaped product, you need to have excellent command of a chainsaw, a feel for the tool and the material. Therefore, this bench is not so simple.
To evenly halve a log, you also need to have some skill. A couple of tips to make your work easier:
- make markings not only at the end, but also along the log;
- if the log is debarked, draw two lines - a strip along which the cut will go, 1 cm thick - this is the approximate thickness that the saw will “eat”;
- if you want to leave the bark and it is inconvenient to draw on a log, then you can stretch a cord from end to end and carefully saw along it;
- secure the log so that it does not “walk” due to the vibration of the saw, support it with wedges, bars, etc.
To decorate a bench or bench, you can lightly run a saw chain along the flat part of the half-logs - the seat and back - and make a few transverse scratches and gouges to age the wood and give the shape a natural look. When sanded, the chipped areas will be smoothed out and will not interfere with use, but the appearance of the bench or bench will become more interesting.
To age wood, firing and brushing are also used - scratching with a hard steel brush.
Scheme for work
To take into account all the little things, you need to think through the drawing before work. Each size must be marked on it. If you are going to align the boards on only one side, then the diagram must be made in three dimensions.
If you will not process the boards, then a two-dimensional drawing will suffice. As a result, all parts of the table with their actual size should be drawn on the diagram.
Tools
The materials you need to stock up on are logs and, if necessary, stain. The tools you need to acquire are:
- saw and hacksaw;
- drill with large drill bits;
- plane;
- screws and nails;
- “Moment” glue for wood and metal;
- hammer;
- a piece of leveled reinforcement;
- sandpaper.
Design No. 2
To make such a bench you will need two two-meter logs. Perhaps you still have them after construction, or you bought materials for a gazebo made of rounded logs with the expectation of a couple of benches in the same style.
Regardless of the origin of the materials, creating such a bench with your own hands only takes a couple of hours! It is enough to cut one of the logs into 2 parts. They will become supports. In order for the bench seat to stand clearly on the supports, you will need to make recesses corresponding to the log for the seat. They will be somewhere like 1/3 or ½ of the diameter. If performed correctly, no fastening materials are required. The bench can be easily disassembled and moved to another place or reused for construction.
Design No. 3
From a single large-diameter log you can quickly make a bench with a backrest with your own hands. It is enough to carefully cut out the core to get a convenient design.
If you use a log with thick branches, they can become legs.
If there are no branches, the collections can be replaced by logs as in the first design option or wooden blocks inserted into special holes.
Blueprints
When planning the manufacture of a garden bench, you need to think about the appearance of the product and draw a detailed drawing. Drawings for making benches are easy to find in finished form.
A detailed drawing will allow you to correctly calculate the consumption of materials and think through the technology of work.
The size of the product is calculated based on the need for seating. It is not advisable to make a small bench for a summer cottage where a large family is relaxing.
For work, you can use the standard overall dimensions of a garden bench.
To comfortably accommodate three adults, the seats are 150 cm long. The width of the seat is usually 40 cm. The height of the bench is 45 cm from the ground, while the height of the back is 90 cm.
The bench should be installed at an angle of about 20 degrees, this will make using it more convenient.
At the planning stage, you need to think about ways to attach the backrest.
Note!
- Do-it-yourself wardrobe: a review of ways and methods on how to build a stylish and original wardrobe (video and 145 photos)
Do-it-yourself furniture restoration - removing chips and scratches, restoring surfaces. Instructions with photos and video tips
DIY ottoman: how to make it at home. The best ideas, master classes. Photo + video review of beautiful ottomans
Another bench made of logs that is easy to make with your own hands
This option is suitable if you have logs of small diameters. To make it clear, it’s better to see it once:
Log bench, front view
The same bench, rear view
Everything here is also clear from the picture. The logs are connected - articulated into longitudinal grooves. Half logs - for the back and seat. For the backrest supports, grooves are cut out in the logs of the “legs”, but, in principle, they can be secured with screws or nails. The bottom bar is necessary for the rigidity of the supports.
What's the main thing here? The main thing is to fasten the supporting logs, “legs”. They can be fastened together:
- dowels - metal or wood; as such, reinforcement can be used;
- nails;
- screws, self-tapping screws.
The fastening elements should be staggered between different logs. When attaching the supports for the backrest to the body of the main lower supports, you need to make sure that the fastening elements do not intersect inside the solid wood.
Checkerboard arrangement of dowels in the joints of logs
Important: Do not screw in a screw or drive a nail from scratch! This way you can split the log, especially if it is small in diameter. Pre-drill the holes with a drill equipped with a long drill bit!
Tools and materials
Tools for work
To successfully complete the work process you will need:
- Chainsaw.
- Axe.
- A simple pencil.
- Skobel.
- Drills with 12 screws (or a Lewis drill with dowels) - for fastening the bench.
- Paint or varnish.
- Paint brushes.
- Compass.
To make a bench you need the following materials:
- Log for the base of the bench. Its length depends on the size of the finished product, which should be comfortable and practical, fitting harmoniously into the overall landscape.
- Additional logs – 2 pieces.
- Wooden board for the back.
- Two columns.
A simple way to make a “wild” stool from thick wood
... which you won’t be ashamed to put in your home. Look how easy it is:
Please note that it is not at all necessary to master a chainsaw, since the scale of the workspace allows you to correct the unevenness of the first cut.
Such a stool will fit into the interior, as well as a table made of logs, especially in a log house in the “wild style”.
Another method of making a stool, where you don’t even need to cut anything out:
A thick enough piece of wood can make an excellent chair. If you burn it, sand it and varnish it, you get an exclusive product that would be a pity to take outside:
Installation
Assembling a table, both from rounded logs and from regular ones, primarily depends on what kind of furniture you plan to make. But, in any case, there are several main points that are the same for both complex designs and very basic simple tables.
- Drilling holes for reinforcing bars - in the log that serves as the basis for future furniture, that is, in the lowest one, the holes should not be through. A depth of half the thickness of the part will be sufficient, but in all the following elements they must be through.
- All holes should be 30 cm from each other, this is the most optimal distance that will ensure the strength of the entire structure.
- All drilled holes must be tightly filled with epoxy glue so that the rods do not dangle in them.
- The places where the parts are attached to each other should be well aligned and not too deep, ideally within 5-6 cm, this will prevent possible cracks during further use of the furniture.
Create a drawing
Before you begin installing the table, you need to make a drawing on a sheet of paper. Here the dimensions of the structure are plotted and a log layout diagram is selected. You can make a drawing on paper in several projections.
A three-dimensional drawing made in computer programs is considered more convenient. You can examine a piece of furniture from all sides, select dimensions, and also determine how a particular type of wood will look. The table, which is designed with a special program, can be adjusted to suit the specific interior of the room.