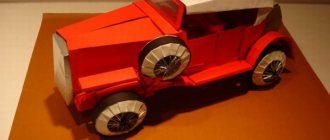
Paper crafts are an interesting and simple activity for children. Here we will look at how to make a paper car with your own hands. Surely you already have all the materials necessary for the work. Origami paper, glue and scissors for crafts are almost all the tools.
If you've never made a paper machine , you should probably start with a very simple design that uses straight lines. The article presents many options, from the simplest paper cars to three-dimensional 3D models and origami racing cars . Although younger children may need your help, don't limit their imagination. Let them surprise you with their creativity again and again.
Military vehicle
As children, boys want to become soldiers. Delight your child by creating a car together.
There are two variations of a military car:
- According to the finished scheme,
- Fire truck method.
The materials are still the same - boxes of various sizes and cardboard or paper for pasting the frame. Please refer to actual images for realism.
Wooden crafts
For older schoolchildren, with the help of their fathers, an excellent option would be to make a car from wooden blocks, pieces of plywood and other building materials.
By first selecting information on the Internet, you can create a fairly attractive toy that will have functioning wheels, and possibly other elements. It all depends on the time spent and the manifestation of imagination.
In this way, you can make a small toy and large enough to fit a child. The main thing is to ensure its safety and exercise caution when using a special tool.
Creative machines - paper crafts (full instructions)
We accumulate quite a lot of tubes after using toilet paper. And if we used to throw them away, now we decided to make crafts out of them. The results were such wonderful machines. Do you want the same? Let's get started!
We will need:
- Scissors or knife
- Glue
- Brush
- Toilet paper tubes
- Acrylic paints
- Cardboard
- White and colored paper (for decoration)
- Small nails or buttons
- Pencil
DIY car ideas for children 3-5 years old
Such boys and girls can already do a lot. They can independently organize a workplace for drawing, modeling or design.
Not only boys are interested in cars, girls are also interested in units that can be rolled and carried with strings. Especially fathers of beautiful daughters are ready to help their child create such a masterpiece.
Sports car
This type of machine is more complex than making a regular one. Its main function is the ability to move on a flat surface by blowing.
Sports car assembly technique:
- bend the sheet diagonally;
- bend all corners to the center;
- smooth it thoroughly;
- bend the resulting triangles towards the center;
- bend to the middle of the side;
- bend the bottom of the workpiece upward from the triangle and bend the entire figure in the center;
- We put the remaining corners into pockets.
We paint the finished product at our discretion.
We recommend reading:
DIY paper orchid - a review of the best ideas and tips from craftswomen. Step-by-step instructions + master class (photo + video lessons)DIY paper hyacinth: the best master class for beginners with step-by-step instructions and diagrams from A to Z (130 photos)
Paper stars - instructions on how to quickly and easily learn how to make beautiful stars with your own hands (100 photos of finished works)
So, guinea pig
The good thing about a remote control crawler is that it has very high maneuverability.
By the way, he even knows how to do this
The crawler has all-wheel drive, permanent differential locks (all wheels spin at the same time) and a constant “low gear”. Those. It drives relatively slowly, but is powerful and passable.
Papercraft toy cars
Quite a popular method of assembling products. It consists in the fact that all structural elements are cut out according to prepared templates.
Special books with ready-made templates are sold, or these templates can be printed or copied from the World Wide Web.
Let's look at how to assemble a machine using this technology.
- We find a ready-made drawing of the machine elements on the World Wide Web and print it out.
- Carefully cut out the templates, strictly along the lines, so that the finished product turns out without distortions. It is important to know that the drawings show in white special valves for connection, to which glue must be applied during the assembly process.
- We assemble the cut out templates along the fold lines, glue them along the flaps and assemble all the parts into a single structure.
It is worth noting that PVA glue or office glue is suitable for such products.
Paper origami machines (diagrams)
Origami racing car
Such cars were popular in the USSR. We also post a video:
Origami tank Origami machine
Setting up Virturilka
Before assembling the machine, you need to configure Virturilka. First, let's consider the option with a Wi-Fi connection.
So, point by point:
- Download the latest firmware, especially for the rcboard files.virt2real.ru/firmware/virt2real-board/1.1/rcboard-0.01.002.zip
- We connect the micro-USB - USB cable to the Virturilka, plug the other end into the computer. A new network interface will appear on the computer, subnet 192.168.3.0/24. For Windows, you may need to install a driver
- Open the basic admin panel (Virturilka web control panel) at https://192.168.3.1/admin
- Go to the “Settings” -> “Network” section and set the ip for the wlan0 interface (or specify dhcp if you don’t need a static ip)
- Go to the “Settings” -> “Wi-Fi” -> “Wi-Fi Settings” section and set the wireless network parameters (change the ssid and psk fields) for the first network
- Go to the “Settings” -> “Autostart” section - move the S80dhcp-server script to inactive (if the initial setup via USB is no longer needed)
- Go to the “Administration” -> “Reboot” section and reboot Virturilka
- Disconnect the USB cable from the Virturilka, connect the Wi-Fi whistle to the micro-USB. Of the tested ones, I recommend ASUS N10, N13, TP-link TL-WM722N, but best of all are five-gigahertz ones, for example ASUS N53 or Dlink DWA-160 rev.B2
Stages of creating a paper model
Let's give an example of the step-by-step construction of a paper machine. The origami will be unwrapped on a square sheet. In this case, we don't need a drawing.
- We bend the paper square diagonally.
- Next, fold the unfolded square with pronounced diagonals in half in two directions.
- Unfold and bend two opposite sides towards the center.
- Unfold the bottom part and bend it in half again.
- Unfold and connect the free side with the bend at the top.
- We do the same from the inside out. The result is a layout divided by squares of the same size.
- Place the reamer with the grooves facing down. We fold the shapes at all corners (in four small squares).
- Turn over and bend down to the width of one square.
- We divide the end of the bent strip on the left into three equal parts. Use scissors to draw the fold.
- We bend a small square from the outermost strip.
- Press the bottom strip over the maximum area.
- We slightly turn the level of the strip to the right and form a square.
- Left turn. Bend the tape, similar to the previous one. We do it this way everywhere.
- We bring the development to its original square state. We make a bend in the second stage.
- We twist the workpiece from right to left, bending the strips in parallel.
- At the corners we change the direction of the resource and form a square.
- We turn the product inside out and smooth it. The result is a rhombic figure that hides the rest of the structure.
- Smooth the small rectangle firmly along the diagonals. An edge is formed.
- Apply parts of the squares and iron them firmly.
- We make folds from the central part of the figure to the sides.
- In order for the outer square to intersect with the plane, we draw a triangle on the right side.
- From the same edge we turn up a small line along the line we defined. Raise the outer diamonds.
- Also, we follow from the opposite part.
- Both stripes are strongly smoothed from the center figures along the strip, downwards.
- Let's take a step back. Connecting the triangles.
- We carefully bring together the entire inside of the product with a strip coming from the core of the product by adding quadrangles.
- We repeat from the vertical line and up. We also attach the outer square sidewall to it. We do it on both sides. We iron it and pack the excess residual parts under the edges.
- Turn it over. We draw a line to the height of the bent part.
- Fold the sides of the mini square.
- We pull the line diagonally to the top of the product. A segment goes down from the top along the diagonal line, add it to it. We also do it on the reverse side.
- The result is rhombuses. Bend upwards to the right.
- We fold the remaining part with the bottom line of the fold strip. We act similarly everywhere. We unfold the squares, inward from the bottom. We hide some inside.
- We bend the strips on the sides.
- Important! One corner will open and fold in half, while the other will “go” under the part.
- We make a lapel of each square, flatten it and fold it in half.
- On the front area of the machine we bend the strip from the bottom.
- We bend the stripes down on the sides of the product.
- Molding wheels (inside out).
- Iron all the folds again.
Now you know how to make a car out of paper or cardboard.
