International Women's Day is coming very soon. On the eve of this holiday, I would like to wish all the girls more tenderness, purity, spring mood, bright sunshine and happiness. On this day, a bouquet of flowers is expected by a girl, a girl, a mother, and a grandmother. It is not necessary to give fresh flowers; you can make tulips from sweets and corrugated paper with your own hands; it is simple and at the same time very exciting.
Thus, we will have a 3-in-1 gift: a sweet treat, a bouquet of flowers, and interior decor that will delight the eye for a long time.
Absolutely everyone likes delicate buds, and those made with your own hands will definitely be remembered for a long time. You will like : The most beautiful crafts for March 8: TOP 30 best ideas with templates and step-by-step photos
How to make a tulip from corrugated paper
It is difficult to imagine a material more suitable for creating flower bouquets than corrugated paper. But paper is different from paper. For flowers, choose Italian-made corrugation marked on the package as 140 or 180 grams. Then the buds and leaves will not be deformed and will take the shape you need.
For the tulip you will need:
- red and green corrugated paper;
- wooden skewer;
- a foil ball or round candy for the middle;
- glue gun;
- threads;
- ruler;
- scissors.
Paper tulip: step-by-step instructions
Prepare a work area with the mentioned material and tools. First of all, cut the blanks for the future flower:
- 6 red rectangles measuring 3x8 cm;
- 1 red sheet 3x10 cm for a bud;
- 2 green rectangles 4x16 cm for leaves;
- 2 strips of green paper 1.5 cm wide for wrapping the stem, length arbitrary.
Please note that on each workpiece, except for narrow strips, the corrugation folds are located lengthwise, and the characteristic stripes run across.
Tulip
Take a bud blank (3x10 cm) and twist it in the middle. Wrap a ball of foil in it so that it is not visible. Curl the bottom part like a candy. Or use a round candy.
Take a skewer, apply a drop of glue to the end with a gun and insert it into the bud. For strength, wrap threads around the bottom of the bud. It will turn out as in the photo. Set aside.
Using six red rectangles, form tulip petals by rounding the top and narrowing the bottom with scissors. Stretch the petals horizontally in the middle so that they look like real tulip petals.
Take one petal, apply a drop of glue at the base and glue it to the bud where it is attached to the skewer. Glue two more petals in a circle overlapping each other. Make the second row in the same way, only the petals are between the parts of the first row, that is, in a checkerboard pattern.
Stem and leaves
Now we will decorate the sepals and stem. To do this, take a long strip of green paper. Stretch it lengthwise so that the folds straighten out. Apply a drop of glue at the base of the flower and wrap it carefully. The edge is smooth. Gradually wrap the skewer in a spiral, using glue for strength at the beginning and secure a strip of paper at the end.
Make tulip leaves from two 16x4 cm rectangles. Use scissors to sharpen one end and trim off the lower side edges slightly. Lightly stretch the leaves horizontally. Attach the pieces to the sides of the stem so that the ends extend beyond the flower. Carefully wrap the second strip of green paper around the attachment point.
The tulip is ready! Use a little imagination and create a gorgeous gift for a loved one. You can make a bouquet of sweets by inserting them into the middle. Or simply create beautiful flowers and place them in a vase!
If you liked it, write in x what kind of corrugated paper flower would you like to make? I wish you creative success and good mood!
Published in Corrugated paper flowers
Source: https://dodim.ru/svit-dizayn/tyulpan-iz-gofrirovannoy-bumagi/
What materials will we work with?
Most often, flower crafts are made from paper: colored, corrugated, or illustrated patterns. But these are far from the only possible options:
- Fabric models.
- Made from colored cardboard.
- Made from satin ribbons.
- From foil.
Any decorative bouquet can be beautifully and originally packaged in paper, a wicker basket, or placed in a vase.
DIY corrugated paper tulips with candies as a gift
We could already see how beautiful large flowers made from corrugated paper look. Today we will continue the topic of floristry, and we will further get acquainted with the capabilities of the material.
But there will be a little twist! We should get not simple flowers, but tulips made of corrugated paper with candies ! Which means our bouquets contain a secret! This charm is especially relevant as a gift. And March 8 is just around the corner!
Master class on a delicious bouquet
I have found for you the easiest way to design crafts, and now I will share it. Just at the beginning I want to say that, as for me, this method has a huge advantage. While preparing this article for you, I reviewed (and even tested some of them) a lot of mk.
I have often seen that candies stick.
Honestly, which of us, after using glue (even through the wrapper), would dare to eat such a sweet thing? In this tutorial the candy does NOT stick! Hooray! Hooray! You can eat it! True, if you find the courage to unfold and destroy such beauty!
How to do:
Cut a strip of pink (red, yellow or some other) paper 4-5 cm wide.
Cut it in half.
Fold each part in half. At the fold, we collect the strip into an accordion and twist it.
We bend one and the second (together) halves of the strip to create a depression in the middle.
We need 3 such boat petals for one tulip.
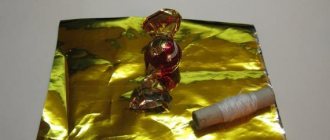
It is most convenient to work with candies whose wrapper is folded at the top. But you can try different sweets.
Unwrap the candy (not all the way). We insert a thin wooden skewer and now wrap the “tail” right on the stick. You can secure it with tape for safety.
We collect the petals around the candy so that their free edges are at the bottom and the folds are at the top.
Holding the petals from above so that they do not diverge, we tie the edges of the petals on the stick under the candy with a thread.
Cut off a green strip 3-4cm wide. Divide the strip into 3 equal parts.
We give each part the shape of a leaf: we narrow it at the bottom, leaving a width of 1-1.cm, cut off the top and round the corners.
We cut all the edges of the bud petals at an angle from bottom to top so that they do not puff up when we make the stem.
Cut out a green rectangle 17 by 7 cm. Cut strips 1cm wide from the rectangle.
- We twist the strip under the flower and further along the stem to the very bottom.
- Glue 1-2 leaves under the bud.
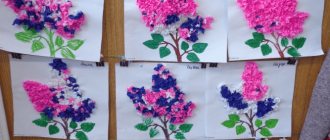
From such tulips we get a beautiful bouquet . We tie it with a ribbon or come up with a more original packaging. I will suggest some design ideas at the very end of our conversation.
Author
Tulip needle
In fact, you can make different tulips. In nature there are all kinds of colors, varieties and sizes. And all this gives us enormous space for imagination. If you are wondering if it is possible to make an open center and how to design a flower with a candy that has 2 tails, this one is for you!
Author MK
So what we need:
- Paper – red, white and green;
- Candies;
- Wooden skewers;
- Scissors;
- Glue gun;
- Ruler;
- Sisal;
- Tape;
- Stationery knife;
- Floral sponge;
- Decorative flowerpot.
We cut a strip of red paper measuring 16 by 2 cm. We twist the strip in the middle and fold it in half.
We stretch the middle of this blank.
We put the candy inside the blank and tuck both of its tails. We twist the edges of the workpiece.
- We also need 7 strips 8 by 4 cm.
- From seven strips we cut out petals with sharp edges.
- Use your fingers to stretch the middle of each petal.
- Glue 4 petals one by one around the candy blank.
Insert a skewer from below. And fix it with glue. Glue the remaining petals to the stick.
We wrap the stem with ribbon. Cut out leaves from strips of green paper 16 by 2 cm. We stretch the middle of the leaf a little. Glue the leaves onto the stem.
We got white and red tulips. Now let's make a composition out of them. We use flowerpots for this.
Cut the sponge to the size of the top of the pot. Place it in a container. We insert tulips into the sponge.
You can come up with your own pattern, in what order your flowers will be arranged. We cover the exposed areas of the sponge with sisal fiber. And we form the edging of the bouquet.
It turns out very elegant! The candies look like beautiful hearts inside. This one used a container to give the design a finished look. If you have a fancy flower pot or a pretty bucket, those will work too!
Author MK
The easiest way to make tulips with candies
I love simple crafts! Then you can keep your child busy by involving him in working on the bouquet. Show him, tell him, do it together... and lo and behold, next March 8th you will receive such an original gift from him! Just don’t think that I’m looking for benefits, it’s just convenient to show children from childhood what they will need in the future.
Cut out 6 identical strips. On one side we cut off the corners and round them. On the other hand, we cut off the corners, leaving 1cm in the middle.
- We stretch the leaves in the middle.
- We tuck the tails of the candy and place the candy between the two petals.
Place the third petal on top. We tie the edges with thread.
We insert the wire between the petals. Glue the remaining 3 petals to the wire.
At the base of the flower we tie it with a strip of green paper. Cut out the leaf. We stretch it in the middle.
- We tie the entire stem along with the leaf with a green strip.
- You can create a beautiful ensemble from such flowers, dilute it with flax, small flowers and place it in a beautiful vase.
Option in 10 minutes
I'm in love with delicate color combinations. Of course, there is no big difference in how I describe the color in this microscope, because you can choose any one. But I like the way coral and sunny tones, salmon and other warm colors are combined so much that I decided to voice them)))
We will need:
- 1 pink-orange rectangle 15 by 7.5 cm;
- Another pink-orange - 12 by 2.5 cm;
- And 1-2 green – 12-15 by 2.5 cm;
- Adhesive tape;
- Green tape;
- Scissors;
- Threads;
- Candies;
- Tape;
- Skewers.
Let's create a bouquet with a surprise:
In a pink-orange rectangle (12 by 2.5), cut and round the edges on both sides.
We divide the pink-orange rectangle (15 by 7.5) in half.
Fold each square 2 times to make 3 identical parts.
Like this.
We cut the edges from one side towards the middle and slightly round them.
We unfold it and get a “picket fence” with three teeth. We cut these “teeth almost to the end, leaving only 1 cm.
We stretch each of the three parts of the workpiece. You get cute petals.
We cut off the corners of the green stripes on one side and the other. To make it symmetrical, first fold the rectangle in half.
Stretch, giving the shape of leaves.
The long pink petal that we rounded is twisted in half and folded. We stretch the middle of the workpiece.
We separate the 2 parts. One should be concave in one direction, and the second in the other direction. It turns out to be a “pocket”.
We bend the tails of the candy and place it in such a pocket. This option is also good because inside 2 petals you can place not only a round-shaped candy, but also a Raffaello , the wrapper of which has a square shape. It is not always possible to “hide” such candy. In this version, it is very simple to place it between two curved petals.
The edges of the petals should overlap one another. We twist them.
We place this blank between the three petals and wrap them. We twist the edges and tie with thread at the bottom.
We cut off the edges so that they are not so lush.
Use double-sided tape to cover the edges of the skewer. We insert a skewer between the edges of the petals.
We glue the tip of the tape and begin to twist it from the base of the bud to the bottom of the stem.
When twisting, insert the leaves and secure with tape.
A whole bouquet of such bright tulips looks amazingly beautiful. But it’s worth finding out how you can arrange such compositions.
Author MK
Corrugated paper tulip for beginners: step-by-step master class
Corrugated paper is an excellent material for creating artificial flowers. It is light, airy, and the structure is velvety. Making a tulip from corrugated paper is quite easy. You can involve the younger generation in the lesson. Children will love the process in which real works of art are made from scrap materials.
A beautiful spring bouquet of tulips is an excellent gift not only for March 8th, but also for any occasion. You can surprise your loved ones with your own handicrafts, spend time with your child doing an exciting activity and add to your collection of interesting, simple crafts.
Velvet petals
A simple and quick way to create a bright spring bouquet for beginners. You will need the following materials:
- corrugated paper for buds of a suitable color. The example used is red, but you can stock up on different shades;
- green corrugation for the stem;
- wire;
- glue gun;
- scissors.
We cut out a strip of corrugated paper (ours is red) 25 cm long and 5 cm wide.
The dimensions are approximate, it all depends on the desired volume of the future bud. At the same time, try not to crush the structure of the material even with a ruler, otherwise the visual volume will be lost.
We bend the resulting strip in half, lightly iron the edges and fold it in half again. We get a rectangle approximately 5x7 cm.
Next, use scissors to cut out the shape of a petal from the blank. You can first draw the outlines with a pencil.
We separate the resulting parts of the bud and carefully curl the ends.
Carefully give the petals a curved shape. To do this, use your fingers to stretch the middle in different directions. Corrugated paper is a fragile material, so you should not make sudden movements.
We begin to form a bud. We apply the petals to each other in a circle, slightly going over the edge. We hold the workpiece by the twisted ends and fasten it at the base with a glue gun.
It's time to start making the stem. We attach the wire to the bud and put it aside for a while.
We take green corrugated paper, cut a strip of the required length about 1.5 cm wide. We also cut out a leaf for our tulip. Carefully and carefully wrap the wire with paper from the very base of the bud. At the end we fasten it with a drop of glue. Approximately in the middle of the resulting stem, glue the petal, first stretching it slightly and giving it the shape of a bowl.
If desired, you can add stamens. To do this, we wrap a yellow corrugation around a piece of thin wire and glue it inside the bud. Make several tulips and combine them into a chic bouquet. This gift will definitely appeal to all representatives of the fair sex.
Sweet gift in beautiful packaging
In addition to flowers, any girl, girl, woman will gladly accept candy as a gift. But simply giving a bouquet and a box of sweets is not as interesting as packing each delicious treat in an original package. A simple master class on making tulips with candies inside will help with this.
You will need some patience and the following materials:
- wrapped candies;
- corrugated paper for buds of any color;
- corrugated green paper;
- wire;
- transparent tape;
- glue gun;
- tape;
- scissors.
Let’s start preparing a delicious present; see the step-by-step process below. But such a bouquet will look beautiful even without sweets. We cut the corrugated paper into strips 20 cm long and 2 cm wide. Carefully twist them in the middle and fold them in half.
We attach the candies with tape to the wire.
Next you need to be careful and careful. We attach three petal blanks to the base of the future bud around the candy using tape. In this case, the wings on the fold remain free. Next, adding a little volume, we also fasten the remaining part. As a result, you will get a tulip with three petals. Instructions with photos will help you cope with the task.
Cut out leaves from green corrugated paper. We tightly wrap the wire-stem with it. You can use fabric of a suitable color for this. Thus, we create several tulips with a pleasant sweet surprise and combine them into a composition, decorating them with leaves along the entire perimeter.
- This bouquet is in no way inferior to the florist’s signature creations, and the sweets inside will delight any lady.
If desired, tulips can be placed in a basket using a floral sponge or polystyrene foam as a holder. Looks very natural.
Artificial tulips will delight the owner for a long time. You can create a real work of art in a couple of hours without investing a lot of money.
Video on the topic of the article
- Below you can watch a selection of interesting videos on creating bouquets from corrugated paper.
Source: https://DekorMyHome.ru/rukodelie/tulpan-iz-gofrirovannoi-bymagi-dlia-nachinaushih-poshagovyi-master-klass.html
What might a master need to make a bouquet?
First of all, prepare a comfortable workspace for yourself: a wide table, even boards for working with glue and creating appliqués.
We will consider a wide variety of methods for making paper tulips, and therefore we have compiled a complete list of necessary materials (you can add to it if you wish):
- Plain colored or corrugated paper;
- Foamiran;
- Foil;
- Scissors, glue, threads;
- 2-3 sheets of thick cardboard for creating templates or ready-made samples (can be found on the Internet and printed);
- Decoration materials: rhinestones, sparkles, beads.
Corrugated paper tulips
Materials: corrugated paper, wire
Tulip
The birthplace of this flower is Ancient Persia (Iran). Here it was called “dulbash” or “tulipan”, that is, a turban - the headdress of the peoples of the East.
In England it was believed that the tulip served as a cradle for little elves and fairies. An old legend said that human happiness was contained in a yellow closed bud.
And no one could get to him - neither by force, nor by cunning, nor by spells... One day a poor woman with her little son passed by. Seeing the flower, the baby burst out of his mother’s arms with a loud laugh and rushed towards it.
At the same moment the bud opened.
- Cut 6 strips of corrugated paper measuring 3x18 cm along the corrugation lines.
- Twist the strip in the middle 2 times. Fold it in half.
- Make a convex petal by stretching both layers of paper.
- Squeeze and twist the base.
- Cut strips of green paper 2 cm wide across the corrugation lines. Take the wire for the stem (15-20 cm) and cover it with strips folded in half.
- Place 3 inner petals around the stem, then 3 outer petals on top. Wrap them tightly with a strip coated with glue.
- Cut out leaves from thick double-sided paper and curl them slightly.
Crocus
These low flowers are among the first to appear in spring thawed areas. The second name for crocus is saffron (from Arabic - yellow). Even before our era, they were known in India and Egypt. Dried pollen from yellow flowers was used as a spice, medicine and dye.
- Make crocus petals in the same way as a tulip, only the size of the stripe should be 2.5x13 cm.
- For the stem, take a 7-8 cm wire.
- Place a yellow or orange core inside.
- Wrap the petals with a strip of the same color.
- Glue the sepals from white paper.
- Glue the leaves.
- Stick 5-7 flowers into a pot of plasticine.
Based on materials from the book “Flowers” by T. N. Prosnyakova
Source: https://stranamasterov.ru/technics/flowers22-23.html
Herringbone
You will need to find a base - a strong wire or block, on which a paper cone is made. The spoons are cut from the handle and glued to the cone from the bottom up, but this time with the convex side inward, creating a bend, like spruce branches. After this, paint the tree in the desired color, you can add holidays and sprinkle it with glitter and decorate it with tinsel.
Origami method 2
If you're afraid you won't be able to handle the previous assembly method, try an easier option. You will also need a square sheet of colored paper for the bud.
It needs to be folded diagonally once. Then fold the side corners overlapping and bend the corner formed at the bottom.
We make a stem from a green sheet of paper. Fold the sheet diagonally. We position the workpiece vertically and bend the wide angle side in half. Carefully smooth out the seams.
After this, we unfold the workpiece and fold the opposite corners of the rhombus along the folds towards the center. We wrap the bottom part towards the top. It turns out a stem with a leaf.
We connect the bud with the stem. The tulip is ready.
This is how you can make beautiful crafts with tulips in just a few steps.
Simple application
A beautiful, bright and simple craft is what you need to captivate a small child.
To create tulips you will need red double-sided paper or thin cardboard.
Draw a tulip bud on white cardboard and cut it out. We apply the resulting template to colored paper, trace it and cut it out. Four identical parts are needed.
After this, take a wooden skewer and wrap it with a ribbon cut from light green corrugated paper. We secure the tape with a drop of glue and begin to fix the cut out buds. It turns out to be a full-fledged tulip.
Note!
DIY fruit bouquets - TOP-200 photos with instructions for creating a bouquet of fruits with your own hands. Unconventional ideas with simple diagrams and work overviews
Crocheted flowers: TOP-160 photos and step-by-step knitting pattern, review of finished products with your own hands. Crochet master class for beginners
- Paper lily - TOP 100 photos of the best product options. Master class with step-by-step diagrams and drawings for creating an origami lily with your own hands