Any girl, going to a festive celebration, wants to look like a real princess. And this image will depend not only on a fluffy dress and elegant shoes, but also on stylish accessories. One of these elements is the crown. You don’t have to buy this thing in a store; you just need to spend a little free time and build it with your own hands. The joy of your baby and her lovely finished outfit will become a reward and delight to her parents’ eyes. Even an inexperienced craftswoman can cope with this process. And for this, let's look at the issue of creating this wonderful thing in more detail.
Practical advice for needlewomen
Do you need a kanzashi crown for the New Year? A master class from experienced needlewomen will help you create an original and, most importantly, exclusive attribute without much effort.
First, think about the design of the crown, its size, and choose a suitable mount. Don’t forget to look into the sewing accessories store and buy all sorts of decorations, for example, shiny stones, rhinestones, beads, beads.
Before we look at the master class and tell you step by step how New Year's kanzashi crowns are made, let's study the following rules:
- Traditionally, satin ribbons and brocade are used in the kanzashi technique;
- to connect the edges, you can use a hot glue gun or a regular wax candle;
- the base for the crown can be made from a regular hairband;
- if you want a real crown, make the base out of plastic;
- all gaps and the distance between the kanzashi petals can be covered with a ribbon of the appropriate color scheme, lace or paper;
- to make the crown more beautiful, it is better to combine several harmonious colors of the satin ribbon;
- we always use small accessories, beads or seed beads;
- You can make the core of the petals from beads, but you will need fishing line or wire.
Attention! If you use natural fabrics for creativity, carefully singe their edges with a candle. Some types of fabrics may not melt, but burn. This is very dangerous for your health. It is better to choose an alternative method for processing the edge of the tape.
Elegant hat
To create a kanzashi hat, prepare:
- satin ribbon in two shades;
- cardboard;
- beads;
- glue;
- scissors and hoop.
Cut out blanks of the required size from cardboard.
Make pieces of satin ribbon 17 cm long, iron them, and glue them to one side of the cardboard rectangle, without stretching too much.
On the other side, glue pieces 9 cm long. Then interlace these ribbons in a checkerboard pattern. Glue the free ends of the tapes to the wrong side of the workpiece.
Make a hat brim from a cardboard circle and form a cylinder from a rectangle. Wrap the circle with tape and glue it to the cylinder. Make a bead decoration and glue it to the hat. Decorate the headband with a satin ribbon of a suitable shade, and glue an elegant hat to it.
The kanzashi hat on the rim is ready.
New Year's gift for your princess
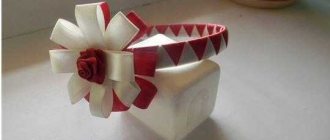
Every girl feels like a princess in childhood. To create an original look, you will need an accessory - a kanzashi crown headband. The master class will help you make such a gift for your daughter at home. The width of the rim can be any. It’s better to take a white headband, otherwise it needs to be decorated with ribbon.
Required materials and tools:
- hair hoop;
- satin ribbons 50 mm wide;
- brocade 40 mm wide;
- scissors;
- lighter;
- glue gun;
- measuring tape or ruler;
- tweezers;
- rhinestones or beads.
Step-by-step description of the creative process:
- Cut out the required number of squares from satin ribbon. The side of each square is 5 cm.
- We do the same with the brocade ribbon. Only the side of the square is 4 cm.
- Now fold each square diagonally twice.
- We connect two parts side by side: one is made of satin ribbon, the other is made of brocade.
- We fix the edges with tweezers.
- Now we need to carefully wrap the edges of the triangle inward to make a petal like this.
- Align the edge and cut off the excess part of the tape.
- Secure the lower part of the petals with thread or a glue gun.
- We cover the plastic rim with tape.
- You can use your imagination and make the base two-color. Try an original weave.
- Select the center of the rim at the top and glue two petals.
- Glue two more petals on top. We fix them with a glue gun at the side cuts to the previous petals.
- By analogy, we continue to decorate the rim with petals, imitating a crown.
- At the top, the crown or diadem has its highest point. Conventionally speaking, the shape of the tiara resembles a triangle.
- After we have decorated the entire rim, we decorate the centers of the petals with beads or rhinestones.
Tip: if you think that the design is not very reliable, the petals can be connected on the reverse side with thick cardboard, transparent plastic or fabric.
DIY satin ribbon crown
Any girl, going to a festive celebration, wants to look like a real princess.
And this image will depend not only on a fluffy dress and elegant shoes, but also on stylish accessories. One of these elements is the crown. You don’t have to buy this thing in a store; you just need to spend a little free time and build it with your own hands. The joy of your baby and her lovely finished outfit will become a reward and delight to her parents’ eyes. Even an inexperienced craftswoman can cope with this process. And for this, let's look at the issue of creating this wonderful thing in more detail.
Feel like a queen
What about a New Year's party at work? An adult also wants fun and a little magic. Your outfit and evening look will be complemented by an original crown made of kanzashi ribbons. The master class will help you make an extraordinary accessory that will be appreciated by others. You can use a regular hairband as a basis. This royal accessory can be easily removed at any time. And you won’t ruin your hair.
Required materials and tools:
- satin ribbons of various colors;
- beads or rhinestones;
- headband for hair of any width;
- brocade ribbon;
- scissors;
- candle;
- glue gun or thread with a needle;
- ruler.
Step-by-step description of the creative process:
- We will make such a beautiful crown.
- Photo 9
- You can choose any colors of ribbons, but it is better to give preference to beige, golden or white.
- Cut out the required number of squares from a satin ribbon 50 mm wide.
- We also cut out squares from a brocade ribbon, the width of which is 40 mm.
- We will also need a satin ribbon 25 mm wide. We also cut out the required number of squares from it. We will get triple petals.
- Let's prepare the headband right away. We wrap it completely with brocade.
- In this case, it is better not to use satin, as it slips.
- We take one square of wide satin ribbon and brocade.
- We fold the double triangles and fix them together using a glue gun.
- Carefully trim the uneven edges.
- We also make a double triangle from a smaller satin square and place it in the center of the petal. This is the element we get.
- By analogy, we need to make a couple dozen more of these petals to decorate the crown.
- Now we take brocade, we need to make triple branches from it.
- Fold the square diagonally twice.
- Then grab the triangle in a straight line with tweezers.
- We cut off the corner that protrudes on the left.
- We singe the edges of the brocade with a special soldering iron or lighter.
- Let's make several of these sticks.
- Then, using a glue gun, we connect the individual parts into these triple branches.
- It is better to place a twig consisting of five parts in the middle.
- Now we completely cover the base of the rim with petals.
- This is what we got.
- Find the center of the crown and glue a twig between the petals.
- Next, we alternate the elements: glue a twig and a petal in between.
- Using a glue gun, attach a translucent tape to the reverse side. For reliability, you can use thick cardboard.
Crochet crown for Snowflake – step by step tutorial + diagram
If you know how to crochet, make an original openwork crown with your own hands. To work you will need:
- yarn;
- hook;
- rhinestones;
- headband;
- threads;
- needle;
- varnish
Using the pattern that can be found on our website, tie the headband and begin to form the frame of the crown according to the pattern that is on our website. The finished product is decorated by sewing on a thread of rhinestones. To ensure that the crown keeps its shape, it is sprayed with varnish and allowed to dry.
Master class on the kanzashi crown in miniature and large versions
There is less and less time left before the New Year - the favorite holiday of children and adults. And parents have a great responsibility for creating a costume and selecting the necessary accessories. Products made in the kanzashi style are incredibly beautiful. This technique came to us from Japan, it is based on a combination of fabric and colors. This technique can be done by anyone.
Using it, you can get a variety of accessories (brooch, bracelet or hairpin). This type of art combines originality and restraint. Therefore, decoration made using this technique will be appropriate for any holiday. This master class on the kanzashi crown will help you make any look unique and original. In the article we will analyze two techniques for its consciousness.
Type of petals:
- Spicy. Fold a 5 by 5 square in half twice, you should get a small triangle, make a loop out of it and cut off the base, and at the end treat with fire;
- Round. Fold the 5 by 5 piece diagonally, fold the top edges towards you, also remove the base and melt with fire;
- Spiral. The same principle as the first petal, only twist a spiral in the center from one part.
Crown on the rim
This is a beautiful product made of satin ribbons. To make it, you will need the following materials:
- a regular medium-width headband for girls;
- satin and guipure ribbons;
- source of fire (lighter);
- scissors;
- details for decoration.
So, get to work.
To begin, take a piece of ribbon and wrap it around your hairband. Proceed carefully and do not leave any gaps. It is one of the main parts of our product, see the photo for more details.
Cut out five centimeter squares from satin, and two centimeters from guipure.
Start making petals using the kanzashi technique. Take a square and bend it diagonally, and carefully set the corners on fire. Using the same principle, make another square.
Then, after cutting off the excess corners and the convex back side and processing the flames, attach the petals to each other.
Make smaller petals using the same system. For this product you will need twelve large and eight small petals.
When you have all the necessary pieces on hand, glue them together and then transfer them to your base. Be careful to avoid any crookedness in the crown.
Now we make the central flower. To do this, we fasten together seven large prepared petals. In the middle we add an original pebble of any shade, the main thing is that everything matches.
Well, our crown is almost ready, all that remains is to decorate it correctly. Here, give free rein to your imagination, just don’t overdo it. Sequins, stones, beads and flowers can be used.
Important tip! Try to fill the edge of the petal connection with decor to hide the glue.
The chic product is ready, and your little princess will be absolutely delighted with it. It will be a good gift for the New Year.
Miniature decoration
To create you will need:
- satin white ribbon;
- wide and narrow ribbon made of brocade and silver;
- rim;
- glue gun;
Once you have all the necessary materials on hand, you can start working.
Take the hoop and decorate it with two ribbons. Now we are working on the main part of your product. For the base we will take polystyrene foam. It should be seven centimeters in volume. This is good material, working with which will not cause you any problems.
Read this: Polymer clay modeling: creating food for dolls
To begin, cover it with white felt cloth, and treat the sides with satin. We make about thirty-five pieces of silver and white petals. Above we discussed this kanzashi technique.
Take twenty white leaves and glue them around the circumference of the base. We insert silver beads into the petals. Next we make the teeth of the crown, see the photo for more details.