The time is approaching the New Year, and many have probably already installed a festive tree and decorated their apartment. Inviting friends over, playing the piano can be a great way to spend time with like-minded people. But what to do if there is no piano in the house? It's no secret that a beautiful piano also serves as a luxurious decorative element. If you don’t have enough space in your apartment for such an instrument, I offer an elegant solution - a piano made of candy. Of course, you won’t be able to play on it, but it’s easy to surprise your friends!
In addition, such a delicious chocolate piano will be a wonderful gift for a person whose life is connected with music. On the eve of the holidays, the problem of original gifts comes to the fore. You can spend a lot of money on a gift that turns out to be unnecessary. Or you can make a gift with your own hands. Such a surprise will definitely be bright and will remain in the memory, because attention is something that has been valued at all times!
The size of such a piano will be about 40 x 40 cm. This piano can be made in different colors, depending on who you are going to present it to.
Step-by-step master class on making a piano from candy
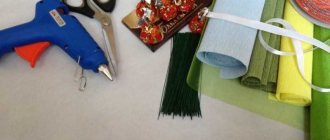
Before moving on to the step-by-step process of creating an original gift, we list the necessary materials and “ingredients”:
- foam sheet 2 cm thick;
- 3 small bottles of Rastishka or other yoghurts;
- corrugated cardboard (any color);
- braid, lace or other decorative elements;
- a piece of guipure;
- 3 wooden skewers;
- black and white paper;
- Double-sided tape;
- glue;
- scissors;
- paper flowers (if you have time and desire, you can make them yourself);
- of course, a variety of sweets.
Don't rush to throw away your old piano
What to do with an old piano that is no longer good for anything, there are no students who go to music school in the house, and it only accumulates dust and takes up space. Throw it away? — it seems a pity for such a beautiful body, and memory is precious. Convert into a bar or cabinet? - banal and not modern.
I propose to turn it into a computer workstation into a stylish, functional and modern interior detail.
This is what we had at the beginning, a donor piano, so to speak.
Manufacturing, in principle, is not difficult if you have basic skills in working with a hacksaw, hammer and drill.
First, we remove all the insides, if they are still there, from the donor.
Then we need to make a box where the monitor will be located and where the keyboard will be retracted. It's not difficult - we buy a sheet of plywood, cut it to size, assemble it with screws and install it into the body.
The most difficult part is making the hinged front cover. This requires two swivel brackets (we buy them at a furniture store) and a lot of patience to fit them in place. It is necessary to ensure that the front wall moves up without touching anything, slowly and safely for the insides. If you succeed, consider it done.
Once the design of the box and the folding front wall is working, we move on to the upholstery. The material chosen was leatherette to match the piano. The upholstery was done on the assembled structure using furniture nails with wide convex heads. The job is similar to covering a door with leatherette. To prevent the material from repeating all the irregularities, fabric was placed under it - an old bedspread. You cut it in place, attach it with a stapler and then nail it. In some places you can make decorative elements and patterns from nails.
Step-by-step master class on making a piano from candy
Before moving on to the step-by-step process of creating an original gift, we list the necessary materials and “ingredients”:
- foam sheet 2 cm thick;
- 3 small bottles of Rastishka or other yoghurts;
- corrugated cardboard (any color);
- braid, lace or other decorative elements;
- a piece of guipure;
- 3 wooden skewers;
- black and white paper;
- Double-sided tape;
- glue;
- scissors;
- paper flowers (if you have time and desire, you can make them yourself);
- of course, a variety of sweets.
Let's start making a candy gift:
- We cut out the base from penoplex. You can draw the shape yourself or find a sample on the Internet. The optimal size is approximately 30x35 centimeters, but this depends on the size of the candies that will serve as keys.
Making the base of our piano
We will need side walls and other elements
Competition entry “Treble Clef” | Country of Masters
“Spring, with its melody, penetrates into our hearts and souls...” I greet everyone who has come to see me! Today I want to show my works that were made for the “Spring Melodies” competition, which was held in our SM, conducted by Nadya, link https://stranamasterov.ru/user/267153 . I did two jobs. This is the first one, or rather I did the second one, I was in a hurry, I barely had time, because... It was before Easter, there was a lot of work to do, like everyone else. I took the photos on different backgrounds, I would like to show you different ones, because... I only needed 2-3 pieces for the competition. My works didn’t take any prizes, but the main thing was participation. I want to thank everyone who voted for my works, thank you so much!!! Now I’m waiting for your ratings. Thank you all in advance!
I suggest you just take a look.
Let's spin around a bit.
Another sideways
Back...
And lastly...
Thank you for your attention, friendship and for stopping by to visit, don’t forget! I’m glad to see everyone!
stranamasterov.ru
Step-by-step instruction
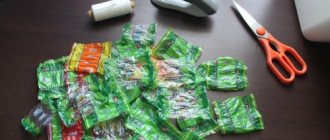
So, to make a candy piano, you will need:
- Actually, the candies themselves. For keys, oblong candies in white and black packages will be good. It’s great if there is an element of gold on the candy wrappers, then the festive piano will look more luxurious.
- For the base of the piano you need polystyrene foam (you can take regular polystyrene foam), superglue, thick and loose cardboard, self-adhesive paper (Oracal), or better yet, double-sided tape.
- Empty Actimel yogurt jars are best for piano legs.
- As additional decorations, you can give free rein to your imagination. Anything goes: flowers (real or artificial), ruffles, printed miniature notes.
Piano made from candies for the New Year
The time is approaching the New Year, and many have probably already installed a festive tree and decorated their apartment. Inviting friends over, playing the piano can be a great way to spend time with like-minded people. But what to do if there is no piano in the house? It's no secret that a beautiful piano also serves as a luxurious decorative element. If you don’t have enough space in your apartment for such an instrument, I offer an elegant solution - a piano made of candy. Of course, you won’t be able to play on it, but it’s easy to surprise your friends!
In addition, such a delicious chocolate piano will be a wonderful gift for a person whose life is connected with music. On the eve of the holidays, the problem of original gifts comes to the fore. You can spend a lot of money on a gift that turns out to be unnecessary. Or you can make a gift with your own hands. Such a surprise will definitely be bright and will remain in the memory, because attention is something that has been valued at all times!
The size of such a piano will be about 40 x 40 cm. This piano can be made in different colors, depending on who you are going to present it to.
Step-by-step instruction
So, to make a candy piano, you will need:
- Actually, the candies themselves. For keys, oblong candies in white and black packages will be good. It’s great if there is an element of gold on the candy wrappers, then the festive piano will look more luxurious.
- For the base of the piano you need polystyrene foam (you can take regular polystyrene foam), superglue, thick and loose cardboard, self-adhesive paper (Oracal), or better yet, double-sided tape.
- Empty Actimel yogurt jars are best for piano legs.
- As additional decorations, you can give free rein to your imagination. Anything goes: flowers (real or artificial), ruffles, printed miniature notes.
When getting started, you first need to glue the base on which the candies will be held. To do this, we cut out the necessary parts from penoplex/foam plastic.
Then we put together all the parts of the base and secure them with superglue. Don't be afraid if the body turns out to be uneven - the candies will hide all the flaws. If there are still large recesses, you can carefully cover them with loose cardboard.
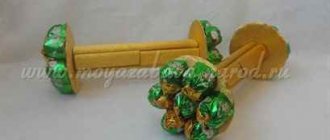
We carefully cut out holes for the legs equal to the diameter of the neck of the yogurt bottle. We insert the bottles there, securing them with superglue.
We paste the resulting blank with oracal of any color. Classic options - white and black - are always in use. We paint the legs of the piano.
When creating the keys, we first lay out another strip of white candies so that in the end the black ones are shorter. Candies must be glued with double-sided tape.
After the keys are ready, you need to paste over the body of the piano in the same way.
When the main work is done, cut out the lid from thick cardboard, cover it with oracal to match the piano and secure it with any thin tube. Under the lid you can decorate with flowers, ruffles, beads or other beautiful little things. By the way, flowers can also be made yourself if you are determined to complete a homemade gift from start to finish. If inspiration strikes you and you decide to be realistic in the details, you can glue miniature notes to the music stand.
Natalya Petskus showed how to make such a candy piano. Thanks to her for the wonderful idea brought to life!
This gift is universal in that it is suitable not only for musicians, but also for those with a sweet tooth. But you must admit: there are very few people in the world who don’t like chocolate!
I also recommend looking at another option on how to make a piano out of candy with your own hands!
Treble Clef – Masters Fair
Found 13 topics with this keyword Sort by:
Date
Popularity
Updated collection of forged jewelry “Asymmetry” from tsdesign. Clothing "Olga Kotelnikova's Workshop", Collection "Like clockwork...". Model Milena Stoyanova. Photographer Mikhail Krasnoslobodtsev.
05/16/2017 13:03 | Smakom
Topper Graduate 2022. Graduation is coming soon in schools, music schools and kindergartens. Let's congratulate ourselves and our loved ones.
Paired brooch “Music with me”. The work includes hematite, rhinestones, Czech beads, sequins, gimp, glass pearls, Czech beads, a lightweight metal chain, eco-leather, a base for the brooch, a black agate bead. Treble clef size 8.5x4, 16th 3.5x3cm
Brooch “Musical Instruments” under tin (JJ USA) https://www.livemaster.ru/item/17595963-vintazh-brosh-muzykalnye-instrumenty-pod-olovo-jj-ssha Stud earrings “Musical Instruments” under tin ( JJ USA) https://www.livemaster.ru/item/7615435-vintazh-sergi-gvozdiki- …
Dear friends! These works were inspired by a striking black fabric with a scattering of treble clefs. The handbags were sewn one after another, gradually, and all of them were never seen together. Now is the first and probably the only time when handbags are ready and put up for sale at the same time))) Very...
And again GOOD NEWS! NEW “Niagara” at a great price! 1m-390rub!!! Delicate, stylish, modern blouse colors! Blouse NIAGARA is a light elastic opaque fabric (only fabrics with prints on a white or milky background are slightly visible). Thanks to the homogeneous...
Dear visitors and customers! We bring to your attention interesting vintage jewelry with the image of a treble clef. The treble clef graphically denotes the note “sol” enclosed in the violin. Currently, the image of a treble clef symbolizes music. Cufflinks - classic...
Dear visitors and customers! From June 8 to June 14, the store is hosting a “World of Hobbies” themed week. The assortment is replenished with interesting vintage new items, in particular, men's cufflinks that were made in the 60-70s. last century. Cufflinks are a classic accessory...
Brooch “I love handicrafts” with tin effect, enamel (Danecraft USA) https://www.livemaster.ru/item/10455725-materialy-dlya-tvorchestva-brosh-ya-lyublyu Brooch “Tailor” with tin effect (USA) https: //www.livemaster.ru/item/10087253-materialy-dlya-tvorchestva-brosh-portnoj-pod Brooch “Sewing…
Issue No. 038 “Open environment at the Mariinsky Theater. Free Petersburg. 2 of 7″ If you find yourself in the center of St. Petersburg and are drawn to beauty, run straight to the Mariinsky Theater! In this issue - how to get to a free concert at the Mariinsky Theater?! This issue featured earrings "...
www.livemaster.ru
"Autumn Blues" Bouquet of sweets (master class)
Marina Kolomicheva
"Autumn Blues" Bouquet of sweets (master class)
I would like to offer you a master class on making a piano for a bouquet of candies, which I called “ Autumn Blues ,” such a bouquet can be presented to a vocal teacher, music teacher for Teacher’s Day, or to any musician. my bouquet of sweets not only with sweets , but also with fresh flowers. To make a piano, we will need a sheet of thin foam plastic - this is the one that is used to cover ceilings, a self-adhesive film, I took red, 3 actimel bottles for the legs, gold corrugated paper, gold cord for decorating, candy , wire, gold spray paint, wooden kebab stick, plain and double-sided tape, glue gun. And so we begin to make a piano for a bouquet of sweets “ Autumn Blues ”
We cut out the parts from foam plastic, having previously made a pattern of the parts from paper, the size of the piano can be different, I made it small, so that it would fit on a box of chocolates .
We glue the parts with self-adhesive tape, also by making patterns first.
Using a glue gun, we begin to glue the parts of the piano together.
We cut the actimel bottles and make legs from the halves, paint them with gold spray paint and glue them to our piano
We'll get something like this:
We begin to decorate our piano using corrugated paper and decorative cord, pre-print the keyboard according to the size of the piano and glue it with wide tape, this is how you can make sheet music
We decorate a kebab stick that will hold the piano lid
We take candies with which we will decorate the piano
Using double-sided tape, secure the candies to the piano
Let's make a music holder for our piano, take a chocolate bar and a thin wire, I painted it gold
We insert the chocolate into the wire and fix it on the piano
In approximately the same way we will make a chair from wire and chocolate
We secure the legs with tape
Next we will decorate the box of chocolates on which we will install the piano, we will use white corrugated paper, a thin red satin ribbon, a pen with gold paste, and other decorative material
We make a border out of paper and paint the edge with gold paste.
And we decorate with the available material
When I installed the piano on the box, I didn’t like how it all looked together, the composition didn’t fit together, so I remade it and decorated the box with artificial autumn leaves using double tape, so I like it much better. But I decided to show you this option for decorating the box and it may be useful for another composition. Then we place a container with fresh flowers in the piano, which we secure in a floral sponge, I chose the simplest flowers that grow in any garden, I also placed candies , securing them with double tape. And it turned out to be a bouquet of sweets “ Autumn Blues ”
We pack it in transparent paper and our gift “ Autumn Blues ” candies
“ Autumn Blues master class was previously published on my personal website “Grandma M’s good advice with my own hands”
Treble clef - MK | Country of Masters
Completed treble clef
Twist a treble clef of the required size from stiff wire.
Secure the intersections of the wire with thinner wire so that the key holds its shape.
Cut any wrapping paper approximately 1.5 cm in size and wrap it around the frame.
This is what happened after winding.
Tie candies (any kind, preferably not too heavy, so that the frame does not bend) with a ribbon, which we will tie to the base.
Pierce the medal candies with a needle, stretching the ribbon
Tie the main candies evenly with ribbons to the frame. To prevent them from dangling, glue them with hot glue.
Secure the medals between the candies. The sweet treble clef is ready.
This original sweet gift is intended for my friend for the New Year. She loves sweets very much and is also a musician. The idea was taken from here: https://club.osinka.ru/topic-58960?p=2357308&highlight=#2357308
Production time is approximately 1 hour.
stranamasterov.ru
How to make a children's cake from candy? Photo
It is very difficult to surprise a little princess or prince with toys these days. But if you prepare a gift for a child with a triple surprise, it will cause fireworks of his joyful emotions.
You can make a cake for your baby from Kinder chocolate candies, decorating it with a box with decorations in the form of a toy.
For this cake we will need to prepare in advance:
- Kinder chocolate for decorating the outside and any brand of candy for filling the cake inside
- Cardboard of different densities and different colors or any ready-made Raffaello candy box
- Scissors
- Ruler
- Pencil
- Rubber bands
- Lace fabric, satin ribbons and beads
- Thread and needle
- Jewelry box in the form of a toy
Manufacturing:
- All Kinder chocolate candies must be placed in one line
- Attach a sheet of paper below them and use a pencil and ruler to measure the future size of the box, leaving a centimeter on the sides for gluing
Making a children's cake from candies Making a children's cake from candies
- Draw teeth on the top side of the rectangle and cut them all out.
Making a children's cake from candy
- Glue the rectangle together and the teeth should be inside the upper perimeter
Making a children's cake from candy
- From cardboard we cut out a circle with a slightly larger diameter than the blank itself, which will be the bottom of the box
Making a children's cake from candy
- Glue the bottom to the base. Carefully place a thin elastic band on the box itself, loosely, so that it is convenient to place candies under it
Making a children's cake from candy
- Insert all the candies one by one, pressing them tightly against each other.
Making a children's cake from candy
- We cut out another circle from cardboard, which will be the lid for the cake.
Making a children's cake from candy
- From thick paper we also make a blank with teeth with a height of about 1 cm
Making a children's cake from candy
- Glue the teeth to the cardboard lid
- Using threads, we collect openwork lace into a beautiful circle, basting it together with a satin ribbon
Making a children's cake from candy
- We pre-fill the box itself with any candies that your sweet tooth will like.
Making a children's cake from candy
- Close the box with a lid. Using glue, we strengthen the box with the decoration on top
Making a children's cake from candy
- And we hide the elastic band with a satin ribbon with a bow tied around the box
This is how you can make any cake for a child and fill it with the surprise that he has long dreamed of.
DIY musical instruments
Tatyana Mayorova
DIY musical instruments
Our kindergarten hosted a competition “ Do-it-yourself musical instruments ”
.
The competition was held among parents and teachers. Parents and children made instruments their own hands from scrap materials. I would like to share the results of the competition of our group (junior group 1)
.
Miracle - guitar - 1st place.
Material used: plywood, tied with woolen threads on one side and covered with material with painted notes on the other side, decorations with Velcro.
A musical instrument can be decorated with different embroidery designs (flowers in this photo)
. This allows the child to develop fine motor skills and imagination through Velcro decorations.
Merry bells – 3rd place.
Material used: multi-colored hair bands, bells.
The child puts rubber bands on his hands and performs various movements to the sound of bells. This musical instrument can be used for rhythmic accompaniment of dances, dances, songs, games and dramatization of plays.
Bells contribute to the development of a sense of rhythm and ear for music .
Material used: board covered with paper, Velcro in black and white.
Each piano key is made of Velcro, which allows the child to develop fine motor skills and tactile sensations.
Materials used: candy box, pencil, rubber bands. The child took part in decorating the musical instrument
Material used: 2 bars, door hinges, handles.
Materials used: multi-layer cardboard, fishing line for strings, bells for voicing.
MUSICAL INSTRUMENTS OF GROUP TEACHERS.
Tambourine – 1st place
Material used: hoop, multi-colored thin ribbon, bells, thin material.
Veselushki – 1st place.
Material used: multi-colored fabric, bells.
These instruments decorate the music corner and are used by children in free, playful, theatrical activities and in classes.
Homemade musical instruments Musical instruments originated in ancient times; instruments dating back to the 2nd-3rd centuries were found during archaeological excavations. before ours.
DIY children's musical instruments DIY children's musical instruments. Surely you already play various musical games with your kids and read music to them.
Master class for parents on the topic: “Do-it-yourself musical instruments” For the harmonious development of children aged one and a half to three years, auditory perception and a sense of rhythm are important. Develop both.
DIY musical instruments Soon there will be a music corner competition in our kindergarten. At a parent meeting we decided to make musical instruments with our own hands. By.
Non-traditional musical instruments Accessible, and therefore loved by children, are noise musical instruments. Children hear the world of sounds in a new way, and there are many of them around us.
Abstract of the educational activity “Musical Instruments” Musical director: Guys, today we will talk about musical instruments. On earth, everyone has a home. Fine.
Project “Musical instruments with your own hands” Project “Musical instruments with your own hands” Project leader: Kartasheva Natalya Pavlovna – musician. manager Project type: creative,.
Entertainment “Cat, Mouse and Musical Instruments” Entertainment “Cat, Mouse and Musical Instruments” puppet show for younger children. Tasks: -creating a good mood.
Noise musical instruments I suggest you make noise musical instruments using multi-colored plastic cups and plates. For work.
Noise musical instruments “Bells” Playing children's musical instruments is one of the important types of children's performing activities. It develops musical and creative skills.
Cake box made of sweets, photo
The original cake box will be a very pleasant and useful gift for a lady of any age. You can make it from scrap materials and put inside everything you want to give.
We will need:
- Any ready-made candy box or just cardboard
- Scissors
- PVA glue
- Beads and ribbons
- Candies and pieces of fabric
The cooking principle is the same as described above. The main thing is to use your imagination.
candy box cake
We decorate the side surface with crepe paper and attach candies on top.
cake box made of sweets cake box made of sweets cake box made of sweets cake box made of sweets