A car is an excellent gift for both February 23 and March 8, even if it is of such a size that it easily fits on the table. Chocolate decoration will lift your spirits and allow you to pass the time with a cup of tea. Making your own candy machine is a great way to get creative and have some fun while making it.
Gifts and compositions made from sweets: a collection of master classes
Not long ago we talked about how to make bouquets of sweets with your own hands. But it turns out that you can make amazing compositions
that will become wonderful sweet gifts for your loved ones and will delight the eye.
Candy compositions are suitable for any festive occasion
and will appeal to everyone: women, children, and men.
We offer you several master classes on making the most popular compositions from sweets with your own hands. Once you know the basics, you can get a little creative and come up with your own compositions
.
Candy gift ideas, 5 options
A candy arrangement is a wonderful gift for any occasion, because candy is always appropriate. By making a candy gift with your own hands, you are not just showing a gesture of politeness, but giving a full-fledged gift that everyone will be pleased to receive.
DIY candy basket
Basket of sweets
- one of the simplest candy compositions that can be easily made using a paper base.
To make a neat basket, they usually use candies in the form of long sticks
.
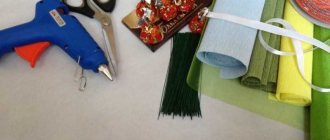
To work you will need:
— Loose colored cardboard
Let's get started:
Bend the tails of long chocolates
, gluing them to the sides using double-sided tape.
2) For the basket you will need a cardboard base, which you can make yourself, or use a ready-made one. Measure the height of the candy and mark out a rectangle on a piece of cardboard
width corresponding to the height of the candy, and long, depending on the size of your future basket.
Staple a piece of paper into a cylinder
and secure the edges with a stapler.
For 300 grams
of sweets you get a basket with a diameter of
7-8 centimeters
.
3) You need to glue a round bottom
.
To do this, you can use a circle of loose paper, folding the edges and gluing them with glue on the outside. a circle of cardboard
onto loose paper that corresponds to the diameter of the bottom of the cylinder.
4) Apply strips of double-sided tape
in the upper and lower parts of the outer side of the cylinder.
5) Then start attaching the candies
.
6) You should end up with a simple basket
:
7) As an addition, decorate the basket with a bow
, bandaging a row of candies.
The basket is ready. Now you can put other candies in it or make several flowers from corrugated paper
.
Sweet locomotive | Country of Masters
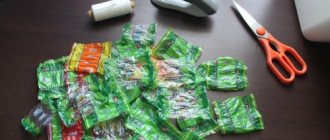
Thanks to the craftswoman from the Osinka forum, I was able to “recreate” such a sweet locomotive. Of course, I had to think through a lot myself, but of course I couldn’t do without a detailed MK. For such a locomotive I used 60 Roshen chocolates ", 5 coins from the same company. I also used black cardboard, white cardboard, black and gold corrugated paper, double-sided tape, silicone glue, wire and foam.
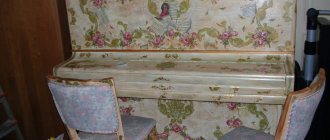
This is a side view. In the middle of this central pipe (at the client’s request, so that the birthday boy would not immediately dismantle this entire structure for spare parts), additional other candies were placed as a distraction.
And now the gift is ready. The final touch: packaging. This evening this locomotive was supposed to arrive to the birthday boy named Deniska. I wonder if he liked the gift?
stranamasterov.ru
Laptop made from candy
This original candy gift can be used as the basis for many other compositions. You can easily make a laptop out of a candy box
, which is decorated with sweets on the outside.
The box should have an opening and closing lid that will serve as a “monitor” for the composition laptop. If you don't have a suitable box, the base of the product can be made from a piece of foam.
To work you will need:
— Candies (flat and rectangular)
— Foam plastic (thickness – 2 cm)
— Printed page showing the Windows splash screen
Let's get started:
1) Lay out flat candies to get the outline of the future laptop
and trace the outline with a pen.
2) Cut out two identical rectangles
, then wrap each one in glitter paper or foil. These will be the main parts of the laptop - the monitor and keyboard.
3) Take the first blank and glue a printout with a computer screensaver in the center of it.
4) Lay out flat long candies
on all sides of the picture.
5) Lay out the candies and glue them to the second blank, which will be the keyboard
.
For example, this is how you can use taller rectangular candies
to get keys:
6) Glue candy to the outside of the laptop
.
7) Cover the sides of the blanks
, then only on three sides.
You will need the fourth side of each of them for fastening. To do this, use a thick wire, inserting it into the end of the monitor
.
 Bend the wire to the desired angle
and insert the other end into the keyboard blank. To connect it to the monitor.
9) You will end up with an open laptop.
Here are some more options for a laptop made from candy
, which will be a great gift for your beloved men with a sweet tooth:
MY CRAFTS: Steam locomotive
I thought for a long time whether to take on this order or not. Because it’s an order from the team where I work, and this is quite exciting. Because out of 50 people who “chip in” for a gift, there will always be those 5 who will say that this is nonsense, that “it’s not worth that kind of money,” and I will be very worried. But my husband persuaded me, arguing that I might not have the opportunity to “turn around” with a good budget. So, it was decided to do it. The idea was taken from the Osinka forum. For the locomotive I needed: To do this, of course, I had to go around to a single supermarket in our city, because choosing the size of a can of coffee, a box of chocolates (which certainly had to not open up, but move out to the side), chocolate and sweets had to fit each other to friend. I went shopping with a ruler and put the construction set right next to the counters. I can imagine how I looked from the outside...... :). So everything has been purchased, whether there will be enough or not - the process will show. For the wheels I used chocolate coins, and their basis was lotto cards (I had to sacrifice Polina’s toys), the stick was a birch skewer for shish kebab, everything was wrapped in silver tape. The question is how to secure a can of coffee - I decided this way: I first wrapped it with foam rubber, then with cardboard and on top with golden corrugation: The stand is a piece of plastic, which I covered with double-sided tape and wrapping paper: Then the problem arose in how to fasten it together "carts": two Ferrero plastic boxes without opening them? A clever idea came to me in a dream. I took a knitting needle, heated it on gas and melted the small holes, and pulled out the rope with a thin hook.
Done: Next came the process of selecting the size of chocolate and pasting it over all the “blanks” of the locomotive, attaching the bottle of whiskey: Four hours of night work and this is the result: The locomotive turned out to be heavy, the stand will have to be remade. tayurka.blogspot.com
DIY candy cake
Candy cake
– an original gift for a birthday or other holiday, as well as a beautiful craft that is easy to make.
The composition is decorated with candy flowers
, which can be made from corrugated paper. You can read more about candy flowers here.
To work you will need:
— Ribbons for decoration
Let's get started:
1) Cut out cake blanks from thick sheets of foam plastic: one larger, the other smaller. The size of the “cakes” will depend on you. Cover the blanks with corrugated paper
, leaving beautiful edges on top.
2) Also cover the cardboard box
, which you place on the top level and in which you can put small gifts and toys.
3) Cover the top of the foam blanks with the same paper and place all levels on top of each other
, securing them well.
This is the basis for your future cake. Now you can decorate it with candies. For example, you can place candy flowers and bouquets on top of it, or cover the sides with candies
by placing the sweets on glue or double-sided tape.
This composition can be made from the same foam base, cutting it in the shape of a triangle. Get a piece of candy cake
.
One-tier candy cake
from long and round candies and paper flowers:
Kitkat chocolate bars.
and topped with
M&M's
.
Not a bad idea for a children's party or birthday
. The chocolate bars were probably used without a base and were held together with tape.
Royal crown
You can find on the Internet a product that was worn by famous kings or emperors, queens and crown princesses. Using this model, you can create your own template. The desired shape is drawn on the cardboard, which is then carefully cut out along the contour. Then glue it together and leave it until completely dry.
To get a beautiful result you will need a golden fabric. It is cut according to the pattern for the base, the lower part is sewn by machine.
The top part will be fastened by hand. You will need matching thread and a needle. When working, you can use beads to hide the seam. Such elements will also serve a decorative function. Large white beads must be attached to the sharp ends of the product.
Additionally, the accessory is decorated with colored sewn-on stones. You can come up with a layout for all the elements. It's better to see real royal crowns. You can also use colored buttons with stones of different shapes. Additionally, sew transparent beads along the edge of the crown that will shimmer in the light. Both girls and boys will like this accessory; at the holiday, the child will feel like a royal person.
Creating beautiful accessories takes time and requires patience. You need to purchase all the necessary materials in advance and prepare the tools. Models may vary. It all depends on the imagination of the master. If you can’t create a masterpiece yourself, you can always look at ready-made examples. It is not necessary to copy the product, it can be modified. You will receive a unique accessory.
Candy grapes master class
Bunch of grapes
made from sweets is an excellent and very original gift for those with a sweet tooth. It can be used as a separate gift, or used to decorate any composition: cake, bouquet, and so on.
To work you will need:
— Round candies in wrapper
— Wire for bouquets
— Details for decoration - leaves, ribbons, ladybugs, etc.
Let's get started:
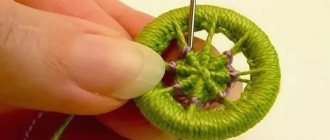
1) Make blanks for the bunch. attach a wire to each candy using tape.
.
2) Then collect several candies (5-6 pieces) together
and secure with tape or tape. For example, you can use colored tape that matches the color of the wrapper, then the fasteners will not be visible.
3) Make several small bunches
, which you will then attach to thicker wire.
4) When the whole bunch is ready, decorate it with leaves, ribbons and other decorations
.
With the help of such bunches you can decorate a gift bottle of wine.
:
Another option for making candy grapes requires the use of toothpicks and a piece of foam.
. Such a bunch is also not that difficult to make.
To work you will need:
— Round candies with a flat bottom in a wrapper
— Details for decoration – leaves, ribbons, etc.
Let's get started:
1) Wrap each candy in wrapping paper
and attach a toothpick to it.
Candy gift for men: candy steering wheel
Steering wheel
– an original gift for a male driver who also has a sweet tooth. It's very easy to make using a sheet of foam or cardboard.
To work you will need:
— Flat-bottomed candies
— Glue or double tape
— Dark paint for cardboard
Let's get started:
1) Cut out a blank from cardboard for the base for the future steering wheel
, having drawn the outlines in advance with a pencil. To make the steering wheel even, use templates in the form of plates or other round materials at hand. You can use a compass.
2) Paint the steering wheel with dark paint
.
3) Cover the steering wheel with candies.
4) You can decorate it with the logo of your favorite car brand
.
Cardboard decoration
Girls love to dress up to look like princesses. A boy may also need an attribute of power if he is a royal person at a party in a kindergarten or school. Parents can make their child's dream come true by making their own crown. An item created with your own hands will perfectly harmonize with your outfit.
A simple accessory is cut out of cardboard. You just need to draw the shape of the product; it is selected in advance. You can find a suitable pattern. Using a ready-made template, it’s easy to create a beautiful accessory. A crown made of paper with your own hands will look original, you just need to find a material of a suitable color. An elastic band is attached to the finished product on both sides.
LiveInternetLiveInternet
—Tags
—Links
—Categories
- beads (28)
- knitting (134)
- beads (7)
- for home (8)
- clothes (61)
- lessons (44)
- dacha (17)
- decoupage (802)
- toning (71)
- volumetric (43)
- Image translation (31)
- craquelure (28)
- sticker methods (24)
- For home, design (331)
- magazines, books (263)
- audiobooks (41)
- health (703)
- Yoga (149)
- recipes (31)
- herbs (6)
- Fitness (68)
- made of paper (747)
- papier-mâché (120)
- paper art (16)
- from unnecessary (357)
- bags (13)
- Plastic bottles (63)
- CDs (14)
- Internet (231)
- Blog (56)
- video (59)
- Music (46)
- paintings (36)
- DIY dolls (222)
- cooking (1242)
- baked goods (379)
- sweet pastries (21)
- unsweetened pastries (12)
- dairy (6)
- porridge (3)
- desserts (114)
- blanks (185)
- seafood (68)
- multicooker (49)
- Meat (140)
- drinks (97)
- vegetables, mushrooms (158)
- salads, snacks (96)
- thoughts, poems (318)
- prayer (53)
- parables (13)
- education (478)
- history (128)
- PC (147)
- right (44)
- languages (55)
- weaving (842)
- newspapers (620)
- macrame (12)
- Reed (5)
- bobbins (2)
- Rogoz (3)
- gifts (386)
- candy bouquets (106)
- Money (125)
- Post (125)
- Holidays (962)
- February 23 and others (12)
- March 8 (12)
- Valentine's Day (105)
- Baptism (5)
- new year, christmas (576)
- Easter (182)
- wedding (107)
- wedding (2)
- Halloween (4)
- educational toys for children (28)
- handicrafts (1406)
- batik (2)
- batik (1)
- costume jewelry and accessories (189)
- bottles (30)
- bottles and jars (253)
- Embroidery (70)
- Ribbons (60)
- Modeling (243)
- Pergamano (2)
- flowers (269)
- gardening (682)
- plants (307)
- bushes and trees (12)
- greenhouses and beds (11)
- other vegetables (9)
- garden calendar (8)
- Bushes and trees (7)
- cucumbers, pumpkins, zucchini (6)
- tomatoes (5)
- berries (4)
- vegetables (2)
- potatoes (1)
- construction (84)
- decorations (157)
- flowers (15)
- shells (32)
- scrap (2215)
- Albums (103)
- pictures (1175)
- postcards (426)
- links (60)
- painting lessons (333)
- one stroke technique (6)
- spot painting (48)
- Photoshop (164)
- sewing (274)
- for home (40)
- clothes (157)
- patchwork (10)
- lessons (53)
—Quote book
OLD THINGS GET A SECOND LIFE.
Exercises for the face and the secrets of sculptural facial massage Let's talk about the secrets of cheekbones.
Orange Flavored Bulk Pumpkin Pie is the Bomb Orange Bulk Pumpkin Pie.
POSITIVE FOR YOU FOR THE WEEKEND So that a positive mood is always with you, we have collected another one.
“Literary Catalog” - Leif Panduro Leif Panduro (04/18/1923-01/16/1977) Famous Danish writer.
Colorful tulips
Bouquets of flowers are found quite often in everyday life. If you want to please a loved one and give an original gift, you should choose a suitable composition of sweets. Showing your imagination, you will end up with a piece of incredible beauty. Such a gift is not only appetizing, but also practical. It will be able to take a prominent place in the house and become its decoration.
The products are of particular interest to children. They happily look at sweets and unusual decorative elements.
Materials for creativity:
- glue;
- ruler;
- knife;
- candies;
- penoplex;
- skewers;
- sisal;
- corrugated paper in bright colors;
- pot;
- scissors;
- tape.
Technique:
- Cut the scarlet paper into small pieces. Their size should correspond to 16.5x2 cm.
- We also make strips of 8x4 cm from red paper.
- We twist the long strip several times in the center and bend it in half.
- Carefully straighten the strip so that the paper takes on a curved shape.
Felt crown
Two base parts are cut out from a material of a suitable tone. They are glued together. It is better to purchase thick felt so that it holds its shape well. A small pompom in a contrasting color is attached to each top of the product. Stars made of shiny paper can serve as additional decor. A ribbon is attached along the edge of the product. The headdress for the little prince is ready.
For a boy, you don’t need to come up with a complex design with an abundance of decor; just a few elements are enough to create the image of a beautiful prince. The crown is assembled to match an outfit that has already been rented or sewn. This will allow you to get a harmonious image.
Lollipop bouquet
Step-by-step photos for beginners will allow you to make interesting bouquets of sweets with your own hands. The work process will bring a lot of positive emotions, even children can be involved in it. Little crafters will be happy to wrap sweets in interesting pieces of paper, creating amazing work on their own.
Materials for creativity:
- Chupa Chups candies;
- green corrugated paper;
- skewers;
- scotch;
- ribbon;
- glue;
- scissors.
Execution sequence:
- We cut the corrugated paper into 5x5 cm squares, fold them in half, and turn each part 45 degrees.
- Glue the blanks to the candies.
- We wrap the skewers with tape around the candy sticks.
- We unfold the paper on the table and put lollipops on it. Carefully wrap and decorate with a bow. We can use anything as decoration. This could be mesh, decorative elements, sparkles.
The work is ready, all that remains is to present it. For such a product, you need to choose a prominent place in the house, although the bouquet will not get lost anyway.
Floral arrangements do not need any special introduction. They look festive and attractive. Roses are the queens among flowers. To please a woman, it is not at all necessary to purchase a huge bouquet of roses.
You can be creative when choosing a gift. Sweet gifts bring no less pleasure than fresh flowers.
- scissors;
- corrugated paper;
- skewers;
- Styrofoam;
- toothpicks;
- elements for decoration;
- wrapping paper;
- ribbons;
- scotch.
Technique:
- Cut out petals from green paper.
- Place the candies on brightly colored paper. We secure the skewer with tape.
- We attach the petals to the flower, placing them over the entire surface of the bud.
- Give the petals the desired shape. They can be closed or loose. It all depends on personal preference.
- We make the rest of the flowers using the same principle.
- We stick candies into the foam, wrap everything in paper, and secure it with tape.
All that remains is to decorate the bouquet. To do this, we use beads, ribbons, and sparkles. At this stage of work, it is necessary to show imagination so that the product acquires individuality.
Lace product
There is a huge selection of accessories on sale. You can choose the lace of the desired width and shade. A do-it-yourself openwork crown for a girl will look great at any holiday.
You should measure the circumference of the child's head to determine how much material is needed. Glue is poured into the container, and then the lace is lowered into it. Afterwards it is laid out on wax paper. You need to wait a few hours until the part is completely dry.
If you cannot find lace of the desired color, you can dye it in any shade. To decorate the product, rhinestones and crystals are used, which are attached with a glue gun. At the end of the work, the ends of the part are connected. This stylish accessory will complement a dress of a delicate shade made of airy fabric. It is suitable for a little girl, and can also be used by adults for themed parties and colorful photo shoots.
Sweet poppies
Handmade bouquets of sweets are becoming especially popular. For beginners, special master classes with step-by-step photos are presented. Experienced needlewomen share their knowledge so that everyone can create amazing work.
Poppies are often found in flower arrangements. They are a decoration of the product and successfully complement it.
Materials for work:
- candies;
- skewers;
- corrugated paper of different shades;
- Wicker basket;
- Styrofoam;
- scissors;
- foil;
- decorative elements;
- scotch.