High-quality fittings are an important condition for long-term and stable operation of the door system. You just need to purchase loops of the appropriate size. If they are not available, homemade hinges will come to the rescue, which are made independently, taking into account the parameters and weight of the sash. To do this, prepare tools and materials.
Self-made loop
Why choose homemade ones?
Many people refuse industrially manufactured fittings in favor of homemade ones for several reasons. Such products:
- Withstands significant loads. What is relevant for garage doors and solid doors;
- They have the required size. If the parameters of those manufactured in industrial conditions are standardized, then when producing in-house, the size that is required is chosen;
- They have a high level of reliability, since the fittings produced for themselves have a high level of strength compared to those produced in the factory. You can always choose a material with high mechanical properties and greater thickness.
Wooden gates
The best choice for a picket fence would be a wooden gate - frame, frame, panel. The advantages of a wooden gate for a fence include accessibility, simple and quick installation, and a variety of design options. There is, perhaps, only one minus - the fragility of wooden structures. To extend the service life of wooden gates, gates and fences, once every 3 years they are treated with antiseptics and fire retardants or coated with “2 in 1” combined compounds - fire bioprotection. Types and features of wooden gates:
Frame
Such designs are considered the most common. The supporting elements of the structure are assembled from timber or boards. Thinner overlay strips are stuffed onto them. Structures of this type are rigid and durable.
Framework
For such a gate, the main load falls on the frame, which is mounted from timber 40 cm thick. To give the canvas spatial rigidity, the frame elements are assembled not end-to-end, but in a groove or in a “half-wood” and tightened with self-tapping screws. The resulting frame is sheathed with wooden planks along the front side.
We make loops with our own hands
The process of making loops is simple. In order for the fittings to turn out to be of high quality, you must be able to perform various types of work on your own.
Preparing tools and materials
To make high-quality accessories at home, prepare the appropriate tools, materials and equipment. You must have the following tools and equipment:
- Tape measure or other measuring tool. Sometimes you can get by with a regular ruler, but in this case it must fully meet regulatory requirements;
- A marker that writes on metal. Instead of a marker, you can use chalk;
- A hacksaw with a blade for metal. Those who know how to use a grinder can use this equipment if it is available;
- File;
- Hammer;
- A welding machine with suitable technical characteristics, as well as personal protective equipment necessary for welding work.
Preparing the tool
- Metal plate 2-3 mm thick;
- Pipe section;
- Steel rod. Its diameter is consistent with the internal diameter of the pipe section. Select a rod so that it fits inside the pipe with a slight interference fit. It is better to discard a rod whose size is smaller than the internal dimensions of the pipe.
When choosing a material, pay attention to its characteristics. The plate, pipes and rod must withstand the applied operating load.
Manufacturing sequence
Initially, two sections of pipe are sawed off. The total length depends on the size of the door leaf. So if it is 11 cm, you need to prepare the first piece of pipe 5 cm long. Before cutting the pipe of the required size, carefully apply markings. You will also need a piece of pipe whose length is 1 cm longer, i.e. – 6 cm. As a result, the total length is 11 cm.
After sawing, burrs often form on the metal surface, which can cause injury during installation work. To prevent this from happening, remove defects with a file. Wear gloves to avoid damaging your hands. Perform processing on both sides.
Once the tubes are ready, the rod is prepared. Its length is equal to the total length of the pipes, that is, 11 cm. To do this, markings are applied to the surface of the rod and a saw is made. The cutting line must be perpendicular to the nominal axis of the rod.
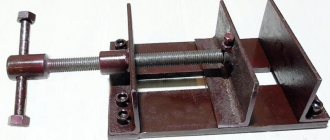
After cutting the rod and pipes to size, they are connected together. To do this, a rod is pressed into the sleeve. Once the sleeves are in place, the plates are prepared. Their size is consistent with the dimensions of the door and the dimensions of the manufactured hinges. There should be two such plates, and they have the same length. This concludes the preparatory stage. Moving on to welding work.
After making sure that the rod has taken the desired position inside the sleeve, the ends of both tubes are welded. This prevents the rod from moving inside the pipe during operation.
The plates are then welded to the sleeves. They are positioned perpendicular to the conventional axis of the sleeves. To do this, the plates are first grabbed, and then, after making sure of their correct spatial arrangement, they are finally welded.
Decoration
To make the manufactured hinges look beautiful, they are painted or galvanized. Both of these options allow you to give the surface a beautiful appearance, as well as protect it from external negative influences. To do this, the thickness of the applied coating must be sufficient for specific operating conditions.
After decoration, the fittings look almost the same as those sold by official manufacturers. In this case, you can always choose the color of the product that you require. So, if you can find fittings on sale, as a rule, black, then hinges made in-house can be painted in any suitable color.
Ready-made accessories
Installation of hinges
After the fittings are completely ready, they are installed. To do this, one plate is screwed to the sash, the second to the door leaf. The fastening is done so that the plate with the upper sleeve is screwed to the door, and the second part to the vertical post of the box. During the installation process, the manufactured loop is assembled into a complete product.
If the gate is made of corrugated sheets
Hinge for gates made of corrugated sheets
The sequence of welding operations looks like this:
- Make two jumpers, directing them parallel to the long sides of the sash. They are secured with special squares.
- The distance between the jumpers is set so that the sash is divided into three equal parts. Then it is necessary to weld loops to them.
- Corrugated sheeting is screwed on top of the canopies.
Be careful! You can properly strengthen the loops so that there are no negative consequences by adhering to basic rules. You cannot brew with faulty equipment. No welding should be done until the paint is dry. Do not weld in clothing that contains traces of oil, grease or gasoline. Do not hang rags soaked in flammable materials on cylinders.
Other options
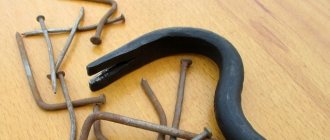
Not everyone can boast of having a welding machine at home. For others, such products turn out to be an expensive option, which is a pity to install on a light door. In this case, the necessary fittings are made from scrap materials. Which option is suitable depends on the size of the door leaf and the material of the door leaf.
To do this, prepare a conveyor belt and metal plates. Their thickness can be relatively small. You can take metal whose thickness is not much greater than the thickness of the sheets that are used in the manufacture of cans. To fasten the fittings, prepare nails 4–5 cm long.
Installation of hinges is carried out by placing the panel in the doorway. Leave one centimeter between the vertical post and the door leaf on the side where the hinges will be located. Having fixed the position of the door, nail the hinges. To do this, first place a conveyor belt and metal plates on top. In this case, the conveyor belt acts as a flexible element that ensures the opening and closing of the sash.
Such fittings are suitable for lightweight doors that are installed at the entrance to a chicken coop or a place where rabbits are kept. Their distinctive feature is the absence of creaking during operation, as well as the ability to operate without lubrication.
Thus, anyone can make loops on their own. Such fittings are suitable for garage doors and entrance doors. If you approach the manufacturing process responsibly, you can make your home a real fortress. High-quality and durable fittings can withstand external loads and at the same time have an aesthetically attractive appearance.
Pendulum loops have several other names: bar, western, metro. The origin of the names is quite justified, because doors on pendulum hinges can be found in American bars in the Western style and in Hollywood films about the wild west. These hinges are classified as double-sided; thanks to them, the door can open in both directions. The scope of application of hinges is in places with high traffic: bars, restaurants, shops, industrial and production premises.
Pendulum loops are usually installed in bars and restaurants
Pros of hidden awnings
Hidden hinges for doors are now in quite high demand and the reason for this is a number of undeniable advantages of these mechanisms.
- Hidden canopies are anti-vandal fittings; these mechanisms are not visible, which means they cannot be affected in any way, for example, by cutting them off;
- The range of hidden awnings is impressive in its diversity; there are awnings in furniture design, for light cabinets, and at the same time, powerful metal hinges for doors and a quarter are produced;
- Door canopies for hidden installation are especially valued in furniture production; such fittings do not spoil the appearance of the products;
- The amplitude or opening angle of a hidden canopy is often greater than that of its traditional counterpart;
- Hidden hinges are made of either stainless steel or high-strength alloys and can withstand quite heavy loads.
Hidden hinges are made of high-strength alloys, especially for canopies for steel doors
Features of bar loops
Classic door hinges, card (overhead) hinges, consist of two leaves on a common hinge. Such hinges are installed most easily - by screwing them to the door leaf and door frame.
A door pendulum hinge has fundamental differences from a regular card hinge and consists of two cards mounted on pins, allowing the door to rotate in both directions. The opening angle in one direction is 90º; accordingly, the door can swing open in both directions within a range of 180º.
Products have their own characteristics, advantages and disadvantages.
Advantages
Thanks to bar hinges, doors can be opened in both directions, which is very useful in hospitals, subways, bars and shopping centers. This design is sometimes used in ordinary residential premises to create an unusual design, most often in country-style interiors.
In addition, hinges for swing doors have the following advantages:
- comfort of opening doors when your hands (body) are busy;
- maintaining heat in the room (the doors do not remain open, as they close automatically);
- unhindered passage through the doors of a large number of people;
- automatic return of hinges to the closed position;
- Thanks to installation by insertion, the product looks aesthetically pleasing and unnoticeable in the interior and can be easily combined with other fittings.
It is worth noting that insertion can be made into a door leaf made of almost any material - plastic, metal (including aluminum), wood, glass.
Flaws
Pendulum hinges for wooden doors, if they are well made and installed, have only one drawback - the price. Their cost is several times higher than the cost of ordinary card loops.
Although the high price is partially offset by the good reliability of the products, achieved due to the spring design. Thanks to it, the hinges will last a long time, which means you will no longer need to incur the cost of replacing them, and also waste time on it.
Welding without plates
If the weight of the gate is light, you can do without plates. The welding technology will be slightly changed:
- The support and frame of the gate are laid horizontally so that their surfaces are in the same plane. A gap of 3-5 mm is left between them.
- 20 cm is measured from the top edge of the frame and a loop is placed in the gap. To raise it a little, you can use two matches, placing them perpendicular to the gap and installing a hinge on them.
- The hinge is fixed by spot welding: the lower element with the pin is welded to the support, the upper element with the groove is welded to the frame.
- To check how well the hinges work, it is not at all necessary to lift the sash: it is much easier to turn the support. If everything is normal, final welding is performed along the entire length of the fastener<./li>
These methods are suitable for installing new gates, doors or gates. If it is necessary, for example, to replace old hinges on an already installed gate, experienced craftsmen suggest proceeding as follows:
- Secure the plaits to the loop.
- Laying the sash horizontally, weld the top part of the hinge.
- Place the sash in the opening and secure it.
- Insert the bottom of the loop into the top. Mark on the support the place where the bottom plate should be.
- Weld the lower part to the support.
After welding the door hinges, the seams are cleaned, primed and painted. Further care of the hinges comes down to regular lubrication, which will prevent rust and reduce friction.
Lubrication should be carried out only in the warm season, otherwise the hinges may freeze. Before applying lubricant, it is recommended to remove the door from the hinge, remove the remains of the previous composition, dirt, rust from the pin, and clean the groove.
Selection of pendulum loops
Choosing pendulum hinges is no more difficult than usual, the main thing is to know what you should pay special attention to. The most important selection criteria are determined not by aesthetic qualities, but by the quality of the products themselves. Let's look at them in more detail:
- The first thing you should pay attention to when purchasing is the manufacturer. It is best to give preference to brands from Germany or Italy.
- The second important criterion is the width of the product. Pendulum hinges are available in different widths, so they should be selected to suit the thickness of the door.
- The third selection criterion is load weight. On average, one loop can support a weight of 25 to 60 kg. In some cases, three or more pieces may be needed (the heavier the door, the greater the number of hinges required).
- The fourth criterion is the aesthetics of the product. Bar pendulum hinges can vary in length and color. The most common sizes are 75 mm, 100 mm, 125 mm; popular colors are matte brass and polished brass, matte chrome and polished chrome, and bronze.
Work order
Marking is a very important step when installing hinges. It involves marking the door where the hole for the hinge bowl will be drilled. Moreover, it is important to first find the place where the center of the hole will be located. And here it is important to understand that the number of hinges directly depends on the size of the facade itself and its weight . But in any case, you need to retreat about 7-12 cm from the edge of the door. The distance between installed canopies should not be less than 50 cm, provided that several of them are attached.
Table. Required number of loops.
Installation of pendulum hinges
The installation of pendulum hinges is almost no different from the installation of overhead and mortise hinges. The sequence of actions is as follows:
- Marks are placed on the door leaf and door frame to determine the location of the hinges.
- Stoppers are removed from both loops (pendulum loops are usually spring-loaded).
- Then a mandrel is inserted into the hole on the hinge and turned clockwise.
- The cards are applied to the surface of the door and secured with self-tapping screws in accordance with the diagram proposed below.
If the pendulum loop is spring-loaded, then before starting work it is relaxed, and at the end it is clamped again
- The springs are then compressed. To compress the spring, you need to turn the mandrel clockwise and then insert the stopper into place.
- After this, you should screw the hinges to the door leaf and to the door frame.
- At the final stage, the door is checked for smooth movement. If you find that the door closes unevenly, the spring will need to be adjusted.
Having installed the element on the door leaf, you can begin attaching the mating parts to the door frame
- This completes the installation of the pendulum hinges.
To clearly understand what pendulum hinges are, what the principle of their installation and adjustment is, we recommend that you familiarize yourself with this video instruction.
In everyday life there are often situations when the most convenient would be a door that swings open in any direction. But ordinary canopies do not allow this. But there are special double-sided door hinges designed just for such structures. They are often called pendulum or bar.
The features of such loops, their scope of application, design and installation will be discussed in this article.
A few tips for a novice master
In order for your efforts on how to weld hinges on a door to be successful, you should be careful when purchasing garage hinges. Be sure to make sure that:
- their size and length correspond to the weight and dimensions of the doors;
- the pin rotates freely in the hole;
- between it and the inner surface of the groove there is a small gap of 0.1 mm;
- There is no damage on the hinge: dents, rust, shells.
The choice of material from which the hinge is made is equally important, since different types of steel are welded differently. It will be easiest to weld fasteners cast from black steel or low-alloy alloy. For them, you can use conventional electric welding.
If you purchase hinges made of stainless steel or alloy materials, you should be prepared for the fact that carbon dioxide or argon welding will be required.
The only advantage of stainless steel is that the hinge will not rust. But, since the coefficient of friction in a hinge made of this material is much higher than in a hinge made of black steel, it will have to be lubricated and cleaned more often. This is interesting: how to properly weld hinges on garage doors.
To avoid problems when welding hinges in the future, it is better to adhere to the following recommendations:
- It is not advisable to purchase cheap hinges made from ordinary raw steel, since their service life is only 2-3 years. During this time, the hinge wears out so much that the gate leaves begin to sag.
- It is better to figure out in advance which side of the gate the hinges will be welded on, taking into account that the optimal option for opening the doors is to the street, and think through the entire welding process down to the smallest detail.
- We should not forget that the main function of the gate is to ensure security. It is not advisable to install them on the street side, as they can be easily cut off. If you cannot do without this, it is recommended to order hinges made of forged steel, which no cutter will accept.
- You need to make sure that the gate leaf cannot be removed when closed. Sometimes, in order to avoid such actions on the part of intruders, experienced craftsmen place one of the hinges on each of the doors “upside down”. However, then it will be impossible to remove the sashes for the purpose of repairs.
- If this is your first time dealing with a welding machine, you should learn how to handle it in advance. Only an absolutely even weld seam will give a reliable and durable connection. It will be difficult to redo completed work.
These simple tips will help the novice master, and the installed doors will not cause him any problems in the future.
Scope of application
The easiest way to illustrate the operation of swing doors is using the example of cowboy salons. They say that cowboys used to ride into a bar directly on a horse, but, as you understand, the horse, as you understand, cannot open the door for itself. That's why they came up with structures that move freely around an axis in any direction.
Now the scope of application of pendulum loops has become mainly places with high traffic volumes of people - retail premises, train stations, subways. They are also convenient in cases where it is difficult for a person to open the door towards themselves. For example, if his hands are full, or he is a wheelchair user.
Therefore, double-sided door hinges are often used in medical institutions, catering establishments, warehouses, as well as in apartments where elderly or disabled people live.
But such structures do not always perform only a utilitarian function. They fit very organically into some interior styles. For example, the last picture shows a decorative wooden gate, stylized as the entrance to a cowboy saloon.
Best wood glue Titebond
What is the best glue to use if you want to make a box with your own hands? It is necessary that it be moisture resistant, set quickly and glue tightly. And the most important thing is that it does not leave marks on the box after drying, it is transparent. After all, we will not only glue the parts of the box together, but also decorate it. All of the above characteristics are met by Titebond brand glue - wood glue. On our website you can choose and order the option that suits you.
Selection options
To choose reliable and suitable double-sided door hinges, you need to pay attention not only to their appearance and color. This, of course, is also important for aesthetic perception. But it’s even more important that the door works properly and lasts a long time.
Therefore, we consistently evaluate the following parameters:
- Opening direction. This has already been mentioned above.
- Dimensions. First of all, the width of the cards, which should not be greater than the thickness of the door leaf.
- Permissible load. It is unlikely that every canopy comes with an instruction manual, but the seller should have information about the maximum load on it.
Advice. Please note that the load is per loop. Knowing the mass of the door leaf, you can calculate the required number of canopies.
- Appearance. This is also a shape that may differ from the standard rectangular one. And a color that matches the door or other interior details. The choice is quite large: gold, chrome, brass, bronze in matte and polished versions. There are also canopies coated with powder paint in different colors.
Some products come with additional features. For example, bearings for smooth and silent movement and elements for regulating the speed of spontaneous closing of the door.
General recommendations
The process of creating curtain or tulle fastenings in itself is not difficult to perform; you just need to gain some skill. But there are also nuances that come only with experience - calculation. This is determining the length of the curtain, the distance of the bottom cut from the floor, the need to process the edges and methods, sequence. It should be taken into account that if there is an additional folded seam at the top, the length of the product will be shortened and may look untidy with too much margin.
If you want more folds and then make a beautiful drapery, then the distance between the loops can be slightly increased.
A more even canvas on the window opening is made by sewing a large number of identical loops. It is difficult to give specific numbers; one must still take into account the total length of the material, its heaviness and tendency to form folds.
Sometimes, if the fabric is thin but difficult to drape, you can increase the distance to 20 cm to “force” it to take the desired shape.
If we talk about the length of the loops themselves, how to choose them, then here it is worth starting from: the length of the material and the highest point of grip of the loops. In other words, the length should be selected individually, taking into account whether there are restrictions on distance from the floor; if you need to raise it, then the loops are shorter, but in order for the curtains to be visually longer, the loops will be calculated differently.
If the loops are not intended for decoration, then they try to place them in inconspicuous places.
Important: the distance by which the fabric needs to be raised or lowered is not equal to the length that the housewife will add or shorten, so it is better to play it safe and “try on” the product for its future location before sewing.
Installation
The installation of such loops is slightly different from the installation of ordinary card loops. To better understand the description below, first look at the completeness of the products and their diagram.
So, double-sided spring door hinges can be adjusted by changing the compression force. Before installation, they must be loosened, and after installation, tightened to ensure that the base returns to its original position on its own.
- 1 – spring;
- 2 – bushing with holes for the stopper;
- 3 – stopper;
- 4 – locking screw;
- 5 – end nut.
And the mandrel is a metal pin with which adjustments are made.
Now you can see how to install a door on double-sided spring hinges with your own hands:
| Image | Description |
Advice. The adjustment must be carried out carefully, without applying much effort. Otherwise you can break the spring.
Often, over long periods of use, the springs themselves weaken. In such cases they are pulled up again. The main thing is not to lose the mandrel.
Cons of hidden awnings
In the material world, absolutely ideal things, in principle, do not exist; hidden models of canopies also have disadvantages.
- Installing hidden canopies is much more difficult than installing conventional hinges;
- Canopies with decent quality hinges and supporting parts cost from 1,800 rubles. a piece. Of course, there are loops on the market for 500 - 700 rubles, but they are not regulated and are often of dubious quality;
- Not all canopy models can be disassembled, so in order to remove a door leaf based on cheap hinges, these hinges must be completely unscrewed;
- To embed such a canopy, the door leaf must have the appropriate thickness. Hidden hinges for metal doors usually have somewhere to go, but problems can arise with framed interior doors.
Not every interior door is thick enough to install hidden hinges
Manufacturers of spring fasteners
There are a large number of manufacturers on the domestic market that produce spring hinges for bar doors.
Popular brands include:
- Justor (Italy);
- Luigi Aldeghi (Italy);
- AMIG (Spain);
- ARMADILLO (Italy);
- MERT (Türkiye).
Spring hinges differ little in the type of device, however, each manufacturer has its own nuances, ranging from the thickness of the part to the availability and quality of components. For example, the thickness of Chinese hinges can be 1.4 mm, while Italian ones are made from 1.9 mm sheet steel, which increases the performance of the fastener.
The presence of additional lubrication of springs, plastic elements between the bushings and soldering of rods affects the quality and durability of door fasteners.
Therefore, it is necessary to give preference to one or another manufacturer only after carefully familiarizing yourself with the part and its technical characteristics.
How to accurately cut hinges into an interior door manually
Precisely embedded hinges, without unnecessary gaps, will decorate any door, which is why all craftsmen strive for this. (Affiliate content).
The insertion process itself is not complicated if you follow all the established recommendations. But you should know that manually inserting hinges into the door leaf and frame takes up most of the door installation time.
Dimensions
Markings for inserting hinges Markings for inserting hinges
The hinge is inserted into the door with an indentation of 20 cm from the edge, and into the frame with an indentation of 20.3 cm.
Marking
Sampling with a chisel according to the marking Sampling with a chisel according to the marking
The loop attached along the indentation is outlined with a sharpened pencil, then the mark is cut with a stationery knife.
However, lately I have been using a different method. I screw the loop to the place of future installation using a self-tapping screw with a press washer, placing a nylon washer under its head so as not to damage the coating of the loop. And then I cut right along the loop with a knife, I give this option to you to choose from.
Inset
We make insertions using chisels. You can purchase a set, or you can buy just three pieces for 25, 19 and 13 mm, as my practice has shown, these numbers are the most popular for inserting hinges and locks.