New Year is always a sea of positive emotions. Blue lights, decorated Christmas trees, the smell of tangerines, garlands, Olivier, firecrackers, fireworks. In the modern world, store shelves and markets are simply bursting with a large number of different firecrackers.
There are also small ones, and there are also more powerful weapons. However, not so long ago, all these “shooters” were an outlandish commodity.
But people found a way out - they simply made this important element of the New Year with their own hands. Let's dive in and make several options for firecrackers.
A little bit of history
This product is traditionally classified as fireworks. They are associated with the New Year. At the same time, there are many varieties of them, completely different. A common feature is the ability to create noise and attract attention without calling out, whistling, or clapping your hands.
The movie firecracker is a subspecies, although it has nothing in common with fireworks. It helps perform the same functions in fact, although they are completely different.
A do-it-yourself movie clapper can be made from plywood, and in this case it will be exactly the same as the one held in the hands of the assistant director. And if you choose cardboard as a material, you will get a beautiful decoration.
This variety appeared at the time of the creation of full-length films with sound, “The Jazz Singer” (USA 1927), “Start in Life” (USSR 1930s). From that moment on, the usual signs with inscriptions, suitable only for recording frames, were no longer used on the set.
New solutions were needed and they were found. The new picture clapper made a loud sound thanks to two movable bars connected together at the top, helping to keep track of the audio series.
The first holiday copies
The world's first New Year's cracker was invented in England. Its author is Thomas Smith, a pastry chef from London. This happened in 1860. To present sweets in Paris, craftsmen often wrapped them in foil.
Thomas Smith knew this and was fascinated by his colleagues’ original approach. He followed their example and began to design his masterpieces in this way, in the hope of greater demand.
The idea once exhausted itself, and he decided that it was important to create a holiday toy, give it as a gift at presentations, when opening stores, and sell it separately. His firecrackers consisted of foil and cardboard.
Inside there were gifts - a handkerchief, pictures, puzzles, puzzles. When the toy opened, there was a loud click and sparks flew. The pastry chef still couldn’t figure out how to make a confetti cracker. But his invention contributed to the further popularization of the idea. Soon a classic version appeared.
DIY New Year's cracker: all the pros and cons
New Year's firecrackers are quite important, as are all pyrotechnics. They can be easily found on any counter, and they cost mere pennies, but they have big disadvantages. Firstly, the factory product has a small supply of gunpowder, which can be harmful to your health. Yes, there is a negligible amount of it there, but the fact that it is there makes this pyrotechnics prohibited for children (who, however, regularly violate safety rules). Secondly, the same gunpowder produces a very loud sound when it explodes, so the product should not be exploded in a room where there are small children (otherwise it could end in severe fright). Thirdly, the gunpowder may become damp and simply not explode, which will greatly disappoint you. There is a fourth reason why you should abandon factory-made pyrotechnics - increased fire hazard, although if you make a home product incorrectly, it can also turn out to be dangerous.
You can easily make a real holiday cracker with your own hands at home, and it will be relatively safe and environmentally friendly. Today we will discuss how to make such a craft at home using improvised materials. The most creative life hacks for making New Year's pyrotechnics, which you can take to the garden or place in the children's room, are already waiting for you in our article, but remember that these products also have a drawback - you will have to clean them up not only after using them, but also after creating them .
Serpentine and sparkles
Do-it-yourself serpentine is created using scissors and foil, which is cut into thin ribbons. Then they are pressed against the blade and pulled with force. The sector processed in this way turns into a spectacular curl.
To avoid monotony, it is better to also cut triangles and squares. Glitter pollen is the most difficult to make yourself, but it comes in handy.
Especially if the crafts will be used indoors or the party is Oz themed, guests will be wearing green glasses like the wizard Goodwin.
Glitter pollen is available in art stores, stores selling New Year's goods, and nail design products. Making it at home will take time. It is still recommended to buy it.
How is a cracker made from paper or other materials? The answer has been found. You can start creating paraphernalia for the upcoming celebration and festive surroundings.
A paper cracker is not only fun
The paper cracker is significantly different from what we usually offer our readers. Cracking is not only fun, if you make a cracker with your child, you can explain to him why a simple piece of paper, folded several times in a certain pattern, makes popping sounds. And everything is simple when folding, we get small pockets, and with a sharp movement of the hand, the pocket is filled with air, but it cannot open completely, because of the structure of the clapper, this is what produces the flapping sound.
Now let's talk about paper, of course, you can use any paper you have. But having experimentally tested different designs and materials. We concluded that a sheet from an ordinary notebook would be ideal for a firecracker. The notebook sheet is moderately thin and light, the cracker claps perfectly and does not tear. Experiments with album sheets also ended successfully, but due to the fact that they are quite thick, it takes much more effort to make the cracker work.
Pen on screen
Author: Alexey Ekimenko
The clapperboard is a ritual instrument of the filmmaking process. And while the youngest art form is adopting more and more technical solutions, design ideas and the most modern equipment, the basic principles of the clapper have remained unchanged for decades.
The magic of cotton has become an integral part of any filming, be it a short film, video clip, commercial or feature film. To many people outside the cinema, it may often seem that the firecracker is just a toy in the hands of a young girl whom the director liked. However, this is not the case! Correctly indexing the filmed material for future editing is a very important task for director’s script supervisors and camera assistants. To do this, they use a number of special marks, marking the mounting sheets with them and entering the corresponding data on the clapper board. This tool appeared on film sets as soon as the timing of the filmed frames grew to impressive sizes and the directors got tired of sorting through reels of film from memory and reviewing everything.
This is what one of the first firecrackers looked like. In the era of silent films, it, of course, did not clap, but was only a tool for recording footage. Soon "Chaz" would be referred to exclusively as Sir Charles Spencer Chaplin.
And then a board is placed in the frame, which cannot yet be called a clapperboard.
The firecracker from the French studio
Gamount looked completely different .
On this firecracker you can see the original solution of the turntables for changing o. And, as we see, they began to pay less attention to black and white markings. Of course, after all, “Fantômas”
and "
Captain
" - color films!
Here's a later French flapper. We decided to abandon the wheels. But the markup is just as ascetic. "Gendarme in New York" is being filmed.
Initially, the camera was adjusted using black and white stripes. The need for the “white on black” writing scheme, which was previously used for comfortable viewing of film negatives, is gradually disappearing. On the negative, the brightness of the light is reversed - dark ones look light, light ones look dark. Therefore, now they are starting to glue strips of paper tape onto old black boards.
Would you like to receive the original Francis Coppola
? Only 4-6 thousand dollars. True, something is expensive for a discounted used one - there is no upper limit! Contrary to the common practice among filmmakers of paper marker strips, part of the clapper board was still left “under the chalk.”
In the 70s thanks to Steven Spielberg
and his film
“Jaws”
there is a tradition of decorating firecrackers in accordance with the style of the film. These days, this practice has evolved into custom-made clappers for each painting, rather than using standard studio versions.
Firecrackers in the USSR cinematography also included inscriptions with chalk. In the cult detective story "The Adventures of Sherlock Holmes"
used these. Even the whole group filmed with her.
It is noteworthy that for the convenience of the assistant, the bars were made longer than in Europe.
But even in the 90s, when the Americans began to use acrylic glass, the Soviet firecracker (and even with this quality of Svemov film!) looked antediluvian.
We especially note the firecrackers used by Andrei Tarkovsky
. An interesting scheme with cells for indexes was used here. Accordingly, the assistant operator did not need to write letters, but carried with him a box of letters and numbers. As you can see, they are looped into bundles.
A modern firecracker looks like this. There is not only official information here, but also branding, which makes the firecracker stand out among its peers. Although the feeling of “classics” disappears somewhere.
Black and white stripes became colored, the wooden chalk board turned into acrylic, backlighting appeared, and on advanced samples they began to install a digital display for time code. But the main functions remain the same.
How do they work with this?
Traditionally, the clapperboard denotes:
Trying to understand how to mark takes
A few simple rules
Camera! Motor! Where's Lucy?
It may happen that the second assistant stepped aside, and filming needs to continue. And while the girl Lucy is drinking coffee or flirting with the lighting crew, the indignation of the film crew can disappear only if she is smart and left a firecracker near the camera. In this case, the camera assistant or someone else will be able to clap in time. The main thing is to make sure that he does not have time to make a career instead of you!
Advantages
& disadvantages of diy clapperboard
When preparing to shoot your own film or wanting to become part of a film crew, you will definitely have to face the choice of a clapperboard. The most unattractive quality of a factory firecracker is its price. And, of course, sometimes the low quality of the product itself. To get rid of the pangs of conscience and the choice of which firecracker is wiser to buy, we simply choose the “do it yourself” option. It is necessary to immediately indicate that in our categorical apparatus the term “self-propelled” or “diy clapper in oard” is not identified with the terms “as usual”, “in a hurry”, “maybe it will do”. Making your own clapperboard confronts any person with a technical mindset with a conscious need to achieve visual similarity of their product with its long-run equivalent. The difference will be noticeable, but it will lie more in the feeling of one’s own attachment to the object than in its aesthetic characteristics. A homemade firecracker must meet a number of requirements. Believe me, we are interested not only in the quality of cotton! You can also clap with your hands in the frame. In order for the ritual film instrument to serve you for many years, pay attention to its size (the compact version is more convenient), the smallness of the inscription board (acrylic glass or thin plywood can crack if handled carelessly), the reliability of the hinge mechanism (the top board should not dangle in all directions) and wear resistance of paint (it will probably have to be updated frequently).
Adherents of standardization and seekers of the “golden cracker formula”
I hope the history of this item outlined above proves to you that there is no such thing as a perfect firecracker. Its parameters are constantly being modified, its forms are being improved, but the conceptual principles remain immutable - it should clap and make it easier to keep records of personnel. Firecrackers are different, but one day you will have to choose something specific. Popular options today:
28 x 24 and 20 x 18.
He said “Let’s go!”, he waved his hand...
In fact, a couple of seconds before, someone else said “Camera! Motor!" and a bang sounded. Therefore, I propose to clap your hands. I say you need to clap! Can you hear me or not? Slammed? Hope so. Otherwise nothing will work. So let's begin!
Source
Simple origami firecracker
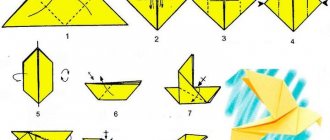
In order to make the simplest paper cracker with your own hands using the origami technique, you first need to prepare a sheet of paper in A4 format.
White or any other color will do, or you can paint or decorate your craft yourself. In an upright position, fold a piece of paper in half and unfold it again.
Next, from each edge you need to bend the corners to the center, to the fold line. It should look like this to create two triangles.
Between both triangles there is a free small rectangle in the center. Along the already marked central fold, bend the sheet again so that the triangles meet in the central part.
Fold the resulting piece in half and straighten it, then tuck the corners towards the center so that they meet on a line. Now the workpiece is folded in half so that the triangles are connected.
The beveled part should be inside between the small triangles. To clap, you need to take the product by the free ends and shake it sharply with your hand, the inside of the clapper will be released out and you will hear a loud clap.
We will tell you how to make a louder paper cracker later.
From a balloon
Like everyone’s favorite “Kapitoshki”, these homemade firecrackers made from balloons can produce a stunning effect, a real sensation. It is better to choose them when many guests are invited and the music is playing loudly.
They are also ideal for organizing outdoor parties, but you should not use anything other than streamers and large confetti as tinsel. Is it dangerous.
This condition is especially important in windy weather. If you are not sure, it is better not to take risks, think over the situation again, calculate how to make a paper cracker with your own hands, no less impressive, more practical.
The disadvantage is that they cannot be distributed to guests. This is more of a design element.
Manufacturing:
- Having purchased a standard balloon, you should pour glitter into it;
- then you need to carefully inflate it;
- tie the edge;
- hang in a gazebo, near the ceiling, on a cornice, or from a chandelier;
- As soon as the chimes strike, it’s time for a competition, a performance, and the ball must be pierced.
You should inflate a ball with tinsel very carefully, avoid getting it into the respiratory system.
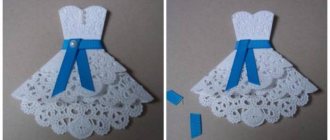
Safe firecracker with confetti for New Year or Birthday
Now we’ve come close to the beautiful holiday firecrackers. You can put not only confetti inside them, but also glitter, paper balls and even candies.
And you can give such a toy to children of absolutely any age, it is safe and will not harm anyone.
Let's take:
- bushing,
- ball,
- confetti,
- colored paper,
- scotch.
First, take a regular balloon; it should not be inflated. We tie its end with a thread. Then we cut through the opposite wide part with scissors. Next, take the sleeve and pull the ball onto one end. The tail should be exactly in the center. For reliability, we rewind the ball to the sleeve with tape. Look what happens.
Next, take glue and decorate our toy.
We wrap the cracker with colored paper for beauty. Sprinkle confetti inside.
That's it, you can play.
Pull the tail of the ball and release it. All the confetti flies out.
A complex version of a cracker with confetti
Now a more complex version of the toy.
Let's take:
- a hollow paper tube inside (sleeve, cling film frame, etc.),
- a piece of corrugated paper
- cardboard,
- glue,
- needle and thread,
- pencil,
- double sided tape,
- match,
- colored paper.
We take the tube and place it on the cardboard. We trace the diameter of the tube. Cut out the resulting round piece from cardboard.
From corrugated paper, cut a square with sides slightly longer than the side of the tube. We fix a cardboard circle in the center of the corrugation.
We thread a thick thread into the needle. We pierce the cardboard and do not pull the thread all the way through. We will tie half a match to this edge.
Now you need to push the match into the tube and wrap it in corrugated paper. Secure the ends with glue.
Now you need to decorate the cracker with paper.
You need to pour prepared sparkles or serpentine inside the workpiece.
Now we will cut out a piece from corrugated paper that will be three times larger in diameter than the circumference of the tube.
We glue it with double-sided tape, straightening the edges.
In order for the toy to fire, you need to sharply pull the string.
I also found similar instructions. Perhaps you will like this design option better.
That's all for today! Make similar toys yourself. It will be cheaper and much more interesting. Moreover, you can make a lot of such crackers and play with them all New Year’s Eve.
All the best to you!
Piñata firecracker
The idea of an elegant holiday cracker was borrowed from the Mexicans: the piñata is filled not only with confetti and sparkles, but also with candies, colored dragees, nuts and miniature toys.
What you will need:
- Cardboard toilet paper or paper towel tubes
- Colored corrugated paper (crepe paper)
- Scissors
- Double-sided tape or office glue
- Twisted thread (for example, “iris”)
How to make a piñata cracker
1. Cover a cardboard tube with plain corrugated paper so that there are free ends on both sides of the workpiece - they should make a lush frill.
2. Cut multi-colored corrugated paper into strips and make a fringe along the edge.
3. Cover the workpiece with multi-colored paper strips (as shown in the photo).
4. Tie one end of the cracker tightly with thread and pour colored jelly beans inside.
5. Tie the second end of the cracker with a thread.
Loud cracker
Do you want your homemade firecracker to “bang” like a real one? This is possible without any pyrotechnics.
What you will need
- 2 large disposable syringes (volume 50 ml)
- Balloon
- Stationery knife (regular kitchen knife, hacksaw)
- Glue
- Scotch
- A sheet of cardboard/cardboard tube from toilet paper or paper towels
- Colored paper (packaging paper will do) or decorative adhesive tape
- Confetti (you can cut it yourself, from colored paper, foil or Christmas tree “rain”)
How to make a loud cracker at home
1. Cut one syringe in half (approximately in the center of the scale).
2. Level the cut with sandpaper.
3. Cut off the tip from the cut-off part of the syringe and connect it to the whole syringe (as shown in the photo).
4. Secure with glue.
5. Fill the cut half of the syringe with confetti.
6. Place the ball onto the syringe.
7. Pull the rubber as tightly as possible and secure with tape.
8. Trim off the excess part of the ball.
9. Cut a rectangle out of cardboard along the length of the structure, make a cylinder out of it, put it on the cracker and secure with tape. You can try putting on a ready-made cardboard tube.
10. To make the cracker look elegant, cover it with colored paper or decorative adhesive tape.
To make the cracker explode, pull the piston to the maximum and push it sharply forward: compressed air inflates the rubber membrane, it bursts and confetti flies out in a bright fountain.
Preparing confetti
To prepare your own confetti you will need:
- hole puncher;
- colored paper;
- candy wrappers;
- foil.
Confetti are traditionally small round-shaped elements made of colored paper (thick, thin, corrugated) or foil. A hole puncher will help you quickly prepare them in sufficient quantity.
This is the only method. He has no alternatives. Only if large elements are needed, it is rational to use a compass and cut them out by hand.
How to make a firecracker from a syringe
This type of firecracker is rightfully considered the most spectacular and effective. In order to make one such cracker with your own hands, you will need two large syringes, a glue gun, a balloon and paper for decoration. The assembly principle is quite simple:
- a base pipe for the future product is made from one syringe (to do this, it is cut off from the side of the main mechanism and the needle mount is completely removed);
- then both syringes are connected using hot glue, the cut syringe is filled with confetti and hermetically sealed with a rubber ball:
- the piston of the second syringe should be pulled out as much as possible;
- After minimal decoration, the cracker is completely ready for use.
The principle of operation of this craft is the same as that of a conventional pneumatic cracker - by sharply pressing the syringe valve, you create powerful air pressure, which tears the balloon and releases confetti. A homemade firecracker made from a plastic bottle, into which air is pumped using a regular car nipple, has a similar principle of operation. It is this that serves as the trigger for releasing the contents of the bottle.
How to make a firecracker from matches
It’s hard to call such firecrackers either environmentally friendly or safe. The principle of operation is approximately this: matches are placed in a container according to the principle, the more the better (this only applies to match heads), then a fuse is made from a box of matches, which then need to be set on fire. But before you make such a firecracker, you need to think about the fact that one careless or slow movement, and this explosive mixture of wood and sulfur can explode in your hands. In addition to damage caused by the blast wave, you also risk getting burns to your hands and face. That is why you should think carefully when making pyrotechnics with your own hands. For the same reasons, you should not make a firecracker from firecrackers or gunpowder. Remember, not only your health is at stake, but also your life.
Glitter popper
You will need: sleeve, scissors, stapler, thin cord, glue gun, tape, cardboard, thin wrapping paper, corrugated paper, bead, glitter. Master class Cut a circle from thin wrapping paper with a diameter equal to the sleeve. Punch a hole in the center of the circle. Secure the cord and attach a bead to it so that it will later be located inside the sleeve.
Glue the circle to the base of the sleeve. Make a fringe from strips of corrugated paper and cover the sleeve. Fill half the sleeve with glitter. Make a cone out of cardboard and glue it to the top of the sleeve.
To activate the firecracker: place it at an angle downwards and pull the cord. The shiny firecracker is ready!
Cracker - candy
This original firecracker will delight you and your friends. And it couldn’t be easier to do this. We will need:
- thin cardboard or thick paper;
- paper for decoration;
- “filling” for the cracker – sparkles, confetti, New Year’s rain;
- scissors, double-sided tape.
Step 1. Cut a sheet of cardboard to the desired size and roll it into a tube. Secure with tape. We make a cut in the middle of the tube to make it easier to tear the cracker.
Step 2. Decorate our firecracker - wrap it in one layer of paper. We tie one end of the tube with a ribbon. Through the open edge, pour glitter, chopped rain, and confetti into the cracker. We tie the wrapping paper on the other side with tape.
Our firecracker is ready. In order to “explode” it, you need to hold it horizontally and tear it at the cut site.
Reusable safety cracker
This is another option for a holiday cracker; its advantage is safety and reusability. If you want your child to receive not only a festive mood, but also a lot of positive emotions, then you need to learn how to make this paper cracker.
What is needed for production:
- paper for gifts;
- multi-colored paper;
- paper serpentine;
- glitter;
- medium balloon;
- long cardboard sleeve;
- PVA glue;
- scotch;
- scissors.
Let's start step-by-step production: (Step 1 preparation of materials)
- Take the bushing. Its length should be 14 centimeters, so it is appropriate to use this material from a paper towel or food foil. This is the main preparation.
- Cut off a larger edge from the ball and tie a tight knot at the tip. We put the ball on the sleeve with the cut side. We attach it to the cardboard using tape.
(Step 2) - Take wrapping paper (you can use colored paper). Cut out a rectangle that can completely enclose the sleeve. Glue the paper onto the main part.
- The most important part - preparing confetti - can be entrusted to children. They will tear candy paper, streamer and any other material into small pieces.
(Step 3) - Place the confetti in the blank, cover the sleeve with corrugated paper on top. Secure the paper with a small rubber band.
Who invented firecrackers?
It was invented by the head of Eftee Studio, Francis William String.
At the same time, an electric bell was used for some time, but it soon became clear that this was less practical. In Hollywood, due to the difficult internal political situation, film studios often opened and closed. It was believed that the main thing is talent, not start-up capital. Employees had to look for ways to make a homemade firecracker.
They tried to turn it into a recognizable attribute, but the design and dimensions often differed. At the same film studio one could find several products of different types, the size of a poster and no larger than a box of summer shoes.
Note!
DIY paper machine craft: various options for creating a machine
- How to make paper flowers with your own hands for children - a master class on making
How to make Minecraft figures and blocks from paper: step-by-step instructions
Soon a tradition arose of making them black and white. Movable slats began to be painted with diagonal lines so that they formed arrows. And on the main part they began to write down the name of the film, scene, shot, take, the name of the director, cameraman, and the shooting date.
In France, however, signs with a movable bar at the bottom rather than at the top were mainly used. The general concept did not change, but the distinctive features gave inspiration and reminded us of the importance of imagination, creativity, and national traditions.
How to decorate a paper cracker
The design of paper crackers has many options, which can only be limited by the imagination of the creators or the lack of desired decor. Traditionally, colored paper is often supplemented with colorful stickers, glitter, various shiny tinsel, and humorous inscriptions. On the wings of firecrackers there can be images in the form of flowers, animals, birds, stars, etc.
When decorating, it is appropriate to take into account the specifics of the events and holidays at which the crafts will be used.
New Year's crackers can be decorated not only with snowflakes, but also with the zodiac signs of the coming year and individual people. All these symbols can be easily played out individually during a family or friendly party. At a birthday or family celebration, it is good to use photographs and stickers with good or humorous wishes.
Making a paper cracker with your own hands is easy if you follow the step-by-step instructions. It is advisable to trust children to decorate finished products using paints and colored pencils. Such involvement allows children to develop motor skills and develop independent decision-making skills. Along with this, they can create extraordinary compositions and different decoration options.
In addition, such involvement in creativity allows the results of their work to be used to organize children's exhibitions.
The proposed step-by-step instructions for making paper crackers with your own hands can become an impetus for creativity by people of different ages. In addition, such a clapper toy, from the moment of manufacture, is able to unite loved ones, and during use, it can please both the creators and everyone present.
Paper crafts and souvenirs
Origami is an applied art that dates back many centuries. It originated in China. Paper was also invented in this country. Initially, it was used during religious rituals. Mastery of origami was considered a very valuable skill.
Using this technique, lanterns were created to decorate temples and carnivals. It was possible to create miracles, make a dragon, a frog, a flower. The modern method is designed to produce all these things, snowflakes and, of course, firecrackers. Its main advantage is simplicity.
Tips for those who are making a cracker for the first time
Even such a simple toy as a cracker has its secrets, using which in production will help achieve better results.
Here are some useful recommendations from megamaster.info:
- To make the cracker clap loudly, do not use office paper or thin newsprint. This type of paper is not thick enough to produce sound.
- Do not use the toy around small children. The sudden noise may frighten them. If the Toy is intended for a child, we recommend the last (safe) version of the cracker.
- To prevent the activity from causing boredom to your child during the manufacturing process, invite him to decorate the cracker. By the way, by decorating a cracker with gouache paints you can achieve greater paper density. Once the paint dries, it will form an extra layer of strength that will make a louder pop.
A firecracker, if made correctly and beautifully decorated, can become not just an original craft, but also a wonderful addition to a family holiday. As you have seen, you don’t need to spend a lot of money to create it. A few sheets of paper are all you need to organize the best holiday with your family.
Pen on screen
Author: Alexey Ekimenko
I was very interested in this question. I knew that theoretically everything was quite simple, but as a representative of the postmodern generation I would like to find the text or video I needed. In a word, a manual that would help evaluate the empirical experience of amateurs who preceded me. Alas, the results were disastrous. Most of them didn't do what I wanted. But I wanted a real movie clapperboard.
I sketched out a sketch of the project and began looking for materials.
We will need: · plexiglass, plastic or acrylic glass (check in advance by applying a marker) · wooden blocks · steel plate and 3 screws with nuts and washers · paint (black and white), solvent · self-adhesive film (black) · stencil, sketch or photo for project visualization · water-based marker (for white boards) · neodymium magnets (optional)
· hacksaw · plane · sandpaper and a block for it · hand jigsaw and files · file · hammer · drill · vice · brushes and containers for paint · cloth for working with paint · drawing supplies
With pieces of wood everything is simple. You need two blocks. Take it easy. It is better not to take oak and birch. Pine, linden, alder - perfect! The length is according to your design, and the cross section is approximately 2.5 by 2 cm.
Inscription board. This could be a problem. A board with a beautiful font performs a magical act as it appears under the flapping pieces of wood. But these days, a blackboard won't cut it unless the movie clapperboard is a souvenir or you're really willing to run around with chalk on set. Initially, we considered the option of transparent plastic with a paper backing and the markings we needed. I recommend it to you too. Because the piece of acrylic glass that I managed to grab is not so easy to find for sale. It's certainly worth looking for. I think the market for technical gadgets and all sorts of things will be more useful than the usual construction supermarket. It’s also worth calling the company that services advertising stands - they know exactly what acrylic glass is and where to get it. But you can always take transparent plastic and a paper sheet, especially if your budget does not allow for more. By the way, they can be replaced with acrylic glass in the future.
The most difficult part of making the firecracker was an inconspicuous but important detail - a groove in the bottom block for subsequent gluing of the acrylic board. It had to be selected manually with a knife, since there was no cutter, and it was impossible to accurately make a slot with a hand saw for metal - the working length of the blade turned out to be small.
A marquetry knife and a strange (probably dental) chisel are my tools for this operation. Do not forget that we need to connect two bars, forming the simplest mechanism for obtaining sound resonance. To do this, we use two metal plates and three screws, one of which will be a hinge. Due to the lack of steel of the required thickness (1-2 mm), I had to take a sheet of brass alloy. To the surprise of many, it is easily cut with a regular wood saw for a jigsaw from a school set. I was once amazed by the versatility of this tool. However, preliminary skill and work experience are required, otherwise you can break a dozen files, but still not cut anything.
Everything I needed is here.
When the components are ready, you can start painting and writing on the board. Of course, we need a 1:1 layout, and not the convention that was in the sketch. This is what the template for drawing lines looks like. For the cracker of the chosen size (28 x 25) it was considered optimal. The proportions of the lines and the font of the inscriptions will determine the overall appearance of the clapper, so it is worth trying all possible options.
Nine words about painting:
matte is better, solvent is required, several layers, sand except the last one. I recommend diluting the paint to the consistency of water. Each layer needs to be sanded a little with a zero polish. Of course, we apply black first, then white. It is better to paint the stripes not under a stencil (it will float anyway), but with a thin brush, carefully drawing the boundaries with a pencil. If the paint leaks, it’s not a problem. Wrap a cloth around a metal ruler and draw its edge along the border, removing excess paint. Everything will definitely work out the third time. This method helps better than masking tape, under which a certain amount of solution always flows.
Initially, it was planned to apply text and cell outlines using black self-adhesive film. Subsequently, I completed the contours by cutting it into narrow strips of 2 millimeters.
But with the letters, the production of which could be too labor-intensive, I was a little lucky. The Soviet transfer letters found in dusty archives came in handy.
Thanks to the developers for not forgetting about the Latin alphabet! It seems the letters will have to be replaced one day anyway. They can rub off, although they cannot be scraped off with a cloth. If something happens, I’ll cut it out again or use printing services. At some printing outlets you can order transparent adhesive film with your original layout.
The cracker is ready. We glue the bars and the board together with polymer glue and put our signature. We try to write with a whiteboard marker. We put it into operation.
Important:
Marker inscriptions should not be left for more than a day! It can eat into the acrylic base. For long-term projects, the columns “film”, “director”, “cameraman” should be printed on paper and carefully pasted on the board. After filming is completed, it is recommended to wash the board clean with an alcohol solution.
Source