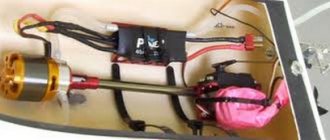
Let's build a radio-controlled tank with a first-person view that can be controlled from a distance of up to 2 kilometers! My project was based on a remote control rover, it is easy to build, easy to program and a great project for hobbyists!
The bot is very fast and agile, not to mention the fact that it has two powerful engines! It will certainly outrun a human, no matter what surface the race is on!
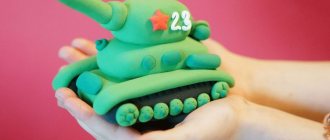
The bot is still a prototype, even after months of development.
So what is FPV? FPV, or First Person View, is a First Person View. We usually see FPV while playing games on consoles and computers, such as racing games. FPV is also used by the military for surveillance, defense, or to monitor protected areas. Hobbyists use FPV in quadcopters for aerial filming and just for fun. This all sounds as cool as the cost of building a quadcopter, so we decided to build something smaller that rides on the ground.
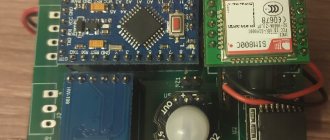
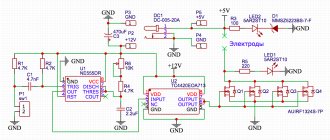
How to manage this? The bot is based on an Arduino board. Since Arduino supports a wide variety of add-ons and modules (RC/WiFi/Bluetooth), you can choose any of the communication types. For this build we will use special components that will allow control over long distances using a 2.4Ghz transmitter and receiver that controls the bot.
There is a demo video in the last step.
DIY tracks for a tank model
Part 4. Options for holders for ship models. HOOK.
I wish you all good health!
We continue the topic we started recently - “Making surfaces, stands and holders for ship models.” In this post, I would like to share with you the options for holders found on the World Wide Web, called “HOOK”. And also some thoughts on making such a holder yourself.
Let's start with “hooks” that can be bought on “invitinghome” (literally, as an Invitation Home in English). This is a store for various DIY crafts and more. Unfortunately, I haven’t seen these “hooks” yet. However, below we will consider the option of making it yourself. And those who often go to construction stores, and perhaps they might come across similar products, will tell us about this directly in the comments to this topic.
So, here are photographs of the original “hooks”-wall holders of our model.
Part 3. Diorama. Simulate water using Vallejo Water effects and Vallejo Still water
HEALTH TO ALL!
What are special means and how to “fight” them?
Vallejo Water effects is an acrylic product designed to create the foundation of rivers, lakes, bays and oceans. Vallejo Still water is a dense gel ideal for imitating the surface of water on a colored base created with Water effects, and can also be used to create waterfalls, waves, ripples and ice.
Part 2. Diorama. Making seawater from acrylic glue
If your diorama involves a splash of water, for example, from a canister falling into the water, you can do it as follows: you need to place the canister on the surface, coat it a little with putty and lightly pinch with tweezers to “lift” the putty up, creating the basis for a splash of water
Part 1. DIORAMA. Making seawater from silicone sealant
Hello everyone!
Having repeatedly searched through everything that is on the World Wide Web for creating such a spectacular surface for ship models, like a diorama, I came to the conclusion that there are three simplest and absolutely inexpensive ways to make a “blue sea” at home. Unfortunately, I couldn’t find the author of this method, and I have no desire to advertise other people’s sites. Therefore, if there is an author, we will definitely indicate it in our blog.
Manufacturing of surfaces, stands and holders for ship models
I wish you good health to everyone who is interested and who wants to add to this story!
When conceiving this blog, I realized that many of us, having often completed a model, leave it on the stand included in our kit. Or they make something similar to friends’ coasters. However, the data is scattered and, as a rule, is in the final stage of topics on the forum, often a month or later after the message about the already completed construction. But how can you present a model to the inquisitive and grateful eyes of your family and guests? How to expose this or that side in the right light, how to indicate the correct angle and viewing angle, without giving “our brainchild” into the wrong hands?
Construction of a functioning railway model. Part IV
Finally, for the first time, I was able to move the train in a complete and logical sequence. Everything turned out even better than I expected - even though I had to stop to take photos. The first photo is of 61626 Brancepeth Castle, which I think is one of the most beautiful locomotives. Therefore, it is not by chance that I have several of them at once.
Tankmaster 1997-04, page 40
The manufacturing technology of such paper or polystyrene tracks is shown in Figures 1-5. First of all, you need to take care of the notches (Fig. 1). with the help of which recesses are cut out on the surface of the tracks. Tracks of this type are almost always “layered”, consisting of two or three sheets of cardboard paper or polystyrene of varying thicknesses, from which the main “sandwich” of the track plate is glued together. It is very convenient to cut the ground hooks from flat toothpicks, the conical profile of which was originally given to them. Hinge fasteners are made from anything, even cylindrical beads. Some craftsmen even put their fingers on such tracks, making them from pins; but this doesn’t make much sense, because most often the track tracks are sealed tightly after assembly.
Finished tracks (Fig. 2) look great in appearance, but when the tracks are made of polystyrene or paper, gluing them together is not always easy. The most durable connection is provided by cyacrine, but assembling caterpillars with this glue is a real punishment, and therefore modelers prefer polystyrene glue or PVA. Meanwhile, a convenient way to assemble tracks and then secure them exists: it is enough to make grooves on one of the plates of the track “sandwich” with a needle file (Fig. 3), and then you can then pull two threads through them and, stringing the tracks one by one, assemble the whole the entire caterpillar (Fig. 4). In this case, it can be bent as desired and, if desired, tensioned, and glued with cyacrine, it will acquire downright “iron” strength. And the tracks, cast from “white metal” (Fig. 5), can be drilled with a thin drill, securing them using a simple jig, and threads and elastic bands can be passed through them (as you like), thereby achieving an excellent connection of the tracks in caterpillar
Just recently, homemade tracks for caterpillars were the most common thing for modelers, especially in cases where they were not satisfied with branded rubber products or had to make the model anew. Now there are many sets of individual tracks for a wide variety of BTT models; but homemade tracks are still not uncommon, especially on homemade models, the number of which, fortunately, is not decreasing in our country. Tracks are cast from metal, stamped and pressed by hand from polystyrene, soldered from tin and even glued from paper. Paper is often replaced with polystyrene sheets, which often makes it possible to make tracks no worse than branded ones.
The simplest handicaps
Making luminous headlights for a tank model is a very difficult task. And imitation headlights are easy to make.
Take a sheet of polystyrene 0.5 mm thick and 50x50 mm in size. Heat it over a candle so that the heated circle sags slightly (1), and quickly place it on the round hole of the officer’s ruler (or any heat-resistant plate with a hole of the required diameter) and press the softened polystyrene with a stick with a rounded end (2); When the polystyrene hardens, cut off the resulting print (3) - this will be the headlight housing.
Heat the needle and bring it to the tip of a polystyrene stick with a diameter of 1 mm (4); the tip will melt, taking the shape of a ball. Cut it and insert it into the headlight housing, after making a hole in it (5). Now in
The body already contains an imitation light bulb.
All that remains is to make the glass covering the headlight. On a piece of plexiglass measuring 50 x 50 mm and 1 mm thick, scratch parallel lines with a needle as often as possible (6). Just as in the manufacture of the case, the glass was given
a convex shape is created, only the stick with which the softened material is pressed into the hole should have a blunt end (7); In order not to spoil the scratches that imitate corrugation, the plexiglass should be heated from the reverse side. On what you received
The bulge should be applied with the same template that was used to make the headlight housing, and with a sharp needle, scratch the glass around the circumference (8), using a ruler as a stencil. After this, the workpiece can be safely broken out of the plate (8). The resulting circle should be sharpened and glued into the headlight housing (9), and then paint the headlight, protecting the glass with a piece of plasticine (10).
DIY tracks for a tank model
All the best to everyone! I also decided to start on a new resource with a “technological” article. Perhaps someone has already seen it on a neighboring, sadly deceased, resource, but for some it will be interesting and will encourage them to experiment. Before starting the description, I will say that I made a mistake with the width of the track, because I made it according to the drawing, but the real tracks, as it turned out, were wider.
I must say that I did not invent anything new. About “eleven” years ago, every paper magazine about modeling taught casting. Why did I even get into this? What the Hobbit Bosses put in the box with the model can hardly be called tracks. There is little chance of releasing special stages for such an unrated model. The only plus is the top view, consistent with the drawing. This moment tempted me to try to make a homemade product. The first thing you need is to make a master. For its base, I took the track from the kit and made a more expressive relief using thin plastic. Molding fillets (smooth transitions) were imitated with superglue, which was carefully applied in a thin layer to the mating surfaces. It was not possible to achieve 100% copyability, but the result turned out to be very acceptable for me and will clearly suit the tank better than the original “paws”. What is in the set and what became the master.
Then it was time to prepare the form. The moment is responsible. The main difference from resin casting when preparing a mold is the presence of a massive sprue, the task of which is not only to bring the alloy to the mold itself, but also, with the weight of the metal in it, to ensure better pourability of the nooks and crannies of the mold. Plus vents, the task of which is to remove air from the mold and also ensure its complete filling. I made the mold from two-component silicone. It didn't work the first time.
After this, we begin the casting itself. We are located closer to the heating source, but I highly recommend pouring the mold over the newspaper while sitting. In a hurry, I did my first pours over the stove, but didn’t really connect the mold. The alloy ruined the stove, the floor, and the table. While I was cleaning up all this mess, I learned a lot of new things about myself from my wife.
For work we need this still life.
The form itself. Please note that from the inside it is generously lubricated with graphite powder and is connected and held in the hands using plastic. IMPORTANT! Its task (plastic) is not only to protect you from burns, but also when connecting the mold, it allows you to distribute the forces from your fingers and ensure uniform closure of the silicone halves, which means uniform distribution of the alloy, will protect you from underfilling. Silicone is quite soft and such plates are necessary. Until I thought of replacing thin cardboards with 2 mm plastic, nothing good came of it.
Added
(07/19/2016, 23:08) ——————————————— For casting I used Rose alloy https://ru.wikipedia.org/wiki/%D0%A1%D0%. 0%B7%D0%B5, and as a graphite separating layer pigment from “MIG”a.
Naturally, a crucible for heating is required. I made it a long time ago, left over from my first experiments.
Let's start filling. The alloy must be melted, since the melting point is very low. You shouldn’t overheat it; after the metal goes into the liquid phase, you should hold it for a few seconds and start pouring.
The metal must be poured smoothly, slowly, until the sprue is completely filled. IMPORTANT! Notice the toothpicks sticking out. I went overboard with the diameters of the vents and initially all the metal flowed safely through them.
Added
(07/19/2016, 23:17) ——————————————— Result. IMPORTANT! Open the mold ONLY after complete crystallization of the alloy!
Remove the casting with tweezers (it is hot)!
After cooling, we bite off the excess and send it to the crucible for re-casting.
IMPORTANT! After removing the casting, go over the mold with a brush to remove any remaining metal. Next, you need to lubricate the mold with graphite using the same brush. Repeat the procedures before each fill, especially after unsuccessful procedures. Reduces the defect rate by orders of magnitude!
At the end there is a little arithmetic. Judging by the photos of the finished models, it is necessary to make 142 tracks. I cast 8 more pieces for scrap during assembly. (while collecting, I ruined three pieces). While watching the 2-episode feature film with one eye, I managed to slowly cast 35 pieces.
And in conclusion, I will answer the question why metal and not resin? After all, it was possible to buy a two-component product, which is used for replication and not bother with metal casting. The fact is that making a master “by eye” is quite a difficult task, which means that during its manufacture, and even more so when casting and assembling the tracks themselves into a tape, we encounter errors in the form of screws and bends. The plasticity of the metal allows you to edit the tape without any problems, and everyone knows about such advantages as the natural “weight” and shine of metal gusli.