Not everyone knows that ordinary polystyrene foam can be used to create an effective adhesive solution. The recipes for making homemade glue are very simple, and the quality of fixation will be reliable. This composition can be useful in different situations. How to prepare glue from polystyrene foam and solvent at home will be discussed below.
A practical guide to making glue
The technology for preparing glue from foam plastic and gasoline comes down to the following procedures:
- We prepare the container for the glue; it needs to be washed and thoroughly dried in the sun;
- A small amount of solvent or gasoline is poured into the bottom of the jar, approximately 1/10 of the planned proportion;
- The first portion is filled with foam crushed into granules, approximately three times more than the amount of solvent poured;
- The mixture of glue, polystyrene foam and solvent is stirred vigorously to remove the released gases;
- Next, you can add polystyrene foam in pieces, embedding it in the adhesive mass. If necessary, add a mixture of gasoline and acetone in small portions.
The result should be a viscous and stretchy mass, with a consistency similar to shoe glue or very thick jelly. As soon as the glue has stopped releasing gas bubbles, you can begin gluing the surfaces.
Second recipe for foam glue
This method is practically no different from the previous one, with the only difference being that nitro varnish diluted with a small amount of acetone is used as a base.
As in the previous case, the foam is loaded into the varnish-acetone mixture in small portions and thoroughly mixed to get rid of bubbles and ensure complete dissolution of the polystyrene foam.
If the first recipe was used as a regular glue that can be used to glue wood and paper, then the second mixture is used mainly as waterproofing. It is very convenient to use glue diluted to the state of liquid sour cream to treat the floor, steps, handrails of a country porch, you can seal holes in the roofing material with glue and even glue the roofing onto the sheathing boards.
Sometimes, instead of pure varnish, nitro paint is used to dissolve the foam. The result is a fairly viscous glue that does not adhere very well to ordinary materials. Due to the lumpy nature and large amount of ballast filler, the strength of the adhesive mass is at the level of putty, and it also dries out and cracks after the material has finally set. A mixture of nitro paint and foam glue can be successfully used as a protective coating for painting metal and wood fences.
Two ways to use homemade glue
Foam-based adhesive material cannot be called superglue. Despite the ease of preparation and fairly cheap and accessible components, foam glue has several significant disadvantages:
- Limited shelf life of freshly prepared glue;
- Reduced strength of the adhesive seam. Foam glue turns out to be weaker than polyurethane or even rubber branded materials, so the amount of adhesive mass when gluing materials is increased by 2-3 times;
- The glue takes a long time to dry. Due to the thick glue seam, the place where the parts are glued takes at least a day to dry.
The most inconvenient thing to work with is that foam glue must be prepared only before direct use. It is known from practice that if you dissolve polystyrene foam in gasoline and leave the finished mass for 10-20 minutes, the quality of glue adhesion to the surface drops sharply.
The finished mixture absorbs water vapor very quickly, and even the naked eye can see how a film forms. Therefore, when gluing metal and plastic to a smooth surface, wipe the area where the glue is applied with acetone and connect the parts as quickly as possible.
Porous materials, wood, paper, brick, slate can be joined without any haste, the glue penetrates deeply into the pores, and the quality of the seam is at an acceptable level.
The second gluing method involves using fine foam powder. Ground polystyrene foam is poured onto the gluing area and covered with synthetic fabric. Using a brush or swab, a solvent - gasoline or acetone - is applied to the fabric and carefully rolled with a rubber roller.
Under the action of a solvent, powder foam dissolves in a few seconds, and the roller provides maximum pressure on the surfaces to be bonded. The fabric used as a backing remains in place where it is glued.
Types of primers
When choosing a primer composition, you should evaluate the following factors:
Let's figure out which priming agents for concrete foundations should be used in various situations.
Depending on the effect on the concrete surface, the compositions are divided into:
Primer "Nova" for impregnation of porous, fragile concrete surfaces, which contains acrylic resins, silicone emulsion, biocides, suitable for external and internal work. It forms a matte film on the concrete surface that is resistant to atmospheric influences (except ultraviolet radiation).
Apply at temperatures exceeding +5 degrees in 1-2 layers with a brush, roller or spray with an average composition consumption per layer of 0.15 kg/sq.m. The price of a 5 kg canister is 700 rubles.
The use of penetrating primer "Toiler", made on the basis of acrylic dispersion, allows to reduce water absorption of concrete and improve adhesion to finishing materials. The average consumption of the composition is 0.15 l/sq.m. It is recommended to apply this deep penetration primer for concrete in 1 or 2 layers. The cost of a 10 liter canister is 380 rubles.
An example of such a composition is the Eunice Concrete Active soil. It is suitable for application to smooth, low-absorbent concrete surfaces indoors and outdoors. It contains a mineral filler that improves the adhesion of the base and applied finishing coatings (wallpaper paste, plaster, tile adhesive), as well as antiseptics that protect concrete from the appearance of mold and mildew.
Work on applying this quick-drying (drying time does not exceed 4 hours) composition should be carried out at a temperature of +5...+30 degrees.
The average primer consumption for concrete is 0.3 l/sq.m. m. The cost of a 10 liter can is around 600 rubles.
Based on their chemical composition, the following types of primers are distinguished:
Requirements for compositions are formulated in GOST R 52020-2003 “Water-dispersion paint and varnish materials”.
The quick-drying (within 2-3 hours) water-based composition has excellent penetrating ability.
Acrylic primer does not smell, and therefore it can be safely used for finishing work indoors. Such primers provide excellent adhesion to finishing coatings. From an economic point of view, these primers are the most optimal.
There are many acrylic-based compositions produced: primer Betonit VD-AK-020, primer “Beton-Kontakt” from, “Akrial-Grunt”, produced or composition “ST-19”, produced by the Henkel concern.
Primers for concrete ST-19 are used for treating smooth surfaces indoors.
They are environmentally friendly, vapor permeable, and contain crushed quartz sand, which helps ensure good adhesion to concrete. The soil dries in 4 hours, its consumption is 0.3...0.7 ml/m2. A package weighing 15 kg costs 1000 rubles.
Polyurethane primers fill small cracks and pores in concrete, provide high-quality adhesion of finishing coatings and the base, remove dust well and increase the wear resistance of the surface. The characteristics of the soils make it possible to use them for treating industrial floors.
“Polybetol” is a one-component composition, odorless, since it contains no solvents, is resistant to chemicals, and can be used as an independent coating. Consumption per 1 m2 is 0.1 kg.
The primer is applied at temperatures exceeding -10 degrees. The disadvantage of these compounds is the high price. A jar weighing 10 kg will cost 4,000 rubles.
Epoxy primers perfectly protect concrete from moisture and chemicals.
They can be applied to damp surfaces. They tolerate mechanical stress very well. Primers can be used as stand-alone coatings or under epoxy paints.
“Epoxol” is an environmentally friendly coating that perfectly fights concrete dust, strengthens the surface, increases resistance to cracking and frost, and protects it from corrosion and chemical influences. The composition can be applied to wet concrete.
The primer is produced in the form of a two-component composition, the components of which are mixed and diluted with water. It is applied to a clean surface at an air temperature exceeding +8 degrees, its consumption is 200 g/m2. 7 kg of primer will cost approximately 2300 rubles.
Alkyd primer is resistant to abrasion, penetrates deeply into the structure of concrete, is durable, and can be applied at sub-zero temperatures. However, it dries for at least 12 hours and its durability is lower than that of its analogues.
The red-brown Lakra composition is suitable for work indoors and outdoors.
It has good anti-corrosion properties and ensures excellent adhesion of materials. Average material consumption: 0.1 kg/sq. m.
It is applied in 1 or 2 layers. Drying time is 24 hours. A can weighing 20 kg costs about 2,000 rubles.
Polystyrene primers dry quickly, but have an unpleasant odor, so they should be applied outdoors or in well-ventilated areas. It is recommended to use such toxic compounds in production or for treating facades. They are practically not used for application to surfaces in residential premises.
Such compositions are used for subsequent application of PVA-based paint or glue. They are used only for indoor surface treatment. Polyvinyl acetate primers dry instantly, within an hour.
Covering the concrete floor
Dissolving polystyrene foam in xylene
Note: I was also advised to use solvent 647, but I didn’t have it on hand.
I would like to see how it will behave, because car owners are interested in cheap varnish to cover the garage against dampness. I’ll start by dissolving polystyrene foam in gasoline. I should also check it in acetone and solvent, but I think that acetone dries too quickly.
- I pour 92 gasoline into a clean, empty metal can. You will need a little more than half the can of gasoline.
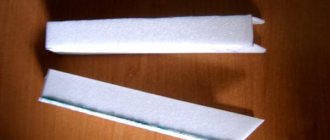
- I cut a piece of polystyrene foam approximately 1500 mm long and 40 mm thick into strips and lower them one by one into a jar of gasoline.
- The width of the strip should be chosen according to the size of the can. My goal is to see how the resulting composition will behave on concrete (I don’t need a lot of varnish).
- The foam easily fits into the jar, melts and compresses into a fairly dense lump at the bottom.
- The resulting composition has the appearance of a gel and is similar to napalm (when ignited, it immediately flares up, burns for a long time, and the flame is high).
- It is not possible to regulate the viscosity of the composition by adding gasoline - it reaches a certain thickness and the process stops there.
- I leave the jar for a while so that the air bubbles come out and all the pieces of foam dissolve.
- I take out the gel-like mass from the bottom of the jar and transfer it to another container.
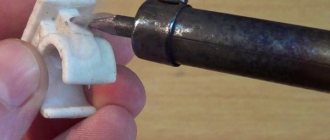
- I clean the area of the concrete slab with a wire brush and blow off dust with a spray gun.
- I prepared a brush and a spatula for work, which I lightly greased with oil. This way the varnish will not stick. It turned out to be more convenient to work with a spatula.
- I pour the varnish onto the concrete and use a spatula to apply it to the surface using movements in different directions.
- After finishing the job, there is practically nothing left on the spatula.
When applying the varnish you immediately smell the smell of gasoline. I leave this area for about an hour to dry.
I will conduct the second experiment with xylene (one liter costs 110 rubles). If you cover the entire garage with this composition, then its cost will be 2.5 times more expensive than polystyrene foam varnish dissolved in gasoline.
- To dissolve in xylene, I chose denser and more expensive fine-grained foam, from which the protection of the computer system unit is made.
- When xylene is added to the jar, the foam dissolves almost completely, the viscosity of the composition becomes less, and the thick lump disappears.
- A composition of this viscosity can be applied in a much thinner layer. It looks like xylene is better for making foam varnish.
- I'll try using xylene as a wood varnish. I take a walnut branch peeled from the bark and apply a thin layer of the composition with a brush. It turns out very well, but you have to wait for the varnish to dry.
- I also apply a layer of composition onto the concrete with a brush. The layer turns out to be very thin and there are no air bubbles in it.
- I leave it to dry.
My first section did not dry completely within an hour - a film with a very large number of bubbles formed on the surface. Huge bubbles formed on the sides. To the touch it looks like the well-known packaging film with bubbles. However, as an option, this composition can be used after complete drying.
The area covered with xylene varnish turned out better. The composition is well absorbed into the surface of the concrete and looks like real varnish. The only negative is the high cost of xylene compared to gasoline. To reduce the cost, you can first dissolve the foam in gasoline, and only then add xylene and achieve the desired viscosity. It will be inexpensive to prepare a composition based on bottled xylene, which is sold in cans and costs less.
Note: the composition dried on wood in 10 minutes and is indistinguishable from real varnish. In the future, for an experiment, I can take a board polished on a machine from a nearby furniture workshop and apply 3-4 layers of xylene varnish to it.
Well, now it's time to finish the article. All the material I wanted to share has been reviewed. I hope it will be useful to you, and you will use it if you need to remove dust from a concrete floor with liquid glass with your own hands. Improve your own practical skills and gain new knowledge, as they say: “It’s never too late to learn!” That's all, thank you for your attention, successful and easy repair!
Modern adhesive compositions, of which there are many in construction stores, with all the variety of names and brands, are not much different from each other. All of them are united by a high price and average gluing quality. Most often, universal construction adhesive is a polyurethane or polystyrene viscous mass in an organic solvent. Foamed polystyrene, also known as foam and solvent, can be found in almost every home. Following the same logic, you can quite simply make foam glue with your own hands based on a simple recipe.
Painting concrete with homemade varnish (acetone+xylene+foam)
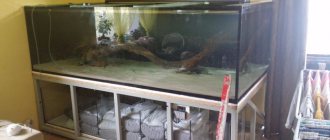
The floor in the garage is concrete and very dusty... absorbs, etc... after searching for a solution to eliminate this shortcoming, I was advised this method... I tried it in the summer of 2022 and now I am writing a review in the summer of 2021. To prepare the varnish you will need: 1- Acetone 2- Xylene
4- Bucket, brush, respirator
We pour 2 liters of acetone into a bucket and begin to dissolve polystyrene foam in it (any foam will do, I dissolved the one I found from household appliances, and when it was not enough, I bought the one that is used for insulation) until a thick slurry forms in which the foam plastic practically does not dissolve... It looks like like this:
When a thick mass has formed, pour in 1 liter of xylene and stir, it will thin out this mixture, making it less thick and similar in consistency to varnish... Then everything is simple... Take a brush and apply a thin layer to concrete or other surface... Before applying it, you need to sweep it, or even better blow it out with a compressor (that’s what I did) The varnish itself turns out transparent:
But... for the sake of experiment, I added a regular color to it for 40 rubles from the paint department...
How to make linoleum glue
The step-by-step instructions are as follows:
Remove dust and other dirt from the coating. If you do not maintain cleanliness, then foreign impurities may form in the future glue. They will only interfere with the work process. If liquid detergents were used for cleaning, the flooring should be wiped with a dry cloth and allowed to dry thoroughly. Cut it into small pieces. To do this, you can use sharp scissors or a knife. The smaller they are, the faster they will dissolve, and accordingly, the less time it will take to get the finished product. It is advisable to cut the linoleum into fragments of 0.5 centimeters or less. Place the chopped pieces in any lined jar
Please note that this container must be tightly closed, clean and dry. Do not use plastic under any circumstances - acetone will dissolve not only the flooring, but also the container. Fill everything with solvent
There are no exact proportions here. You just need to make sure that the liquid completely covers the linoleum. Close the container. If it seems that it does not close tightly enough, then you can put a PET bag or a piece of film under the lid. Dissolution will begin almost immediately. But the final result will be achieved within 10-24 hours. The amount of time depends on how finely the coating pieces were cut. But it is better, nevertheless, to withstand the maximum amount of time. After the jar with the “mixture” is closed, set it aside and shake the contents periodically. “Shaking” can speed up the process and make the mixture more homogeneous.
Dissolve polystyrene foam in solvent - All about insulation and energy efficiency
In the house, sometimes an adhesive composition is required for repair work. Buying the necessary product in building materials stores is not always pleasing with the price-quality ratio.
It is easier and better to make a homemade adhesive composition from polystyrene foam.
A simple recipe will reveal useful secrets: how and with what to dissolve the foamed polymer to create a viscous adhesive mass.
Using homemade glue
at the beginning of preparing a homemade product, you need to learn which objects can be glued together, and for which material it is not suitable.
Connecting only rigid objects will be successful, since the adhesive mass hardens, increasing the strength of the product. You won't be able to seal a crack in a flexible rubber boot with a homemade product.
The specificity of the use of glue is the limited time of its use - 10-15 minutes after preparation, later the quality of the adhesive mass decreases.
Due to this, the product is required for small and urgent work:
- sealing fiberboard joints;
- repair of floors, roofs made of tiles or asbestos-cement corrugated roofing sheets;
- gluing furniture, baseboards, interior items;
- hydroprotection of the base;
- fastening cornices;
- insulation of loggias, balconies, ceilings and floors, foundations, walls with extruded polystyrene foam.
Owners of garages, garden houses, and private homes will often be helped out in everyday life by a simple and quick-to-prepare handmade adhesive composition instead of expensive casein and carpentry adhesive.
Related materials
Making a homemade adhesive requires only two main ingredients: a foamed polymer and an organic solvent.
Two main ingredients: foam polymer and solvent
Thrifty owners know where they can always find different pieces of expanded polystyrene:
- in packaging boxes for current devices - used as an anti-shock agent during transportation;
- remains of sheet-type material (clippings or crumbs) used as a heat insulator in the process of cladding the premises;
- old foam trays, plates, glasses - were used everywhere in the past.
Packaging and containers made of polystyrene foam
— how to cut foam polymer. Detailed note.
Foamed polymer comes in different qualities, as this term refers to a whole group of materials obtained by various methods of foaming the initial substance. There are 4 types of polystyrene foam:
- pressless - products made from most bonded balls. When pressed, the material crumbles;
- pressed - a dense product with very high strength;
- extruded - material with a solid structure;
- granular - a bulk material that consists of a majority of very small grains.
Before preparation, samples of different types of polystyrene foam can be loaded into gasoline for comparison. The distinct result will reflect a very effective dissolution of granular and pressless material.
It is important to take into account that the foamed polymer for homemade glue must be clean, without fire-retardant additives, and without an unusual odor.
Solvent
There is always some kind of solvent in everyday use. In preparing glue you can safely use:
- acetone;
- thinner for nitro paints;
- purified gasoline "Galosha";
- automobile gasoline:
- Vietnamese gasoline (with the addition of acetone).
Gasoline grades with an increased content of fuel alcohol and additives are not suitable. It is not recommended to dissolve with dichloroethane, benzene, toluene - these substances with high toxicity of aromatic hydrocarbons. Although they are considered optimal solvents, inhalation of vapors during stirring leads to poisoning.
Equipment
In addition to the components to prepare the glue, you will need:
- Capacity. The first portion can be diluted even in an ordinary bowl or jar. It is convenient to dilute a significant volume of adhesive mass in an iron canister.
- Gloves.
- Fan. When mixing elements, gases are released (freon, styrene, etc.), which are not recommended to be inhaled.
Cooking recipes
There are two key recipes that skilled home craftsmen use.
The first method consists of the following step-by-step steps:
prepare a container for mixing the components - it must be clean, dry, the volume depends on the required mass of glue;
Instructions for preparing linoleum glue
Linoleum is not only a beautiful, practical floor covering. There is a recipe for universal glue; it is prepared from the remains of old flooring. Making this home remedy is quick and easy; no special ingredients are required. Do-it-yourself linoleum glue is a reliable, strong composition that is suitable for joining the following materials:
- ceramics;
- metal;
- wood;
- plastic;
- glass;
- rubber;
- cardboard;
- paper;
- porcelain.
The components for making glue are linoleum scraps and acetone. You will also need a 1 liter or larger glass jar with a tight-fitting lid.
There is an important condition: if the flooring is without a backing, it is used in its original form. If there is an insulating layer, it must be torn off
Step-by-step manufacturing technique:
- Wash a piece of flooring with soap. The material must be completely clean.
- Dry the linoleum by wiping with a cloth. Cut into small pieces (a few millimeters) with a sharp knife or scissors.
- Take a dry, clean jar. Fold in the cut pieces.
- Fill the material with acetone so that it completely covers the trimmings.
- Place the closed jar in a dark, not cold place.
Linoleum begins to gradually dissolve in the solvent, the whole process lasts about 24 hours. The more often you shake the contents of the jar, the faster the composition will be ready. Within a day you can glue any surfaces or parts with it. To do this, apply a little product to the base, spread it in a thin layer, press the product and fix it.
This glue is easy to use - it dries as the acetone evaporates in a few seconds. Add an equal amount of wood chips to create a quality wood putty or window putty. The introduction of chalk (1:1) will allow you to prepare an excellent mastic for laying tiles. The cost of such glue is very low, and the quality is not inferior to store-bought, so it can be used everywhere.
see also
Comments 56
This is not entirely normal... It gives away schizoy.
This method sucks.
crazy... see a psychiatrist urgently
I had it like this for half a month. and then it cracked and everything fell off.
5000r?! It makes sense to make such a floor if it costs 300 rubles. This color is water soluble. I think it greatly reduces the strength of this substance. A methyl methacrylate self-leveling floor for this area will cost a little more, but the quality is incomparably better.
This is an experiment. The essence of which is “it’s worth it, or you shouldn’t bother!”
it means it's fake, we'll know
Right. I decided to conduct an experiment personally to see if it is as shown on many videos. A five-liter can and a piece of foam plastic, as in the video, are clearly not enough.
Paint in a respirator? The respirator protects against mechanical impurities and suspensions. It will not protect you from chemicals. Either paint in a filter gas mask or in a hose
Will it be slippery in winter?
I thought the surface was slippery. But I don’t seem to be skating on it.
Having read something about solvent and polystyrene foam, I immediately didn’t think about paint at all...
Of course it’s a plus for the experiment! Damn, but on the other hand, why all this crap? I filled 24 square meters of garage with a two-component epoxy kit for 5 rubles. So it dried in a day, with “chips”, does not stink, does not absorb gasoline oil, stuck exactly without bubbles and has been holding on for 4 years like new. And with this xylene foam, it is not yet known how it will affect health in a year. So this is some dubious savings... plus how much time was spent on all this...
You don't get -35.
Of course it’s a plus for the experiment! Damn, but on the other hand, why all this crap? I filled 24 square meters of garage with a two-component epoxy kit for 5 rubles. So it dried in a day, with “chips”, does not stink, does not absorb gasoline oil, stuck exactly without bubbles and has been holding on for 4 years like new. And with this xylene foam, it is not yet known how it will affect health in a year. So this is some dubious savings... plus how much time was spent on all this...
what kind of set? consult the manufacturer.
Make a floor Standard, I took it for 20 m2, it turned out to be one layer (but the floor was perfectly flat) and it was enough for me for 24 m2. There are different colors and volumes of cans. By the way, the manufacturer indicates that it is also suitable for outdoor work; I was too lazy to look for temperature conditions.
what kind of set? consult the manufacturer.
Additional materials Technical description Protective composition Make a floor Car-park gray for 20 m2.pdf (PDF, 0.09 Mb)
The final polymer coating for the floor Make a Floor can be applied to concrete, brick and stone surfaces, old concrete tiles, as well as wood and asphalt. Type: Protective compounds Brand: Make a Floor Country of manufacture: Russia Scope of application: For interior work Mixture base: Epoxy Gross weight (kg/set): 6.74 Walkability: After 24 hours Use with heated floors: No Detailed description Make a Floor - two-pack protective Epoxy-based composition, easy to use, does not require special skills or special equipment. The “Make a Floor” composition forms a decorative coating that is wear-resistant and durable, and also gives the floor antistatic and anti-slip properties. The finished coating is resistant to mechanical stress, dust and the penetration of dirt, oils, water into the substrate, and also prevents the formation of fungus and mold. The composition can be applied to concrete, brick, stone surfaces, as well as wood and asphalt.
The “Make a Floor” composition is recommended for use: -in retail and warehouse premises and exhibition halls; -garages, parking lots; -service stations; -car washes, workshops, basements, entrances, etc.
Of course it’s a plus for the experiment! Damn, but on the other hand, why all this crap? I filled 24 square meters of garage with a two-component epoxy kit for 5 rubles. So it dried in a day, with “chips”, does not stink, does not absorb gasoline oil, stuck exactly without bubbles and has been holding on for 4 years like new. And with this xylene foam, it is not yet known how it will affect health in a year. So this is some dubious savings... plus how much time was spent on all this...
What does polystyrene foam dissolve in, how and with what do you dissolve polystyrene foam?
Households often require glue for repair work. Buying the necessary product in construction stores is not always pleasing with the price-quality ratio. It’s easier and more reliable to make homemade foam glue. A simple recipe will reveal little secrets: how and with what to dissolve the foam to create a viscous adhesive mass.
We do it ourselves: quickly and inexpensively
Using homemade glue
Before you start preparing a homemade product, you need to understand what objects can be glued together and what materials it is not suitable for.
Connecting only rigid objects will be successful, since the adhesive mass hardens, increasing the strength of the product. You won't be able to seal a crack in a rubber boot that is flexible at the break with a homemade product.
The peculiarity of using glue is the limited time of its use - 10-15 minutes after preparation, later the quality of the adhesive mass decreases.
Therefore, the product is required in cases of small and urgent work:
- sealing fiberboard joints;
- repair of floors, tile or slate roofs;
- gluing furniture, baseboards, interior items;
- basement waterproofing;
- fastening cornices;
- insulation of loggias, balconies, ceilings and floors, foundations, walls with extruded polystyrene foam.
Owners of garages, garden houses, and private houses will more than once be helped out by simple and quick-to-prepare homemade glue instead of expensive casein or carpentry glue.
Styrofoam
Thrifty owners know where they can always find various pieces of foam:
- in packaging boxes for modern devices - used as an anti-shock agent during transportation;
- remnants of sheet material (clippings or crumbs) used as insulation during the finishing process;
- old foam trays, plates, cups - were widely used in the past.
Packaging and containers made of polystyrene foam
- how to cut polystyrene foam. Detailed article.
Polystyrene foam comes in different qualities, as this term refers to a whole group of materials obtained by different methods of foaming the original substance. There are 4 types of foam:
- pressless - products made from many connected balls. When pressed, the material crumbles;
- pressed – a dense product with increased strength;
- extrusion – material with a solid structure;
- granular - bulk material consisting of many small grains.
Before preparation, samples of different types of foam can be immersed in gasoline for comparison. The visual result will reflect the most effective dissolution of granular and pressless material.
It is important to take into account that the foam for homemade glue needs to be clean, without fire-fighting additives, and without a specific odor
Safety regulations
The use of foam glue requires compliance with fire safety rules, because the mixture ignites quickly and burns for a long time. Even a lit match can cause a fire. When heated, the mass releases a significant amount of heat and produces thick black smoke.
It is recommended to carry out work on the production of glue in the open air, so as not to harm health by inhaling the released vapors and gases when mixing polystyrene foam with gasoline or other solvent.
Roof repair with foam glue
The method of preparing glue from materials that can be found in any home is practical and simple. Following simple rules will help you carry out routine repairs safely, quickly and inexpensively.
Where can it be used?
The scope of application of glue from scrap materials is huge. In the domestic sphere, it is used to repair roofs, facades, furniture, if necessary, correct interior decoration, glue a loose piece of tile, seal holes that have appeared in the wrong place, and seal surfaces.
For what materials is it used:
- paper, cardboard;
- wood, particle boards (chipboard, fibreboard, MDF);
- ceramics;
- slate;
- metal;
- concrete.
Since all compositions, of which there are many, are based precisely on mixing polystyrene foam and some kind of solvent, this glue is not suitable for every plastic. Food grade and regular household plastic can lose their strength and become deformed. But when working with plastic suitable for flammable liquids, such problems do not arise. For example, if a leak occurs in a plastic canister, it can be repaired with a patch of thick household glue, and for several more years the container will work properly without letting in a drop of water at the sealing site.
It is worth considering that glue does not adhere well to smooth surfaces, and this applies not only to plastic. It is capable of gluing parts with a glossy surface, but first you need to thoroughly matte the joint on both parts and wipe with acetone immediately before the gluing procedure. Glue is applied to both sides.
The mixture perfectly replaces polyurethane foam: suitable for sealing cracks in roofs, walls, stairs, wooden objects (window frames, window sills, doors, door frames, lining). Large cracks are filled with a spatula; small cracks are filled with a pastry syringe, instead of which you can use a thick bag with a corner cut off. For external repairs, the uncured glue is sprinkled with sand or covered with a clean rag.
Many people do not recommend using glue with this composition for decorative repairs: due to its consistency, it is quite difficult to apply accurately. But if the front surface of the object near the joint is lubricated with oil, no traces of glue will remain. The main thing is not to drip grease onto the place where the glue will be applied.
Useful: the strength and durability of the connection will depend not only on the material being glued, but also on the quality of the components included in the glue itself.
After complete hardening, the substance becomes glassy and holds quite tightly, but you should not use it to attach objects that are under constant or heavy load.
It is possible to use a mixture of gasoline and polystyrene foam as a varnish. To do this, the mixture is made almost liquid, jelly-like. Essentially, it turns out to be liquid plastic. Applied in a thin layer, when hardened it turns into a film and serves as an excellent protection against moisture. Used for waterproofing:
- wooden, metal, concrete fences;
- concrete walls and floors; roofing;
- household items made of wood.
There is a misconception about using homemade adhesive to adhere insulation. As a rule, to preserve heat, sheets of polystyrene foam are used, which in composition is the same foam, only made using a different technology. And the solvent-based glue simply “eats away” the bulk of this material, leaving only a layer of air as insulation.
Disadvantages of foam glue
- Homemade foam and solvent glue has a very limited shelf life.
- It is characterized by reduced strength of the finished seam.
- To obtain sufficient reliability of the connection, you need 2-3 times more glue.
- The glue itself takes longer to dry (at least a day), so it must be used immediately after preparation. After 10-20 minutes, the quality of bonding of parts will be lower. This is especially true for preparing glue using gasoline. Metal and plastic smooth surfaces must be connected immediately.
- If porous materials are processed, for example, wood or brick, then the first layer of the composition must be allowed to absorb.
If the mixture is prepared with the addition of gasoline, then it is better to use it for outdoor work, for example, waterproofing the basement line of walls. It is better to carry out all work away from sources of fire and sparks. It is necessary to avoid preparing the mixture near heating devices that are turned on.
There are situations when you need to glue something together, but you don’t have the necessary product at home. It is not necessary to buy an adhesive composition. You can always make it yourself if you have the simplest materials. “Folk craftsmen” make glue from polystyrene foam and solvent. The result is a product no worse than store-bought, suitable for a variety of purposes.
Features of the composition
Glue from acetone and polystyrene foam is prepared in compliance with safety rules. The fact of easy ignition and combustion of raw materials is especially taken into account. Therefore, work is not carried out if there is an open source of fire nearby.
Homemade glue will ensure adhesion of various materials, provided that the mass is thoroughly mixed and the composition is uniform.
If the mass is used to create a protective coating, then a more liquid consistency is prepared.
The adhesive layer hardens within several days. The duration is affected by its thickness.
Sometimes, instead of polystyrene foam, plastic elements are used. All materials are prepared in advance. The foam pieces are crushed or crumbled. To speed up the drying process, acetone is used to soften. The frozen layer is able to withstand temperature changes. Thanks to these properties, the product is used to seal the roof, and there is no need to be afraid that moisture will seep through again.
Adhesive for polystyrene foam
When installing thermal insulation, polystyrene foam is easy to process, fit, and install. It is recommended to use a combined method of fastening - additionally secure the slabs installed on glue with dowels. Since various types of solvents (gasoline, acetone, ethers) dissolve polystyrene foam itself, adhesives based on them cannot be used.
There are bitumen-based mastics and cement-polymer mixtures specially designed for polystyrene foam. These compounds provide a reliable connection to almost any base - concrete, brick, various types of blocks, plasterboard and perform the function of additional waterproofing.
If there are no special requirements for installation technology, and depending on the scope of work, you can use many of the available adhesive materials - silicone sealant, liquid nails, tile adhesive. When installing ceiling skirting boards or moldings, a spot or thread application of glue is sufficient, so a tube of sealant or liquid nails is more than enough to install them in a standard apartment. The technology for applying tile adhesive is the same as when installing tiles - apply over the entire surface and remove the excess with a comb spatula.
Results
Foam glue can be used for exterior finishing of house facades. For example, for waterproofing the base, fastening roofing felt, blocking the opening of a sewer pipe in the country. Also, the glue works well in contact with tiles and asbestos-cement slate. If there are cracks, they are treated with an adhesive composition on both sides, and a fabric-based patch is applied on top. This patch can last at least 1.5 years.
Hello readers of my blog! Today we will talk about how to properly remove dust from a concrete floor with liquid glass with your own hands. It would seem that the matter is not tricky, but when you are faced with this problem, you have to think about how to do it correctly, what preparation to do, what materials to choose. Thus, I decided that this article would be useful to someone, and I am devoting my efforts to this subject. In it, I will answer a number of questions that will arise immediately before How to properly remove dust from a concrete floor with liquid glass with your own hands, and some even after that. This topic is quite broad, because before work, thorough preparation is necessary, but how to do this? And this is a separate topic. You can learn about all this in great detail in the article below. How to properly remove dust from a concrete floor with liquid glass with your own hands
Priming any surfaces before finishing is an indispensable condition for the installation of reliable and durable coatings. Concrete is no exception.
Let's figure out how important it is to treat concrete bases with a primer, what types of products are used for this, how primers for deep penetration concrete differ from other types, and also consider the technology for applying these compounds.
What tools and equipment will be required?
To prepare polystyrene foam varnish, you will need the following raw materials and equipment:
- polystyrene foam (there should be a lot of it);
- dissolving liquid (one of the types or a combination of them);
- dishes for dissolving (any large glass, tin or polyethylene container with a wide neck will do);
- wooden stick for stirring;
- filter for straining (you can use a plastic strainer, gauze, a piece of tulle or old nylon tights);
- storage container with a hermetically sealed lid.
In addition to equipment, you need to stock up on a respirator, safety glasses, rubber gloves and long sleeves. Contact of solvents on the skin, and their vapors on mucous membranes and lungs, is undesirable, since they contain toxic substances. When foam bubbles collapse, they also release gases, the inhalation of which can cause poisoning. Work should be carried out in a well-ventilated non-residential area (garage, workshop) or outdoors. If this is not possible, then the solution is prepared on an open balcony.
Acetone substitute for degreasing parts
Degreasing removes unwanted dirt, grease, oil from equipment or prepares parts for finishing. Suitable for industrial cleaning and surface preparation, methyl acetate contains no VOCs and is biodegradable. Its hydrophobic properties are critical when it comes to problems associated with moisture, which can damage or corrode parts.
An active, mixable solvent can be used alone or in compositions for degreasing metal parts, wooden parts and others.