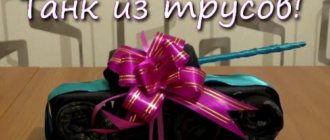
How to make a tank for a child
For very young children, a simplified version of the plasticine tank (from 3 to 5 years old) is suitable.
You should prepare 3-4 whole layers of green plasticine, since it is from this color that most of the parts will be made.
The tank has the following parts:
- Frame
- Tower
- A gun
- Caterpillars
- Hatches
- Fuel tank
Caterpillars
- First, take a whole piece of green plasticine and cut off one of the edges diagonally with a plastic knife. This will be the bottom of the tank.
- To create caterpillars you will need a black layer of plasticine. Cut two rectangles from this piece and turn them into two black sausages.
- Next, you need to crush the two black rollers with your finger. So that they become flat.
- Next, use a plastic knife to make shallow furrows on the black plasticine sausages.
- Then you should prepare 10 large balls of the same size and 4 smaller ones.
- The next step is to crush the balls and make disks out of them.
- Five large wheels and two small ones should be placed next to each other and a black ribbon should be wrapped around them.
- This will be the gangway. The same should be done with the second side.
- Then you need to attach the caterpillars to the green layer of plasticine on the sides from different sides.
Material selection
Before sculpting a craft, you should pay attention to the following characteristics of the material :
- Color . Many crafts look beautiful when bright and rich colors are used for them. In this case, it is better to choose muted shades: dark green, gray, brown. These colors have long been considered military colors and are perfect for sculpting a tank. It is better to put shiny plasticine aside too.
- Quality . Before sculpting a tank, you need to check the material for strength and quality. High-quality plasticine does not stick to your hands much and quickly becomes warm. Ten seconds after kneading the plasticine in your hands, it should become warm and begin to stretch easily. The material is considered to be of high quality if it does not crumble under mechanical stress until it dries completely.
- Alternative options . An alternative to plasticine is polymer clay. Crafts made from this material crumble less when completely dry. Polymer clay can be baked and coated with clear nail polish to increase the strength of the material. This craft will last longer than a plasticine craft.
Let's make a cannon
In order to make a cannon, you need to make a fairly long sausage and blunt it on both sides.
To prevent the cannon from falling off the rest of the tank, you should insert a toothpick into it. Then attach the resulting cannon to the rest of the tank.
Small tank parts
The final step is to sculpt the fuel tanks, hatches, antenna and red star.
- Fuel tanks should be made of thick but short rolls.
- You need to draw grooves on the tanks with a knife.
- To make the hatches, roll the balls and cut them in half.
- Make the antenna from black plasticine and thin wire. Glue them to the tank body.
The end result of the plasticine tank should look like the picture.
Torso
Next, the body is made. You need to take a small amount of green and blue; they will serve as a tunic and riding breeches.
Connect the two parts, separate the legs with a stick. It is necessary to add a rectangular green part to the hips to create smooth edges of the jacket. Glue yellow circles (buttons) in the middle.
Make a brown belt with a yellow plaque in the middle. The sleeves are made of green plasticine in the form of a tube that becomes wider towards the end of the arm. Make hands from beige color.
How to make a T-34 tank
The next version of the tank is intended for older children. The T-34 tank is well known to almost all people. After all, it was he who helped make a decisive contribution to the victory.
To create a T-34 from plasticine, the first step is to take a fairly large amount of plasticine and knead it. This will make it more elastic and easier to work with.
Frame
In order to mold the body of the T-34, you need to take a whole piece of green plasticine.
- We cut one edge at a greater angle than the other. We also cut off the sides at an acute angle.
- Thus, you should get a trapezoid. We must remember that all the edges of the T-34’s hull are very sharp, so we must give the sides a pointed shape.
- Next you should make two long sausages, and then knead them with your finger.
- These will be the wings that cover and protect the track from tearing.
Fighter aircraft
Boys love to play with military equipment. Including by plane. Try to make a fighter plane with your child, it won’t take much time, but the child will play with the new toy all day long.
You can take one color or two pieces of green in different shades.
To create a marble effect, you can mix two colors. You should not mix them until the color is uniform; you need to lightly mix them together.
- From most of the plasticine, make an oval shape that is narrower at one end and wider at the other.
- For the wing, prepare two circles.
- The circles must be made flat and given a triangular shape.
- Attach to the aircraft body.
- To design the tail, you need to add 3 triangles to the narrower end (two on the sides, one in the middle)
- Install a cockpit for the pilot on top of the hull and add glass.
- All that remains is to make the propeller. To do this, you need to make a semi-oval red core and add 3 blades. The propeller can be secured with matches, then it can also be rotated.
- The plane can be decorated with a red star.
The plane is ready. You can go flying with a new toy.
Bottom and tracks
To create the bottom, you need to take a layer of plasticine and knead it into a fairly thick rectangle.
- From a black piece of plasticine you should make two black and long sausages.
- Then you should knead them into a flat shape and connect their ends to each other. Use a plastic knife to make notches on them.
- For the wheels, make 14 balls. And then shape them into disks.
- 5 large and two small disks will go on each side of the tank.
- You need to draw a ladder around these discs.
- The resulting tracks should be attached to the bottom.
Tiger combat vehicle
Many boys want to make this model of a tank so that it can compete with our Soviet tank during the game. You can carry out the production together with your child, because modeling from plasticine for children is very useful, as it develops many of the child’s abilities.
For production, you will need plasticine of several dark shades and one light one to create stripes, and of course a board. The process of sculpting a tiger goes like this:
- Body molding. We take a wide piece of plasticine as a basis and make it rectangular. Next, glue a thinner piece onto it and begin to bevel the edges of the thin piece. If there is not enough material, it is better to add it.
- Making wheels. The tiger has 12 wheels on tracks, so we roll out the required number of circles from plasticine, press them a little with our fingers and get flat blanks. Using a pin in the middle of each wheel, press out the axle. Upon completion of manufacturing, we attach the parts to the sides of the body.
- Manufacturing and fastening of tracks. Roll out the long “worms” and press them to form ribbons. We make notches. We attach the resulting blanks to the wheels. Next, we take plasticine, roll it out and cover the chassis of the tank with a thin layer.
- Making a tower. We make a tower from two balls of black plasticine, with one ball being slightly smaller than the other. We attach the tower to the hull. Now we take a thin object, wrap it in a thin layer of plasticine, and install the blank in place of the tower. This will be our barrel.
- Finally, we make tiger stripes on the body. They are made from beige plasticine.
Our Tiger is ready, we can take it to the battlefield.
A gun
To create a cannon, we need one long green sausage, which needs to be blunted on both sides.
- You need to make a hole at one edge of the cannon using a toothpick.
- At the other end, insert a toothpick.
- This is necessary so that the gun holds well and does not fall from any blows or other embarrassments.
The T-34 has a fairly large bump on the front of the turret.
- In reality, it was needed for the gun to rise and fall.
- To create this pine cone we need to make a cylinder and then cut it in half.
- Using a plastic knife, draw two deep lines on the sides of the tower.
Additional tank parts
- Hatches
- Antenna
- Fuel tanks
- Star
Operating procedure:
- In order to make a hatch for the crew, you need to roll a medium-sized ball. Then you should cut it in half and lightly crush it.
- To create an antenna, you should tear off a small piece of black and make a very thin and long sausage out of it. Glue to the tower.
- To recreate the fuel tanks, you need to mold a thick and long roller. One third of the roller needs to be cut off with a plasticine knife.
- Next, you should draw shallow furrows on it. Attach the resulting tanks to the stern of the hull.
- To make a star you need to roll a small red ball. Crush it into a cake and cut out a star shape with a plastic knife. Glue it in the center of the tower.
- Place the resulting plasticine version of the T-34 tank in the refrigerator to freeze for 2 hours.
This method will help the tank harden and not break. After the time has passed, remove the fake from the refrigerator.
The T-34 tank is ready!
Don't forget to take a photo of the plasticine tank as a souvenir.
Head
It is better to start doing the work from the head. To do this, you need to take a small piece of beige color and give it an oval shape. Use a stack to mark the place of the eyes and attach the nose. Add eyes, eyebrows and lips. We make a cap on the head
To do this, take red plasticine and make a flat circle, place the green part protruding slightly at the top on it, attach a black visor to the bottom of the red plasticine. Attach a small yellow circle in the middle of the red part.
We put the cap on the head and attach the ears. You can leave the head bald or add some black or brown hair.