Robots are replacing people in production and at home, working in dangerous conditions. Human-like androids typically work as promoters, while industrial machines are tuned to perform precise functions. They are developed by specialists.
Home craftsmen are interested in the question of how to make a robot from improvised means. Original mechanisms can be designed independently and programmed to implement simple tasks.
Lighter options
For very busy parents, you need a craft that does not require a lot of time and material to create. With a minimum of material costs, but which will not be ashamed to show. It is desirable that a simple robot craft for kindergarten look like serious work created with dedication.
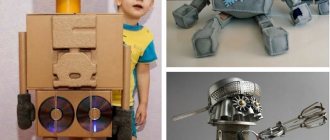
You can take regular packaging cardboard, any box will do for this, and make a large craft out of it.
The arms and legs are attached separately, by interlocking the puzzles, this is necessary so that the product has volume and not a flat shape. After that, all that remains is to paint the model with gouache and you will get a very original robot.
From bottles and tape
If the previous design seemed too complicated to make, you can use a simpler method. Secure three 1.5-liter plastic bottles with tape without removing the caps - this is the body of the robot. To each outermost bottle, attach another bottle of the same type with adhesive tape to the cork - you get legs.
Cut the next bottle in half, and tape the half that is without a cork in the middle bottle - this is the head. Decorate your head with two plugs - eyes.
Hands can be made from half-liter bottles by cutting them into segments and connecting them together.
Cut out palms from two more bottles and attach them to your arms. The craft is ready!
Another interesting option
An egg carton can be turned into a real masterpiece. To create a composition, it is better to take two, of different sizes. One will be the base of the body, and the second will be the head of the robot.
We recommend reading:
Craft bullfinch: detailed description of how to make a bird with your own hands (115 photos)Crafts from vegetables: 100 photos of the best crafts for children and a review of recipes for adults
- Craft ship: 120 photos, templates, drawings and step-by-step instructions on how to make a boat
To paint the craft evenly, use a foam sponge and dilute the gouache with water, the paint will lie evenly and there will be no smudges. Blot the egg cassette thoroughly so that there are no unpainted cracks left.
DIY geometric applique
And small children can cope with the task by making a fun appliqué with a drawing of a robot, using geometric shapes.
First you need to make the necessary shapes on paper and cut them out. These can be triangles, circles or squares of various shapes.
Using a glue stick, glue the cut out shapes onto a piece of paper, making a robot craft for children. Using a marker, we draw small elements and decorate the background.
This creative activity will teach children to distinguish colors and shapes, and the activity also promotes the development of fine motor skills.
We do it beautifully
- Wrap the boxes in white paper to hide anything unnecessary. However, you can choose the background yourself: gray, green, blue will look even more impressive.
- Cut out eyes and other small elements from colored paper of a different shade.
- Use toilet paper rolls to create arms and legs. To prevent them from breaking, we fill them with newspaper. With its help, it will be very easy to attach individual elements to each other.
- The head is attached with glue.
Robot made from plastic bottles
You can make a robot from the simplest material – plastic bottles. For the craft, prepare:
- an opaque cola bottle;
- a toy bucket from a set of children's dishes;
- two forks;
- three caps from plastic bottles;
- two wheels from a toy car connected by a chassis.
We make two holes on the bottom sides of the bottle, through which we thread the chassis and screw on the wheels. We bend two forks - these are the arms - and attach them to the body from the back with bolts. We put a bucket on the head, to which we attach two larger lids - these are the eyes, and one smaller one in the middle - this is the mouth. We decorate the robot as your imagination dictates.
Another option
Making typical modifications is not always preferable.
You can diversify the work, create a robot using additional materials. Make the eyes from a foam ball, cutting it in half, everything else is paper, cardboard and paints. It is not necessary to make it full-length; the arms and legs can be soft, so the robot will be presented in a sitting position.
Useful robotic devices for beginners
You can begin your first steps in robotics:
- from getting acquainted with the Lego BOOST (7-12 years old) and Lego EV3 (from 10 years old) construction and programming kits;
- from the design of vibration robots intended for children's games;
- from classes using electronic construction sets “Znatok”;
- from assembling simple construction kits for beginners based on Arduino;
- from constructing models presented by Engino educational constructors.
Soft copy
An equally interesting model can be constructed from felt:
- Body base – 5 cm;
- Robot head – 4 cm;
- Legs – 2.5 cm;
- Handles – 2 cm.
To create each square, you need to prepare six layouts.
- Stitched in any shape. Large stitches will add drama.
- The finished parts are stuffed with filler, after which they are glued or sewn.
- By choosing the color of the material, you can indicate the floor; additional elements are also possible. For a robot boy, you can attach a tie or bow tie, and for a girl, an elegant bow is suitable.
- The eyes are buttons.
Obstacle detection robot
Before assembling a smart device, think about its appearance and principle of movement. The best option is to use a caterpillar chain (like in a tank).
Such robots are easier to control and are able to move on any type of surface. You can remove the tracks, motor and gearbox from a toy tank.
Tools and spare parts
Before creating a robot you should prepare:
- microcontroller (ATmega 16 in Dip-40 package);
- ceramic capacitors 0.1 µF, 1 µF, 22 pF;
- 25 W resistors with a nominal value of 10 kOhm (1 unit) and 220 Ohm (4 pieces);
- diode 1N4004;
- L7805 in TO-220 housing;
- soldering iron;
- infrared diodes (2 pcs.);
- phototransistors capable of responding to the length of infrared rays;
- 16 MHz quartz resonator;
- multimeter;
- radio components;
- caterpillars and motor from a toy excavator, tank.
Working with the board
To provide power to the microcontroller, a voltage stabilizer is selected. The optimal choice is the L7805 microcircuit, which provides a stable 5 V output. It is complemented by capacitors for voltage smoothing and diodes that protect against polarity reversal.
Next, the MK-Dip controller housing is inspected and the components in it are identified:
- Reset pin, pulled up by a resistor to the “plus” of the power source;
- 1000 uF electrolyte for protection against voltage surges;
- a quartz resonator and capacitors, which must be located close to the Xtal1 and Xtal2 pins.
Motor control
The device uses an L293D chip with built-in diodes that protect the system from overload. It has 2 channels, which allows you to connect 2 motors at once. Motors on the board are prohibited from being connected directly to the MK. Contact is provided using key transistors.
During operation, the microelectronic device may heat up. To dissipate heat, GND legs are provided, which should be soldered on the contact pad.
Installation of obstacle sensors
Orientation of the robot in space is provided by a simple infrared sensor. It consists of a diode capable of emitting in the infrared range and a phototransistor for receiving rays. In the absence of an obstacle in front of the mechanism, the transistor is closed.
When it approaches furniture or a wall, the elements trap heat. The transistor opens, which activates the flow of current through the circuit and causes the device to change its trajectory.
The sensors are installed on the front of the board, connecting them via wires to the main circuit. A caterpillar mechanism is located on the sides of the base.
Robot firmware
To operate the device, a program is required that will allow you to take readings from sensors and control motors. For simple robots, it is written using the C programming language. It is a set of functions that call each other to complete.
When writing commands, you should take into account that according to the instructions, the robot has 2 sensors. If one of the phototransistors receives light from an infrared diode, the mechanism begins to move backward, moving away from the obstacle. He turns around and drives forward again.
The presence of obstacles should be checked on the right and left, which is specified using commands. The operation algorithm can be improved by specifying the command line what to do if there is a threat of a direct collision.
An encoder that recognizes the robot’s position in space will improve the finished mechanism. For further information, a display is installed that will display debugging information, distance to obstacles and other necessary information.
From matchboxes
The originality of the idea is that the robot can be a transformer. The number of boxes is not limited, everything is up to your imagination.
- Boxes, according to preference, are covered with colored paper
- The parts are connected to each other with paper clips or, for reliability, with glue.
DIY robot craft is an entertaining and creative activity for children of all ages.
Robot made from caps
A robot made from plastic caps would be quite interesting. Thanks to the elastic band that holds all the elements together, his arms and legs will move. We offer a detailed master class on making a transformer from 22 caps:
- For each leg you will need 4 caps. In the first two we make a hole with a hot awl in the middle, in the third - in the bottom, but closer to the edge, and in the fourth we make two holes at once - in the center and on the side.
- We thread a needle into the elastic on one side and tighten a tight knot on the other.
- We thread two covers with a central hole, then there is a cover with a shifted center and a cover with a hole in the side. We tie the elastic band into a knot.
- Using the same scheme, we assemble the second leg.
- To make a hand, we make holes in the center of three lids, and on the side in the fourth.
- First, we pull the needle and elastic into the lid with the side hole, then alternately with the central ones. Tighten the elastic band onto the knot.
- For the head we will need one lid and one cap from a toothpaste tube. For the body - five caps. In two of them we make holes in the center, in the other two - two symmetrical holes on the sides, and in the fifth - three holes in the center and on the sides.
- We tighten the head cap, the toothpaste cap and the cap with three holes with an elastic band. They are followed by a cap with two holes and a cap with one hole. We thread the two remaining caps - the shoulders - with an elastic band into the side holes on the body.
- We make one side hole in the outer lids of the hands. We pass the elastic through it, then through the shoulder and the lid with three holes. Next is the second shoulder cover and the outermost cover of the second arm.
- We pass an elastic band through the side hole in the leg, then it passes through the side holes of the lower lid of the body, through the side hole in the second leg and is pulled together.
In principle, our transforming robot is ready. All that remains is to add his eyes. You can make holes in the head cap, an applique, or attach them from plasticine. The robot will need a grenade launcher. A ballpoint pen cap is perfect for this. It can be attached to your arm, placed behind your back or placed on your shoulder.
Photo diy robot
0
2
Operating procedure
- Combine three bottles together by taping them together.
- Then take three more bottles and fasten them in the same way. Combine these blanks together and you get a square-shaped robot body.
- Now make the head - for this you will need a bottle cut in half.
- Take the bottom part. Glue it to the main structure using a glue gun or tape.
- It’s time to make the robot’s legs; how stable the craft will be will depend on them. One leg is two plastic bottles held together with tape.
- Use a glue gun or tape to attach the legs to the robot.
- To make a hand, take a fragment of a bottle and cut the hand from a piece of plastic.
- Roll another piece of plastic, a larger one, into a tube and secure with tape. Attach the arms to the robot also using tape or glue.
- Move on to decorating the craft. Bottle caps can serve as the robot's eyes. You can draw the mouth with markers.
You can add other details, it all depends on your imagination.
Instructions for assembling a robot car
In this article we will tell you how to assemble a universal robot on a wheeled or tracked platform step by step. It will be controlled by an Arduino nano microcontroller. If you don’t like to read for a long time, look at the video at the end of the article prepared by our partners - the ArduMast Club channel.
An example of a robot machine platform on Arduino
We offer instructions on how to create a universal platform, which will then be useful for creating a wide variety of projects, regardless of the selected controller or chassis type. You can use standard options from Aliexpress, as in the video, you can equip the car with tracks and create an all-terrain vehicle, or you can come up with an option that is completely unlike anything else. The main thing is that the number of motors does not exceed 4 and that they are not too powerful (then you will have to change the type of motor control - another motor driver).
Robot on Arduino
To implement the project we will need:
- Arduino controller (in our case, Arduino Nano).
- L298N motor driver.
- Motors with gearboxes.
- Housing and chassis for mounting wheels and equipment
- Case for 18650 batteries with switch.
- Connection wires.
Additional equipment that will be required to create a full-fledged project:
- Distance sensor and servo motor on which it is installed.
- Infrared line sensors.
- LEDs for display and “beauty”.
- Piezodynamic - tweeter.
- Bluetooth module (if you plan to control the machine remotely).
- Sensor shield (simplifies switching).
- Battery charging and recharging module.
- The batteries themselves.
General diagram of the Arduino machine
Robot car power supply circuit
The issue of organizing a proper, stable power supply is one of the most important in any project. Our model uses our recommended power supply circuit, based on the use of 18650 lithium-ion batteries and a board protecting them from overdischarge and overcharge.
Let's look at the simplest version of the electric motor power supply circuit. Before starting assembly, it is better to solder the wires to the motors in advance.
Power supply and connection diagram for motors in an Arduino car
Everything is quite standard and you will find dozens of similar examples on the Internet. But this scheme has a big disadvantage - if the batteries are completely discharged, they will become unusable.
Arduino machine
To add a discharge controller, you will have to make the following changes to the circuit:
Power circuit with battery discharge monitoring
Now the batteries will be protected, but there is no way to charge them here.
Powering the Arduino Robot
For charging, you can use a module to increase the voltage from 5v to the required charging level, which depends on the number of series of batteries used. It has a micro USB type socket and with frequent use it can break, so we recommend installing an additional socket for subsequent recharging with a five-volt power supply. To charge two lithium-ion batteries, you need to set the output voltage to 8.4 Volts.
Power supply circuit with charging module for Arduino robot machine
Connecting the motors and board
We've figured out the power supply for the platform, now let's connect the remaining components. First, we solder the wires to the motors, then wrap them with electrical tape so as not to accidentally tear off the contacts in the future. You can make it so that in the end only two wires will go to 2 motors instead of 4. This will make installation a little easier and save space on the platform.
We mount the motor driver on the platform so that its radiator is in front. IT IS IMPORTANT! Otherwise, you will have to rewrite the program for the microcontroller.
Motor driver for Arduino robot
Then we place the holder and the BMS board. Don’t forget to leave space in front for later installation of any sensors. The Arduio needs to be placed in such a way that it will be possible to connect it to the PC for firmware later. The same rule applies to the battery charging module.
We will take power for the Arduino and other electronic components from the motor driver.
Connect Bluetooth to the machine
We are going to use the Bluetooth module via SoftwareSerial (SoftwareSerial.h library), so we connect the Bluetooth module to the 3rd and 4th digital pins of the Arduino. RX to D3, TX to D4
Connection diagram for Bluetooth to Arduino machine Connecting Bluetooth
Connection diagram of the motor driver to the robot
Connection diagram of components to Arduino Machine distance sensor
The robot platform is ready! Now all that remains is to download the firmware for the Arduino controller and the program for the RC CAR smartphone. You can look at our website for a review of Android applications for working with Arduino.
Where to buy platform and spare parts
Everything discussed in this article can be purchased without any problems on a well-known website. Unfortunately, the vast majority of proposals are based on a standard 4WD car platform with two supporting bars, not very reliable engines and wheels that like to roll around. But these options are relatively inexpensive and are quite suitable for getting started.
Arduino 4WD platform with motors, wheels and frame without electronic components
4WD platform for Arduino with an unusual type of fastening of elements
Designer of an Arduino car on a 4WD platform with a Bluetooth and PS2 control panel
Typical set of 4WD cars with Arduino, shields and main sensors
From tin cans
A craft robot is always a welcome toy for children. You can make several different figures. Carbonated drink containers make an excellent preparation. Any robot can be made from such a jar.
An interesting option would be to create a figurine in the form of an insect. This fantastic character will take its rightful place in the fidget's toy collection.
If you add a small motor to the craft, it will be able to move. Such a product is beyond the power of a child; the help of a father or grandfather will be required.
Home robot spy
Recently, you can find many different devices that allow you to study the area through a remotely controlled video camera.
You are already familiar with flying quadcopters with a camera on board, which online (when installing the necessary module) transmit an image to the operator’s laptop, and today we will look at a small riding robot spy designed to protect premises.
The delivery set contains a charger station, an AC adapter, batteries, cords and cables, as well as the robot itself.
This robot moves with the help of 3 wheels, and it can do this in any direction, since special roller wheels are used that rotate both around and along the axis. Now such wheels are used in modern warehouses - on electric forklifts.
This device is not just a toy, but also a useful thing.
The spy robot can be used to remotely monitor a room located anywhere in the world, controlling its movement and performing video, audio and photo shooting via the Internet using a wireless Wi-Fi connection with the robot. Naturally, video can be recorded as a video file. The robot is controlled via a computer using a special program.
A home robot spy can move in all directions, change the camera's height, turn on the backlight, make sounds, and turn on special modes (for example, take a photo when a motion sensor is triggered). The robot is charged automatically or by remote command via Wi-Fi, from a special station that projects infrared marks onto the ceiling, by which the robot finds the charging station.
It can patrol your home using predefined routes that you configure with user-friendly software based on a simple interface.
This model uses Northstar technology - a system that creates micro-GPS navigation in your home, allowing the spy robot to know the structure of your home with millimeter accuracy. Even if a child or pet knocks it off course, the robot will immediately understand this and return to its original route.
You can give it a route along which it should patrol and quietly go about its business - the robot will monitor your home, periodically approaching the charger to replenish energy. Docking with contacts occurs automatically.