Toothpicks are the cheapest and most multifunctional material. They are used in cooking, in serving people, in everyday life and, of course, in handicrafts.
The complexity of DIY toothpick crafts varies from the simplest for children to very complex delicate works. Toothpicks are found both in hedgehog crafts and in manual settings of castles and houses.
Children's crafts
Working with toothpicks is a great fine motor practice at any age. And for kids, this is also a wonderful exercise for developing associative thinking. Of course, it is worth taking care of the safety of little artists, because careless manipulations with toothpicks, which have very sharp ends, can be dangerous.
When choosing crafts made from toothpicks as a creative debut for children, pay attention to the first way of working with them, which involves sticking pointed sticks into a three-dimensional base. In this capacity, you can use figures made of foam plastic, plasticine, clay or salt dough, natural material (nuts, pods, cones, etc.) and even fresh vegetables, fruits and berries.
Flags on a wooden skewer
Glue a piece of paper or fabric onto a toothpick, paint it in the desired color, and apply inscriptions. Small drawings can be printed on a printer in advance, and then cut out the desired colored flags.
This craft can be used:
- as advertising;
- shares on a sandwich.
Advertising inscriptions and drawings will attract attention. They can be used as price tag indicators.
We recommend reading:
Wood crafts - the best craft options, instructions for beginners and ideas for making wooden crafts (85 photos)- Fabric crafts - the best ideas and the most practical crafts and toys made from various types of fabrics
Sponge crafts: tips for choosing ideas and unusual ways to use sponges (75 photos and videos)
Plasticine base
When talking about plasticine base, as a rule, we mean all types of plastic masses - ordinary or polymer clay, salt dough, etc. Of course, it should be noted that figures made with toothpicks should not be exposed to very high temperatures, which means that the clay product cannot be fired. And products made from polymer, self-hardening clay and salt dough can be painted after complete drying.
Organizing work on crafts made from plasticine and toothpicks for the little ones is, first of all, the responsibility of an adult, parent or teacher. Carefully consider the sequence of actions and prepare the required amount of material. You need to take more toothpicks than you need for the craft, since naughty little fingers can drop this small stick, and you shouldn’t interrupt the creative process with a long search for the part.
The basis of such a craft is, as a rule, the torso. Take a piece of plasticine of the desired color, knead it well and give it the appropriate shape:
- round - for hedgehog fish, octopus, satellite, sun or star
- elongated, drop-shaped - for a hedgehog, peacock, dinosaur or dragon
Outline a muzzle or face, but do not do so, so as not to smear it in the process of sticking toothpicks: for now this is just a guide.
Decorate the craft with toothpicks. If they serve as sun rays or a peacock's tail, arrange them in a circle or semicircle in the same plane. Toothpicks are stuck along the back or around the head if they are making a dinosaur or a dragon. The satellite and the octopus will have from 3 to 8 sticks placed on one side. The surface of the starfish, hedgehog fish or forest hedgehog will be studded with them quite densely: toothpicks or their fragments can cover them quite densely over the entire area.
Next, you can begin to design the face and other elements - wings, paws, ears, etc. Toothpicks can also be further decorated, for example, by sticking small multi-colored plasticine balls on the peacock’s tail.
This type of crafts also includes 3D models - volumetric and semi-volume figures, the parts of which are held together using small plasticine balls. In this way, you can make a person or an animal, or build a house, a rocket, or create an original polyhedron - a pyramid, cube, dodecahedron (dodecahedron), etc.
LiveInternetLiveInternet
- Registration
- Entrance
–Rating keys “Yandex.blogs”
- To the application
–Tags
-Always at hand
- To the application
–Categories
- Handicrafts (1521)
- Knitting (434)
- Crochet (327)
- Sewing (326)
- Handmade other (280)
- I have an idea! (84)
- New life for things (75)
- Decoupage (39)
- Weaving, macrame, knot techniques (33)
- cross stitch (26)
- Beading (10)
- Patchwork (9)
- Quilling (7)
- Satin embroidery (5)
- Scrapbooking (3)
- Marbling (3)
- Thoughts about beauty (418)
- Fascinating (369)
- Thoughts about home (275)
- Home interior (82)
- Home renovation (33)
- Thoughts on cooking (260)
- Baking (80)
- 2nd courses (49)
- Desserts (45)
- Snacks (25)
- Salads (22)
- Drinks (16)
- First courses (3)
- Thoughts about health (227)
- Thoughts about children (156)
- Thoughts on fashion (153)
- Lyrics (135)
- Personal thoughts (98)
- Other (tests and sundry) (64)
- Travel thoughts (45)
- Plants – garden and vegetable garden (40)
- Thoughts about animals (8)
- Music (8)
-Video
- All (67)
-Music
- All (2)
–Search by diary
–Subscription by e-mail
-Statistics
Foam base
This option is also good as a toothpick craft for beginners. The easiest ideas to implement here are stars, snowflakes and a Christmas tree. The basis for the first and second crafts will be a foam ball, and for the third - a cone.
To consolidate the color, the base must first be painted with gouache or acrylic paints. The toothpicks themselves are painted the same color: for a snowflake - white, for a star - gold or silver, for a Christmas tree - green, blue-white or silver.
An adult craftsman can use aerosol paint by spraying it onto the finished product. But it is better for children under a certain age not to have anything to do with this substance due to its toxicity.
When making a snowflake or star, toothpicks are stuck across the entire surface of the foam ball. The snowflake can be further decorated by pinning small pieces of foam, plasticine or foil on the upper ends of the toothpicks. Ready-made crafts will be a wonderful decoration for the New Year's interior: they can be hung on a Christmas tree, on a chandelier, or hung from the ceiling.
In the same way, you can make a dandelion or an aster, imitate the umbrella of a blooming or dried hogweed - such art objects also fit perfectly into the design of the premises.
When working on a Christmas tree, toothpicks need to be stuck in rows, in a circle, gradually reducing their size. If this is a New Year's toy, you need to insert one toothpick vertically into the top of the cone - it will serve as the basis for attaching decorations (stars, icicles, etc.).
Complex intricate shapes
The limit of fantasies and ideas is unlimited. There are many crafts that are made by professionals and are a hobby for adults and children. Such crafts require a lot of perseverance, time, effort and desire.
They use a lot of material and complex engineering calculations. These include: ships, boats, castles, mosques, palaces, bridges, equipment and much more. Before you start creating something like this, you need to be patient and have a great desire. Such crafts can be used as gifts and home decorations.
Natural materials
Numerous photos of crafts made from toothpicks clearly demonstrate the ardent love of craftsmen of various levels for elements made from natural materials. Getting to know them begins in kindergarten. There they will tell and show how to make a funny figure of a person or animal from nuts, cones, acorns and shells using toothpicks.
So, using the chestnut fruit as a basis, you can make a cheerful spider.
- Flatten a small plasticine ball and fix the chestnut on it.
- Insert 8 toothpick halves at an angle into the plasticine base - 4 on each side - so that they are adjacent to the fruit.
- Attach another 8 halves of toothpicks to the already secured 8 using small plasticine balls, also at an angle, but in the opposite direction.
- Roll up a small ball-head, attach it to the craft, and decorate it with eyes made from plasticine or small seeds.
What parts are needed?
Naturally, you can only use toothpicks, threads and cardboard, but if you want to further decorate the box and get the highest quality product, then in addition you will need to take:
- heat gun;
- colored paper;
- PVA glue;
- decorative scenery.
For decoration, options such as sparkles, beads and almost everything else can be used.
Table decoration
Having mastered working with toothpicks and natural materials, it is easy to make a hedgehog from an onion, a lion from new potatoes, and a porcupine from beets. The next step using this technology could be the design of holiday dishes.
- An original addition to an exotic fruit salad will be berry canapés in the shape of funny ostriches.
- But charming pear hedgehogs carry ripe grapes or strawberries on their needles
- Here, cheese boats raise ham sails over toothpick masts.
Creating delicious crafts from toothpicks and various products is so exciting that ideas will not keep you waiting long, and the holiday table will surprise you every time with an unusual design solution, adding fun and joy to the celebration.
Massive complex products
Only diligent people undertake such crafts. The range of difficulties includes:
- At home;
- Locks;
- Layouts of cities;
- Stationery;
- Equipment models.
As a rule, this is done by real masters who are not afraid of complex and long work. They love what they do. And their works, if they are original, are often expensive.
For those who are just getting into it, it’s worth trying small architectural buildings, like a 5 by 5 cm house with detailed instructions for making. After this experience, it becomes immediately clear whether a person wants to do this.
Toothpicks are a simple solution to complex problems. Use your imagination to find simple solutions in new ways.
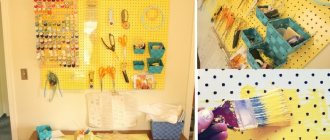
For home, for family
You can make crafts from toothpicks with your own hands that are not only decorative, but also useful, using both the first and second methods. That is, both by sticking into a volumetric or flat base, and by gluing to the selected surface.
So, when making a charming box, toothpicks are stuck into the cardboard bottom of the chosen shape (circle, square, diamond, heart, etc.) and fixed with glue for strength. Then they are braided with threads, twine, braid or ribbons, the ends of which are also fixed with glue. The design can be complemented with beads, which are strung on toothpicks and braided with the main material. The edges of the finished product are decorated with lace or openwork braid.
Another option for decorating the box involves lining a box made of durable cardboard with toothpicks. In the same way, you can make a photo frame, decorate a sketchbook, notepad, or family photo album. Cover a tin or glass jar with toothpicks and you will have a container for bulk products. Using toothpicks pre-painted with paint or stain or parts of them of different lengths, placing them at different angles, you can lay out a real patterned mosaic. Such beauty is pleasant in any home!
Photo frame, wall frame
To make a photo frame you will need: toothpicks, fabric, glue, and any decorative finishing elements. We need to decide what we want to decorate. Cut out a frame from paper or cardboard.
Cut the base a little larger, taking into account the fact that we will stick toothpicks on the base. Having glued the toothpicks to the frame, we cut off the excess ones, glue beads, shells, buttons onto the resulting base, and cover it with fabric and sea pebbles. The resulting frame can be wrapped with multi-colored yarn threads.
The pinnacle of excellence
It is quite logical to believe that complex structures made from toothpicks are direct descendants of matchbox houses, towers and palaces, which enjoyed fabulous popularity in the 80s of the last century. However, the technique for working with toothpicks is still different, in particular due to the fact that the matches are thicker and have a square cross-section.
At the initial stage of mastering “toothpick architecture,” you can use the second method of making crafts from toothpicks: cut out elements from thick but thin cardboard, paste them with toothpicks, trim off their sharp ends, and then assemble and glue the finished structure. The third method - gluing toothpicks together - is more complex and requires maximum concentration and precision of movements.
To understand how to make a craft from toothpicks, you need to carefully study the step-by-step instructions, examine the finished model from all angles, make drawings, calculate all the dimensions, and stock up on a large amount of material and glue that ensures instant gluing.
Current model
The product can serve as a toy if it is equipped with movable parts: the swing will swing on chains, the carousel will rotate, and the well will be equipped with a movable rotator.
- When making a well, toothpicks with cut ends are glued together in the form of a square so that one end of each of them protrudes 2 - 3 mm.
- The next layer is made in the same way, gluing prepared toothpicks to the previous layer, leaving small protrusions in those places where there was an even joint. You can first make all the square modules and then glue them together sequentially.
- Having folded the base in this way, make supports for the brace by gluing together 3 cut toothpicks in a row (the toothpick located in the middle should be shorter than the others). Glue the supports to the opposite walls of the well.
- The brace is made from a toothpick, slightly trimmed at one end. A broken L-shaped toothpick (fix the break with glue!) is glued to the cut side at a right angle. A thread is fixed next to the sharp end, on which a decorative bucket will then be hung. The thread is wound tightly around the toothpick. The rotor is placed on supports.
- To make the roof of the well, glue 2 triangles from cut toothpicks and glue them to the supports from the inside. Cover the roof slopes with toothpicks, fitting them tightly together.
Buildings and structures
It is almost impossible to make a house in this way without a drawing: the slightest mistake will lead to a violation of the geometry and the inability to assemble the structure correctly.
- After drawing a drawing on a sheet of paper, place toothpicks on top of it and carefully glue them together. Do not let glue get on the paper! Trim the resulting wooden wall with scissors or a stationery knife, cutting off the sharp ends.
- Glue the other walls in the same way. To make a doorway, carefully break or cut off the part of the wall where you want to cut the door along the glue line. Cut in the center, across the section, a segment equal to the width of the door. Glue narrowed sections along the edges of the entire upper part of the wall, forming a doorway.
- Window openings are made in the same way, but in this case the wall canvas is divided into 3 parts, and a window is formed in the central one, and then all parts are glued together again.
- Glue the walls. Form the joints by gluing vertical posts made from cut toothpicks.
- You can also use toothpicks to decorate a doorway, or to form frames in windows.
- The roof is glued using the same method.
- The house can be decorated by adding a veranda, balcony and other decorative elements.
More complex, openwork designs are often made by assembling them from numerous modules. In this way you can create fairytale castles, ships, birds and amazing fantastic creatures. Go for it! Make your wildest dreams come true!
Foundation for any house
To ensure that a house made of wooden sticks holds its shape well, you can first create a base from corrugated cardboard. They do it according to the drawn diagram, drawing one by one all the walls of the building in order. At the end you need to leave a small strip for gluing the parts together.
Then fold the cardboard along the lines and connect the first and last parts of the walls together. For the roof, a long rectangle is measured with a ruler and cut along the contours. All that remains is to fold the workpiece in half and install it using a glue gun on the wall supports from above. If holes are needed for additional parts - doors and windows, then cut them with scissors before assembling the cardboard base. All that remains is to cover the future house made of wooden sticks with natural material and place it on a reliable foundation.
Photos of crafts made from toothpicks
Master class on making a box
To create an attractive heart-shaped box, you will need the following tools and materials:
- heart cut out of cardboard;
- threads for knitting, acrylic can be red, scarlet or pink;
- toothpicks;
- needle or awl;
- glue;
- scissors;
- rhinestones, beads, maybe lace.
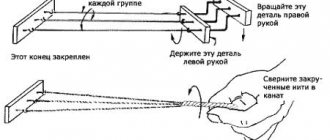
First you need to make two blanks from cardboard - the bottom and the lid of the box. In the prepared cardboard heart, make holes with an awl or a thick needle at the same distance along the entire contour. Lubricate the toothpicks with glue and place them in the prepared holes, wait until they “set.”
When the frame of the box is ready, wrap the outline, alternating toothpicks through one, with knitting threads. At the selected height, place one bead on each toothpick and continue winding.
The number of beads depends solely on the height of the sides of the box and the imagination of the craftsman. The beads hold the threads well, so you can line them up at the bottom as the base of the bottom, then in the middle and at the end as the finishing touch.
The decoration of the box itself and the lid depends on the taste and preference of the author. The lid should be covered with toothpicks of different lengths along the contour, and the bottom of the box should be decorated with paper to match the color of the threads. Thus, you can create a useful item for yourself or an unforgettable gift for a loved one.
Hobbies and health
Modeling made from wooden toothpicks has a beneficial effect on the body of both children and adults. Psychologists have long known that creativity with one’s hands frees a person’s mind from worries, lifts them out of depression, and sets them up for a wave of calm and positivity.
To see how gradually a model of a building, an airplane is formed from numerous toothpicks, a painting of a great master or a toy for a child emerges means that you have a beneficial influence on your own consciousness, reveal your creative potential and improve your health, regardless of the age of the creator.