If you need a small gift or just want to create, make your own mushroom from salt dough using our master class.
A flat one-sided craft is much simpler than a voluminous one, and it will take less time to dry. If you prepare a few fun souvenirs in advance, you will always have useful and beautiful gifts in stock. Just don’t spare your imagination - add your own little twist to each one. You can take ready-made material, for example, hardening mass for modeling or polymer clay.
- Preparation of materials for modeling and decoration
- Step-by-step manufacturing technique
History of the art of making dough products
Even in Rus', when the New Year was celebrated on September 1, and at the same time weddings were celebrated, it was customary to give figurines made of salt dough. It was believed that any craft made from salt dough found in the house is a symbol of wealth and prosperity in the family. The plastic properties of salt dough have long been known. Our great-grandmothers sculpted from it figurines of various birds and animals, the so-called “larks” with whom they welcomed spring, bagels, gingerbread “roes”, which they presented to their friends and relatives on New Year and Christmas, on their birthdays as a sign of love and respect . Dough products were used as children's toys.
But before they turned into children's toys, dough figurines had ritual significance. Rituals associated with grain and bread, traditional for the peoples of Russia, Ukraine, Belarus, Poland, Bulgaria, and the Czech Republic, have long been known. In accordance with these rituals in the spring, before the arrival of the birds, shaped dough products were baked, most often in the form of a stylized bird. The figures were called “larks”.
In Ukraine, such dough products were made not only for spring rituals, but also for winter holidays, as well as weddings. The figurines were given along with wishes for health, prosperity, wealth and good luck.
The art of making dough products is not dead today, and handmade souvenirs are in great demand. This is a wonderful gift for any celebration and holiday. Both children and adults enjoy modeling.
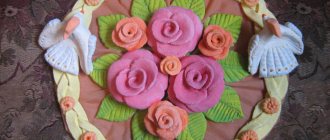
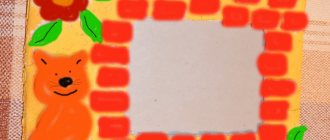
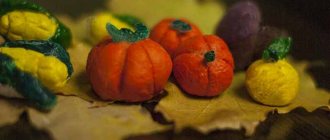
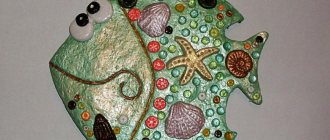
From salt dough you can make simple figures and products, such as leaves, mushrooms, apples, and quite complex options - trees, figures of animals and people, as well as various multifaceted compositions.
DIY felt refrigerator magnets
Felt can be purchased today at office supply stores or fabric stores. This material is convenient because its edges do not fray.
Soft toys are made from felt, but they are stuffed with little cotton wool. This toy looks almost flat. You can sew anything: little animals, a Christmas tree, Santa Claus and Snow Maiden, fruits, vegetables.
From a piece of felt you need to cut out two identical parts, for example: two torsos, four arms, four legs.
Connect identical parts with a seam over the edge, and when there is about a centimeter left before connecting with the beginning of the seam, fill the space between the parts with cotton wool, but not tightly. Finish the seam.
Note!
How to make wooden shelves with your own hands - original design options
Kinusaiga technique for beginners: what is it, a description of creating paintings from threads
How to weave a figurine from rubber bands: how to learn to weave animals, toys and what you can make from rubber bands on a slingshot
If the figure is assembled, connect all the parts together. If necessary, you can stick on a felt applique of a different color, for example, eyes, greens for vegetables and fruits, etc.
The magnet itself can be glued to the outside or placed inside the toy. Only for this you need to take a more powerful one.Products and tools for making salt dough crafts
Flour
Flour is a natural product, and its quality can vary depending on the degree of grinding of the grain, and even on the weather conditions under which the grain ripened. For salted dough, inexpensive varieties of flour that have not been subjected to special processing and without additives, emulsifiers and leavening agents are best suited. After all, the presence of vitamins and microelements in flour is not important for modeling. Wheat flour is best suited for making salt dough. But in dough made from rye flour, more pores are formed, it is more difficult to dry, and it is harder when molded. Different types of flour can be mixed, for example wheat and rye flour.
Salt
Salt is added to the dough solely to protect against mice and harmful insects. Therefore, in essence, a large amount of it is not required. Too much salt can make the dough brittle and brittle after drying, which leads to the formation of cracks in the product. You can use any salt, even the cheapest one. Coarse salt is easy to grind in a coffee grinder.
It should be noted right away that to work with salt dough you need a certain temperature regime in the room. The optimal air temperature is 20°C. If the temperature is higher, the dough dries out quickly, making it difficult to process and join the parts.
For the test:
- Flour - 2 parts,
- “Extra” salt - 2 parts,
- water (necessarily cold) - 1 part,
- plastic bag for storing dough
To work with the test we will need:
- a jar of water to wet your fingers and brushes,
- stacks or plastic knife,
- modeling board or baking sheet,
- rolling pin for rolling out dough,
- brushes,
- paints,
- toothpicks,
- nail scissors and scissors with rounded ends.
DIY topiary magnet for the refrigerator
Topiary is a small artificial tree placed in a flower pot. Its crown is made from artificial flowers, coffee beans, beads, seed beads, multi-colored stones, bows, buttons, and candies. All this is glued to a ball cut out of a floral sponge.
The topiary magnet will be only half voluminous, but no less charming.
You can use cardboard as a base. From it you need to cut out the silhouette of a tree in a pot with a round crown. The size can be arbitrary, but you need to understand that it will be more difficult to work with very small parts.
The topiary “pot” can be covered with corrugated paper or corrugated cardboard. The “trunk” of the tree will look natural if you wrap it with twine. Well, to decorate the crown I will use the same elements as for a real topiary.
To add volume to the crown, you can stick several circles on the main silhouette, so that each of the subsequent ones is slightly smaller in diameter than the previous one. The result is a convex hemisphere.
Note!
How to properly make a birdhouse with your own hands from scrap materials: we create an original birdhouse according to sketches
How to make candles with your own hands: instructions for making wax, gel, scented, homemade decorative candles with a wick
What you can make from foamiran with your own hands: we create flowers, Christmas tree decorations, snowflakes, three-dimensional paintings (photo + video)
As an option, you can stick twisted yarn, the ends of cotton swabs, or a piece of fur in place of the crown. It is convenient to attach the magnet itself and all the elements to the base with warm glue.
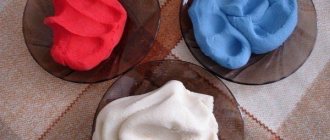
Recipe and preparation of salt dough
Mix 1 cup flour and 1 cup salt. Then pour in 125 ml of water (the volume is approximate, since the amount of water may depend on the type of flour we used for the dough). Stir this mass again with a spoon, and then knead with your hands until a homogeneous consistency. Water can be replaced with jelly made from potato starch (dissolve 1 tablespoon of starch in 1/2 cup of cold water. Then pour another 1 cup of boiled water into this liquid, stirring. When the jelly thickens and becomes transparent, remove from heat. You have a paste ). The dough will only benefit from such a replacement - it becomes more plastic.
If the dough turns out to be too soft, knead it with a small amount of additional flour and salt mixture. The salt dough should be dense.
Place the salted dough in the refrigerator in a plastic bag for 2-3 hours. You can simply store it there for future use.
Making crafts
It's best to sculpt on a baking sheet or board - this is a good place to dry. The drying itself is carried out at a temperature of 80ºC in the oven for an hour, or on a radiator (in winter). The drying time depends on the thickness of the figurine.
If we need colored salt dough, then it can be colored either at the kneading stage, using food coloring or gouache; or paint the finished product after complete drying.
Surface treatment of salt dough products
Glazing of products with salt solution and browning.
When the product is dry, it can be glazed. Glaze the product for an hour.
Since the “salt glaze” is formed by salt crystals, products treated in this way do not need to be varnished.
Color
White color.
The product will remain white after air drying or oven drying if the firing temperature does not exceed 125°C.
Brown color.
During the last hour of drying at a temperature of 150°C, brush the products with beetroot syrup diluted with water.
Coloring and varnishing salt dough products
Coloring.
Finished products can be painted in whole or in part. However, if you need to completely paint the product, it is recommended to use acrylic paints. After drying, they do not stain your hands or smear. You can also use watercolor paints for coloring. Works painted in this way must be secured with varnish. Gouache paints can also be used for coloring. In this case, you should add a little PVA glue to the gouache. To color the finished kneaded salted dough made from wheat flour, you need to add food coloring to it drop by drop. If the product is monochromatic, paint can be added when kneading the dough, and if the product should be multi-colored, then the finished, kneaded dough should be divided into parts according to the number of colors.
Varnishing.
To prevent paints from fading or drops of water accidentally falling on the surface of the product from spoiling the work, the figures are varnished.
Drying salt dough crafts
Drying
- a very important stage in the manufacture of salt dough products.
Outdoors at room temperature.
You can dry the craft outdoors in a dry place. The thicker the product, the longer it will take. But this method is the most economical.
Drying time in an electric stove oven: 1 hour - at t 50°C, 1-2 hours - at t 75°C, 1 hour - at t 100-125°C, 0.5 hour - at t 150°C. Larger pieces will require more time to dry.
Note. The black baking tray heats up more, and at all stages of drying the temperature is reduced by 25°C.
After we have dried the salt dough figures in the oven, we need to cool them. If a slight bulge appears on the product or the product bulges slightly, the temperature in the oven is too high, in which case cracks may form on the back of the product.
Swollen crafts cannot be fixed, and cracks are easy to cover up. To do this, dilute a little flour with water, add PVA glue, mix well and apply this mixture to the crack, then rub the mixture into it with a glass or your finger.
The product should not remain damp. Its readiness is determined by its sound. By tapping the finished product with a finger, we will hear a ringing sound. If the sound is dull, the product needs to be dried.
For large items, you can use combined drying: first for several days in the air, then in the oven.
Browning
After we have made sure that all the products in the oven are completely dried, the temperature in it can be increased to 200°C.
CHAPTER
II SEARCH FOR AN OPTIMAL SOLUTION
Bank of ideas and suggestions
Option No. 1 Kittens on the refrigerator
(see Appendix 2 Fig. 1)
The work is labor-intensive, as many small details of the kittens must be carefully completed.
Option No. 2 Composition “Hedgehogs”
(see Appendix 2 Fig. 2)
Even more painstaking work, since there are a lot of needles to make. The work takes a lot of time. There is nowhere to put it in the interior of my room, since the room is small.
Option No. 3 Panel “Butterfly”
(see Appendix 2 Fig. 3)
For such a panel you need a very beautiful frame. Working on the panel requires perseverance and accuracy, because the butterfly must be symmetrical.
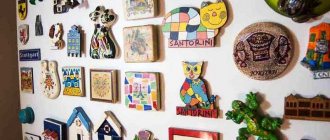
Option No. 4 Fridge magnets
(see Appendix 2 Fig. 4)
Anyone who knows how to sculpt can make such figures. I love to sculpt, this is work for me.
Design analysis
After researching all the options listed, I decided to make refrigerator magnets. Since this is my first time working with salt dough, I need to start with a not very difficult job so that everything turns out beautifully and neatly. This will increase interest in further work with salt dough. There is a place for my magnets on the refrigerator.
CHAPTER
III TECHNOLOGICAL STAGE
Project execution sequence
1. Take 200 g of flour, 200 g of salt, about a glass of water.
2. Pour salt into a wide bowl, add water, then flour. Mix everything well. You can mix salt and flour well, gradually add cold water, mix until smooth. The prepared dough should not stick to your hands or crumble. To prevent the salted dough from tearing and crumbling during modeling, it must be kneaded and kneaded well until it becomes elastic.
The dough should be elastic and quite stiff. Place the dough in a plastic bag to prevent it from drying out for 2-3 hours.
3. We make a fish, a bird, a rooster from the dough.
4. Dry the craft for two days, first in the open air, then in the oven at a temperature of 50°C, gradually increasing the temperature, but not higher than 150°C. If the temperature is too high, the product may swell, sometimes even cracks appear. Swollen crafts cannot be fixed, and cracks can easily be covered with dough
Volumetric hedgehog toy
Three-dimensional toys are used as creative work for older children. Before starting classes, you should prepare a standard set of materials and tools, as well as a plastic backing as a base. Master class on creating crafts from salt dough:
- The working mass is mixed in a container. The dough should be kneaded thoroughly so that the mass acquires sufficient elasticity and no air bubbles remain.
- On the prepared base, a central part is sculpted, which should have the shape of a drop.
- To obtain black eyes and nose, you can use pre-colored dough or large beads.
Hedgehog needles are made using nail scissors. The blades of the scissors are inserted into the dough, an incision is made and the layer is slightly lifted upward until needles are obtained. By analogy, several consecutive rows are formed. The next step is to dry the product at low temperatures.
After the dough has hardened, you can begin to apply paint and open the hedgehog with acrylic varnish. Separately, the master can make a couple of apples or a mushroom, which is placed on the back of the toy.