In the last weeks of December, more and more people begin to prepare for a good and cheerful holiday. Someone comes up with unusual decorations for the Christmas tree, someone invents recipes for New Year's salads, and someone gets serious about decorating their apartment. If you want to please and surprise your loved ones, then start making original crafts right now. Today we will tell you how to make a salt dough house with your own hands and decorate it in the style of the upcoming holiday.
Hedgehog
A hedgehog is considered a simple three-dimensional toy that you can instruct a child to make on his own when moving from flat figures to three-dimensional ones. The sequence of actions is as follows:
- Prepare foil and roll it into a ball;
- Roll a ball of salted mass on top of the wad of foil and give it the shape of a pear;
- For the eyes and nose, use black pepper grains;
- Using nail scissors, give the upper body a jagged texture (an adult helps with this part of the work);
- After the hedgehog has dressed in a coat of needles, you can send it to dry;
- Color it.
Foil is placed inside the hedgehog's body so that it dries faster and is lighter. Instead of black peppercorns, small balls of dough, painted black after drying, are suitable. The beautiful hedgehog is ready.
How to make a basket of apples from salt dough
Shot: Jodee Luna / YouTube
This craft does not need to be covered in bright colors. Decorate your kitchen with it.
What you will need
- Salty dough;
- clip;
- knife;
- glass of water;
- brush;
- apple cuttings;
- rolling pin
How to do
Make a flat trapezoid with rounded corners from the salt dough. This is the base of the basket. Use a knife to make horizontal notches on it. This will show the texture of the woven material.
Shot: Jodee Luna / YouTube
Roll the material into a long thin sausage, then fold it in half and twist. Brush the base of the basket with water using a brush. Secure the part in a damp place. Cut off the excess.
Shot: Jodee Luna / YouTube
Make another sausage. It should be several times larger than the previous one. Fold in half and twist. Fix the workpiece with an arc at the top of the craft. This is a pen.
Shot: Jodee Luna / YouTube
Make seven balls. Flatten them slightly on top and bottom. Fix five pieces on the basket in two rows, placing two on the sides. Cut the cuttings from the apples. If the pieces seem too long, shorten them. Stick into the tops of the balls.
Shot: Jodee Luna / YouTube
Using a rolling pin, roll out the dough into a flat cake. Cut out six leaves from it. Make strokes on each piece with a knife to show the veins. Secure the molds under the apples. Some may overlap the fruit.
Shot: Jodee Luna / YouTube
Make many small balls. Brush the leaves with water. Arrange the parts so that you get a voluminous bunch of grapes.
Shot: Jodee Luna / YouTube
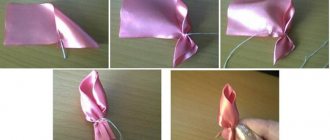
Make a small sausage and then flatten it. Carefully gather the strip into a roller. This is the base of the bud. Make several small balls and make a cake out of each. Fix these parts in rows around the roller. You will get a rose. Place it next to the grapes.
Shot: Jodee Luna / YouTube
Make another large rose and secure it on the other side of the bunch. If desired, you can also make the rollers that you made for the base of the bud. Fix them, for example, between apples.
Shot: Jodee Luna / YouTube
Small details are in the video instructions:
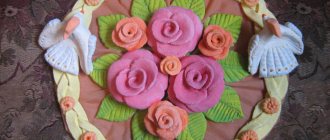
We make a panel from salted dough “Pourable apples”
Master class on creating panels from salted dough “Pourable apples”.
In a number of church holidays, revered and loved by us just like our ancestors, Apple Savior certainly takes its place at the end of August. I consider this day to be a day of illuminating everything that Mother Nature gives us in our gardens. And by right, apples are the main and separate part of this ritual.
I propose to pay tribute to recognition and admiration for this gift from the garden, to spend a little time in joyful anticipation of creating a wonderful panel with your own hands and together with your children (they love working with salt dough).
What do we need? First, find a recipe for salt dough. (There is plenty of this goodness on the Internet, choose any one. Just prepare the dough in advance, let it “reach” in the refrigerator - it will be more plastic (this is from my observations and experience).
So, knead (warm) the dough thoroughly. Lay out small pieces on a board, roll out and cut out.
By the way, I make a small “hole” at the bottom, and only then I figured out that I could insert a clove, which would also work out well.
Now let's move on to the leaves. Probably for some it will be more convenient to do it some other way, but I did this: roll out a small ball with a small flat cake,
Use a knife to shape it (direction of leaf bend).
We make “teeth” along the edge of the notch.
We remove the excess. We highlight the veins on the leaf.
The leaves should not be the same size, with different curves (in nature it is not so often that you will find 2 absolutely identical objects, Mother Nature does not make her works “carbon copies”, She is a real, unsurpassed Creator!). To make it more similar to what we have in Nature, before baking, try to give the leaf blanks additional volume, set the direction - create small “bends”.
You can dry it in the oven (this is what I did about 10 years ago, and now we have a microwave - an assistant for housewives in the kitchen and...handicrafts (Zadornov has not yet joked about its use!). Sorry, I slightly fried my parts... But still, look what happens.
Now we need to find a base on which we will glue our “apples” and “leaves”. I took a wooden cutting board (the design on it doesn’t suit me, and I want to use it differently), glued a self-adhesive film, and carefully cut off all the excess.
And now it's time for the fun part - coloring our panel! For coloring I use regular gouache.
I paint the leaf green,
I thoroughly paint the edges of the leaf (so that the dough is not visible), and when the gouache dries, I mix green, white and yellow colors, and make strokes in the middle of the leaf.
First I coat the apple blank with yellow color.
Then a few strokes of orange (slightly emphasizing the shape, adding volume).
The upper part is in red (strokes should lie on top of each other at different levels (remember Mother Nature!).
We bring the apples to “perfection” at our discretion, the indicator is your brain and stomach: as soon as the “apples” want to “eat”, they “ripe” - that’s it, the coloring was a success.
I personally always like the next stage - layout. We move, change, form our own “apple still life”. We remember the location of the parts.
Glue it with a gun. (How did we do without him before!?). All that remains is to varnish and the whole apple panel arrived, just in time for Apple Spas.
Congratulations to you! I also have this miracle apple tree holder for a tear-off calendar.
Source
Materials for making crafts
Kneading the dough is only the first stage of independent creative work. Also, to create original crafts, you need various decorating materials that need to be prepared in advance:
- Paints (you can use acrylic) and clear varnish.
- Glue.
- A sharp knife (stationery) for cutting out shapes.
- Threads, metal wire (if you plan to create New Year's toys).
- For homemade dolls you will need various accessories (eyes, yarn, clothing parts).
You can also prepare instructions in advance for making your own salt dough crafts. Such training schemes and video lessons will help inexperienced craftsmen conduct creative activities correctly.
Variety of products
In the photo of folk crafts, first of all, what catches the eye is the variety of work performed, the abundance of colors and paints, and the expression of folk culture in the products. It can be:
- Figures and paintings made of straw, clay, salt dough, wood;
- Crafts and toys made from scraps, yarn, paper;
- Models of huts, churches, Russian stoves;
- Khokhloma painting;
- Dymkovo toys.
How to dry salt dough?
There are two most common ways to dry salt dough. The first method: the finished craft will dry on its own. The main thing is that it should not be exposed to direct sunlight, otherwise it will crack. The craft can be placed on a flat surface and wait a few days. Second method: dry the finished craft in the oven for 3 to 6 hours (depending on the size of the craft). Drying occurs in batches with breaks. One approach is 1-2 hours. For quick drying in one go, set the oven to 75-100 degrees, and then the craft will dry in an hour. At a temperature of 120 degrees, the craft will dry in 30 minutes, but it is better to dry it naturally.
DIY craft
Both professionals and beginners in needlework can create a beautiful product. You just need to put in a little effort, patience and perseverance.
Crafts on a Russian-folk theme are often created from scrap materials and simple tools. If you know how to sew or knit, you can make dolls, characters from Russian folk tales, and amulets.
The basis is made:
- Made from material stuffed with cotton wool,
- Straw,
- Mattings,
- Tree.
The top is decorated with sewn and knitted clothes, hair made from threads and yarn. From leftover yarn and fabric you can sew bright patchwork rugs, blankets, and sofa cushions.
It’s easy to make a matryoshka doll or a Dymkovo toy from clay or plasticine. It is better to use polymer clay for the product. It holds its shape well and does not crack when drying. With the children, paint the finished craft with bright ornaments and cover the top with a layer of varnish.
Make three-dimensional pictures from salt dough or plasticine: scenes from Russian fairy tales, nesting dolls, fairy-tale characters. Stick the details of the painting onto a board, dry it, and paint it.
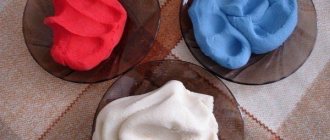
Dough coloring
Natural colored dough crafts are a bit boring. I always want to color them. In practice, two simple methods are used for this:
- color the dough;
- paint finished crafts.
Finished products are given color using acrylic paints or gouache. A regular paint brush is dipped into paint and the toy is painted over, or contour patterns are drawn on it.
Another method involves giving the modeling mass a uniform color using food coloring. Coloring agents are diluted in water, then combined with the dough during its preparation. The final stage in creating the craft will be drying and coating with transparent varnish in 2-3 layers. This will extend the life of the toy and maintain its presentable appearance.
Play dough recipes
There are many play dough recipes, below are some examples. When kneading, there is one rule: take the same amount of salt as flour, not by volume, but clearly by grams. It is recommended to use fine salt: it does not contain hard dark granules, which can cause unpleasant tactile sensations and spoil the appearance of the product.
Classic dough
The tradition of creating crafts from dough goes back a long way. During this time, many recipes have appeared, but let's start with the basics - the classic one. It differs from others in its density.
You will need:
- 200 gr. wheat flour;
- 200 gr. fine salt;
- a glass of cold water.
Sift the flour into a deep bowl, add fine salt. Add cold water as needed and mix thoroughly after each time. Mix until the resulting dough becomes elastic and elastic.
Dough with added PVA glue
When you add PVA glue to the batch, the finished craft becomes as durable as possible and you won’t be afraid to drop it in the future. This is especially true when creating toys. The dough is of medium density.
You will need:
- thick PVA glue;
- 200 gr. wheat flour;
- 200 gr. fine salt;
- a glass of cold water.
Pour a glass of cold water into a deep bowl and add a tablespoon of glue. When the glue dissolves and the water turns white, add all the salt and stir until completely dissolved. Add flour and knead until dough forms.
Soft dough
Used for playing with children and when creating small parts. It is distinguished by its softness and ductility.
You will need:
- 200 gr. wheat flour;
- 200 gr. fine salt;
- 5 tablespoons of vegetable oil;
- a glass of cold water.
Mix all the dry ingredients, add all the oil and gradually add water. Knead the dough until smooth.
Dough with glycerin
Another not the most popular recipe, but it is the one that will allow you to make dough like the famous Play Doh toy. It is distinguished by its shine and special softness.
You will need:
- 4 tablespoons of glycerin (can be found at any pharmacy);
- thick PVA glue;
- 200 gr. wheat flour;
- 200 gr. fine salt;
- a tablespoon of vegetable oil;
- a glass of cold water.
Dry ingredients are mixed in a deep bowl. In a separate bowl, in a glass of cold water, mix glycerin and 2 tablespoons of PVA glue. Gradually pour the liquid into the flour and salt, mix thoroughly.
The resulting dough can be divided into containers and dye added.
Doll girl
- Take white, beige or pink yarn.
- Cut the threads 20 cm long to make a bundle with a diameter of about 2 cm.
- Tie it in the middle with a thread of the same color and fold it in half.
- Leave 6 threads on the braids, tie the rest by 2cm. from the top is the head.
- Divide the remaining threads into 3 parts, the middle one being slightly thicker.
- Bandage the side parts at the base, shorten them by half, bandage them at the ends - these are the arms.
- Decorate the middle part with an apron or embroidery - this is a dress.
- Braid braids from the top remaining free threads and tie thin ribbons.
The doll is a guy, made in the same way as the first doll.
- Only the dress is tied in the middle, the threads are divided in half and tied at the bottom - these are pants.
- We decorate the shirt at the top with embroidery, and tie a patterned sash to the belt. We cut our hair shorter.
These folk crafts for children can be made in just a couple of hours. Give such a touching souvenir to your grandparents or friends. Children themselves will be happy to wear such amulets.
How to make a gnome from salt dough
Shot: Basil Lemonade / YouTube
The gnome is a good decoration. It will fit into any interior.
How to do
Tear two large pieces from the foil. Give one the shape of a cone with a depression at the base, the second an oval, flattened at the bottom. These are blanks for the cap and body.
Shot: Basil Lemonade / YouTube
Using a rolling pin, roll out the dough into a large flat cake. Wrap the future body.
Shot: Basil Lemonade / YouTube
Make a second cake. Spread the material over the surface of the foil hood. At the same time, give the part a curved shape.
Shot: Basil Lemonade / YouTube
Using a knife, make a lot of strokes on one side of the body - this will show the texture of the beard. Place the cap on the body.
Shot: Basil Lemonade / YouTube
Make a small oval and flatten it slightly. Attach the piece to the craft. Roll out the dough into a long, thick sausage. Secure it at the bottom of the headdress. Send the gnome to dry in the oven or leave it to harden at room temperature.
Shot: Basil Lemonade / YouTube
Apply blue paint to the cap.
Shot: Basil Lemonade / YouTube
If you need to better understand the details, watch the video:
What other options are there?
This way to make a gnome is a little more complicated, but you can do it:
Another cute craft option:
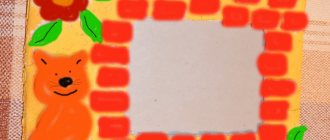
How to decorate a Tea House blank using salt dough and putty
Author: Shirina Vera
Author's blog
We will need :
- plywood blank,
- Salty dough
- Construction putty
- Millet
- Flowers for scrapbooking
- Acrylic paints
- Ice cream sticks
- The desire to create.
Well, first of all, let’s assemble the blank. We look at what parts will be inside, take it apart and paint it in the desired color. Mine is light green. Painted, dried, varnished. Which one is up to you to decide. I have the simplest acrylic one. After drying, we assemble the house. I mounted all the parts on PVA, so the roof does not need to be removed. And I intend to put the bags from the bottom, it’s even more convenient. We make the dough according to any recipe found on the Internet, I think it’s not difficult, salt, water and flour. Roll out thinly, I used a rolling pin. We measure the dimensions of the roof and cut it with a simple knife. I made the roof curly along the edge, depending on who you like. I smear the blank with PVA and sculpt the roof. I draw tiles with a pen with a non-writing tip. The door, too, was first made from rolled out dough, then the panel was drawn.
The roof didn’t seem very voluminous to me and I pressed the tiles harder with the handle of a spoon. Then we make bricks. Optional.
The roof took a couple of days to dry. During this time, I faked everything that came to my mind - fake windows, bricks.
Everything is clear here.
When everything was dry, I wanted to make a pipe. We also had to hide the ugly edge of the tile. Next, I diluted a thicker construction putty with PVA. Millet was added to it. All proportions are by eye. I also sculpted it to my heart’s content. I also made bricks on the pipe.
The dough turned out to be a bit thick, so I took the first glass outline I came across and drew another window, bricks, and painted on the doors.
I thought for a long time about what to do with the bottom part. At some point I even wanted to glue wider plywood. But since there was dough left, cobblestones were invented. And steps to the door.))
I prime everything. Artistic soil.
I found a braid that fit well into the roof of the house. Glued it and primed it. I also cut up ice cream sticks and glued them together to form a fence. And since it needs to be thoroughly glued, I applied putties again and it turned out to be a front garden with a fence. I'm priming again.
I planted a dough pudding on the window.
And it was necessary to plant flowers in the front garden. I rolled out these bushes from the dough, dried them and glued them on. This stage took me about two weeks. I did it in the evenings after work and dried it on the window.
Well, the fun begins. The roof is brick-red, the house - I can’t say what kind. Something beige-red-sand. We paint and dry.
My doors and windows are dark brown. I paint on the bricks.
I paint the grass dark green, or whatever this vine entwining the house is called... Land.
I go over the raised parts of the grass with bright green to freshen up the foliage a little. I highlight the windows with white, paint the frame, and hang curtains. My fence is gray. So are the cobblestones.
The tiles on the roof, bricks, and walls of the house are highlighted with light paint. I plant pink and lilac flowers on our thick vegetation on the house.
I paint on every detail.
The grass in the front garden seems to be in place, but something seems to be missing...
I found making a flashlight on the Internet and glued it for two days. Drawing paper, outline for drawing, paints. Hanging on a wire from flower stems. Lantern size 10*25 mm. It turns out that I have very thick fingers)))
The only metal part is the curls. I broke the filigree I bought for the boxes. But now the structure is strong. Inside, a yellow half-bead acts as a light bulb.
The bell was part of a decoration for a child's glove. Not for long. Then it became a decoration for the house.
Another false window. With a curtain.
Closer details.
I planted flowers in the front garden that were left over from my passion for scrapbooking. There are nails from the outline on the fence.
I still looked at it for a few days, adding and painting something from time to time, then I covered it with aquacoat. Simple, cheapest. Because I think scuba tanks are the same. I took both expensive and cheap ones, and realized that the only difference was the price.
What can you create from salt dough?
Salt dough opens up endless possibilities for imagination and modeling; you can use it to create both flat simple decorations and complex figures. Below are examples of creating simple crafts that will captivate not only children, but also adults.
Home decorations
Additionally you will need:
- glass or molds;
- small figurines or herbariums;
- cocktail tube;
- ribbons or twine.
The simplest yet most impressive decoration. To begin with, roll out the dough to approximately 5 mm thickness. Use a glass and cut out some round bases. Place the herbarium in the center of the base and use a cocktail straw to make a hole for later hanging the decoration. You can experiment with figurine patterns or use cookie cutters to cut out the base. After the resulting result has dried, attach ribbons or twine. This way you can make decorations for the Christmas tree for the New Year.
Keychains and magnets
Additionally you will need:
- bases for keychains;
- magnets.
The dough is suitable for creating anything: forest and sea inhabitants, plants and corals, insects, characters from films and cartoons... The list is endless. If making figurines doesn't sound like the most fun activity, what about making magnets and keychains? The bottom (base) will be flat, while the top will be voluminous. An excellent option for a gift.
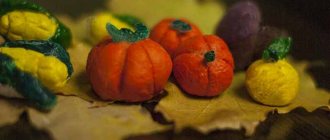
Volumetric figures
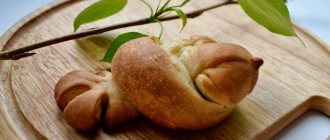
Figures occupy a special place in modeling, at the very top of the hierarchy of complexity. There are many ideas, but if they seem too complicated, then you should remember your favorite pastries and translate them into miniature products. Simplicity is captivating, and you can go further and model fruits and vegetables. Children can use them for games, and adults who are especially persevering can work on small details and make decorations.
Master class on making animal crafts for children
And since most of us do little creative work, those who have children try to come up with interesting activities just for them, so that joint activities will be very exciting.
I suggest you, together with your daughters and sons, make this funny hedgehog, look for photo instructions further.
We will need:
- Salty dough;
- Scissors;
- Beads
- Paints.
Manufacturing process:
1. Make a drop-shaped piece from a piece of dough.
2. Make eyes and a nose from beads.
3. Now we will make needles, for this we take nail scissors and make small cuts, lifting them up a little.
4. We perform the next row in a checkerboard pattern and so on until the entire back is covered in needles.
5. Dry the finished toy in the oven. We color the hedgehog at will.
It’s also very easy to make a bird and decorate it with bean seeds; it’s not only easy, but also useful for developing children’s fine motor skills. Watch the video of how this craft is made:
Of course, there are a lot of options, and if you surf the Internet, you can find a whole storehouse of ideas, and your leisure time with your child is guaranteed. I share souvenirs that I personally liked:
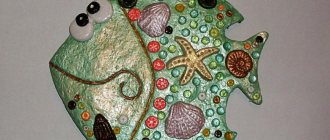
- Magic fish
- Cows
- Princess Frog
- Mice
- Snail
- Blue elephant
Crafts for children
All children love to draw, sculpt, and make things. Join them in creating folk crafts. This exciting activity will appeal to kids and older children.
Consult with your children what interests them most and get to work. Make small amulets from threads or yarn. They can be used as a toy, decoration or keychain.
Testoplasty - where to start
Modeling from salt dough is an interesting process that will bring pleasure to everyone. The dough turns out so soft and pliable that you don’t want to let go of it. Therefore, for some needlewomen, dough crafts - testoplasty - are not just periodic activities with children, but a real hobby.
The youngest children can be introduced to dough as the first material for modeling. The dough is superior to plasticine because it is harmless to children. If a young researcher has tasted the mixture, do not worry, the dough does not contain foreign impurities or harmful additives. The child can do whatever he wants with the dough: knead it in his hands, pinch off pieces, roll it into balls, sausages, cut it with a knife. Such manipulations are useful for fine motor skills.
For children aged 2-3 years, simple crafts are enough. First, these are flat dough shapes that are cut out using cookie cutters, round lids, or a clay knife.
Children over 4 years old are ready for crafts that are more complex than just cutting with a shape. These can be Christmas tree decorations, three-dimensional animal figurines, vegetables, fruits, small toys as gifts for friends. Using salt dough, you can make wonderful counting material for teaching mathematics in games.
Decorations made from multi-colored dough
A salt dough house can be decorated using various techniques: placing silhouettes of a snowman, snow-covered bushes, trees and much more on it. In order to get a deep and rich color for these figures, prepare several pieces of multi-colored dough. To do this, take the required amount of product, apply paint to it with a brush and knead it again. If you want to add a voluminous texture to the details, then grate multi-colored pieces on a fine grater and attach them to the walls or roof. From them you can make a red fur coat of Santa Claus, a prickly Christmas tree or a fluffy hare.
Step-by-step instructions for making dough crafts for beginners
Now that you know how to prepare material for creativity, it’s time to begin the sculpting process itself. Let's start with the simplest. I will show you step by step how you can easily and quickly make a beautiful thing. We will sculpt a cute bear.
We will need:
- Flour;
- Salt;
- Water;
- Cup;
- Acrylic paints or gouache;
- Brush.
Manufacturing process:
1. First, knead the dough: mix half a glass of flour and half a glass of salt, add a little water and mix everything well. Next, wait 2 hours, during which time the dough sits in the refrigerator.
2. Now we start sculpting the figure: we make one medium-sized ball for the head, a larger one for the body and 7 smaller ovals for the paws, ears and nose. We connect everything together. Then we put the product in the oven and dry it for an hour. After drying, take out the craft and cool it.
3. Next we proceed to coloring. Take a brush and the necessary paints. We are waiting for the “Bear” to dry. That's all!!
Advice!! Cover the finished souvenir with varnish. This will make the craft brighter and more practical!!
Thus, the step-by-step instructions for sculpting products from salt dough are as follows:
- knead the dough;
- we sculpt the necessary elements and connect them together;
- dry the work in the oven;
- paint and wait for it to dry.
And remember that the main sculpting techniques are balls and sausages.