Features of sculpting
The most important feature of such a composition is that it can only be created in volumetric form. No, technically you can sculpt a playground on cardboard. However, it will not look very convincing. It is also worth emphasizing that it is permissible to use plasticine of a wide variety of colors and shades.
Finally, the very appearance of the created children's playground strongly depends on the imagination of modeling lovers, and you can flexibly vary it at your discretion.
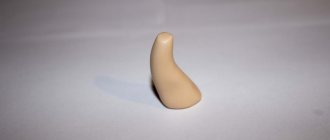
Cute bunny
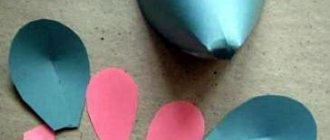
Can be molded in any color. Both the head and body have the same shape, differing only in size. The animal’s ears are long, so you need to first make sticks and then place them on the top of the head. They can be flattened and made slightly thicker on top, or one ear can be bent in half.
The paws are molded in different sizes. The arms are long, and the legs are made round and small. The claws are drawn with cuts using a stack. Decorate the craft with a bow or flowers. The nose is highlighted in a different color.
Tools and materials
But still, some recommendations can be given. So, in any case, you will need flesh-colored plasticine to draw the open parts of children playing. To depict the background, blue-blue and green colors are used. The attractions on the site will have a wood or metal color, depending on the choice of designers.
Additionally you will need:
- plasticine of other shades (for drawing clothes and balls, the sun in the sky and other small details);
- stack (for preparing fingers and giving relief to sculpted figures);
- a set of toothpicks (for some small jobs);
- special board for modeling;
- a kitchen rolling pin or bottle are excellent helpers in rolling out the material;
- knife;
- a bucket of water (a washed mayonnaise jar will also work);
- some other devices - but they are already chosen independently as you gain experience.
Papier mache
Here's how to make mountains out of paper for a model, imitating a mountain range:
- Crumple up newspaper sheets and moisten them with water from a spray bottle.
- Shape into mountain peaks or hills.
- In a bowl, dilute PVA glue with water in a 1:1 ratio.
- Tear newspaper or writing paper into pieces up to 10 cm in size.
- Soak the strips in glue and apply them to the desired area of the base. Apply 5-7 layers.
- Next you need to glue paper or white napkins so that later after painting the typographic font does not show through the paint.
- Color the slopes.
How to make a mountain layout more realistic? Coat the slopes with a thin layer of glue and sprinkle with sand, salt or semolina. Once dry, it can be painted to even out the background.
Step-by-step instruction
If you decide to make a playground from plasticine, you can equip it with a sandbox and swings.
The technique is as follows:
- make a swing out of popsicle sticks;
- immediately glue plasticine onto them so that they hold firmly;
- create a play area;
- frame and decorate the space - so that there is a sky with clouds and the sun, trees, grass with flowers.
But you can make a winter version of the playground with your own hands . Then the slide will naturally come to the fore in the composition. It is most often created not from plasticine (still, this would be too labor-intensive), but from cardboard. The surface is covered with napkins. Plasticine athletes stand on skis made of aluminum foil, and will push off with toothpicks simulating sticks.
It’s worth paying special attention to the design of the skier figures. Clothes can be of any color. But you definitely need to work on red mouths and reddened cheeks. Giving volume to the figures is achieved by using padding polyester or cotton wool. For skiers, you will also have to fashion green hats decorated with pom-poms of a different color.
Next steps:
- formation of the face (according to the scheme “eyes - nose - mouth - cheeks - eyebrows”);
- body preparation;
- connecting it to the head;
- clothing decoration;
- modeling of legs and shoes worn on them;
- modeling of skis (their color is not specified in any way);
- final connection of the previously mentioned parts;
- modeling mittens from a pair of flattened circles - it should seem that the skier is using poles.
If you need to make a summer sandbox, then use a combination of plasticine and cereal as a basis.
This method has proven itself repeatedly. A playground prepared in this way can be safely used in playing with children. The choice of toys is at your own discretion. A plastic plate is used as a basis.
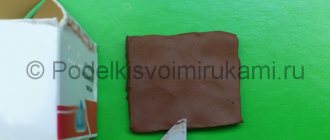
The inside of the bottom is covered with green plasticine. It will have to be cut with a stack to form the texture of growing grass. Recommendation: you can sculpt an additional 1-2 simple flowers to make the composition look more convincing. It is also necessary to make a “house”, because without it the site looks unfinished, it feels like something is missing. To work, you will need a heavy piece of plasticine - you should not feel sorry for it.
This mass is flattened, ensuring that the thickness of the square is about 1-1.5 cm. Otherwise, the construction will seem lightweight and will destroy the entire plan. The children's house is placed on prepared grass - but it must remain completely visible and not covered by this structure.
The following important points:
- forming a “window” from peas;
- rolling plasticine sausages;
- connecting them in such a way that they imitate real sandboxes and swings;
- filling the sandbox with yellowish grains, indicating sand.
To learn how to make a playground from plasticine, watch the video.
Source
Rainbow hedgehog with flower
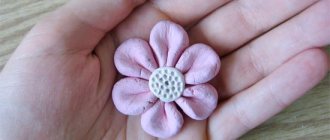
The next example of a hedgehog is made in an unusual way. Multi-colored needles show the true feelings of the animal, which has clearly fallen in love and gives its lover a flower. A boy can make such a figure for a girl, hinting to her about his attitude.
The methods and techniques of sculpting are identical to the previous execution, the difference lies in the position of the hands and the thickness of the needles. The colors change on the spines in layers, in rows. The petals of the flower have the same shades.
A piece of the Alps at your dacha
When developing the design of an alpine slide, you need to take into account that this is an imitation of rocky natural areas. This means that the basis of the composition should be stones and creeping low plants, characteristic of high-mountain areas. And the definition of “slide” dictates the general shape of the rock garden - a hill with mandatory elements: the base, slopes and top.
A rock garden is a “highlight” that can instantly transform the appearance of a garden landscape
There are several options for rock gardens, which repeat their appearance in different areas of the mountainous terrain:
- rocky cliff - a pile of almost bare large boulders with a minimum of plants in niches and “pockets”;
A combination of functionality and decorative function: stone steps and rocky rock garden
Larger plants are planted on the tops of the rolling pin, emphasizing the dynamics of the height difference
- mountain slope - a complex high composition of stones of different sizes and with a wide variety of creeping and low-growing plants;
To design such a rock garden, dwarf plants are used, as well as large blocks of stone that imitate rock fragments
- valley in the mountains - large stones, partially protruding from the ground, surrounded by abundantly flowering ornamental plants;
The natural landscape made it possible to create a flowering stone hill with little effort
- gorge is the most difficult to implement, but also the most spectacular type of rock garden, which can be placed in a natural hollow, framing the slopes with stones and planting representatives of rock flora.
Neatly stacked stones in the shape of a semicircle in a composition with flowering plants - a spectacular club in your yard
A rock garden is considered a separate type - a garden of stones, which are the main “characters”, in contrast to a rock garden, where stones serve as a background for plants.
Any terrain landscape, including absolutely flat soil, is suitable as a site for creating a rock garden.
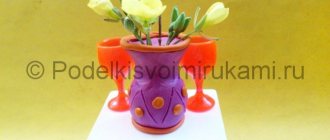
Basis for stucco painting
You can paint pictures with plasticine on completely different bases! Often, ordinary cardboard is used, which can tolerate all the options for a child’s creative self-expression. For older children, glass is suitable as a basis for a plasticine picture, to which the plasticine is securely fixed and lasts a long time. Glass is especially good for “reverse paintings”, when the plot is stuck from bottom to top, from light to dark tones, from the main elements to the background.
Kids will be interested in plasticine painting on improvised materials, for example, an old mp3 disc, a boring white cup or an ordinary plastic plate. This “picture” does not require additional decoration and can be an ideal gift for your beloved adults on any occasion.
Dear visitors of the video site Lepka.rf!
The source of all text, photo and video content about modeling from plasticine, dough, clay and so on, including that played on the pages of the Lepka.rf resource, is a third-party video resource, namely the public video hosting YouTube.com, which provides open access to its video content (using youtube.com's open and publicly available video API3 technology)! The video resource Lepka.rf is a search engine based on the name and description of video content. Files are never uploaded to the hosting and website Lepka.rf and no photo/text/video content protected by copyright is stored on our server at all. Detailed information for copyright holders.
If you own the copyright to this text, photo and video, which was uploaded without your consent to YouTube.com and is displayed from it with us, go to the main page of this video on YouTube.com, click on the link under the player More - > “Complain” -> “Violation of my rights” and in the drop-down menu, select what exactly is being violated and click the “Submit” button
.
To report a prohibited, illegal or inappropriate video, photo or text, go to the YouTube website, click on the link under the player More -> “Report” and select in “Report Violation” what exactly you are not happy with in this video
. Read more about the terms of use of the video site about modeling Lepka.rf in these rules.
Publications on the topic:
We sculpt from salt dough (photo report) Dough is a very surprisingly plastic material for sculpting various figures and compositions. Unlike ordinary plasticine, the dough does not stain.
How to make an alpine slide on a personal plot?
If you have firmly decided that a self-made alpine slide will be the decoration of your garden, step-by-step instructions will give you the opportunity to avoid gross mistakes and get the desired result. Before starting work, sketch out a sketch of the rock garden - this will help you decide how much area it will occupy, what configuration it will have and how many tiers you will make on it. You can even roughly estimate how much an alpine slide will cost you - a diagram drawn to scale will help you calculate how many and what kind of stones you will need, how much drainage, sand and soil will need to be prepared. The design needs to be made in relation to the area in order to take advantage of all the advantageous aspects of the existing landscape.
Creative decoration for rock gardens - clay bowl with plants
- When deciding on the location for the future rock garden, do not forget that you will need to look at it - choose the most favorable angles. In addition, think about it - you may want to spend your free time near it. Then you will need an adjacent flat area with paths, space for a table and a fireplace.
How to make a volcano from plasticine.
Even the youngest children can be shown interesting chemical experiments at home, developing their cognitive interest in the subject of chemistry for the future. And the simplest thing is the interaction of soda and vinegar. The violent hissing that accompanies such a neutralization reaction will not go unnoticed, but, on the contrary, will cause a storm of emotions. Of course, it’s too early to tell about the chemistry itself, but an interesting experiment in the form of a real volcano is worth showing.
In this lesson we will show you the process of sculpting a volcano from plasticine; perhaps at the same time you will want to tell your child about interesting natural phenomena - volcanic eruptions. Even the smallest children can get involved in such creativity, because such a craft is quite simple.
1. The most inconspicuous colors are suitable for creating a believable volcano, for example, gray, brown and beige. For this craft, plasticine spoiled by a child will do just fine. Surely, if you mix it, you will get a brown or brown color, and this is what you need. Only a little orange and yellow will be used to sculpt the magma. Also prepare some kind of base - a cardboard cutout.
2. Cut out a small circle from cardboard. Knead the dark plasticine in your hands, and if necessary, mix several shades without bringing them homogeneous.
3. Press the dark piece into a flat cake. Then create a slide out of it by sticking it on a round cardboard base. Make a hole in the top.
4. Using the tip of the stack, begin drawing random vertical lines across the brown plasticine.
Construction rules
Before you figure out how to make a slide for children with your own hands, you should study the rules for its construction and installation. You need to remember the following:
- the design should be comfortable for the child;
- there must be a “brake pad” on the descent. This is the area where the slope should be parallel to the surface of the earth. If the descent speed is not reduced, there is a risk of injury;
- The length of the homemade slide should be twice the height of the structure. For example, with a ramp length of 5 m, the height of the launch pad should not exceed 2.5 m;
- there should be no other structures a meter from the descent so that the child does not hit himself during acceleration;
- in the descent area there is a special covering (for example, a rubber mat);
- a swamp should not form under the structure;
- For the construction of the structure, use only safe and environmentally friendly materials. No matter what you choose, they should not contain harmful ingredients. This also applies to the paints and varnishes with which you will cover the slide;
- if the slide is made of wood or plastic, it must be resistant to fire;
- When constructing, be sure to use fences and railings. Thanks to these elements, the child will not only maintain balance when climbing up, but will also not fall during active movement. These structures must be present on the slide no matter how old the child is;
- the structure should not have cracks or openings so that the child does not get injured or get stuck during play.
The slide must certainly be stable, functional, durable and have an attractive appearance. Its base can be concreted or metal supports can be used . All structural elements should be sanded and varnished.
Be sure to take into account the age of the child; if we are talking about preschoolers or primary schoolchildren, then the height of the slide should be a maximum of 3.5 m.
DIY children's slide: recommendations for creating structures (91 photos + video)
Children carry a powerful charge of energy, so a playground is an indispensable attribute of any summer cottage where children visit.
Absolutely any number of entertainment items can be installed on the site. It all depends on the financial capabilities and wishes of the owners.
You can also please your children by doing some fun with your own hands. As an example, a children's slide. Absolutely simple to construct, and will delight you for many years if you take the process seriously.
The process of creating a slide and the end result will serve as an additional source of joy at minimal cost. A children's slide at the dacha will be the best entertainment for children.
Wooden slide
Such a building can even be placed inside the house, if the size of your area allows it. When building a slide, it is important to remember that you need to use environmentally friendly raw materials, since the child will be in direct contact with it. A children's slide made of wood is best suited for such entertainment.
But if you decide to build from other materials, then make sure that there are no harmful components. This also applies to the bright colors that are usually used to decorate the slide.
It is important to monitor such inserts both for the content of harmful substances and for resistance to fire.
Install strong railings regardless of your child's age. In any case, this will protect you from unwanted injuries and falls. The railing will also act as a support for the child’s balance.
Wooden slide safety
A children's wooden slide should first of all be a safe object for play. It will fit perfectly into any exterior and interior of the house thanks to its calm style. It will not be the first to catch your eye, but will only emphasize the previously created style.
In the summer, in the sun, a wooden slide heats up slowly, without burning the child on contact, like, for example, slides made of metal. This is a big plus when children often play outside.
Such a slide can be installed anywhere on the site, and not just where there is always shade and coolness. The child will get burned on the metal, and the wood will only become warm in direct sunlight.
Even if a plastic outdoor slide is more convenient, its weak frame will not serve you for long. It will crack, and the child may get injured from riding such a slide.
Location of the slide on the site
The slide must be located away from extraneous buildings and trees. This precaution will not be superfluous, because it will make your baby’s games more comfortable.
You can also dot the perimeter around the slide with grass or cover it with a special artificial turf. The descent from the slide will be softer in the future and the child has a minimum chance of falling.
The base is best secured or concreted. Even if the child cannot move the structure with his own hands, then from frequent rolling it may itself tip over.
The height of the structure should depend on the age of the child. It is advisable not to exceed more than 2 times the height of the person who will use it. There should be no cracks, openings or holes in the structure.
Take this seriously, as children, while actively moving, do not notice small obstacles. The child may get caught or stuck.
DIY slide
If you are interested in the question of how to make a high-quality children's slide with your own hands, then you need to follow all these tips. Then the child, while riding down the slide, will be completely safe and will remain without unwanted injuries.
If we are talking about a wooden structure, then you can develop drawings for a children's slide yourself. Choose the color, texture and even shape as you wish, or use a ready-made photo of a children's slide to complete the picture.
The materials you will need are nails, boards, slats and wooden beams. Also make sure you have a hammer, saw and plane. These are the most basic tools for the job.
You can simplify your construction using a hand or electric drill. When assembling the structure, carefully check that there are no nails sticking out anywhere.
The ramp may be made of plastic material. After all, over time, a wooden slope can develop clues if it is not treated with anything.
But with a metal slide everything is much more difficult. Here you will already need a machine for welding metal. If you decide to make the slope metal, then paint it with a special paint that will prevent it from heating up quickly.