bird feeders made from milk cartons
In this article we will look at the most practical material for making bird feeders with your own hands - milk cartons. While you can use almost any material to build a simple box with a roof that can hold a handful of birdseed and a sturdy perch, why not use the materials you have on hand to be eco-friendly? Firstly, making a bird feeder from a milk carton is very easy, and secondly, aside from a little cutting with a sharp knife, this project is completely suitable for children of any age. You can usefully spend a family day at the craft table and teach children not only how to make feeders from milk cartons , but also from other scrap materials, and at the same time tell them what benefits they will bring to nature. These 35 projects have been carefully collected from the Internet so that you can use instructions and step-by-step photos on how to make a simple DIY milk carton feeder .
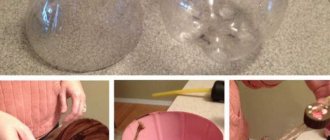
Milk carton bird feeder in the shape of an owl
Birds need our care! And we can show it very easily, namely by making a feeder for feeding the birds. Such feeders also provide an opportunity to observe the behavior of your feathered friends! The first step to making an owl shaped bird feeder from a milk carton is to prepare the necessary materials.
Birdseed
In winter, birds are absolutely unpretentious about food and eat almost everything with pleasure. You can pour any cereal into the feeders, for example:
- millet;
- buckwheat;
- oats.
Birds will also be happy with sunflower seeds, only unsalted and unroasted. And even just a piece of stale bread will arouse their genuine interest. You can put a piece of apple and leftover porridge in the feeder. It is important not to overdo it and not to overfill the feeder with food from excess feelings. In the thaw, all this will turn sour, and the feeder will have to be washed, and the wooden one will have to be completely replaced.
Bird feeders are those few crafts that even small family members can make. Often this becomes a family activity, an additional means of communication between children and parents. And how much joy can be seen in the eyes of a child when birds flock to the feeder he has made with his own hands.
How to make a bird feeder from a plastic bottle
This is one of the simpler types of feeders. To make it we will need 1.5 - 2 liter plastic bottles.
In the first option, we make two holes in a plastic bottle into which we insert two flat wooden sticks with small indentations. After this, we pour the food into a bottle and tie it to a branch by the neck. The food from the holes will pour out into the recesses on the sticks, which will also serve as a perch for the birds (Fig. 1).
Read also: Alcoholic cocktails with Pepsi
In the next version, we cut off the neck of a plastic bottle as in Fig. 2, attach a perch and make holes on top for attaching the feeder. Then we fill it with food and hang it on a tree.
Now a more complex design of a plastic bottle feeder. To make it we will need two plastic bottles of different sizes. First, we cut off the bottom of the larger bottle, make a hole in it and put it on the smaller bottle. Pour food into it and close the lid. Then we make several holes in the upper part of the bottle for pouring out the food, and also in the lower part we make holes for the rope by which we will hang the bottle. Now we turn the feeder over and attach it to the tree (Fig. 3).
The next version of the feeder is also not complicated. We make holes on the sides of the bottle, make a decorative roof, add food and the feeder is ready (Fig. 4).
Open areas
Such structures do not require a suspended mounting system. A durable open platform or with small sides is mounted on prepared supports. These can be metal corners, corners made of wood. Fastening is carried out to the underlying wall or the trunk of a large tree.
Note!
Do-it-yourself rugs - TOP 120 simple patterns with master classes on how to make them yourself + photo reviews of finished rugsDo-it-yourself dolls: a master class on making a beautiful doll. Simple instructions with photo examples of ready-made options
DIY satin ribbon bows - step-by-step instructions for creating unusual bows + detailed diagrams with photos
Milk carton
Making a feeder is a simple process that even a small child can easily handle. Get him interested and the child will be happy to make useful crafts under your guidance. You can also use a milk tetra pack as a preparation.
Next we do the following:
- The inside of the box is rinsed several times (it is important that no odor remains).
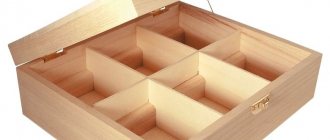
- Let's make a feeder for several people: the box is laid on its side and a long hole is cut out in one of its walls, but so that between it and the bottom (one of the side walls) there remains a small side. Instead of one long one, you can cut out several square “dispensing windows”, leaving jumpers between them. It will be more convenient for the birds to eat if you attach a perch made from a thin twig in front of the openings.
- We make holes at the ends of the box and pass a wire or nylon cord through them. If the place where you plan to place the feeder is poorly protected from the wind, it is better to attach it to a tree trunk. To do this, we pierce two small holes in the wall located opposite the inlet hole and pass the wire through them.
Milk carton
All that remains is to tie the feeder to the tree with this wire.
Do you want to feed birds in winter? Making your own bird feeder is very easy, and it can be made from a variety of materials.
You can see homemade pig feeders on this page. Photos and description of manufacturing stages.
Rules before production
- Sides are needed to protect the feed from the wind.
- To avoid injury, it is better to sand sharp edges.
- A roof is required, then the food is not afraid of bad weather.
- Close the way for cats.
- Do not create closed places; birds are afraid of them.
- Choose reliable material.
- Consider weighting agents for a lightweight product.
- Ensure that food cannot fall out on the ground to avoid attracting predators.
What do you need for work?
To make a feeder from a box, you do not need special materials or tools.
Materials and tools for making a bird feeder
Everything you need can be found at home:
- box (any cardboard box, milk box, juice box, shoe box, candy box, cake box);
- wire or rope to make a hanging loop;
- stationery knife;
- scissors;
- awl;
- scotch;
- glue;
- office stapler;
- paints (optional).
To work, you need to prepare a workplace by covering the surface of the table with film or newspaper.
Plastic bottles
The most unusual and original bird feeders are made using plastic bottles; you just need to cut holes in them for the birds and fill them with treats, fix them in the garden or near the house, waiting for your feathered friends.
Using ice cream sticks, wooden spoons and spatulas for the kitchen, you can complement such structures with perches for birds, where they can sit for lunch and not injure their paws. It is important to replenish the feeders in a timely manner and not forget about the treat.
Recommendations for selection
When choosing a ready-made feeder or material for manufacturing, you need to consider several factors:
- what time of year it will be used;
- where to stay (in the city, forest or country house);
- what birds should it attract first.
City birds are accustomed to living close to humans; they are able to obtain food in almost any weather conditions, so it is not necessary to equip a special feeder for them. If you want, you can feed sparrows, pigeons, and crows anywhere, but the other, more timid birds can be driven away by city birds.
Even sparrows can be useful in a garden plot, in a grove, or in a park, especially during the period when chicks appear, for feeding which the birds actively destroy harmful insects. But to attract sparrows, you need a spacious and fairly open area, since they fly in flocks, and in case of danger they fly vertically upward. A closed “house” with a deep roof, on the contrary, will protect food intended for other birds from these ubiquitous little robbers.
Decorating the product, using it to decorate the site
In addition to its main functions, a bird feeder can also serve as a decorative accessory for a garden plot. By showing creative imagination, you can give these products an unusually original look.
Paper and cardboard products can be decorated with drawings. For this purpose, oil paints should be used. Plastic bottles and eggplants can also be beautifully painted.
Using paints, the container can be imagined as a house with windows and a door. The feeder can be stylized as a wooden frame. Crafts with images of birds and flowers will look beautiful in the garden.
To decorate products, ropes, twine, and burlap are used. Compositions of pine cones, spruce trees, chestnuts, straw, and artistically selected scraps of fabric are placed on top of the craft. Particularly talented craftsmen can decorate their products with forged elements and carvings.
If ceramic dishes act as a feeder, this option can be beautifully played up by using items from one set to create an integral composition.
You can decorate the area using disposable feeders in the form of cardboard figures. These can be stars, Christmas trees, hearts, bears and other molds.
Gelatin or a nutritious adhesive mass based on oatmeal mixed with raw egg and honey is applied to a cardboard base. The figurine greased with “glue” must be rolled in a food mixture of grain, seeds, nuts and bread crumbs.
Next, a hole is made in the figurine for the fastening thread, threaded through it and the products are sent to the refrigerator for 3-4 hours. After hardening, the cheerful and nutritious figures are hung on trees. If it happens on New Year’s Eve, such figurines can act as Christmas tree decorations.
How to quickly make a beautiful feeder:
Complicated options
If you have an irresistible desire to create unusual feeders, you can make them in the form of a house. In this case, they usually make a roof with curtains so that it can be opened and food can be placed inside. You can make a product like this:
- a bottom is made of plywood, to which the sides are screwed so that the food remains inside;
- using thin bars of the same or different lengths, two side walls are assembled;
- the sides are attached to the base of the future house using self-tapping screws;
- it is necessary to fix the upper part of the structure before installing the roof, for which two bars of the required length are suitable, which connect the walls;
- you need to cut a triangle out of a piece of wood, which will become the base of the roof; it needs to be secured to the top of the feeder;
- the roof is made using wooden boards - on one side it is monolithic, on the other it will be divided into two parts, fastened with curtains;
- the back wall can be made of plywood or boards and have a rectangular shape with a triangular top that follows the shape of the base for the roof;
- attach the roof to the base;
- make holes for fastening;
- We set up a feeder and fill it with food.
The design may be different, for which it is better to use drawings that mark the front and rear walls of the house with a flat base and a triangular top where the roof will be installed. There are no side walls at all, but low sides are installed at the bottom.
For those who want to build something more complex, you can try creating a feeder with a dispenser. To make it, you need to have wooden parts and a container that will act as the latter. The creation procedure will be like this:
- a sketch of the future product is drawn up, all elements of the product are accurately measured;
- a bottom is made of wood or plywood, in which holes are made in the corners;
- 4 thin wooden rods need to be inserted into the prepared holes;
- two triangles are made, which will be the base of the roof, two boards of the same length and width are attached to them;
- holes are also made in the roof into which wooden rods attached to the bottom of the product are inserted;
- in the center of the base of the structure it is necessary to make four round holes into which the food will be poured;
- you need to find a jar of the required dimensions, which has a metal screw cap; Holes are made in it, where food for the birds will fall out.
This option will allow you to ration the amount of food supplied and extend the duration of its consumption by the birds. This option is far from the only one; there are also more interesting models that have not only wooden parts - they use plastic, decor from branches and much more.
Whatever types of products are chosen as the basis, the main thing is that the feeder is comfortable for those who will use it. To decide which option to choose, it is worth considering the most original ideas that are currently available:
- models with reference planes;
- with a dispenser or feed compartment;
- wall products;
- feeders with metal mesh for placing food;
- products for hanging feed;
- plywood houses;
- suction cup structures;
- wicker varieties;
- log structures;
- using improvised means.
Each option is unique in some way, has its own advantages and disadvantages, but the greater the choice, the greater the chance of finding exactly the sample that will be within the capabilities of a particular performer and suitable for the conditions of the place where it will be hanged.
How to design a bird feeder out of a box
The main thing for birds is tasty food. A person usually decorates his product for aesthetics. After all, it’s much nicer to see a beautiful house hanging on a tree than a dirty plastic bottle with a hole.
Don’t get carried away and use materials that can harm birds.
To decorate the feeder you can use:
- Indelible safe paints, such as acrylic.
- Paper, foil, colored and colorless tape.
- Wire, staplers for fastening parts.
- Stationery PVA glue. It has good moisture resistance and is safe for animals.
DIY bird feeder
For example, making a wooden bird feeder with your own hands is a task for a real master carpenter who knows how to work with wood and special tools, but, fortunately, there are simpler materials that will help you make a very useful craft - a bird feeder. You can make it using an empty tetra pack, cardboard box or plastic bottle; as you can see, these materials can easily be found in every home. You may not really like the idea of cardboard, because under the influence of weather conditions this material will quickly deteriorate, so plastic is rightfully considered the most affordable and practical material. You can use two-liter bottles or five-liter eggplants.
In a harsh snowy winter, the birds that stay with you for the winter especially need support, because now they do not have the opportunity to get food for themselves in the fields, pick up crumbs on the ground - everything is covered with snow. The feeder consists of two parts: a lower container where seeds are poured, and a roof so that snowflakes do not fly inside and rainwater does not accumulate.
If you are lost in the options of which
bird feeder is best, you can look at the photo on our website.
By the way, with the help of such crafts made from waste material, you can expand your child’s horizons, because by hanging a feeder in the yard of your house, you and your children can watch and study the feathered guests. Remember that you cannot use metal elements for the structure; it is not recommended to make grilles out of them, because at low temperatures they will become dangerous for feathered guests. If you do it from wood, then make sure that there are no nails sticking out anywhere or any sharp points. If you have decided how to make a bird feeder from tetra pack, then first you need to wash and dry it, then cut holes, but it is not recommended to make holes opposite each other, because the wind can blow away the seeds. Holes can be cut on two adjacent sides. To make the structure stronger, you can insert wooden sticks into the corners. You can hang the feeder on a tree using a wire or thick thread, which must be threaded from above. Using wire, you can fix the structure on a tree trunk.
Second way
The easiest way to make a bird feeder at home for children. We are preparing a large jar, and for it you will need:
- marker;
- stationery knife;
- hot glue;
- acrylic paint, brush;
- satin ribbons;
- drill with a thin drill bit;
- decorative decorations (for us it’s a large sunflower and sparkles).
If everything is there, let's start making:
- Remove the sticker from the can. We draw an entrance for the birds on both sides.
Our hole will be in the form of a large semicircle, you can make another one. The entrance is located on both sides. Cut out what is marked with a utility knife. - Now let's paint the jar with acrylic paint. We used yellow for the base of the jar and red for the design on the lid.
The sides of the lid and the bottom of the jar were sealed with satin ribbon. - Drill holes in the lid and thread another ribbon through them, using which we will hang the structure from the tree. Decorate the jar with sunflowers and glitter.
We pour millet, raw seeds, oats, pearl barley, millet inside and watch as feathered guests fly to us. It is best to use raw, unroasted seeds and cereals for birds.
Don't forget to use ballast
To prevent the birdhouse from simply being blown away by the wind, it is recommended to place some weighty object on the bottom. An ordinary stone or construction bolts, the total weight of which does not exceed 300 grams, will be sufficient. Otherwise, the bottom of the birdhouse may not withstand the load and will simply tear.
Also, instead of ballast, you can simply tie the product to a branch, if this is possible. This option is even more preferable, since it provides much better fixation of the structure. However, use quality thread that will not break during the process.