How to make a sailboat “Scarlet Sails” with your own hands. The Scarlet Sails alumni festival is regularly held in St. Petersburg. The name of the festival is taken from the book of the same name by Alexander Green. I will not comment on this event, but if you are curious, you can visit it once. I propose to build your own sailboat with scarlet sails by setting it sailing and making a wish. Maybe the wish will come true, and the sailboat will return as a dream come true. Read below on how to make a sailboat with scarlet sails.
How to make a yacht out of paper
This simple paper yacht is also called the magic boat. It uses a very simple origami technique, you need to go through 12 steps, the folding time is only 2 minutes. The boat is made from one purple and white single square paper, measuring approximately 20 cm x 20 cm. Although you can use any kind of paper, just make sure the front and back sides are slightly different. Below is why this model is called the "Magic Boat". As you can see, the main sail of the boat is shown in the left picture. Ask your friend to hold the sail and have him close his eyes. After this, quickly make two valley folds as shown in the picture. Now the sail your friend is holding is no longer a sail, but a hull. This is the trick.
Below is a diagram of how to fold a yacht out of paper
Photo source: origami-blog.origami-kids.net/boat/traditional-origami-magic-boat.htm
Watch the video: Paper boat
This motor boat floats quite well and can stay on the surface of the water for quite a long time.
Templates
Let's first try to create a ship using templates. They are easier to work with. What you will need:
- thick cardboard (you can use an old box);
- scissors;
- pencil;
- ready-made template;
- glue or tape;
- colored paper and other decor.
First you need to print the template and transfer it to the main material. By the way, if you are using cardboard that is not too thick, you can print the template directly on it.
You should get something like this:
Next, you need to dilute a little PVA glue with water, cut plain paper into pieces and dip them in the solution and glue them to the base of the ship. Remember the papier-mâché technique. It is better to connect the ship parts themselves using tape.
All that remains now is to decorate the blank with the prepared decor. This can be colored paper, wrapping paper, fabric. The ship can also be painted with ordinary watercolors.
You also need to make a mast for the ship. You can use an ordinary twig and several round pieces of thick cardboard.
Every boat must have a flag. For it, use fabric and applique made of paper or material. The sail can also be made from cardboard; use toilet paper rolls.
Making a big ship
This option is suitable for young children who love exciting games. For such a ship you will need a large box. This could even be packaging from under a refrigerator or from a large TV.
First you need to connect the valves of the box and make a sharp bow of the vessel. On the sides you need to cut out several round timbers to make improvised portholes. Use a thick stick and fabric to make a flag. Use paints to decorate the ship.
Don't forget about details such as the anchor - it also needs to be made of thick material and decorated. A large do-it-yourself cardboard ship is ready to sail across the endless expanses of the apartment.
We use matchboxes
Let's call this modeling, because we will create a whole ship from several matchboxes. What you will need:
- cardboard;
- glue;
- matchboxes;
- wooden skewer or thick paper;
- colored paper;
- markers;
- scissors.
First you need to glue two matchboxes together with the short sides. Glue another box on top in the middle.
Now you need to cut out a rectangular piece of paper and glue it to the structure on top.
Now we need to cut out a strip from thick colored cardboard, with which we will form the bow of the ship.
Now you need to cut out a piece of cardboard that will correspond to the contours of the ship, look at the photo:
Now the bottom and top of the ship need to be fastened with glue. Next you need to make the mast. You can use a wooden skewer or roll up an A4 sheet very tightly and secure the tip to prevent the sheet from unwinding.
A hole needs to be made in the top matchbox of the ship so that the mast can be inserted. Don't forget to use glue.
Now all that remains is to cut out the sails from colored paper, paint them and attach them to the mast.
The matchbox ship is ready! It can be made wider and higher if you use more matchboxes. If you use very thick cardboard for the bottom of the ship, then it is quite possible to float it on the water and participate in competitions for the title of the fastest boat.
DIY cardboard spaceship
We suggest using a fairly simple option that will allow you to literally create a 3D model. To do this, you need to cut out several identical parts from cardboard, but of different sizes. The parts need to be fastened together, but either a thin piece of foam rubber or a small piece of thick paper must be placed between them. It will look something like this:
- Or like this:
- An entire space station can be made using cardboard rolls from toilet paper and tape.
- Use silver foil, a compass, a black marker and a pencil to give the spaceship a realistic look.
Tips for working with cardboard
Cardboard is a fairly convenient and easy-to-work material, but if you know a few nuances, the work will seem even simpler, and the product itself will turn out neat:
- When working with very dense material, use fairly sharp scissors, or even better, a stationery knife;
- before bending the cardboard parts, it is better to draw along the dotted lines with the non-sharp side of scissors or an old pen that does not write, then the material will bend neatly and evenly;
- Not in all cases you can use a glue gun. For example, if you are working with thin material, then it is better to use office glue or PVA;
- work in a room where the humidity is not too high, otherwise your products may delaminate or parts may not stick together;
- the room should be light, it is advisable to have a window that can be opened and ventilate the room;
- We also always advise you to work only in a good mood.
- How to make a ship out of cardboard with your own hands - a few more interesting options
- We would like to offer several more interesting and beautiful options for ships that you can make with your own hands.
- In this case, a milk carton, cardboard boxes and a sleeve are used.
- And this is a luxury boat made from an ordinary cardboard box.
With a little practice and imagination, you can create such a beautiful pirate ship made of cardboard with your own hands. We always advise you to involve children in creativity. They will be especially pleased to know that they are creating a boat just for themselves. At the same time, you can think about a pirate costume, and also make a spyglass, a hat and a cardboard knife out of cardboard.
Such participation of children in creativity helps to develop their imagination, attentiveness, perseverance, and the desire to create something with their own hands for themselves. Be sure to involve children in cleaning too.
Explain to them that after themselves they need to fold all the materials, put them in their places, and also need to clean the work area so that later they can get back to creating.
And as usual, we want to share with you an interesting video master class. This will be a DIY ship made of cardboard with a step-by-step story. Don’t be alarmed if you don’t know English, because the video shows all the stages of creating a beautiful vessel very clearly and in detail:
Source: https://zhenomaniya.ru/hobby/prochee-rukodelie/kak-sdelaty-korablik-iz-kartona-svoimi-rukami
Procedure
Here are the simplest instructions on how to make a ship out of wood with your own hands:
- Prepare your workplace, materials and tools.
- Strip the bark you have chosen as a base from the bark.
- Combine raw materials and create a custom design solution. Use a pencil to sketch the design on the block. Then process the timber so that it is as smooth as possible and the top and bottom are parallel. For this purpose, it is best to use a sharpened knife.
- Sketch out the front and back parts. Cut them out using the same technique. To make the bow of a ship, saw off a piece from the front and round off the resulting cut.
- Cut through the deck. It is preferable to use a chisel and hammer at this stage.
- Once the deck is ready, drill holes for the rigging. Install masts in them.
- Work on the bow of the boat by cutting off a small piece from the capstan and securely attaching it to the bow of the boat with glue.
- Build a rectangular stern using retrofitting blocks.
- Make yards according to the number of sails.
- Cut sail blanks from fabric.
- Glue the masts, yards and sails into a single structure, making sure that the panels are curved.
- Fabricate and install the top flying sail and rear panel.
- Paint the product in the color of natural wood or simply varnish it. The ship is ready to disappear into the sunset.
Postcard for February 23rd in the form of a suit
A greeting card is perhaps the simplest thing that is suitable for display at school, and for congratulating dad, grandfather or older brother on Defender of the Fatherland Day. Why do we propose to design it as a men's suit? Because such a card will look unusual for such a holiday, elegant and emphasize gender. We think that all men, regardless of age, will be pleased to receive (especially from a daughter or granddaughter) just such a postcard.
You choose the color of the shirt and jacket yourself, but remember that with light jackets, the shirt should be darker and vice versa. As for the tie, mothers should tell their children that its color should match both the shirt and the jacket and not be flashy, but fashionable.
For a postcard like the one in the photo, we will need:
- colored cardboard in black and red and a sheet of white office paper;
- scissors, glue stick and hot glue;
- a simple pencil;
- 6 small black buttons and a thin ribbon for tying the card.
Bend a black sheet of cardboard on both sides - these will be the sides of the jacket.
Fold a sheet of office paper in half and inside write wishes and congratulations on the holiday to the person to whom the card is intended (it is quite possible that it is a labor or physical education teacher). Glue the piece of congratulations to the “jacket” so that the message can then be easily opened and read.
We make a collar for the shirt. Cut out a rectangle with sides 15x4 cm from white paper, bend the edges of the rectangle towards its middle to form a trapezoid and glue the collar to the middle of a large sheet so that part of it protrudes beyond the edges of the sheet.
Cut out a tie from red cardstock. Its length should be approximately 20 cm. Glue the tie to the collar and glue the collar so that the folded sides cover part of the tie, forming the corners of the collar.
Next, decorate the jacket with buttons, which you glue to it using a glue gun or Moment glue. Cut it out of black cardboard and glue a pocket and a handkerchief made of red cardboard (two triangles) onto the jacket. Don't forget to fold back the top corners of the jacket sides.
All that remains is to tie the buttons with a ribbon (braid) to close the card.
Another very interesting version of a postcard with a moving airplane, which is suitable for a school exhibition, look at the video.
Birthday in a pirate style - a DIY cardboard chest
YO-HO-HO! Do you love pirates?
My son loves them very much and decided to celebrate his fourth birthday in this style.
We spend the summer at the dacha, but since it is not located on the seashore, it was decided to transform the site into a small pirate cove!
The morning began with turmoil, while the main pirate was sleeping, work was in full swing: the trampoline was turned into fishing nets, they were looking for a place to moor the ship, hanging flags, pulling the sails, and goodies were placed on the veranda - the hold.
When the entire pirate crew had gathered, they were given pirate accessories (hats, sabers, belts, bandanas)
Then the team members went in search of the treasure. They were faced with difficult trials, which the team coped with honor.
After completing the tasks and successfully finding the treasure, the pirate team went to celebrate their victory.
- We began to prepare much in advance to purchase everything we needed in Moscow.
- First of all, I started preparing the decorations and, I want to say, it took quite a bit of time. What we had:
- imitation of a pirate ship from a refrigerator box, painted with regular gouache
- Cardboard anchor + gold paint.
- Flag - cardboard primed with black paint + Jolly Roger cut out and glued on.
- A rope is a thick rope, folded in half and twisted.
- Cardboard steering wheel. The process of its creation
Peculiarities
Making a sailing ship out of wood with your own hands is quite a labor-intensive task. You will need knowledge and a certain skill. You will also need to be patient. But the end result will definitely repay all the effort.
A handmade vessel will not only be a source of pride for you, but also an excellent element of interior decor in a nautical style.
Making a boat that doesn't sink in water
I offer you quite interesting models that are made of cardboard. Moreover, you can come up with such a miracle yourself. The main thing is that you need to find high-quality cardboard and have it be glossy on the other side. This type is usually not sold in stores; all kinds of souvenirs are packed in it.
Then ask your child to make decorations or decorate for him. In general, make it irresistibly beautiful.
Can be made from ordinary plastic cups or plates.
And, you can, hee hee, of course it’s a joke, and sail on such a creation on the lake yourself).
It’s also a good idea to take a milk or yogurt carton, i.e. a tetra pack, and use it to make a craft like this. Don't forget the checkbox.
An excellent option is to use a plastic bottle; it will never sink and such a boat will serve you for a very long time.
By the way, they also make structures from foam plastic and other available materials.
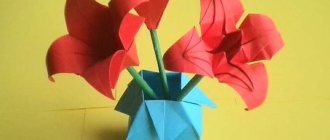
Where to put the talisman of success - a sailboat.
1) Place your sailboat in the hallway, near the front door, with its bow pointing inside the house. In this place, a sailboat will bring new opportunities, all kinds of benefits and prosperity. 2) In the southeastern sector, the wealth sector of your apartment, place a sailboat with golden, scarlet or blue sails. This talisman in this zone will bring you an increase in salary, success in business, as well as big money and wealth. Just do not turn the sailboat with its bow towards the window or front door. 3) In the northeastern sector of your apartment, you can also place your sailboat. To achieve success, you need knowledge in anything. So activate the knowledge sector.
Where to buy handmade products?
Handmade products and a variety of materials for making them can be found on OLX. Here you can find products both directly from craftsmen and from intermediaries. Delivery and payment for selected goods is carried out by agreement with the seller who posted the advertisement for sale.
You can buy embroidered shirts, beaded paintings, tablecloths, diamond embroidery to decorate your interior. Souvenirs and crafts, for example, figurines, postcards, a dream catcher, which can be bought cheaper than in stores, are excellent gifts. In addition, on OLX you will find original handmade clothes and jewelry, candles, bouquets and much more.
Simple paper boat folding patterns
Now you can use another guide to make a bunch of other and brand new models.
1. Take a square shaped sheet and roll it like this.
2. Fold each corner diagonally to form a triangle.
3. You will get a figure like this.
4. Take the next action.
5. And then fold and iron the corners on both sides to the center line.
6. Almost everything is ready, only a small matter remains. Namely, expand the figure.
7. Using your fingers, open and gently press everything against the walls of the boat.
8. This is such an interesting and funny toy, the kids will be delighted. Place your favorite cartoon characters in it and have fun playing with your child.
If, in short, or in general, you have already learned how to make such a boat, but at some stage you forgot, I am ready to offer you such a small scheme that you will definitely remember, copy it to your desktop so as not to forget))).
You can also make such a boat, it also resembles a closed boat. The diagram should be read from left to right. She swims perfectly in the stream and does not drown.
I think that even if there is a storm, such a toy will cope with it.
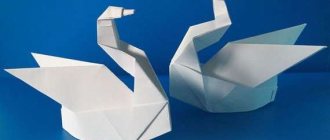
Ship with sails
But such a boat, on the contrary, for some reason is not popular among Russian children. Making a romantic boat with sails is not at all difficult; moreover, we found two ways that lead to the same result. It should be noted that such a boat does not sail very well, but it looks beautiful, and on our streams it is also fresh and unusual!
(Click on diagram to enlarge)
(Click on diagram to enlarge)
* Advice - when watching the video, turn off the sound, for some reason during this particular filming, someone was diligently torturing musical instruments in the background.
Bouquet of sweets - Ship. Master Class
expand
Master class from Murmansk.
For the base of the ship's hull we take a sheet of penoplex (insulation material for walls and ceilings).
master class" src=»//mtdata.ru/u12/photoCE9D/20943022088-0/original.jpg#20943022088″ alt=»Bouquet of candies - Ship. master class» />
We mark the parts (we will need 4 parts of a foam sheet for a ship 10 cm high). The width of the plate is 20 cm, I adjust the length later. We make markings for the rounding of the bow of the stern of the ship's hull.
For convenience, there is a triangle on one plate. We cut out the rest according to the template.
We cut out the nose of the body on all 4 parts.
Having folded all the blanks, we align them with a knife.
We make a recessed base for the bottle only in the two upper parts, having previously tried on the future trophy.
First, cut out on the top sheet.
Fitting.
we get 4 blanks.
Determine the required length of the ship's hull.
From the two cut pieces we make a side at the tail of the ship.
We glue together the 2 upper and 2 lower parts of the ship.
When the parts are glued, we align them with a knife
We sand with sandpaper.
Cut out the top cover of the body from the corrugation
We cut out the covering for the hole in the body from gold corrugation
We glue the corrugation onto the remaining parts of the ship.
We glue the gold mesh using a gun and decorate all the seams with cord or braid.
We glue candies onto the side of the ship as decoration.
We decorate the ship's bridge with corrugation and candies.
We collect.
Master class from Kangaru.
From the mesh I cut out 3 trapezoids, height 40 cm, top 7 cm, bottom 15
.It’s better to leave the margins along the edges so that you can trim them along the braid later
Makes 3 blanks
We attach the braid to the vertical sections.
We cut out the decorative mesh - 5 cm wide, length along the length of the sail - 40 cm
Pin the gold mesh onto the sails
We attach the braid along the horizontal cuts. Along with the mesh.
We bend along the line where the sails should be separated from each other. imitate yards.
We pin the folds with pins and sew off the fold.
We take a skewer. You can wrap it with a gold ribbon or cord. You can paint it. Thread the sail onto a skewer. It fits tightly, so no additional fastening is needed.
We install the masts on the prepared hull. We try it on before fastening it tightly. We place it at a slight angle to the axis of the body. Checking the “level”.
We tie ropes or strings.
Taking aim - how to make triangular sails on the bow and stern.
READY
https://master-flowers.rf/konfeti/46-buket-iz-konfet-korabl-ma…
Did you like our site? Join or subscribe (you will receive notifications about new topics by email) to our channel in MirTesen!
1
Impressions: 1 Reach: 0 Reads: 0
Source: https://supersweetie.mirtesen.ru/blog/43656760569
Necessary materials
The photo of a ship made of wood, made by yourself, shows that the following materials can be used for its manufacture:
Tree. It can be represented by such soft and non-fibrous species as cedar, linden, and walnut. Area of application - creating the main parts of a ship or small detail elements. Requirements for wood - evenness of surfaces, absence of knots and defects.
Plywood. The most popular material for shipbuilding. Usually the balsa or birch type is used, since they give the least amount of chips when sawing. The standard sheet thickness is considered to be 0.8 - 2 mm.
Veneer. Externally, these are thin plates of natural wood of valuable varieties. Used to decorate surfaces made of cheap materials.
Also, when creating models of merchant and military ships from wood with your own hands, you cannot do without such fasteners as thin chains, laces, threads, small nails made of brass and copper, etc. gizmos.
It’s also worth purchasing high-quality wood glue, sets of cardboard and tracing paper. Tiny detailing elements are made from metal casting or polymer clay.
Candy ships. Master Class
- I first “cut out” all the sails from paper. Of course, this increases the time spent working on the ship, but at this point
- I need it, since I make all the sails by eye, based on the size of the base.
- The sails consist of three rectangles. I start “cutting” from the bottom, its width coincides with the width of the ship, every
- subsequent ones are narrower than the previous one by 2-4 cm (it all depends on the scale of the ship).
- This ship has a lower sail of A4 size sheet, and a slightly larger one on the middle mast.
- For the masts I use fiberglass rod extensions (they can be cut to size if necessary)
- So that the flaws on the sides of the ship are not visible, I “dress” them.
- Using regular pins, I attach the cardboard and cut it to size, not forgetting to mark the right and left sides, the “wrong side” and
- "facial"
- Trying on ship clothes)))
I cover the cardboard for the sides of the ship with polysilic or paper to match, and, if desired, cover it with mesh.
- I already said that it is better to glue polysilk onto a glue stick; it does not spoil the film and allows you to change it if necessary.
- her position.