Plasticine is a universal material from which you can make a wide variety of crafts. A handmade vase will be a wonderful decoration for your home. In addition, this is a great activity for a child who will have the opportunity to develop their creative abilities. With the help of this master class, you will quickly understand how to make a vase with your own hands from purchased plasticine.
A little history
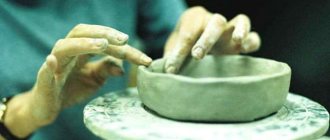
The first vases served as vessels for liquid and bulk products. They were made from clay. The finished vase was dried in the sun or fired in a kiln to give the material more strength. As objects of art, these vessels were used to decorate tombs; even then, craftsmen applied various ornaments to Greek amphorae.
First of all, such vases were decorated with historical paintings depicting various important events. By conducting excavations and finding such objects of art, archaeologists can judge entire eras.
Ideas for using baby food jars
- Pincushions. It’s easy to make these cute pincushions from glass jars that can hold buttons and other small handicrafts.
- Fairy houses. If you are into modeling, then you should try to make such a delightful fairy house.
- Aquarium. A jar is a small aquarium for a toy fish. Pour soil inside, install algae - the craft is ready. You can also make fish from plasticine together with your child and place them in a jar.
- Terrarium. Plant moss and other small, low-maintenance plants inside.
- Decorations for the holiday. Decorate the jars with glitter, make holes in the lids and install decorative elements, letters and numbers. A very original decoration is ready.
- Bird feeders. Few people realize that an ordinary baby food jar makes such delicious water bowls and bird feeders. In the sun they will shimmer with all the colors of the rainbow and delight the eye.
- Storage for small items. Jars make not only beautiful things, but also very practical ones. Screw the lids to a wooden surface and you will get very convenient containers for storing small items.
- Candlesticks for the garden. Buy a lot of small candles, put each one in its own jar and hang them on ropes on tree branches. A beautiful setting for a romantic evening is ready.
- Container for growing onions. Green onions are a storehouse of nutrients that are so lacking during the cold season. Growing such an onion is not difficult. Pour water into a jar, place the onion on top, and in a few days we will get the first shoots.
- Pots for seedlings. It is convenient to plant parsley, dill and other herbs in small jars.
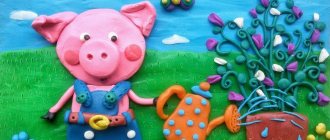
- Crafts from baby food jars. It’s easy to make such beautiful flowers in pots yourself with your children. We trace the palm on a green sheet of cardboard, cut it out, and glue a flower to each finger. We put it in a pot-jar - the beautiful craft is ready. These flowers will be a great gift for your mother or grandmother on March 8th.
- Storage containers. It is very convenient to store buttons, beads, and seed beads in mashed potatoes jars.
- Pencil holders.
- Night lights.
- Snowball. A baby food jar makes an adorable snow globe. Just glue the figurine onto the lid. Pour baby oil into the jar and add glitter, close the lid tightly and shake.
- Gift-treat for guests or children.
- Original frames. Just place photos inside the jar.
- Storing spices. Glass jars with a screw-on lid will help keep spices fresh for a long time.
- Vases for flowers. Just dip a jar in paint and get unusual vases for small flowers.
- Jelly mold. Small jars are great for making jelly. It looks beautiful and appetizing in them, one jar holds one serving, and the screw cap will help keep it in the refrigerator for a long time.
- Portioned desserts. Small jars are convenient for making portioned desserts.
- Refreshing cocktail in jars.
- Candles. You can read how to make such candles.
- Crafts. Small glass jars make an excellent base for crafts.
- Storing rubber bands. The advantages of transparent jars are obvious - it’s easy to find the one you need.
How do you use jars?
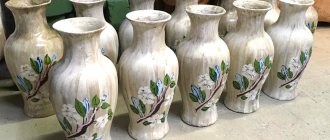
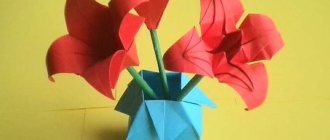
Vases are elegant vessels for liquids, plants or bulk materials. They are made from various materials: clay, porcelain or glass, decorated with carvings or stucco, and painted. For a dollhouse or a gift for mom, children can build a vase from plasticine. Modeling from this material develops fine motor skills in a child, as well as creative imagination and fantasy.
The first vases were used to store bulk materials and liquids. These vessels were made exclusively from clay. For greater strength, finished products were fired in special ovens or dried in the sun.
Vases were used to decorate the tombs of rulers and rich city dwellers. In Ancient Egypt, funeral amphorae were filled with fruits, gold and precious stones. The Egyptians believed that the pharaohs would need food and familiar luxuries in the afterlife. Already in ancient times, Greek and Egyptian potters decorated their amphorae with everyday scenes, plant ornaments and images of animals. Archaeologists use such finds to recreate scenes of everyday life, military battles, and festive rituals.
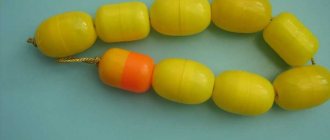
Striped plasticine vase
Another option for a plasticine toy is a striped vessel. It can be used in a doll's house, but if you make the vase large enough and use cardboard for the bottom, it will work as a pen and pencil holder.
You need to choose plasticine of four colors: blue, lilac, yellow and red. The material is kneaded and rolled into thin pieces of different lengths. The parts are divided in half. A ring is made from one half, connecting the ends of the blue strip. A larger diameter blank is made from the lilac half. The third part is made of yellow plasticine. The largest ring is made of red material. Four more similar rings are prepared in a similar way.
Master class on creating a vase from plasticine sausages
Another option is to make your own vase and decorate the glass base, decorating the jar with multi-colored plasticine sausages. They can be attached evenly horizontally or vertically, making a striped rainbow vase. You can decorate with small waves, which can be made ribbed using a regular dinner fork.
There are many master classes. For example, such a product can be made multi-colored, single-colored or striped. For example, make your product in a marine style, decorating a jar with blue, white and red stripes.
In order for the plasticine to last for a long time, it is necessary to attach it evenly and firmly to the surface of the jar. To create a vase from a bottle and plasticine, finger movements must be strong and uniform, and the edges of the sausage must be thoroughly smeared.
How to choose plasticine for creativity in a group of children?
To sculpt crafts, it is better to choose high-quality, soft material. It is perfect for decorating glass or creating a separate vase.
It is worth buying classic children's plasticine, which does not have an acidic color or a fruity smell . also not recommended to take too cheap plasticine . It can dry out quickly, turning to stone.
Play dough or super soft material for kids will not be suitable for such crafts either . These materials have a different composition, they dry quickly, shrink, and do not stick to the glass.
Before starting work, it is better to store your material in a warm place. If the pieces are too hard, first knead them with your hands, dividing the piece into several parts. And then they form flagella or sausages.
Decoration for a doll's house
Even kids can make the simplest vase for dolls. To do this, you need to form two balls of different diameters from plasticine and connect them together. The joint is carefully smoothed with your fingers.
Using a pencil, you need to make a hole in the body of the vessel. Next you need to form the neck using your hands. Having made the base, you can move on to the design of the vase. Just show your imagination!
The finished vase will be an excellent decoration for a dollhouse.
Creating a product for dolls
The interior of the dollhouse can be decorated with a plasticine vase of flowers. For the product you will need:
- plasticine of two colors;
- stack with a sharp tip;
- pencil;
- board for work.
Roll out two balls of different sizes from a material of the same color on a board. The parts are connected by carefully rubbing the joint with your fingers. I make a hole in the smaller part of the product with a pencil, and form the neck of the vase with my hands. You need to twist two thin ropes from plasticine of a different color. The smaller one is used to wrap the lower part of the vase, and the upper part is used to wrap the neck. A pattern is drawn on the product in a stack, complementing it with colored geometric shapes. You can put a small artificial flower in the finished vase.
How to make a vase from plasticine: classic model
Let's start with the standard option. To perform this work, we will need plasticine and a tube, which, if desired, can be replaced with a regular pencil. You can choose a variety of colors, depending on what idea you will bring to life.
- First of all, let's start making the base of our product - the body. To do this, you need to take a block of plasticine of your chosen color and make a couple of balls of different diameters from it.
- Now we connect the resulting parts so that the transition point from one to another is invisible.
- Next, we form a hole inside the future body, into which we place the tube. We model the neck and margins around the hole from plasticine, making them as wide as possible.
- Having finished making the base of our vase, you can start decorating. To do this, we create a wide variety of decorations from plasticine of different colors - from simple circles to complex ornaments and plants. In addition, using the sharp edge of the stick, you can complement the pattern with neat lines and curves.
Create an original vase from polymer clay
I want to show you how to create a composition vase from polymer clay. The advantages of such a vase are not only originality, but also the possibility of choosing a color and thematic selection for your interior, as well as exciting work and a unique result. I want to warn you that it will be difficult to complete the work in a day. The lesson will not contain new and useful information for everyone, but I will try to reveal as much as possible the essence of making useful things for the home, focusing on accessibility, selecting simple techniques that give professional results, and also warning against some mistakes.
So, first, let's decide what we want to get. Our interior requires a large stone vase or a miniature golden one. I chose a composition consisting of an old tree, a nymph girl and vegetation. The idea of my vase is that the powerful trunk should support lush bouquets, turning them into a small tree. Your options are endless! To implement the idea I will need:
- polymer clay of different colors (for my vase I needed brown, green, beige, red, white and black);
- tools: round and cone-shaped silicone stacks, homemade wooden stack with a bevel, sewing needle;
- acrylic and oil paints and brush;
- varnish for polymer clay;
- glue Moment second;
- cup.
Rice. 1 - Materials
In addition, I used rhinestones and sparkles.
I selected each material so that our vase could come into contact with water. The glass will be the base of the vase. I'll write about paints. Acrylic paints dry quickly and mix easily, but if you have oil paints, painting with them is also possible. The fundamental difference in working with oil paint is that it takes a long time to dry, and the tinting with it will turn out to be quite even, unlike quick-drying acrylic, which, with light tinting, will not give you the desired result, but will roll off more. If you add more water to the acrylic, bringing it to a solvent state, you can tint it, but this requires certain skills, and it is better to try it on some part that will be glued with the side with the sample inward. I took a second glue. If there are small parts, such as twigs, a wire frame is needed, which will subsequently prevent the vase from flying apart if it falls.
In my work, I used a gradual assembly method due to the presence of small parts. I wanted to give the vase some lightness with elements such as grass, a dress, and mushrooms outside the vase. I would like to draw your attention to the fact that a method such as gradual gluing is good where you want to create airiness: many inconsistent details will give a natural lightness to the composition, but sometimes deformation during baking can only ruin the material and your mood. Therefore, for beginners, I advise you to make separately those elements that you are definitely afraid of ruining (the face, bows, etc.), and what can break or fall off is better to stick to a durable frame or create it inside from wire.
So, let's start making our vase. I would like to immediately warn you that initially think through your vase, how and what will be attached, and in what sequence, so that later you don’t have to “cut through windows” or sand it so as not to damage the workpiece. I would also like to warn you about painting: I describe painting the parts immediately after baking, however, this may lead to an imbalance of colors when assembling the work. It also happens that painting a job after it is completed is not always convenient. Therefore, if you are not confident in imparting color saturation and integrity to the composition during gradual painting, then it is better to prepare all the details, and then sit and paint them at one time.
I draw sketches in order to edit all the difficult moments in advance. In one sketch, I realized that I needed to place the stones and the bottom of the glass in the same plane, and also shorten the barrel. In the second picture I depicted an approximate attachment of the nymph. Then I came up with a skirt and roughly made its measurements. Do not forget that it is better to make the drawing in full size, so that later we can apply the details and see if we fit into all the dimensions.
Rice. 2 - Sketches
Rice. 3 - Sketches and actual size ratio
STONE
To begin with, I decided to make a “stone” base for the vase to make it more stable. I will place the stone and the bottom of the vase in the same plane. I will then add trees, grass, and other decor onto these stones.
We take paper, foil, from which we form the stuffing part of the stones, as well as gray polymer clay (I mix black and white with beige to get some shade).
Fig. 4 - Imitation stone: materials
I filled the stones and roughly saw if it was enough for me by placing it around the glass.
Fig. 5 - Imitation of stone: estimation with quantity
One thing to keep in mind: always choose a base color that you will complement later. The main color is the color of which there is more, and the tinting color is the color of which there is less. In practice, it will be easier for you to paint over a small piece; moreover, it will turn out much neater, and scratches with this method of painting are less scary. I form an uneven stone, and then, drawing my fingernail to the corners, I sharpen the edge, and so on over the entire surface of the stone. The stack can additionally cause scratches and cracks.
Fig. 6 - Imitation of stone: creating a stone texture without tools
I got this set of pebbles.
Fig. 7 - Imitation stone: ready-made set
So, we have made the stones, it’s time to “cut” them according to our idea into the shape of a vase. I always like to make several spare blanks, which can then be used to complement the composition. Now we bake them so that we can continue “planting” the rest of the composition. After the stones have received the necessary strength, we collect them around the glass and set them on glue.
Fig. 8 - Imitation stone: after roasting
Let's start painting. If you are not satisfied with the color, you can paint it the desired color. We take a synthetic brush for acrylic paints (they are easier to wash) and the paints themselves. We highlight the convex parts: dip it a little in a light gray brush so as to take a little paint (it’s better to dip it on the paper a couple of times), then lightly move it along the protruding edges. After drying, you can take other colors to add liveliness to the composition: yellow, red, green, and so on.
Fig. 9 - Painting stones
After “hardening” the stones, let’s start sculpting the wood.
TREE
To complete the work we will need: brown plastic (I mixed my own multi-colored), foil, acrylic paints and a synthetic brush.
Another warning: if you intend to use the vase quite often, then it is better to avoid parts that will not attach well or be thin; It’s better to attach parts that require thinness to a backing (for example, it’s better to stick a girl’s hair to thicker strands, to wood, to the body, and if absolutely necessary, make a wire frame inside).
Fig. 10 - Harvesting wood
To begin with, I make several rectangular layers that are larger than a glass. Then, I wrap the glass around to see if the bark is the right size for the glass.
Fig. 11 - Harvesting wood: measuring the length of bark
Let's start pushing the bark. I squeeze out and cut out the bark in a circle using a cone-shaped stack, which I made myself from a bamboo stick, and with a soft silicone cone-shaped stack, I kind of widen the cuts and make them deeper. The picture shows exactly how I get textured wood from smooth wood.
Fig. 12 - Wood preparation: texturing
I try on the bark again. Due to extrusion, the bark is slightly deformed, so it may not be enough or become larger.
Fig. 13 - Harvesting wood: measuring the length of bark
We lay out our bark in a row to figure out where we can still deform it.
Fig. 14 - Harvesting wood: preparation for bark deformation
Let's add even more relief using foil and plastic inserts. We put foil in plastic and plastic at the back, and push it through the front. We get a more uneven shape, closer to real bark.
Fig. 15 - Harvesting wood: deformation
And again we try on the bark. At this stage I want to leave the bark on the glass and not peel it off anymore. We can bake it easily if we do not place the glass in a preheated oven (!).
Fig. 16 - Harvesting wood: securing the bark
When the bark sits tightly on the glass, we can begin to detail it. We have the main veins, we must apply the small ones. In the same way as we created the structure of the bark, we make small veins.
Fig. 17 - Harvesting wood: veins
You can stick balls and poke holes in them with a needle, getting a round growth.
Fig. 18 - Harvesting wood: creating a build-up
I decided to give the tree a face. According to my idea, in the mouth of the tree you can see the water level, since I removed all the bark up to the glass. When my idea with the tree is finished, I bake everything together. I put the preparation in a still cold oven and bake it. The workpiece should also cool down on its own. Now we can start painting it. First, we paint the wood with dark paint in the recesses. I mix red, yellow and black paints to get a shade similar to mahogany.
Fig. 19 - Harvesting wood: securing the bark
Once we have deepened the color of the bark, we can tint the raised parts. I mix white and brown paints (it turns out something similar to lilac-gray), and with a light movement of the brush, which I first dip on the paper, I apply paint over the entire surface of the wood, along each sharp edge.
Fig. 20—Wood harvesting: securing the bark
To add liveliness to the composition, I tint the bark in places with yellowish-green paint.
Fig. 21— Harvesting wood: securing the bark
This technique will allow you to achieve maximum resemblance to the bark.
So, we have created the framework. Now we begin more painstaking work: sculpting a nymph, grass and other forest vegetation.
NYMPH
I'll start with, perhaps, the most difficult thing - the nymph. Sometimes it is difficult for me to give a doll's body some kind of static pose without damage. In some cases, when there are not many open spaces, I use a trick: I divide the figure into parts, fashioning the necessary parts according to the situation, and then gluing them together with less deformation than in the “monolithic” version of the problem solution. I want to do the same here. According to my ideas, it will be possible to divide the figure along the hip and shoulder lines. We take the required color for our nymph, the stacks (I have a silicone round one, a sewing needle and also a cone-shaped stack, which we used to press the bark).
Let's start sculpting the face. I advise you to familiarize yourself with the structure of the head and the parameters of a person’s face in advance. Any face has its own characteristics, I chose a certain type, and I will stick to it, but you may have a different vase and figurine, so I will only focus on the principles of manufacturing without indentations. In addition, it’s a good idea to sketch out the proportions of the figure, which will help you adjust the shape at an early stage. You may have a face mold, but if not, then make a small egg out of foil and place it on a stick so that it has less contact with the clay and is deformed by it. Now let's stick it around.
Fig. 22 - Preparing a nymph: shaping the face
We start with the nose: attach it and smooth out the seams (nail polish remover is great for smoothing).
Fig. 23 — Preparing a nymph: shaping the face
Now the eyes. We squeeze out the eye sockets, then attach the eyes there and smooth out the seams. We make the nostrils with a needle. Then we cut out the eyelids from the eye, highlighting them with a cone-shaped stack. You can stick on your eyelids and smooth them.
Fig. 24 — Preparation of a nymph: eyes
We cut out the lower eyelid from the eye, simply pushing the clay inside.
Fig. 25 — Preparation of a nymph: eyes
Make sure that the oval of the face does not collapse (turn your face sideways and look at the forehead-chin line).
Fig. 26 — Preparation of a nymph: verification
Now let's make the mouth. To do this, first stick on the upper lip, smooth it on top and shape it with a needle and the same silicone round stack.
Fig. 27 — Preparation of a nymph: upper lip
We fasten the lower lip and do the same. We make a fold between the lip and nose, you can add it on the cheeks. Now you can add ears as desired. I didn’t do the ears, because I immediately decided to put my thick hair on my shoulders.
Fig. 28 — Preparation of a nymph: lower lip
The face is ready. We attach the head to the neck and torso, which we will prepare according to our drawing. We make the torso, arms and legs. To do this, we make rough clay blanks using our template.
Fig. 29 — Preparation of the nymph: preparation of the body
I allow myself to separate parts of the body in some places (hip and shoulder lines). I will decorate the seams in future work. We create handles: we make a sausage of dimensions according to our diagram, then we begin to give it a shape. The palm is flattened at the end where the fingers will be. Let's cut them out. The fifth finger can be cut out or stuck on. Let's give the fingers a more round shape by rolling them a little. If, when rolling the fingers, they become too long, then simply cut them off. For realism, I press the bones on the hands at the top with a round stack, and at the bottom I make a concave hollow for the palm. In the elbow joints, do not forget to make a bend line, stretch out the bones. I use the same tools as for the face.
Rice. 30 — Preparation of a nymph: hands
Making the legs a little easier. Flatten the end again where the fingers will be. Then we push through the bones. Now, where we have rough ends of our fingers, we press them inward with our nails, adding depth and at the same time smoothing the edges. We press with a needle near the foot between the toes to give them realism. We compare everything with the layout.
Fig. 31 — Preparation of a nymph: legs
Our nymph is almost ready.
Fig. 32 — Preparing a nymph
Depending on our thoughts, we can connect or separate parts. For example, I want to make a long dress for a nymph, for this I don’t care about the legs near the pelvic joint from the back. I apologize in advance to the masters who are not ready to accept such receipts in forms, but I want to justify myself by saying that we simply save time and nerves on some operations, but do not worsen the result. I hope you haven't forgotten that we need to attach thin parts to a substrate or make a frame. What I mean is that fingers, toes and thin strands of hair can quickly break off. I also want to separate the arms from the shoulder joint, but then the seams will be hidden by the hair. Now we get to the hair. Making hair is similar to the technique of making bark, which we discussed above, but there is a slight difference: we do not need to take a thin layer, and we can allow ourselves, depending on the hairstyle, any shape - curved and wavy, flat and elongated, short and sticking out... There are no limits in variations of hairstyles and their colors! I choose the standard color. I take the layer with unevenness and begin to shape the hairstyle the way I wanted. I make cuts, roll in places, add strands.
Fig.33 — Preparation of a nymph: hair
I have the opportunity to fix the hair directly on the head, and in some works this option may not be possible. For example, it’s inconvenient for me to bake my hair and figure at an angle. Before baking our nymph, we will attach it to our vase to slightly correct the shape. We bake our parts.
Fig. 34 — Preparing the nymph: leveling before baking
Once the nymph is baked, assembled and glued to the tree (sounds "original"), her robe can be created. I make it from green and white flowers, mixing them in a pasta machine. Cut the layer into arbitrary pieces. I cut out three sharp triangles and then used a circle stack to create pleats on the dress. Don’t forget that we are making an item that we will use, so “it’s better to take thicker material for the dress.”
Fig. 35 — Preparing a nymph: creating a costume
Bake again and then glue on the dress. Now let's start painting. To obtain subtle shades, you can use oil paints or pastels. I often use the second option for the face, as it has a light shade. I use acrylic or oil paint to apply color in dark areas. On the dress I applied white paint around the chest and hem.
Fig. 36 — Preparing a nymph: creating a costume
Many craftsmen paint dolls in advance before frying, but you need to get better at painting. The advantage of painting after baking is the ability to erase makeup without causing damage to the form. We paint over the eyes, lips, cheeks - the simplest thing. If you are a makeup master, you can use all your skills to create a masterpiece! I limit myself to highlighting the eyes.
Fig. 37 — Preparation of a nymph: makeup
Painting the arms and legs may interest you in the colors we used in tinting the stones. I highlighted the arms and legs in lime green along with the stones and wood, as if they were glowing.
Rice. 38 — Preparation of the nymph: tinting the arms and legs
PLANTS
The simplest but most time-consuming work is creating vegetation. Have you decided on it too? I cut lots of triangles using a utility knife and then casually pull them out in a stack.
Rice. 39 - Plant Creation: Grass
I make mugs: I roll out the ball into a pancake, stretch out the leg, then squeeze the pancake between the finger bone and the pattern of the palm. This method allows us to create a small pattern similar to the texture of a natural leaf. I press the leg with a needle. You can make several snags, bark, twigs, spikelets.
Rice. 40 – Creating Plants: Burdocks
I really love making mushrooms. The standard assembly is shown in the picture: we make the leg, cap and lamellas (plates) using the cutting method with a stationery knife.
Rice. 41 - Plant Creation: Mushrooms
I can't when nature is faceless. As a result, all my mushrooms acquired their own facial expressions. If you want to make mushrooms more original, you can find a detailed master class on my blog.
Rice. 42 - Creating Plants: Mushrooms with Faces
We paint all the vegetation that was previously baked, and then randomly populate the base of our tree with it.
Rice. 43 – Creating plants: painting and gluing
And again, do not forget that where it is thin, everything that is thin must be strengthened.
When our composition is put together, we can see all the flaws and correct them. When the vase seems to be ready, I start decorating it. In some places I add multi-colored paint, finish painting the grass and mushrooms, the nymph’s hair, and stones.
Rice. 44 – Creating Plants: Painting
I decorated the nymph's dress with sparkles along the hem, rhinestones on the bracelets and necklace. I sprinkled the mushroom plates, glowing arms and legs, and grass with fluorescent powder. To imitate dew, I used transparent beads. Now we varnish the vase and leave it to dry.
Rice. 45 – Vase decoration
Rice. 46 - Result
Thank you all for your attention! I hope I was able to save you from many pitfalls when creating complex compositions from polymer clay. I wish you good luck in fulfilling your dreams!
PS I created the vase to display ceramic flowers, but the vase remains calm even under standard conditions.
Presentation “This Amazing Plasticine”
#1st grade #Labor #School education #Project activity #Presentation
This amazing plasticine. The work was carried out by Sofia Yurchenkova, a 1st grade student at the Aksyonovskaya Secondary School. 2022
Project goals: To study the history of the appearance of plasticine. Get acquainted with the composition of plasticine and types of plasticine. Learn about the meaning of plasticine. Make plasticine with your own hands.
The history of the appearance of plasticine. The first plasticine appeared in England 138 years ago. It consisted of clay, salt and petroleum jelly. Industrial production began in 1900 in Germany.
Types of plasticine Domestic plasticine. (Classic and wax) Foreign plasticine. Ball. Plastic clay. Plastic sand. Floating plasticine. Salty dough.
Edible plasticine Salty and sweet plasticine are produced for kids. In the confectionery industry, mastic is used to decorate cakes.
Composition of plasticine. Domestic plasticine. (Wax and classic) Foreign plasticine. Edible plasticine. Paraffin, chalk, dyes, petroleum jelly, rubber, fats, polyethylene, wax. Vegetable dyes, starch. Flour, vegetable oils, salt.
Types of work with plasticine. Modeling of figures. Connecting parts when working with natural materials. Application. Application to glass. Sculptures. Creation of cartoons.
The meaning of plasticine
Develops fine motor skills, attention, imagination, speech, artistic taste. Instills perseverance, accuracy, promotes memorization and color recognition
Relieves stress, calms.
My research. 10 students were interviewed. They like to work with plasticine 8. 2 students do not like this activity. Out of 7 adults, 5 loved to sculpt (from clay or plasticine) as children.
My art.
DIY plasticine. My plasticine Recipe for making plasticine at home. 1 glass of warm water. 1 tablespoon of vegetable oil. ½ cup salt. Food coloring. 1 cup flour.
Conclusions. Plasticine was invented 138 years ago. I learned the composition of plasticine, types of plasticine. Many people like to work with plasticine and clay. You can perform various works from plasticine. Working with plasticine is very useful.
Used Books. %82%D0%BE%D1%80%D0%B8%D1%8F+%D0%BF%D0%BB%D0%B0%D1%81%D1%82%D0%B8%D0%BB%D0%B8 %D0%BD%D0%B0&gs_l=psy-ab.1.1.0l2j0i22i30l8.3315.15846..17483…1.0..4.429.6687.2-16j3j4……0….1..gws-wiz…..6..0i71j35i39j0i131j0i67j0i 20i263.8rKzkvTaf1M https://www.google.com/webhp?hl=ru&sa=X&ved=0ahUKEwjrsrW8mePeAhVCfywKHWBxAkoQPAgH https://www.google.com/search?source=hp&ei=Huf0W7H
Light airy plasticine that glows in the dark at home: instructions
Light airy plasticine that glows in the dark
We suggest taking note of a few more unusual ways to make light airy plasticine at home. The first is a modeling compound that glows in the dark. Here are the instructions:
Main ingredients:
- 300 milliliters cold water
- 400 grams of baking soda
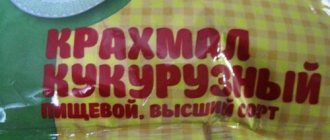
- 200 grams of starch
Do this:
- Mix all these parts and heat well until a homogeneous consistency is formed.
- Then mix everything in your hands and add vitamin B from the pharmacy until a viscous consistency is formed.
- The material for modeling is ready.
When your child makes a figurine, leaving it on the window, his product will light up. After all, vitamin B glows when exposed to the sun.
How to make a vase for fruits and flowers from plasticine⋆Children's World
Every home is probably full of old and broken children's toys that you no longer play with. Sometimes you feel like you should throw them away to make room for new toys. But don’t do this, but rather turn on your imagination and roll up your sleeves. Every broken toy can be given a new life with the help of ordinary plasticine. We will look at some combinations of plasticine and old toys today.
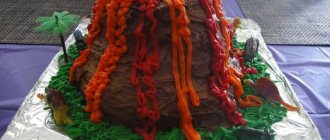
Technology for making a plasticine fruit vase
Using plasticine, you can sculpt not only toys, but also make various beautiful vases in which you can hold fruits, sweets and cookies. For example, you can sculpt a vase in the shape of a swan, using part of the toys for the neck and head. For example, coat a plastic ball with plasticine, attach a beak, a neck (you can use a thick electrical wire, pierce a hole in the ball. We will also cover the wire with a layer of plasticine). As a bowl in the swan’s body, we use some kind of plastic container, covering it with plasticine inside and out, and simply mold the rest: wings, tail from one plasticine. Of course, you don’t need to immediately put fruits and cookies there after you fashion a plasticine vase.
How to process the walls of a vase
First it needs to be processed in a special way. When your product is completely ready, carefully sprinkle the vase on all sides with potato starch. Potato starch must be dry. Now let your vase sit for a few days. This is necessary so that the plasticine becomes completely fat-free. After this, the starch must be swept away from the vase. Now take a brush and very carefully coat the entire surface of the vase with PVA glue. After the glue dries, your vase will be covered with a thin continuous film. The next step is to paint the vase with white emulsion paint. It is necessary to paint in several layers to ensure a durable surface. Now use your imagination and choose what colors to paint your product with.
You can paint a vase with Khokhloma painting, decorating the vase with ripe berries, green leaves, ornate curls, beautiful flowers, thick grass. Khokhloma painting, in principle, is not that difficult, and even you can handle its application. To make the painting of your vase more elegant and neat, use the thinnest brush for the job. Use gouache as paint. After you have painted the vase and the paint has dried, coat the product with varnish. That's it, your plasticine vase is completely ready, you can show off your work to your friends.
Making a flower vase
Using plasticine in this way, you can make not only vases for sweets, fruits and cookies, but also vases for flowers. To make it easier, use a small children's bucket or a plastic mayonnaise jar as a base. You will also need half a plastic ball and a bowl. Coat all these items with softened plasticine. And add the top, narrow part of the flower vase. Well, you already know what to do next.
You can safely pour water into a plasticine vase made in this way so that the flowers do not quickly wither.
Making a fruit bowl from plastic bottles
In this tutorial you will learn how to make this fruit bowl from large plastic water bottles.
To work you will need:
- Old 19 liter water cooler
- 6 liter water bottle
- PVA glue, plastic glue and brushes
- Leg-split
- Scissors
- Toilet paper
- Black and gold spray paint
Let's start working on the vase:
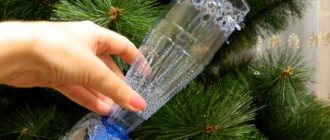
We cut off the necks of the bottles just below the beginning of the wide parts of the bottles, as shown in the photo. These are the only things you need for the job.
Then we decorate the surface of the two blanks using the papier-mâché technique. To do this, use PVA glue to glue the blanks with several layers of toilet paper. If you don’t have time, as a last resort, you can simply paint the necks, but the effect will not be the same. Having leveled the surface, leave the parts to dry.
Then we make relief patterns on the surface from pieces of toilet paper. To make ropes and lumps out of it, we wet our hands in water. Glue the finished patterns with PVA glue and dry. You can sculpt flowers, leaves and berry bunches.
We do the same with the second part of the vase.
We cover the dried halves with two layers of paint - first black, then gold. If there are any unpainted areas left, we finish them with a brush.
We glue both parts with plastic glue and wrap the joint with twine dipped in PVA. A beautiful fruit bowl is ready!
Technology for making a plasticine fruit vase
Using plasticine, you can sculpt not only toys, but also make various beautiful vases in which you can hold fruits, sweets and cookies. For example, you can sculpt a vase in the shape of a swan, using part of the toys for the neck and head. For example, coat a plastic ball with plasticine, attach a beak, a neck (you can use a thick electrical wire, pierce a hole in the ball. We will also cover the wire with a layer of plasticine). As a bowl in the swan’s body, we use some kind of plastic container, covering it with plasticine inside and out, and simply mold the rest: wings, tail from one plasticine. Of course, you don’t need to immediately put fruits and cookies there after you fashion a plasticine vase.
We make an exquisite craft with step-by-step instructions
In addition to the classic version of making a vase from plasticine, you can make a wonderful souvenir using a bottle. Such a product can act as a wonderful gift, as well as a craft for 4th grade children. The manufacturing process is simple and takes relatively little time. For your convenience, we offer instructions, following which step by step, you will receive a beautiful decoration for your interior.
In the process we will use the following materials:
- Plasticine
- Plastic bottle
- Brushes and paint
- Toothpaste
- We start by clearing the surface of the bottle from the label, washing it and drying it.
- Now that the base of the vase is ready, let's start sculpting. We apply plasticine to the bottle as your imagination requires.
- Next, we are making jewelry, which will be flowers. Using plasticine we create plant petals, stems and cores.
- We fix the resulting parts on the product.
- In order to be able to apply paint to the vase, you need to apply toothpaste over the plasticine and allow it to dry. T
- Now we paint the vase and draw the elements to give the decor the most advantageous look.
The resulting vase can be a creative design solution and add some spice to your home. She will also make a delightful gift, made with all her heart.
You can also use jars as a base for a vase. This product will be more spacious and voluminous. It is done in exactly the same way as when using a bottle - we clean and dry the container. Then we stick layers of plasticine onto the surface of the jar and decorate the top with plasticine flowers. You can also attach beautiful beads that will add originality to your product. Using this technique, you will give your child the opportunity to learn the art of modeling from plasticine, develop fine motor skills and provide hours of exciting work.
Gift for mom
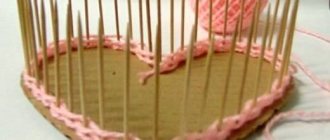
An indispensable attribute of the spring holiday on March 8 are fresh flowers. Of course, it is the privilege of adult men to give such gifts to their female half. But students in grades 1-4 are quite capable of pleasing their mothers with an unusual vase. It can be made using the plasticineography technique. This technique is based on applying plasticine to various hard surfaces. We suggest you make a vase from plasticine and jars. To make a vase you will need:
- Glass jar;
- Plasticine;
- Green wool thread;
- Various cereals (peas, rice);
- Toothpick or sharp stick.
It is best to take an elongated jar for a vase. The plasticine should be soft or should be softened first by placing it in a warm place.
First, the prepared jar needs to be covered with a thin, even layer of plasticine.
Next, use a toothpick to draw the selected pattern on the future vase. In this case, it is a bush with daisies.
Line out the outlines of the branches with thread.
Place the daisies from the cereal. Use peas as the yellow center of the flower, and grains of rice will serve as chamomile petals.
Write “March 8th” on the back of the vase.
A wonderful gift for mom is ready. Such a vase will certainly please her, because it is made with love.
Plasticine frog
Making simple shapes with your own hands is quite simple. Here you need to show your imagination and a little patience. In order to make a frog, it is recommended to prepare several colors of plasticine: green, white, black. A regular toothpick will help you create texture lines.
The process of creating an interesting craft from plasticine is divided into several stages:
- We begin to form the head. To do this you will need a small piece of green. Carefully form a round part using smooth movements;
- Next we move on to the body. Here a piece of larger volume is taken. We place the soft material between the palms and begin to form an oval;
- The legs of a frog consist of long elements. We form sticks of medium thickness from green plasticine. Press one end with your fingers. Use a toothpick to form membranes;
- We carry out the same manipulations with the front legs;
- Let's start designing the muzzle. To do this, take a small piece of white material and give it the shape of a circle. It will help highlight the eye area of the frog. So, we proceed with the next element. The pupils can be made from black plasticine;
- Now we connect all the parts together. We fix the head on the body. We attach the front and hind legs to the frog's body.
We create a multi-colored plasticine vase ourselves in a master class
There is another technique for performing the classic version. Even a child can easily handle such a vase, it’s so simple to make.
- You will need multi-colored plasticine, from each block of which we pinch off a small piece.
- To make it soft and comfortable to sculpt, you need to carefully knead the plasticine in your hands.
- Now let's get to the fun part - making the vase itself. We roll each piece into long sausages so that their size increases depending on the color. The shortest strip will be used as the base and neck.
- We divide each resulting sausage in half and bring its ends together.
- Now we have rings of different diameters. All we have to do is place them on top of each other as their size increases. Then, having reached the maximum ring, we place the same size on it, and then place the parts in descending order of diameter. Attach the smallest ring and the vase is ready
- You can decorate the plasticine toy at your discretion.
Plasticine flowers
Plasticine is a bright material that can take any given shape. You can create a whole vase of flowers from plasticine with your own hands.
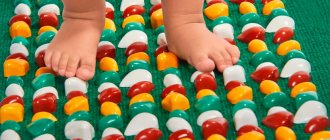
In order to make daisies, it is enough to make a round cake from a piece of yellow color, and the petals will be white plates elongated in the form of droplets.
For cornflowers, blue or dark blue petals are glued to the yellow round core, the edges of which need to be pinched with your fingers, making 3-4 notches.
In order to make a carnation, you need to roll out a long strip of red plasticine. Make light tucks along the top edge with your fingers or using a stack. Roll the strip into a spiral. Decorate the bottom edge in green.
Making a rose queen from plasticine is much easier than drawing it. Make several round flat plates of the same size. For a small flower, you can cut them out using half of a plastic kinder egg. Cut them into two equal halves. Roll one, making a core, glue the rest in a circle, giving the shape of a rose. Depending on the size of the future flower, you may need from 2 to 7 petals. Their edges can be bent so that the rose becomes like a real one.
It will be even easier to fold the halves of the circles in a row with a slight overlap. Roll into a spiral.
Another rose option. Make a cake out of plasticine and use a stack to press the petals into it, starting from the center, making notches in a spiral. This option is suitable for decorating a vase.
Flower stems can be made from toothpicks or bamboo sticks, depending on the size of the buds. They also need to be coated with green plasticine and provided with leaves.
These flowers can not only decorate the surface, but also put them in a finished vase.
For the holidays:
New Year:
- Star
- Octagonal star
- Classic kusudama
- Kusudama Sakura (Chernova M.V.)
- Garland of balloons
- Christmas balls
- Volumetric paper ball
- How to draw a snowflake
- Volumetric paper lantern
- Lantern pendants
- Paper lanterns
- Garlands of ballerinas and snowflakes
- Felt Christmas decoration
- Learning to draw a Snowman with a letter (Tikhonova N.A.)
- Snowman made from a sock
- Bullfinches on the branches
- Christmas angel
- Christmas stocking
- Learning to draw a New Year's candle (Kurova T.V.)
- Carnival New Year's mask (Goloshumova O.E.)
- Mittens
- How to draw a Christmas tree
- How to draw a fluffy Christmas tree with a pencil or felt-tip pen
- Christmas tree for every day
- Christmas tree on Christmas tree
- Christmas trees made of colored paper
- Christmas tree made of paper
- Making Christmas trees
- DIY Christmas tree
- Volumetric Christmas tree
- Let's make a Christmas tree
- Christmas trees made of strings
- Drawing Christmas trees
- Learning to draw a Christmas tree and Santa Claus (Kurova T.V.)
- Santa Claus (origami)
- Drawing Santa Claus
- Santa Claus from paper-1
- Santa Claus from paper-2
- How to draw Father Frost and Snow Maiden
- Snowflakes-ballerinas
- Volumetric snowflake
- Volumetric paper snowflake
- 3D paper snowflake
- Cutting out snowflakes
- New Year's applique
- Year of the monkey. Draw a monkey
- Do-it-yourself souvenir dog (Kurova T.V.)
- Let's draw a dog - a symbol of the New Year (Fuflygina N.N.)
- Craft “Pig from plastic bottles”
- Drawing the symbol of the year of the pig
- Drawing a pig
- Christmas tree toy “Pig”
Easter:
- Original crafts for Easter
- Crafts for Easter
- Crafts for Easter
- Easter crafts for little ones
- Crafts for Easter from dishes
- Easter crafts from disposable plates
- Making Easter bunnies
- Easter egg (Kneis E.A.)
- Drawing an Easter egg (Sinitsyna I.V.)
- Drawing Easter eggs
- How to draw Easter eggs
- Easter paper bunny
- Drawing the Easter Bunny
- Easter bunny made from plates
- Easter chicken
- Ideas for Easter from plates and napkins
- Easter applique (Sinitsyna I.V.)
Postcards:
- Postcards for February 23
- Greeting card for February 23 (Isaeva A.V.)
- Postcard for daddy (Dulishkovich S.N.)
- Shirt (by February 23)
- Postcards for March 8
- Postcard for March 8 – 1
- Postcard for March 8 – 2
- Postcard “Bouquet of Flowers”
- Postcard for mom – 1
- Postcard for mom – 2
- Cards for mom
- Card using the outline of a child's hand
- Postcard for mommy (Dulishkovich S.N.)
- Making a postcard (mimosa)
- Happy March 8th (Kneis E.A.)
- Butterfly postcard
- Magnet postcard for May 9
- DIY postcards for May 9
- Postcard for May 9th from plasticine
- Plasticine postcard for May 9
- Postcard “Happy Victory Day!”
- Postcard for May 9 – 1
- Postcard for May 9 – 2
- Postcard for May 9 – 3
- Easter cards (chicken) (Sinitsyna I.V.)
- Easter card made from pistachios
- Drawing a New Year's card
- Drawing a New Year's card (Fuflygina N.N.)
- Postcard “Christmas tree” – 1
- Postcard “Christmas tree” – 2
- New Year card “Christmas tree”
- Volumetric postcard “Christmas tree”
- New Year card (origami)
- New Year's card made of paper
- New Year card
- Postcard with a surprise
- Coloring cards for the year of the pig
- Postcard “Doggie”
- The work of an artist in your home. Postcard (Itkim T.V.)
- Invitation to the Birthday
- Postcard for the holiday “Chamomile”
Vase made from a bottle and plasticine. Master Class
Valentina Korobkova
Vase made from a bottle and plasticine. Master Class
Vase made from a bottle and plasticine. Master Class
bottles of Babushkino Lukoshko in my house
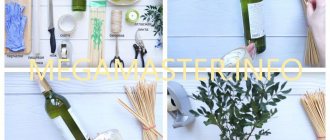
(left over from my grandson, it’s a pity to throw it away and I decided to make vases . You can see what we did in the next photo report (if you want to come visit, but now I offer you a master class . For work we will need: a glass bottle from baby juice, plasticine , board for working with plasticine (or oilcloth, napkin.
Take the bottle , remove the label, remove the cap.
Coat the bottle with a thin layer of plasticine of the same color (you can mix different colors)
. We left the ribbed part of the bottle plasticine .
We give the neck the shape of a vase.
Now let’s use our imagination and decorate with elements made of plasticine (you can decorate with cereals: buckwheat, rice, millet, peas, etc.)
. I made a flower, leaves, dots and stripes.
Such a vase will decorate our group, and can be used as a gift for the Eighth of March, Mother's Day, or given to your friends and acquaintances. They will be very pleased!
I will be glad if someone likes my idea!
Master class “Vase of flowers for your beloved mother” 1. For work we will need: plasticine, a board, colored cardboard, a vase template, a pencil, beads. 2. We trace the vase according to the template. 3. Apply.
Making a flower vase
Using plasticine in this way, you can make not only vases for sweets, fruits and cookies, but also vases for flowers. To make it easier, use a small children's bucket or a plastic mayonnaise jar as a base. You will also need half a plastic ball and a bowl. Coat all these items with softened plasticine. And add the top, narrow part of the flower vase. Well, you already know what to do next.
You can safely pour water into a plasticine vase made in this way so that the flowers do not quickly wither.
Craft from a jar
On International Women's Day, mothers, grandmothers and sisters always receive cards and flowers. Children from the older group of kindergarten or students in first and second grade can create a vase from plasticine with their own hands. For a product using plasticineography technique, you need to prepare:
- an elongated jar with a smooth surface;
- sandy or light brown plasticine;
- green wool thread;
- cereals;
- stack or toothpick.
Useful activities
Modeling is one of the types of fine art. It is based on giving plastic materials various shapes and creating compositions. This type of creativity is one of the most tactile, because in the process of work you need to touch the material. Such contact develops fine motor skills of the hands, which contributes to the development of speech. This happens due to the close location of the speech center of the child’s brain with the center responsible for the coordination of hands and fingers.
A child can create a large number of different images from just one piece of plasticine. At the same time, perseverance is developed, attention and memory are trained. By creating something with his own hands, a child not only realizes his creative potential, but also learns aesthetic thinking - the vision of beauty.
How to process the walls of a vase
First it needs to be processed in a special way. When your product is completely ready, carefully sprinkle the vase on all sides with potato starch. Potato starch must be dry. Now let your vase sit for a few days. This is necessary so that the plasticine becomes completely fat-free. After this, the starch must be swept away from the vase. Now take a brush and very carefully coat the entire surface of the vase with PVA glue. After the glue dries, your vase will be covered with a thin continuous film. The next step is to paint the vase with white emulsion paint. It is necessary to paint in several layers to ensure a durable surface. Now use your imagination and choose what colors to paint your product with.
You can paint a vase with Khokhloma painting, decorating the vase with ripe berries, green leaves, ornate curls, beautiful flowers, thick grass. Khokhloma painting, in principle, is not that difficult, and even you can handle its application. To make the painting of your vase more elegant and neat, use the thinnest brush for the job. Use gouache as paint. After you have painted the vase and the paint has dried, coat the product with varnish. That's it, your plasticine vase is completely ready, you can show off your work to your friends.
Bottle decor
Bottles decorated with plasticine and painting look beautiful. Plasticineography technology is not considered easy, so older children can handle it better. To decorate a bottle with plasticine you need:
- plasticine of any color (you can take used one);
- stack;
- glass bottle with smooth edges;
- toothpaste and brush;
- brushes and gouache;
- hairspray or wood surfaces.
The bottle is completely covered with a thin layer of plasticine. A yellow pancake and thin stripes are attached to the top - the sun of the future landscape. A tree is fashioned from strips of different thicknesses and applied to one side of the bottle. On the other side there will be a Christmas tree - plasticine triangles with fringe made in a stack.
Winter vase
Bottles decorated with various ornaments look very beautiful. Try making an unusual decoration for your home. In the proposed master class, the process of making a vase from a glass bottle will be examined step by step. Not only adults, but also children over 9 years old can cope with such work. And its implementation will help improve the skill of modeling and painting. To make a vase from plasticine and a bottle you will need:
- Plasticine (you can take used one);
- Glass bottle;
- Stack;
- Gouache and brushes;
- White toothpaste and toothbrush;
- Spray (you can take hairspray).