Children who frequently walk on uneven surfaces have virtually no chance of developing foot deformities. Since many people do not have the opportunity to let their child run barefoot in the natural environment, an orthopedic track comes to the rescue. You can do it yourself. The result will be no worse than a store-bought one, or even better - after all, such a product will be distinguished by a variety of elements and protrusions.
Benefits of a massage mat
We have already written about the benefits of a mat, so we won’t repeat ourselves; read our article “How to choose a massage mat for children.” The main thing worth noting is:
- Walking barefoot on an orthopedic mat stimulates the biologically active points of the foot.
- This massage helps prevent flat feet and other foot deformities.
- Its regular use increases blood circulation, improves immunity, and relieves muscle tension.
Proper care is the key to long service life
To start using such a product, just unwrap it and you can begin your spiritual development. After training, you need to take your time and fold the mat correctly. In addition, do not forget that such an irreplaceable assistant can become dirty over time. If you take good care of it, it will last for several more years.
In order to extend its service life, you must adhere to several basic rules:
- Please take into account the fact that the purchased mat cannot be used immediately, as manufacturers coat it with special compounds so that they do not stick to each other during transportation. Therefore, first wash the mat with a soapy solution, where the main component is laundry soap.
- When cleaning the mat, do not use laundry detergent or regular toilet soap.
- This product needs to be washed once every 2-3 months.
- Washing rugs in a washing machine is strictly prohibited, as frequent washing may render the rug unusable.
- Do not do exercises with shoes on. It is better to do this in socks or bare feet.
- Don't stack your yoga mats multiple times. Large folds or creases may form at the fracture.
Important! Unfortunately, this type of product takes a very long time to dry - up to two days. After waiting a little, you can safely use it in your work.
How to make a massage mat yourself?
In order for the rug you made to be as good as a store-bought one, you need to think through the following details:
- Shape, color and size of the rug.
- Material for production.
- Base material.
- Additional materials.
Shape, color and size
Make the product at least 1 meter so that the child can run, jump on it, and not just mark time. You can make a standard rug shape - rectangular or square. But if you want the rug to promote mental and speech development, make it of an unusual shape - round, oval, in the shape of a flower, a house, a fish, a leaf, etc. The surface should consist of several colors, so it will be more interesting for the child to play, and at the same time remember the names of the colors.
Material for making a rug
Different materials are suitable for creating an orthopedic mat, the main thing is that they do not have sharp corners. You can take several materials of different textures and sizes. Feel free to use:
- Natural materials - sea pebbles, aquarium soil, cereals, beans, coffee beans, shells, pine cones, chestnuts, wooden beads, pencils.
- Artificial - buttons, plastic bottle caps, kitchen sponges, washcloths, felt-tip pen caps, orthopedic insoles, ropes, cords, curtain rings, sink nets.
Base material
The material for the base on which the elements are attached must be dense and wear-resistant. Thin fabric, such as gauze or chintz, will tear easily and the filling may spill out. The base should not slide on the floor - this is dangerous for the baby. You can make a double-sided mat, just make sure that the side adjacent to the floor does not slip.
Suitable for the base:
- An old bedspread or carpet.
- Old jeans.
- A long and narrow terry towel.
- Tourist foam.
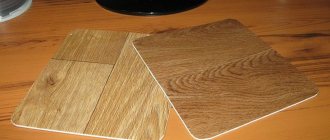
- Linoleum or laminate.
- Calico, felt, drape.
Additional materials
Once you have the base and the materials you will attach to it, determine how you will attach them together. It all depends on the material for the rug, for example:
- For buttons, sponges, curtain rings, prepare a needle and thread.
- For pebbles, cones, ropes - a glue gun with rods.
Description
Depending on the material used, thin or super thin yoga mats are durable and resistant to damage.
If you decide to buy a thick and comfortable mat, the “thickness” parameter should vary within 6 mm. This is a great choice for yogis who want to practice at home.
Medium models
The legendary black PRO Manduk mat has a 6 mm thickness and a lifetime guarantee.
The disadvantage of thick mats is the high price and the fact that they are heavy. If you will be shuttling between home and a yoga studio, the best solution would be a medium mat with a thickness of 4-5 mm. A good example of an affordable mat is the EKO Manduk (5 mm) or the Yin and Yang Studio mat (4.5 mm with the lowest price level). In the differences in the qualities of the rugs, it is difficult to find a sharp transition; both rugs are a good compromise between comfort, durability, weight, and price.
A thick mat is an ideal choice for people who train at home and love comfort.
A medium mat thickness is also a good choice for those who will use it at home or in the studio. Most of them are available in lengths up to 200 mm.
Murugan
Made from natural material, the Murugan rubber yoga mat has phenomenal anti-slip properties. Cotton fiber is used to reinforce the Murugan. It is thick enough to absorb moisture during intense sweating. For yoga, the rubber used to make mats comes from the Brazilian Hevea latex tree. The product does not deform or lose its shape depending on operating conditions.
Reebok
Thin mats include (RSYG-11024). Its anti-slip structure helps keep your arms and legs in place while performing various asanas and also prevents the mat from slipping. The Reebok can be stored on a special riser because it has special eyes that allow it to be hung.
Massage mat made from natural materials
A mat made from natural materials is considered the best foot massager. To make it you can use: polished sea pebbles, chestnuts, acorns, cereals, coffee beans, etc. They can be attached to glue, thread, fishing line, and filled with fabric bags.
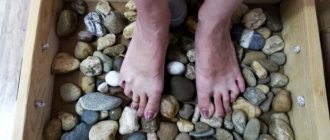
Massage mat made of stones
The stones must be placed in the cells allocated to them, which are stitched manually. Place large stones tightly, and you can leave gaps between small ones.
Prepare:
- 2 pieces of any dense fabric that does not slip on the floor.
- Lots of smooth stones, preferably flat.
- Glue gun.
- A needle and thread.
Technology:
- Lay out one piece of fabric on a flat surface and mark places for the stones.
- Glue the first stone in the center, since it is more convenient to start from the middle.
- Place a second piece of fabric and sew the stone with a “needle back” stitch.
- Place the following stones nearby, secure with pins, and sew cells for them.
- Continue stitching each stone until you fill the entire rug.
- Trim the remaining material.
For wet rooms, you can take a rubberized base and tightly stick pebbles on it, filling the entire area. For beauty, they can be laid out in patterns.
Chestnut massage mat
Chestnuts for such a rug need to be laid out in rows. It is better to make a product 100x40 cm - it will be enough for the child.
Prepare:
- 2 pieces of dense natural fabric.
- Chestnuts.
- Thread and needle.
- Scissors.
Technology:
- Lay out a piece of fabric on a flat surface.
- Lay out one row of chestnuts first.
- Place a second piece of fabric and stitch a row of chestnuts.
- Do this with each row until the end of the mat.
- Trim the remaining material.
Massage mat made from cereals
A cereal rug model can be made in several ways. Regardless of the method, there is no need to overfill the compartments with cereal.
Method 1
You need to sew two layers of fabric, stitch them and fill them with cereal.
Prepare:
- Cereals - buckwheat, peas, semolina, beans or any other.
- Plain weave fabric - linen, calico.
Technology:
- Make a pattern from fabric - 2 identical rectangles.
- Sew them around the perimeter, leaving one short side open.
- Draw lines parallel to the long and short sides.
- Sew along these lines on your sewing machine.
- Fill the compartments along the short lines with cereal, then sew them up.
- When you have completed the last row, fold the edges inward and sew.
Method 2
You need to place the cereal in separately sewn bags, then sew them onto the base.
Prepare:
- Thick fabric for the base.
- Baggy fabric.
- Several grains of different textures.
Technology:
- You need to sew bags of different sizes from baggy fabric.
- Turn the bags right side out.
- Fill all the bags with different cereals.
- We need to sew them up.
- Sew the bags in rows onto the base. The first row should consist of finely ground cereal or sand, and the rest should consist of coarser grains. The last row should consist of bags filled with the largest grains.
Method 3
This will be a rug for children in the shape of a leaf with ladybugs.
Prepare:
- Three types of fabric - green, red, black.
- Cereals of different grinds.
- Needle and thread.
Technology:
- From green fabric you need to cut out a large leaf of a tree, from red - the wings of a ladybug, from black - the head, circles for the wings, legs and body of the ladybug.
- First, prepare the ladybugs: sew red wings with dots on the body in the form of a black circle, prepare the head and paws.
- Sew them onto the fabric, leaving holes for filling with cereal.
- Fill the cows with different grains.
- Sew up the remaining edges.
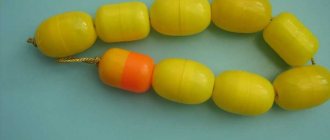
Massage mat made of buttons and corks
Plastic bottle caps or buttons can make an excellent orthopedic mat for a child.
Cork mat
You will need some time to collect the different colored corks. For beauty, fasten the lids by color. Such a rug will turn out to be double-sided, with one hard side and the other soft.
Prepare:
- Lots of traffic jams.
- Thick fishing line.
- Awl.
Technology:
- Hole each cap in several places.
- Pass a line through the cap, connecting it to the next one.
- Having connected all the caps, additionally pass the fishing line around the perimeter to increase strength.
Button rug
Use colorful buttons so your child can use them to learn the names of colors.
Prepare:
- 2 pieces of thick fabric.
- Round buttons of different sizes and relief.
- Strong thread and needle.
Technology:
- Sew buttons on one piece, with a small distance from each other. Alternate buttons of different sizes and textures.
- When all the buttons are sewn on, place the second piece of material on top.
- Sew the two materials together on the sides and turn them right side out.
- Align the corners, sew the remaining sides with a blind seam.
Texture
These are important parameters that determine strength, slip resistance, and cleaning path. The popular ones are made from cheap PVC materials. Today, many people are turning to more natural and safer materials - rubber mat or TR. Many people think that if the canvas contains small pieces, it will not be as slippery. This is not correct - the material is important.
Rubber mats are best, but those made from PVC and TPE (rubber-like thermoplastic elastomer) also have many advantages. Abroad, TEP is designated TPE and TPEL.
The cotton from which the mats are made is hard and durable, it absorbs a large amount of moisture and does not become slippery. A very good option for Ashtanga yoga. Works well even if placed on another mat called Kailash or Adidas Premium.
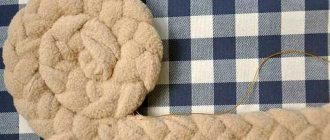
Textile massage mat
A variant of an orthopedic mat for children made of fabric balls. It is suitable for very young children.
Prepare:
- Round template.
- Pieces of different fabric, you can use unnecessary things.
- Sintepon.
- Strong thread and needle.
Technology:
- Trace the outline of the circular template onto the fabric.
- You need to cut out the circles and sew their edges with the seam forward.
- Pull the thread slightly to make a bag in which you need to put a little padding polyester.
- Pull the thread completely.
- For convenience, sew the balls in rows, and then connect the rows into a single piece.
- Secure them to a thick fabric base.
Cutting and sewing lessons
The question “how to make a yoga mat with your own hands” does not seem so difficult if you have basic sewing skills. The width of the product should be 15-20 cm greater than the width of the shoulders, and the length should be 20 cm greater than the height of the practitioner. For a yogi with a shoulder width of 60 cm and a height of 180 cm, a yoga mat measuring 80x200 cm is suitable. After washing, many natural fabrics “shrink,” so allow a margin of a few centimeters on each side. Before cutting, draw a rectangle with calculated dimensions with chalk. The edges of the workpiece must be overcast, otherwise after a couple of yoga classes they will fray.
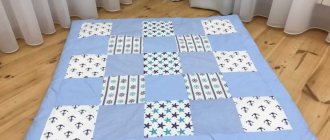
Combined massage mat
This version of the rug for children has a good orthopedic effect. It consists of compartments of different relief, texture and design. It can be made from any material that can be found in the house, and almost any idea can be realized.
Prepare:
- All kinds of natural or synthetic materials.
- Dense material for the base and filling.
- Strong thread and needle.
Technology:
- Divide the base into several squares.
- Sew the second material to create pockets.
- Fill the squares, one at a time, with grains of different grinds.
- Sew a different material onto each remaining empty square. On one - kitchen sponges in a checkerboard pattern, so that some have the hard side on top, and others have the soft side. On the other, attach pencils, on the third, sew buttons of different shapes, etc.
Thickness
The dimensions of the mat ensure comfort in performing asanas. The thicker the mat, the greater the comfort provided to the body and joints (especially for people who have problems with knee diseases). Thicker mat:
- better protection from cold floors;
- has excellent damping, which must be taken into account in classes with vigorous exercises (Ashtanga yoga).
The super-thin mats are easy to transport and very lightweight, making it easy to perform exercises. They may have good slip resistance (depending on the material they are made from) but a low drag coefficient.
Products available on the market have the following thicknesses:
- 2.5-3 mm (thin);
- 4.5 mm (medium);
- 5-6 mm (thick).
If you value mobility but don't have a car, a thick rug will create additional problems.
What's the alternative?
Thin mats start from 1.5 mm. Stores also offer a super-light Manduka ECO Super Light mat for Manduka yoga, which weighs one kilogram. Big advantage:
- mobility;
- ease.