Along with knitting, wet felting has been used to make clothing since ancient times. Modern craftsmen have diversified this type of needlework and came up with the technique of dry felting from wool, otherwise known as felting.
The process of forming volume during dry felting is similar to sculpting from plasticine or clay, and wet felting is reminiscent of drawing. Therefore, creating works from wool requires artistic imagination and the ability to draw and sculpt.
Step-by-step wool felting for beginners
Handicrafts such as wool felting are becoming more popular and do not lose their relevance. This is a very ancient way to create unique and beautiful things with your own hands; it is also called felting. Let's look at how to do wool felting step by step for beginners.
Before we completely immerse ourselves in creativity, let's find out what felting and wool felting is? This is a method of making various crafts from flat to voluminous by weaving fibers.
Why does wool roll and create beautiful products? The fact is that natural wool has the same structure as split human hair. But if in the latter case, a person may develop tangles, then wool allows making crafts by felting.
Felting can also be done using cashmere, angora or mohair. Using such a base and special tools you can get: toys, clothes, shoes and even carpets. The fibers are intertwined in different ways. Below we will look at such types of felting as dry and wet. Let's look at the tools that are used in these techniques.
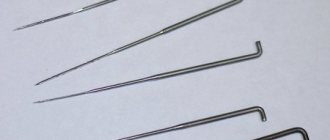
The first and most important thing you will need for your work is special needles. They differ from ordinary needles in that there are special notches at their ends, which push the hairs through, and the hair gets tangled. The needles are resilient, but often break, especially if they are not handled correctly.
Needles are distinguished:
- By numbers. The thickness of the needle depends on the serial number. When working with wool, they use different needles, starting with a thick one, and when it begins to fit tightly into the material, this is a sign that the needle needs to be changed to a thinner one.
- By section. The following types are distinguished here: triangular, conical, diamond, cylindrical, star-shaped. There are also special types: crown and reverse. In the first, the notches are located at the very tip and are used to attach small, decorative elements.
The second one also has serrations at the end, but they are directed in the other direction, which allows you to pull out the wool and create fluffy products.
The choice of needle depends on your convenience. Experienced people advise starting with star-shaped needles and, after gaining initial experience, stopping at tools with a complex cross-section. Each master uses his own set of needles, and there are no identical preferences, so you will have to make the choice personally.
(Felt backing and sponge)
When felting wool for beginners, you will also need a mat or, in other words, a backing. In order not to hurt your finger or break the needle on the workbench, you need backings. You can buy all this only in specialized stores or in craft supplies.
You can stop at:
- Foam washcloth. This is a budget option and can be purchased at any hardware store. The positive aspects of such a substrate are that it is inexpensive and accessible. However, the washcloth quickly deteriorates and very often pieces of foam rubber remain on the product.
- Brush. This is a special brush for felting. It is convenient to create even the smallest details. The negative quality of such a brush is that it fluffs up quickly.
- A backing made of hard felt. Compared to the options mentioned above, this choice will be the best. This mat is wear-resistant, dense, and easy to work with. The backing is thin and there is a chance of damaging the table or needle.
These are the basic tools that beginners will need. Now let's move on to the minor ones:
- Holders. They fit onto needles and help simplify the felting process; they are especially convenient when making flat parts. The holders are designed for different numbers of needles. You can purchase anywhere from a plastic to a wooden holder at a craft store, but if you want to save money, make your own from wood cork.
- Machine for felting (felting). After gaining experience in felting, you may find such a machine very convenient. It is used to make reliefs on toys.
- Carder (or comb for fluff). This is a familiar pet comb that can be purchased at a pet supply store. Use a comb to fluff the wool and mix colors.
- Thimbles. They should definitely be used if you decide to do this type of needlework for the first time. Due to the sharpness of the needles, it is almost impossible to avoid injury without thimbles. They will also come in handy for those who have overly sensitive hands.
- Molds. You can use anything from cooking molds to homemade molds here. They are useful for creating neat and flat applications.
This list is complemented by all the usual tools and materials, such as glue, scissors and sewing needles.
Felting wool video:
There is also an interesting way of modeling from salt dough
Christmas tree
For the forest beauty it is necessary to prepare the basis. A cone is made from thick cardboard. Pompoms are made from green threads, which are attached to the workpiece with glue.
A Christmas tree made from yarn is decorated with beads, sparkles and other accessories. The size of the product depends on the wishes of the master.
You can simply wrap a cardboard cone with green threads coated with glue. Afterwards the Christmas tree is decorated.
Dry felting
We became familiar with the necessary tools. Now let's look at felting methods, starting with dry felting. It should be noted that this principle of felting appeared much later than wet felting, however, now it is very popular.
Megamaster.info draws your attention to the fact that making toys from wool using dry felting will be a difficult process for beginners, and children should not be trusted with such work. If you are distracted, you can get injured, because the needles severely tear the skin.
It is better to use L-shaped needles. They are easy to purchase in craft stores. Consider the principle of dry felting:
- Separate the desired part of the wool from the general tape. We rub it between our palms. Thus, the fibers will begin to tangle. We wrap the material into a cylinder; this should be done as tightly as possible.
- We take the needle and plunge it deeply into the material. We need to compact the material inside. To do this, simply carefully turn the needle. This way, the wool will fall evenly. The ball will become dense, and its surface will gradually straighten out.
- If the needle becomes difficult to pass inside, replace it with a thinner one. When the ball stops deforming when pressed, this means that felting can be stopped. And in order to get relief shapes on it, simply process the same place in the same way.
That's the whole principle of dry felting.
New Year's wreath
So that guests can already feel the festive atmosphere reigning in the apartment on the threshold, you can decorate the door. For this purpose a wreath is made.
The base is cardboard, which is wrapped with thread, fabric or corrugated paper. Yarn pompoms are used as Christmas balls.
Multi-colored details look great on a white or green base. The composition is complemented with shiny beads, bows, and tinsel.
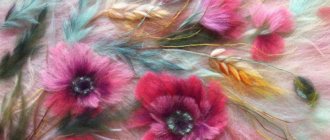
Wet felting from wool
This is the first method of processing wool, which appeared even before drying. If you want to use wet felting from wool, you should know about its principles:
- the material is soaked in a soap solution (it must be hot);
- the wool is rubbed in different directions; it is better to use a felting machine for this;
- felt is obtained in this way.
Before creating products, keep in mind that after drying, the wool will shrink by 30 percent.
And now a little more about the process:
- We determine what size material we need. Let's separate it. We lay several layers of wool on the film. We place each subsequent layer perpendicularly. On the latter we apply the intended pattern from individual fragments of wool of a different color.
- Add soap to warm water. We wet the material with the solution and cover it with film on top. We smooth the surface with our hands.
- For density, the workpiece can be wrapped with a bamboo napkin or mesh. To remove excess liquid, the workpiece can be additionally wrapped in a towel.
- As the product dries, it will shrink. Rinse the resulting fabric in warm water and leave until completely dry.
Jewelry, clothes, bags and even carpets are made in a similar way.
And now you can move on and find out how felting wool toys for beginners occurs, because we already know the principles and we have the tools prepared.
There is also an interesting scrapbooking craft technique.
Impregnation of woolen products
Impregnation is needed to ensure that felted products keep their shape. In dry felting, these are thin elements of toys, for example, tails, ears, and paws of birds. You also cannot do without impregnation when creating lampshades, collars, voluminous brooches, flowers, hats, bags.
Experts recommend several options:
- Salvitose, cellulose. Colorless powder or granules. Application: 5g per glass of hot water, let it brew until it becomes a paste. Apply with a brush; if by dipping, then squeeze out the excess.
- PVA glue diluted in half with water. But such a coating turns yellow over time.
- Acrylic varnish also must first be diluted to a liquid state, then applied to the surface with a brush, foam pad or fingers.
These are the main components that can be mixed together in different proportions, the main thing is not to overdo it!
How to felt wool toys for beginners
Let's look at some simple examples of felting crafts using the wet and dry method. Let's start with the simplest thing, making slippers using the wet felting technique. We will need:
- unspun wool;
- soap;
- template (pattern);
- water;
- net;
- bamboo rug;
- yarn;
- needle;
- knitting needles
When making slippers, it is better to use a template. The template can be made on a medium-thick laminate.
Let's start making:
- We lay out the wool in two layers and rub it thoroughly. You need to lay out layers lengthwise and crosswise. Cover the material with a net and water it with soapy water. Press with your hands and smooth out. We try not to move the fur.
- We remove the mesh so that the material does not fall on it. Then smooth it out with your hands. Get rid of excess liquid. Apply two more layers and repeat the work again. Make sure there are the same number of layers. It is better to write down each new addition.
template for slippers - We need to cover the template with wool on both sides. We wipe the material, cut it and take out the template.
- We design the heel and toe of the slippers. We place the product in a bamboo mat and begin to carefully roll out the product, at least 50 times, while pressing firmly on it.
- We put the slippers on the last, trim the edges and give it shape. All that remains is to decorate the felted wool slipper, in our case it is embroidery and elastic at the top of the product.
Symbol of the year
If you need to decorate your house for the holiday, you can make any toy or decoration from scrap materials. An excellent solution would be to make New Year's crafts from yarn.
For the animal you will need pompoms, buttons, felt. The figurine can be complemented with accessories. This symbol of the year will decorate the Christmas tree, the room, and bring good luck to the house.
We recommend reading:
Crafts from plasticine: the best master class for children at school or kindergarten. 90 photos of the best ideas for creating plasticine figuresFelt crafts - the best patterns and templates. Step-by-step instructions and master class for beginners (130 photo ideas)
- DIY crafts from egg trays - the best step-by-step master class, with description. TOP 100 photos of original ideas for crafts
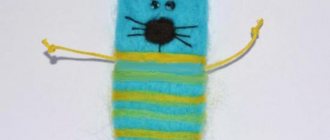
Making cats using dry felting
To make toys from wool, dry felting is the best option for beginners. Let's look at the method using the example of a cute cat. You need to prepare:
- wool;
- needles;
- padding polyester;
- threads;
- acrylic paints;
- mat;
- pastel;
- polymer clay;
- brush.
Ready? Then let's start:
- We take a padding polyester and use a needle to form a figurine in the shape of an egg. Fluff the selected wool of the desired color and apply it to the padding polyester. We begin to felt the material using a large needle. We stick the needle as deep as possible, thus compacting the ball from different sides. It turns out to be a torso with a head.
- Next, we will make blanks for the paws. We use padding polyester and wool. We pierce the material until the paws become loose. We roll the legs onto the previously obtained figure and give them shape. We fix everything together with a needle.
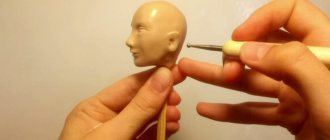
- Let's work in the muzzle area. Let's add a little wool here and increase the volume for the eyes. Let's form a triangular plane for the nose. We form cheeks from two separate pieces of wool and roll them. We do the chin in a similar way.
- Let's sand with a small needle. From a separate piece of material we make a tail for the cat. We attach it to the body.
- We make eyes from polymer clay. You already know how to sculpt from polymer clay. Glue the eyes to the cat. We work on the smile, then add the bridge of the nose and a small orange nose.
- Let's move on to the final stage. We need to make felting of two identical triangles - these will be the ears. We attach them to the cat's head. Use acrylic paint to paint the eyes and lightly tint the toy.
Ready. You can make many different animals this way:
Pompoms
Soft and fluffy elements can turn into a beautiful rug, a funny animal or an original garland. To make a pompom you will need two circles. They are cut out of cardboard and holes are made in them.
It is necessary to cut one side of the warp, and then wind the yarn. Then the two circles are moved apart. The wool is carefully cut, a thread is threaded between the pieces and the yarn is tied. The base can be removed.
Felting wool slippers for beginners
So now we’ll make felting slippers using the wet technique, this way you can make toys and absolutely everything, the main thing is to know the technique, and its description is below.
What you need to felt wool slippers:
- Wool
- Templates
- Soap solution
- mosquito net
- Cellophane gloves
- Synthetic fabric (tulle)
- Bamboo mat
- Ruler
- Nail scissors
- Scissors
- Bubble film
- Towel
- Massager
- Homemade block
- A piece of skin
- Threads
- Needles
- Apply a thin first layer of wool evenly onto the template. There should be long edges on the sides, for convenience the wool should be folded. We lay out the second layer in the middle of the template, and do the same with the second future slippers.
- For convenience, we put on cellophane gloves, start rubbing, put a mosquito net on top, pour warm water through it, and then rub the wool intensively with soap. We hold the mesh with our hands and periodically lift it so that it does not stick to the workpiece.
- Turn over and carefully bend the wool without wrinkles. We carry out the same procedure with other slippers. Then, from the bend side, we evenly lay out a new layer of wool on two slippers and also rub it in with a mosquito net, and on the other side we bend the edges. We lay out the second layer, not on the fold side of the previous one, and rub it in with a mosquito net. Next, using tulle, we wrap the workpiece in it and, using gentle but strong movements, rub the slippers on all sides. Then we rub the top and bottom of the slipper through the mosquito net. Next, we roll one by one through tulle and a mosquito net until it becomes difficult to tear the wool off the workpiece.
- Afterwards we make a small, technical cut, retreat from the edge 6 cm, 3 cm in length. Use nail scissors to make a hole. After this, we take out the template, steam the slippers with warm water so that the wool fibers are better bonded.
- Then we wrap the slippers in a towel and bubble wrap, fasten them on the sides with rubber bands, and begin rolling our “candy” over the towel 25-30 times. We wrap it in the opposite direction, press lightly, since the workpiece is still poorly deboned. Next, we dip the slippers in water and begin to rub them with soap on the outside and inside.
- The cutout is enlarged and then we rub it intensively on all sides, outside and inside. Then we rub it on the bubble wrap and form the nose and heel of the slipper. Next, dip the slippers in water to smooth them out, wring them out, roll them into a bamboo mat, then into a towel, and roll them 50 times. Turn the slipper over and repeat the procedure. Then smooth it out using bubble wrap and a massager. Then we insert a homemade last inside, give it the shape of a leg, then trace it on a piece of leather with a slipper handle and cut it out.
- Then use an overcast stitch to sew the insole to the slipper. Let’s start decorating the slipper, mark the location of the flower, then carefully use a needle number 38 “star” to attach the leaves, which we made in advance using the wet felting technique. Everything you need can be bought at a sewing store or you can purchase a felting kit. Next, we attach the roses, the petals of which are made from two felting techniques. We sew the cutout with an overcast stitch.
Garland
For decoration you will need many colorful pompoms. You can carefully apply glue to them with a brush and then sprinkle them with glitter.
Such crafts made from yarn for the New Year will cause real delight among kids. You can involve your daughter or son in this exciting activity.
We recommend reading:
DIY crafts from Kinder surprise eggs - 125 photos of exclusive options with step-by-step instructions, master class and video- Crafts made from twine - an overview of original design solutions. More than 100 photos of new products + step-by-step instructions for creating crafts with your own hands
DIY crafts from candy wrappers: 150 photos of the best ideas from craftswomen. Simple instructions, master class, diagrams and video tutorials on creating crafts from candy wrappers
Felting a bull from wool master class
2021 is the year of the ox, which means every craftswoman can’t do without this year’s main toy. What you need to make a bull from wool using the felting method:
- Wool of different colors
- Cushion brush or household sponge
- A piece of laminate backing
- Felting needles coarse 36 and fine 40
- Wooden handle
- Copper wire 0.4mm
- Doll eyes
- Flowers for decoration
- Tape 0.3 cm
- Sliver
- Bells with a diameter of 1 cm
- Glue gun
- Scissors
- Awl or gypsy needle
(For wet equipment)
- Water
- Soap
The easiest way to buy everything you need is with a felting kit or go to a construction and sewing store. Step by step description:
- First, we fasten three coarse and thin needles with an elastic band, and after that we wrap the pillow brush with a backing. We tear off either white wool or sliver, chop it, mix it in our hands, give it the shape of a circle and place it on the brush.
- Using coarse needles, we begin to pierce the wool deeply, then take wool of a different color and apply a thin layer of it on the prepared base, the wool should completely wrap around the white wool. The dry felting technique is used with the help of notches on the needles, the result is a workpiece with a diameter of 7 cm, the wool is felted in half.
- We make a nose, take white wool or sliver, mix it in our hands and form a snout, start pricking it with needles, if the nose turns out to be too big, we squeeze it on the sides. We connect the nose and body with coarse needles, pricking deeply.
- We start with the legs, tear off four identical pieces of wool, mix one piece, put it on a brush and roll it into a tube. We repeatedly pierce the wool, leave the upper end unboned, we will use it to connect the body and limbs, before making the hoof we add more wool to the upper part of the leg, add brown wool, secure it first with coarse and then thin needles - this is the hoof, we make using a coarse needle on it straight. The leg should be hard and dense; when grinding, insert the very tip of the needle. In this way, we make all the legs of the bull, for attachment we open the non-felted tip.
- We make sure that everything looks aesthetically pleasing, we fasten the leg with needles, fasten the second one in line with the first, after that we fasten them more thoroughly, check whether the toy is supported on the legs, and go over the entire body of the animal with a coarse needle. Let's make ears on the frame, from the wire, cut off 13 cm and form an ear in the form of a drop, 3 cm long, and a twisted tail of 2.5 cm and also make a second ear. We tear off two small pieces of wool, prepare one in our hands, place it on the brush and chop off the frame in the wool, leaving the lower tip untied.
- Add shredded white wool and stuff the wool with a thin layer of needles number 40, thus creating a second ear. We open the tip so that the wool does not cling, trim the tip of the wire, make a hole for the ears with a coarse needle, then with an awl, make sure that the holes are on the same line, glue the wire into the hole, then pin the ears to the body, after that we pinch the ears and fix this position with needles.
- Next, we carefully treat the wool in our hands and pierce the toy with needles. Then we make horns and a tail, cut two 10 cm pieces from the copper wire and fold them in half, cut off thin long strands of wool, insert its upper bend of the wire, glue the strand to the frame, after fixing the wool, twist the ends of the wire, then wrap the wool around the wire with glue , leave about 2 cm of wire without wool, wind the remaining wool in a second layer, note that the horn at the bottom is wider than at the top, we also make a second horn.
- Let's make a tail, cut off 20 cm of wire, fold it in half, cut off several short strands of wool and twist each of them a little. We take a bunch of strands and insert them into the upper bend of the wire, fix them with glue - this will be a tassel, twist the ends together. Next, we take wool the color of the bull’s body and paste it over the frame of the tail, leaving 3 cm of the tip without wool, thus winding several more layers of wool without glue, so that the end is narrower and wider at the top.
- Let's work a little in the wet felting technique, dip the horns and tail of the bull in warm water, soak them, and then add soap and begin to roll between the fingers so that the wool does not stretch out; in the process, use the fingers of your left hand to move it to the right side, and felt it with the fingers of your left hand, We slowly increase the rolling force, the wool thickens. After that, the tail, dip the brush in water and hold each strand in your hands, then combine them and roll them together, roll the tail in the same way as the horns. We rinse the soap blanks and straighten the brush so that everything looks beautiful.
- After drying, we make the same holes as for the ears, carefully make sure that everything is on the same line, glue the horns to the holes, twist the horns as you like, then also attach the tail so that the transition is smooth, add wool around the tail and fasten it with thin needles on the sides carefully go through with one needle, twist the tail as you want.
- Now we make recesses for the eyes, pierce the wool at the location with coarse needles, put the wool in the holes so that the eyes are more expressive, attach them to glue, then fill the eyebrows with a thin needle, then use the same needle to make nostrils and a smile with a strand of wool. For decoration, we attach a flower to the smile and a bow made from a ribbon with a bell; to this felted wool bull, you can add some other New Year, winter crafts for school or room decoration.
Bullfinches
Bright and cheerful birds will decorate the interior. To make them you will need threads of red, black and gray colors. Crafts made from bullfinch yarn will help lift the spirits of your household and guests. Birds are made from threads, wound on a cardboard base.
Interesting works are made from pompoms. To do this, you will need to calculate exactly how much red yarn to wind, and fill the remaining space with black threads.
This pompom will be the head of the bird, and the body is made of gray and red yarn. Wings, beak and eyes are attached to the fake.
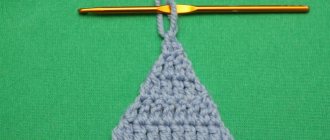
The process of working with needles for felting
For felting, needles of different thicknesses are used, commercially available from No. 19 to No. 42. They begin work with a thick and long needle, it is inserted and withdrawn into the part at an angle of 90 degrees. The needle inside cannot be moved or twisted as it is quite fragile. The sharp edge is equipped with notches, penetrating into the part, they capture the fibers due to this, and felting occurs.
At the initial stage, the needle goes deep into the craft so that there are no voids left inside. As the part is compacted, it is replaced with a thinner one. When working, the product is placed on a special substrate made of material that cannot be felted.
Important! When working with felting needles, you need to be careful and not be distracted, as you can seriously injure your hand.
Rules for connecting parts
Large parts are usually felted in one piece. And small parts, for example, ears, tail or paws, are made separately. When filing small items, loose fibers are left at the edge. Next, they are pinned to the place of attachment and tucked into the middle of the base.
When the parts are tightly in place, small pieces of wool are used to cover and seal the seams. Sand the surface with a thin needle.