- Metal stand
If you think that you can only buy a case or a convenient stand for your device, then you will be glad that all these accessories can be made for your tablet with your own hands with maximum benefit for yourself and useful experience for the future. Moreover, you will be surprised how useful things can be that you have long gotten rid of because they are no longer needed.
How to make a tablet out of paper?
Time flies at great speed, changing everything around us. If previously children were happy with constructors or cubes, today the situation is a little different. Many children have been familiar with computers, iPads and tablets from an early age, and requests to buy one of the new and fashionable devices for their birthday are no longer uncommon. In our article we will talk a little about something else. We will give you advice that will help you get your baby interested and possibly get him away from the computer. You don't need anything special to do this - you just need paper, a few tools and a lot of patience. Below we will tell you how to make a tablet out of paper - a wonderful toy for your child.
First, you need to stock up on some materials and tools.
Origami
There are many schemes on the Internet according to which you can fold a stand from ordinary thick paper. A few movements with scissors and the stand will be ready. It can be folded to a small size and carried with you, and when you need it, just a couple of seconds and your phone is no longer in your hands.
So let's get started
- Take one sheet, choose the color you like - that’s the color your homemade device will be. Cut a rectangle from it. Now take the cardboard and cut out another rectangle - this will be the base for our toy. The rectangle should be several (2-3 cm) smaller than the first one on each side.
- Place the cardboard template on the laid out piece of paper so that it is in the middle. Now start folding each edge of the colored sheet. The side parts can simply be folded, and the bottom and top edges must be folded so that no obvious folds are visible. You can use scissors for this, just cut off the unnecessary and unnecessary parts.
- Now we need to cut out two squares from multi-colored paper, and if we place them on our tablet, they should completely cover the front part. Once you have cut them out, glue them to the workpiece, before doing this, place an iron clip under one square. Please note that the paperclip should be closer to one of the corners. This little detail will be needed in the future to make the toy more real.
- After you have finished the front part and secured the paperclip, we will try to make the screen of our toy. To do this, you will need several white A4 sheets, which should be aligned with the rest of the parts - they should be slightly smaller than it. These are the leaves that will be our display.
- Once you have prepared several of these sheets, it's time to attach them to the tablet. As you remember, we glued a paper clip for something - now we will need it. Place all the leaves (up to 5 pieces) and attach them by pressing them with a magnet - place it above the paperclip. Thus, we were able to make a tablet out of paper.
As you can see, gluing together such a homemade “device” is quite easy.
If you don't have a magnet on hand and want a more durable toy, you can use a slightly different method. As in the previous one, you will need cardboard, glue or tape, scissors, colorful paper and blank A4 sheets.
- This time you will need thicker cardboard, preferably about 4-5 mm. First, make a base - a rectangle of thin cardboard.
- Now take a thick material and mark the same rectangle on it, only now cut a window in the middle (do this so that 1.5-2 cm remains on each side). Cut out the same frame from thin cardboard.
- The frame we cut from thick material needs a little work. To do this, simply cut off one of the short sides - you will get a frame in the shape of the letter P. You should cut it so as not to shorten the part. It should be the same length as the other parts. Do not throw away the cut piece
- Having done this, you can begin to put everything together. Glue a U-shaped frame to the base, and a thin cardboard frame on top of it. Cover it with colored paper to hide the cardboard. The middle does not need to be sealed. You can use a piece of thick cardboard to cover the side hole.
- Cut the A4 pieces of paper so that you can insert them through the side hole - this way you will make a toy screen. You can write or draw on the leaves with felt-tip pens. You can draw your menu. To “open” a new window, simply pull out the leaf. After that, you can decorate the toys, draw buttons on the bottom panel, or even sign your creation.
We hope that our tips on how to make a tablet out of paper will help you. Good luck!
Attaching a tablet to a vertical surface with your own hands
Let's dream a little and draw a portrait of a “smart switch” in our imagination.
This is something flat, hanging on the wall, or even built into it. Instead of the usual push-button switch. Something with a bright, responsive touch screen. Which is turned off in idle mode, but begins to glow at half power when a person approaches and lights up at full power when you bring your hand to the screen, displaying in all its glory the local controls of engineering systems. Using the built-in wi-fi, the “switch” can communicate both with the Internet and with other “switches” scattered along the walls of the smart home. The “switch” contains a microphone and speaker, understands voice commands in different languages and can say something in response. The “switch” has a standard wall mounting scheme, runs on a built-in battery and is charged from a wireless charger mounted inside the wall. Any “switch” can be removed from its “seat” and moved to another, for example, from a corridor to a large room. In this case, the function will automatically change - it will control the room chandelier, and not the corridor lamp. When unhooked from the wall, the “switch” also automatically switches to the wireless remote control mode for all engineering systems of the house.
“Utopia” - you will say and you will be wrong. Today, most Chinese inexpensive tablets already have all the necessary hardware capabilities to implement such a scenario. All that remains is to learn how to properly mount them on the walls, charge them with wireless chargers (by the way, also already widely available and relatively inexpensive) and write the required software. The road ahead is long, but you can start walking it today.
Below the cut is a small experiment with attaching a 7″ tablet to a vertical surface with magnets.
Requisites
The first experiment will be performed on a wooden surface. To carry out the plan, a specially prepared board was purchased from a hardware store, and the favorite, albeit very dangerous, toy “daddy’s screwdriver” was temporarily taken away from the three-year-old son with a scandal:
We will attach the device to three points. For the experiment, six pairs of magnets of two sizes were purchased - with a diameter of 10 and 14 mm. In each pair, one of the magnets is a thin disk (for fastening with double-sided tape to the back side of the tablet), the second is a thick disk with a central hole for a self-tapping screw with a countersunk head (the so-called magnetic ring, for fastening to a vertical surface, in our experiment it was a wooden board). This is what a 14mm magnetic ring looks like:
We also purchased the necessary consumables for drilling and screwing:
Two types of self-tapping screws were purchased, since it was not clear which ones would fit better into the magnets. It turned out that 12x3.0mm fit perfectly, smaller ones were not needed. There are two types of drills for two standard sizes of magnets - 10mm and 14mm.
Selecting a tablet
We didn’t have an extra tablet, so for the purposes of the experiment we specially ordered an inexpensive Chinese 7-inch Larude tablet.
This is a 7″ tablet with a regular TFT screen, a fairly fast processor, a large amount of built-in memory (1GB RAM + 8GB flash), a fairly responsive touchpad, rubbery plastic to the touch and a non-removable battery (and a non-opening back cover, respectively). The ideal “wall tablet” should have the following characteristics:
- Have an IPS screen so that information can be easily read regardless of the height of the owner of the smart home;
- Have a flat back wall to securely mount flat magnets or metal plates;
- Have a regular plastic or metal back surface, without “rubberization”, for high-quality fastening of double-sided tape;
- Support wireless charging function, or have a removable back cover for installing a separately sold wireless charging receiver;
Looking at the list of requirements, it's clear that we didn't think much when ordering our first tablet. It is small, fits comfortably in your hands, handles interface transitions very smoothly, but is poorly suited for wall placement. Well, let's use it in this experiment, and then we'll give it to a three-year-old child to be torn to pieces. Fortunately, a bunch of children's programs are already installed on it from the factory.
Magnet placement
We need to place the magnets as perfectly as possible on both the “wall” and the device. Without relying on our eye, we used the full power of modern technology and printed several identical templates. One of them was posted on the board:
Marked holes:
After drilling, it turned out that the thickness of the board was not enough. It is not possible to secure magnets with self-tapping screws:
Nevertheless, the magnets entered the drilled holes “with a creak”; the insufficient thickness of the board could not ruin our experiment:
We cut another copy of the template along the contour of the rectangle and attach it to the back wall with a magnet (it turned out that, although not strongly, the magnets “stick” to the tablet itself):
We put the magnets in their places, aligning them with the contours on the piece of paper, and carefully trace them with a pencil. We get the following contours in the right places:
We prepare the reciprocal parts of the magnets for gluing to the tablet:
It is important not to confuse the polarity, otherwise you will get the opposite effect - the tablet will bounce off the “wall” rather than be attracted. It is also important to choose the right tape. After gluing we get:
Experiment
The result of combining the board and tablet is visible in the title photo.
Our goal was to test the strength of such a connection. Agree, it would be a shame to find your even inexpensive “wall-mounted” tablet falling off and broken due to weak magnets. In this video you can see what “loads” such a mount can withstand: Thus, the magnetic mount provides a more than stable attachment of the tablet to a vertical surface. Let's be honest, our fastener later fell off when trying to disengage. But it fell apart at the place where it was attached with adhesive tape, which was not at all optimal (on a soft substrate) and was glued to an inappropriate surface. Therefore, this post-peel-off cannot be considered a failure of the experiment.
The next step (which most likely will not happen soon) will be an experiment with mounting on a real wall and wireless charging placed in a standard glass from a regular switch.
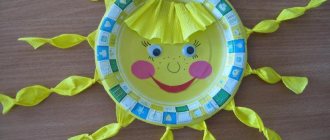
How to make a tablet out of paper: master class with photos
Tablets and smartphones are modern gadgets that are difficult to live without today. However, their popularity has increased so much that they are replacing traditional toys with inexorable force and arousing great interest among young children. For a preschool child, a homemade device would be an ideal option for games. How to make a tablet out of paper, and what materials will be needed for such a craft?
Remote
Many smart TVs, media centers like Android TV, Roku, Fire TV, Apple TV, or media servers like Kodi or Plex allow you to control them through Android or iOS apps. Just install the appropriate app and make sure both devices are on the same Wi-Fi network. That's it, now you don't need a remote control.
In addition, there are many applications for remote control of your computer through commands from Android or iOS. So you can control not only your TV and media center, but also your desktop computer via Wi-Fi.
Paper tablet: preparation of material
To make a paper analogue of a tablet, you will need a modest set of materials, tools and very little effort. So, for the craft you need to prepare:
- scotch;
- glue;
- paper;
- felt-tip pens or pencils;
- scissors;
- cardboard;
- decorative elements;
- colored paper;
- magnet and paperclip.
There are several options for creating toy tablets. Let's look at some of them.
Where is the tablet attached?
- The first option: the device is mounted on the dashboard, to the right of the steering wheel (or to the left, if the steering wheel in the car is located on the right). There are many ways to mount a tablet in this place, some of which will be discussed below. Many car enthusiasts prefer to follow the path of least resistance and simply buy a tablet holder in a store. The problem is that it is not always possible to find holders in the store for a specific tablet model and a specific car brand. This is why car owners often have to make holders themselves.
- The second option is also possible: the tablet is mounted in the headrest of one of the front seats. It is clear that in this case it will be used mainly by passengers, and not by the driver. In this article we will talk about attaching “driver” tablets.
Paper tablet with magnet
The paper tablet can be made in any color. Having decided on the shade, you need to take a colored sheet and cut out a rectangle from it, which will be the basis of the future device. Then you should take cardboard and cut out another rectangular piece. The size of the latter should be 2-3 cm smaller than the first. The cardboard template needs to be laid out in the center of the colored sheet. Next, you need to fold the side parts, and fold the bottom and top edges so that the folds are not so noticeable.
You can go another way - cut off the excess parts with scissors. How to make a tablet out of paper to make the toy interesting? To do this, you need to cut out two square parts from sheets of different colors and glue them to the workpiece. Before you do this, you need to place a paperclip on one of the squares.
Once the front part is ready, you can start creating the screen. It is done using white A4 sheets. These leaves need to be aligned with the rest of the parts of the future toy. The prepared parts are attached to the tablet and pressed with a magnet.
Phone stand from an old cassette player
Perhaps someone has an old cassette player lying around at home. It is unlikely that it will ever be useful, and with the advent of disks and electronic media, no one uses cassettes anymore. But still, you can find a use for the cover in which the cassette was located.
To do this, just “turn” the cassette player inside out, tilting the lid back. The hole in which the cassette was held can accommodate a telephone. The advantages of this design are that it is easy to wash and transparent.
Cardboard tablet
How to make a tablet out of paper if you don’t have a magnet at hand? To make the toy durable, you can use another method. This time, thick cardboard (0.5 cm) will come in handy. A thin material is suitable as a base, from which, as in the first option, a rectangular part is cut out. Then, on thicker cardboard, you need to mark the same rectangle. A window should be cut out in the center, making 1.5-2 cm indentations on each side. An identical frame should be cut out of thin cardboard.
The thick cardboard frame needs improvement. One of the sides must be cut off, in other words, the cardboard should turn out to be a piece in the shape of the letter “P”. However, you need to cut it so that it is not shortened. Once all the elements are cut out, you can begin assembly. You need to glue a U-shaped part to the base, and on top of it - a frame made of thin cardboard. If white or gray cardboard was used, the top can be covered with colored paper. A4 sheets need to be cut so that they can be inserted through the side hole.
Material of execution
The material of the case determines its durability, strength and reliability of the case protection. Therefore, it is especially important here to find a compromise between your tastes and the main purpose of the case - to protect the device.
Textile . Budget variants of covers are usually made from fabric. There are many options for the materials themselves: from eco-friendly cotton to brutal, hard felt. Polyester has the best performance characteristics. This is a synthetic material that is incredibly durable, elastic and, most importantly, does not absorb dirt and moisture at all. This cover is easy to care for and you don’t have to worry about the occasional stain or dust. Nylon has similar qualities - a soft, smooth, durable material. Books and fabric covers are made extremely rarely due to the softness of the materials and the need for an additional frame, but cases and bags are made everywhere. Microfiber and corduroy are often used on the inside of covers for better shock absorption and aesthetics. Microfiber simultaneously protects the screen from dust.
Plastic . Inexpensive, lightweight and moderately durable material. Plastic will not add much weight to the device, is pleasant to the touch and does a good job of protecting the device from damage. But it does not absorb shocks very well and may not protect the tablet if it falls. Moreover, if there is a strong impact, the plastic case itself may crack. Sometimes plastic is combined with other materials. For example, the back of the case is made of plastic to firmly secure the device, and the top is made of artificial or genuine leather.
Silicone . The silicone case is as light and thin as possible. Silicone perfectly protects the case from scratches, but it is not at all a protector against shocks and falls. In addition, silicone, even despite its elasticity, sometimes breaks when removing the case and is not particularly durable.
Faux leather . Excellent, durable material for a case. It doesn't look like the notorious leatherette of the past. Artificial polyurethane leather is made specifically for products with increased operational load. It is durable, does not stretch or tear. Faux leather is often coated with a protective compound that completely repels dirt and water. The appearance of artificial leather is often not inferior to natural leather, but at the same time it costs much less.
Genuine Leather . Expensive, noble, reliable - this is how you can characterize cases made of genuine leather. Even if the cover wears out over time, it is unlikely to become less cool because of it - it will simply acquire a new style. Natural leather is somewhat tricky to clean and can absorb stains, but still caring for it is not difficult, and if you are at least a little careful, nothing will happen to the leather. It is elastic, it can be torn, but it is difficult to imagine that anyone would do this on purpose, and it is too thick for accidental damage. Strict, laconic models are often made from leather. It does not fade in the sun, does not tan in the cold, and generally preserves well over the years.
How to paint a craft?
How to make a tablet out of paper so that it turns out interesting for games? To do this, you must paint it. The menu can be created at your own discretion. To “open” one of the windows, you just need to pull out a piece of paper. On the bottom panel of the toy, you can create an imitation of buttons or give a name to the resulting homemade “gadget.” To make the paper model a worthy copy of the original, you can print an image of the tablet’s desktop on white cardboard and stick it on the base.
Pattern
First you need to find or select a pattern drawing for this element. Moreover, it is not necessary to contact specialists - you can find it yourself on the Internet, then download and print it on a printer.
Carefully cut out the printed design using stationery scissors. After that, select the fabric you want to sew and fold it in half (right side folds inward). Next, attach the pattern to it and use a pencil (you can also use chalk or a dry piece of soap) to trace the pattern.
iPad made of paper
We figured out how to make a tablet out of paper according to the diagram. Let's look at how to create an iPad Mini 3. This will require the same materials as for making a regular paper tablet. The printed image of the iPad Mini 3 desktop needs to be cut out so that the image has edges that can be folded back.
To create the back side of a paper “gadget” you need to make a printout with the famous “apple” and the inscription IPad. One of the cut out pictures needs to be attached to the cardboard and outlined. Using a utility knife, you need to cut out a rectangular piece. This model should have rounded edges. The front part of the tablet needs to be glued onto a cardboard base, then you need to bend the edges and secure them with glue. The rounded edges must be glued so that the tablet lasts as long as possible and does not lose its original shape.
The Apple logo needs to be glued to the back of the craft using regular glue, but for the rounded ends, Moment glue is ideal, since it is important that they dry as quickly as possible. Now you know how to make a tablet out of paper, a photo and diagram of which are presented in our article.
Made from plexiglass and stationery pins
This is a very convenient holder.
It requires a minimum number of parts, but the main advantage is that there is no need to drill holes for mounting in the dashboard. To assemble, cut a piece of plexiglass to the desired shape and size. Next, take the wire and make 4 hooks from it. They should be fixed on prepared plexiglass. PVC glue is suitable for fastening. Two hooks are installed on the long side. This will be the bottom of the holder. A couple of other hooks are installed on the side. 2 holes are drilled for fastenings; it is better to place them on the center line.
The next step is decorating the plexiglass substrate. In principle, this is not necessary, and if there is no special desire, then you don’t have to do it. The easiest way is to cover the base with leatherette. Next, the fasteners are installed; for this, screws 4-6 centimeters long are inserted into the holes. The nuts are screwed onto them and tightened. Clothes pins are attached to the bolts.
The holder is installed on the deflector located in the middle of the torpedo. To do this, tails of clothespins are inserted into its cracks. This stand is held quite firmly. Thanks to its convenient location, the tablet can easily be used as a navigator. The only drawback of the design is the restriction of the flow of cold air through the deflector, but this problem arises only in winter.
Convenient stand
Only some tablet computers have their own stand; for other devices you have to buy expensive cases that get boring or break over time. Therefore, now in a few minutes you will learn how to make a wide variety of coasters from inexpensive and simple materials.
Cardboard stand
Most likely, every user in childhood cut out various figures from cardboard, and now it’s time to remember the old days again and take up the stationery and build a convenient stand for the tablet with your own hands.
The image above shows a schematic drawing that you can change to suit a specific device - this is a kind of template, but no one forbade you from imagining.
Be sure to take thick cardboard, it’s best suited for packaging boxes of household appliances, unless of course you don’t mind.
Now we transfer the drawing to cardboard and carefully cut it out, fold it in half, as shown in the image, and a convenient stand for the device is ready. Its service life is almost unlimited, every day you can do something new, the main thing is that there is more starting material in stock.
Coffee glass
Continuing the theme of working with office supplies, with the help of an empty glass and scissors, you can create an original stand, and it is done in a matter of minutes.
This unusual design will appeal to those users who like to spend a lot of time in coffee shops: they made it, used it and threw it away, and the next day they can make a new one.
Please note that depending on the angle of the cuts, you can change the position of the device in space as convenient for you. You can come up with various designs yourself and share them with friends, and someone will definitely appreciate them.
Application of boxes
And completing the series of cardboard crafts, the laziest users can make a practical stand from any small box.
Moreover, you can use any boxes; most likely, many owners of touch gadgets still have small containers from chargers, cartridges, shoes, boxes from photo or video equipment, and so on. The main thing is to have a good imagination, and, of course, desire.
What tools will you need?
Most models do not require much physical effort or skill. Simple cardboard coasters can be made in a few minutes. Complex ones will require more time and perseverance, but the result will bring a lot of positive emotions.
To work, depending on the chosen model, you may need the usual tools available in every home:
- scissors;
- knife;
- wood saw;
- chisel;
- ruler;
- pencil;
- stapler;
- awl (for making holes);
- needle for stitching thick material or leather.
For complex metal models:
- drill;
- screwdriver;
- screwdriver.
The most unusual coasters
Anyone can cut out cardboard, but coming up with something truly original and unique is a much more difficult task, so below you can see the most extravagant designs for a tablet; Making the same ones with your own hands is not only easy, but also entertaining. A wide variety of improvised means will come to the rescue.
Metal stand
Most likely, in every home you can find a good old metal hanger in the nooks and crannies, which, with the help of skillful hands and brute force, can be turned into a convenient stand for pills. In appearance, of course, such a device is not very good, but you are not doing it for show, but for home use and when there is nothing else at hand, it is even a very wonderful idea.
Second life of a hanger
You need to be very careful with sharp ends so as not to inadvertently damage the case, or even worse, the tablet computer screen; it is recommended to use pliers for bending. If you are still afraid, you can, as an option, glue pieces of foam rubber and then your tablet will not be in any danger.
You can also use plastic hangers, but when bending you will have to heat the bends, because the product is very easy to break.
If you feel sorry for spoiling a hanger, and have a piece of hard wire lying around somewhere, then using the same pliers and an elastic band, you can make a beautiful and aesthetic stand that will be much more attractive than the previous one.
Another interesting way
social networks
But holding it with one hand in front of you is often uncomfortable or tiring - your hand and neck quickly become numb.
After some digging around on various Internet sites, I realized that it is not difficult to buy a tablet stand, but they are quite expensive considering how simply they are made. So I decided that I would make the stand myself.
I didn’t want to leave the house that day to go to the store for some materials, so I decided to build a stand from scrap materials. I'm sure that many people have a cake box for CDs lying around at home - a round plastic container with a lid and a pin in the middle where discs are strung.
So, I took a regular cake box with six slots
along the edge (see photo below). If you get tired of it as a tablet stand, you can always use it again for its intended purpose. The changes we will make to the cake box will be minimal. The pin, which will support the tablet, of course, does not look very aesthetically pleasing. More savvy and less lazy readers will probably come up with ways to decorate it. I'm happy with the cake box the way it is.
Step 1: Materials
There are only two of them:
cake box for CD/DVD discs and a paper cutting knife (or any small sharp knife).
Step 2: First cut
Select any point along the edge of the container and make a vertical cut. Now cut a notch of this shape - \__|. The cut out portion should be wide enough for your tablet to fit into the cutout at the perfect thickness.
The vertical part will support the tablet, and the diagonal part of the notch will ensure a convenient positioning of the device.
Step 3: Continue cutting the cake box
Make two more of the same cuts and cut out the same shape. Each notch you cut should be wider than the previous one. This needs to be done because the container has a cylindrical shape.
Step 4: Make identical notches for the other side
Take the tablet and insert one side into the already cut recess, place it so that it rests on the pin. Now mark on the edge of the container where to cut a notch for the other side of the tablet. Cut a notch on the other side.
The end result should look like my photo. If you suddenly cut a notch in the wrong place, it’s okay, use another container slot.
Step 5: Done!
Congratulations! Now you have an ergonomic tablet stand that allows you to place it vertically or horizontally at 6 different angles.
A tablet stand is a very convenient thing, with which you can place the gadget in any position convenient for you. It is especially necessary when watching movies or reading e-books. There are currently many options for these stands in stores, but you can make this primitive thing with your own hands.
Our article today will tell you how to make a stand for a tablet.
How to Make a Tablet Out of Paper
How to make an iPAD tablet for dolls and a cover - a stand for it with your own hands. DIY.
Take a look at my second channel ✯"NK Show"✯https://goo.gl/7y6Cht, where I shoot challenges, pranks, sketches, vlogs, in general.
How to make a tablet out of paper
I apologize, it didn't work out completely.
limshark_animation | Cardboard gadgets | Cardboard gadgets
Rus- Konnichiwa everyone! It just so happened that this video took off, and YouTube even began to issue it as a recommendation.
How to make a paper phone/tablet stand. Origami. Origami Phone stand/holder.
In this video I will show you how easy it is to make a stand for your phone or tablet out of paper with your own hands.
How to make a tablet
Don't have money for an iPad or Galaxy Tab? This video will clearly show how you can create the coolest one yourself.
Do-it-yourself universal origami smartphone stand made from A4 paper?
How to make a convenient stand for your smartphone with your own hands from a sheet of A4 paper. To do this you need to fold it.
How to make a tablet out of paper
Sorry that there is no ending, the camera just stopped filming. But you get the whole point. At the end I just drew.
How to easily make an iPhone out of paper?
See all the ways to make an iPhone and other phones out of paper on the website: https://www.xn——5cdbcgrdkylfpbtx4fxaz7p.xn--p1ai/kak-sdelat-i.
DIY NOTEBOOK FROM CARDBOARD
How to make a laptop from cardboard with a tablet.
DIY.Do-it-yourself book case for a tablet with Lady Bug.
DIY. DIY tablet case with Lady Bug. DIY master class. Let's do it with your own hands.
Sucker
To make such a simple holder, you will need a suction cup, used for attaching toys to the windshield, as well as a stationery pin. This is perhaps the easiest way to make a holder; even girls can cope with this task. The suction cup connects to the clothespin. The resulting structure is installed on the deflector. The phone is attached to the suction cup.
To hold a more massive tablet you will have to use 2 of these mounts. The advantage of such a holder is its convenience; it can also be removed if necessary; it will not take up much space in the glove compartment.
Home weather station
Do you live in a private house outside the city? Of course, you can spend money on all sorts of smart gadgets like a thermostat or barometer with Wi-Fi connection, but why if an old tablet can show you the weather, temperature, barometric pressure and moon phases?
Hang the gadget on the wall, connect the charger, turn off the display dimming, and expand a weather app or widget to full screen. Fortunately, there are so many of them on Google Play and the App Store that there is nowhere to put them.
At the same time, set up your “weather station” to signal if it’s going to rain - this way you’ll have time to bring home things left outside. And in addition, it can be used as an alarm clock.
Media center
There are many applications for streaming music and videos for Android and iOS. In addition, many Android tablets, even quite old ones, are equipped with HDMI connectors for connecting to a TV and a mini-jack for audio transmission. Put it all together and you get a good media center for those who haven't got a SmartTV.
Connect the tablet to the TV, turn on YouTube, Pandora, any streaming service and listen to music, watch videos even on a TV that does not have an Internet connection.
Things to remember
- When installing the holder (especially if it is installed on the dashboard on a bracket), we must not forget about safety precautions. The bracket should not be too long, the tablet should not be too close to the steering wheel, or at the same level with it, because this way the driver will certainly touch it when he next reaches for the gearshift lever. In the event of an emergency, this seemingly insignificant moment may well become the cause of an accident.
- A tablet built into the front seat headrest could cause injury to the rear passenger. If this person is not fastened, then in the event of sudden braking or an impact, he will be thrown forward, face-first directly onto the headrest. If there is a tablet in the headrest, its fragments will cause cuts to the passenger (this point is especially relevant for tablets whose display is covered with glass with a so-called oleophobic coating, rather than plastic).