Advantages and disadvantages of a tablet instead of a radio
First of all, it is necessary for everyone to evaluate for themselves the feasibility of installing a tablet in a car.
Therefore, below I have provided a list of the advantages and disadvantages of this replacement.
List of benefits:
- Playing music is much more convenient.
- You can watch videos (movies, TV series, clips, etc.).
- More flexible sound settings in the car are possible (adding effects, equalizers, compressors, using different players).
- You can surf the Internet, use social networks, instant messengers, and communicate via video conference.
- You can take pictures with the front camera.
- You can use any navigator and GPS.
- The 2 DIN socket is great for a mid-sized tablet. In the worst case, you will have to slightly enlarge the 2 DIN frame.
- The device will not have to be constantly charged, since it will be directly connected to a power source, without using a lithium-ion battery.
List of disadvantages:
- To fully make a radio from a tablet, you need to work hard on the installation and connection. Moreover, you will need at least basic knowledge of how to connect such devices. If you blindly follow installation and connection instructions, in most cases nothing will work. This is due to the fact that absolutely identical situations are impossible. On some cars the connector will be too large, and on some tablets the voltage will be non-standard.
- During installation, you may accidentally damage other parts of the vehicle.
- Connecting a tablet to a car with your own hands does not imply any guarantees or returns, so you will have to correct your own mistakes yourself. But before that, they still need to be found!
- Some features of the device will become inconvenient to use, since the gadget is attached to the car interior. For example, playing games will be inconvenient, as will typing text messages. For games you will have to connect external peripherals, and replace text messages with voice messages.
- The main camera will become completely useless.
Installing a tablet in a car is not an easy task. So first decide if you need it! Otherwise, there is a chance of ruining both the car and the gadget.
Important Features
When installing a tablet with your own hands in a car instead of a radio, you need to consider some important points. First of all, pay attention to the weight and size of the tablet. A large and heavy device will not work, because it is more difficult to install, and when driving on a bad road, it may come off and fall out. Choose a compact and lightweight tablet.
Next are the buttons. It is desirable that the tablet has only one physical button. This will make using the device in the car easier.
Which tablet is right for you?
Choosing the device to use is an important step before installing the tablet in the car.
There are several criteria:
- There is no need to pick up an expensive flagship. Instead of a radio in a car, a mid-priced tablet, and not necessarily from leading brands, is quite suitable. But you shouldn’t buy a very cheap gadget from an unknown Chinese manufacturer.
- The display diagonal should be small, approximately 7-8 inches. This is the size that fits the 2 DIN socket standard. You can get a device with a larger screen, but it’s definitely not worth buying less.
- The display resolution must be at least FullHD. If the resolution is low, then the driver sitting next to the device will easily notice the pixels on the screen.
- Technical specifications may not be the best. Typically, a powerful processor, video chip and large amount of RAM are needed only in games and certain applications. Playing on a gadget built into the car interior is not very convenient, but almost any device is suitable for playing music, videos and surfing the Internet.
- It is imperative to have a slot for a SIM card, otherwise there will be no connection to the Internet. The only exception is the situation when the car has a portable Wi-Fi modem that distributes the Internet.
- It is desirable that the device has a GPS module and GLONASS technology. Both are useful for navigator applications. Otherwise, GPS satellite reception is poor, as it only works via the Internet.
- For radio lovers, I advise you to buy devices with a radio module. But this is not necessary, since if you wish, you can listen to radio stations via the Internet.
A good tablet from Lenovo, the Tab 3 TB3-850M, meets all of the above requirements.
This is an inexpensive gadget with a display diagonal of 8 inches. The gadget supports 4G, GLONASS, GPS.
The amount of RAM is 6 GB, and the permanent memory is 16 GB. The current cost is approximately 10 thousand rubles.
WIFI or Bluetooth
An optimal and familiar option to many, which does not require any cords and provides a fairly good communication signal. However, such connection methods are relevant and only work when there are special modules on the radio. Signal and file transfer occurs after:
- Enabling a special module.
- Perform a search for Bluetooth devices on your tablet.
- Make a connection after finding the equipment.
- There is no need to make any additional settings. The device automatically configures itself to receive the necessary files.
Some devices will require you to specify a login method even if the Bluetooth transmitter is turned on.
This is a special input that allows you to connect devices in the vehicle. To perform a simple task, you will need a special cord - Jack 3.5 at both ends, which are inserted into the radio and the MID connector. After connecting, you will need to indicate in your mobile device that it needs to work in AUX mode.
Immediately after connecting, without additional settings, you can listen to music, watch programs, videos, films. However, you should not count on more than the transmission of sound. In some cases, even this is carried out with interference, especially when a low-quality cord is used.
Installing and connecting the tablet to the car
To make it clearer how to connect a tablet to a radio, I divided this process into two stages: direct connection of the amplifier/speakers, and physical installation of the device.
Before starting work, you should prepare the following tools and equipment:
- soldering iron with a fine tip;
- screwdrivers;
- keys;
- drill with suitable drill bits;
- cutting tool;
- tablet;
- amplifier;
- audio adapter (if the player will be used as an amplifier, a cassette recorder adapter will do);
- car adapter for powering the device;
- prepared wires for connecting to the battery and for audio output;
- thermal tubes;
- mini RCA cables.
Having all of the above and having at least basic knowledge in connecting such devices, you can safely get down to business!
Connecting speakers and amplifier
Detailed instructions for connecting the device through an amplifier:
- Remove the original radio. To do this carefully, use the instructions for your player model.
- Stretch the wires from the amplifier to the battery, while the cable on the positive should have a fuse located as close as possible to the battery. The fuse housing must be waterproof!
- Make a small hole in the wall between the passenger compartment and the engine compartment to route the cable. Be sure to use a standard rubber coupling to prevent the cable from chafing on the metal surface.
- To ensure high-quality signal output to the amplifier, use an adapter adapter, thanks to which you will not need to bundle and solder each cable to each other.
- Route 2 wires from the amplifier to the audio adapter.
- Connect your tablet using two RCA wires.
- Identify the connector on the fuse that only receives voltage when the ignition key is turned on. This connector should be indicated on the fuse box or documentation. The plus is connected through a fuse, the minus to ground. Here we connect the cigarette lighter socket into which the charging adapter is connected. The adapter itself is connected to the gadget.
This completes the connection to the amplifier.
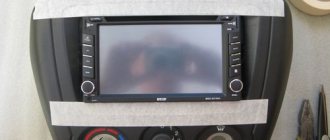
Installing the tablet
Now you need to install the device. Installation instructions:
- Insert the device into the place of the radio; if the frame is not large enough, you can file it down in the right places.
- Before installation, make fasteners to hold the gadget on the back side so that it does not fall inside.
- After inserting the device, secure it with epoxy glue.
- It is best to connect the device to an amplifier via a headphone jack. Then the signal quality will be good, without noise and delays.
That's it, now you have installed the device! Check if everything works and use the new, improved radio.
Working with a footprint
Now you need to measure the hole where the radio was previously located. Based on the size, you need to cut a sheet of plastic. Its width and length should be approximately 1 cm greater than the measured dimensions. This sheet of plastic is secured with epoxy resin in place where the radio previously was. You need to secure it at 6 points.
A hole for cables is drilled in the middle of this plate. Then it is advisable to paint the surface of the plastic plate with a suitable color. You need to glue holders to the corners. They are glued with epoxy resin.
After this, the cables are connected to the tablet.
Ways to connect two Chinese cameras to the radio
There are models on the market for dual-zone monitoring of the vehicle space - front and rear. This solution allows you to register possible emergency situations on the road, and record the condition of the car in the absence of the owner.
Connection and configuration are carried out in the following order:
- the on-board network of the machine is de-energized;
- the front camera is installed on the rear view mirror holder;
- install the rear one;
- for an aesthetic appearance, the connecting wires are connected to the head module under the interior trim;
- if the standard radio has two Video In inputs, connect the signal wires to them. In the case where the kit has its own recorder, select the location for its installation, connect it to the network and cameras;
- check the connections according to the installation diagram, turn on the battery;
- configure camera operating parameters.
All that remains is to test the system in motion and, if necessary, make adjustments.
Sometimes it happens that one of the cameras does not provide adequate coverage of the space in front of it. The solution is to purchase a “Fish Eye” overlay. It acts as a wide-angle lens and expands the viewing angle.
Connection diagram of the camera cable connectors to the car radio
When the preparatory work is completed and the cables are laid, you can proceed to connecting all system components.
Let's take a closer look at the diagram:
The standard connection cable consists of two parts:
- yellow – signal;
- red – food.
Please note that the colors of the voltage wires may differ on different models.
The video signal connection is made through tulip-type connectors.
The standard method of powering and activating the camera is through the reversing lights. The operating principle is as follows:
- The red wire is connected to the lights, the black wire is connected to the ground of the car.
- The signal cord is connected through the trunk in the cabin to the radio via the Video In connector.
- When reverse gear is engaged, voltage appears on the power wire of the camera, which activates it.
- The radio detects a signal on the input channel and switches to image broadcast mode.
Very often, the connection to the radio is made through the ISO connector. In this case, you should familiarize yourself with the connection pins and find the video input.
The second connection method allows you to activate the surveillance system regardless of reverse gear. To do this, 12V is supplied to 2 wires - red and blue. The first one is connected to the ignition switch, to the key1 position – ACC. The second is connected to the reversing lamps.
With this method, the system will operate in two modes:
- when shifting into reverse gear;
- in the key positions key1 and key2 – Ignition, which corresponds to the on-board power supply being turned on and the car ignition.
Some radio models require manual activation of the shooting mode in the “settings” of the device. After activation, you should check the operation in different key positions, especially in key2.
The next step is to configure the radio itself, namely focus, sharpness and light sensitivity. Different systems offer a different set of settings, so configurations are individual.
Tip: It is important to observe strict correctness when connecting wires. To avoid mistakes, it is recommended to assemble the system on a table and configure it
When connecting power components to the vehicle network, protect them with fuses.
How to connect an antenna
To connect a radio receiver, you must additionally install and connect an antenna. Most often it is located on the roof or fender of the car. A stronger and more stable signal is provided by an additional amplifier, which is located in the switching circuit. Power is supplied via a separate cord. The connection diagram depends on the model of the head unit and the technical design of the amplifier itself.
In a 2 DIN radio, the round ANT connector is responsible for connecting the antenna. The wire with positive polarity is connected to the red cable, which is responsible for supplying voltage. The negative cord is connected to the body panel.
Installation of a new device
Using an adapter
To insert the body of the new car radio into the dashboard niche, you need to repeat the dismantling operations in the reverse order. In new cars with “audio preparation”, it is enough to compare the connectors of the head unit and the car wiring of wires from the battery and speakers. Each of the well-known car audio brands uses connectors of its own design, which differ in configuration
If the connectors of the car electrical wiring and the new car radio match, it is enough to connect them and insert the head unit housing on the slide into the niche. For mismatched connectors, you will need to purchase an adapter, which is available for all models of car speakers.
To find an adapter in retail or at a car market, you cannot remove the connectors from the car radio. The easiest way out would be to photograph both connectors and write down the exact markings of the car radio model.