It’s always nice to look at a beautiful and well-kept dacha plot. And if there are also objects of the owner’s creativity on it, then it is doubly pleasant. Nowadays there is a huge number of different garden figures that can easily be bought in the store.
But why not make your own? Various animals are a very common theme among craftsmen. Today we will tell you how you can place a cute cat made from a plastic bottle on your property and spend time usefully.
Black cat
The black cat has been the object of superstitions and various prejudices since ancient times. But, as the well-known song says, “only a black cat is unlucky.” Therefore, we suggest not to listen to prejudices, but to spite all the failures of the black cat!
To make this craft you will need:
- plastic bottle for kefir (milk or drinking yogurt);
- cardboard;
- self-adhesive colored paper;
- plastic eyes;
- scissors;
- glue gun;
- a can of black paint (can be replaced with acrylic paint).
Execution instruction
- Take a kefir bottle, remove the top label and wash it with dishwashing detergent inside. Screw on the lid.
- Cut out 2 ears and 2 paws from cardboard.
- Using a glue gun, glue the parts to the base.
- Cover the top with spray paint. To avoid getting the table dirty, cover it with newspaper or cling film. Use gloves when working with paint. It is better to take children to another room while painting.
- When the paint is completely dry, glue on the eyes and nose with mustache. Glue several circles of different sizes on the surface of the bottle.
The result is a funny black cat. The craft can be used as a noisemaker (pour some peas or beans inside) or as a decorative figurine in the garden.
What is a protective collar for a cat?
Protective collar for cats.
The protective collar or Elizabethan collar is a cone-shaped design
, which is worn around the cat's neck. Although wearing this device does not cause much delight in animals and causes them some inconvenience and discomfort, there are times when a collar is vitally necessary.
A little history
Why is it called Elizabethan
? During the reign of Queen Elizabeth of England, high fluffy collars were in fashion, which forced you to keep your head straight and did not allow you to turn it.
During the reign of the English queen, puffy collars were in fashion.
An enterprising cat owner who lived in those days decided to use such a collar to prevent his pet from scratching the wound. The device was named after the queen, who introduced such an inconvenient wardrobe item into use among the courtiers.
Progress
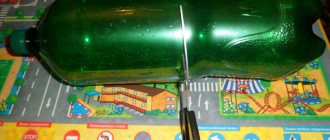
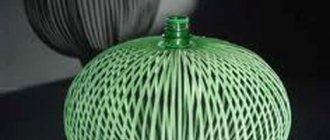
1. To make the body you will need a bottle with a high neck : neck. Unfortunately, I received a vessel with the end cut off - I had to “reanimate” it
. Scotch tape helped me connect the parts.
2. Cut off the bottoms of the other two bottles
3. Cut out the ears and make folds.
4. We insert the bottoms into each other and secure the ears. We fix everything with tape.
5. Now we connect the head to the body, again using tape.
6. From thin white packaging material, cut out circles of different diameters and make cuts.
7. Cut off a strip of plastic for the tail .
8. I used a corrector to paint the muzzle, ears, tip of the tail and draw the front paws.
9. I painted eyes, nose, and mustache with gouache
10. The final touch is tying a ribbon around the neck (I hid the ugly connection of parts with tape)
.
Now this couple will have more fun together!
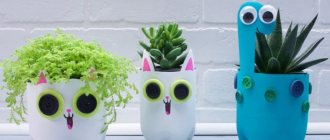
Flower pots “Cute kittens”
Small plants planted in pots in the shape of charming kittens look original and stylish. Making such crafts is not at all difficult.
You need to prepare:
- several plastic bottles;
- a stationery knife or scissors with sharp ends;
- black marker.
- acrylic paints.
Step-by-step instructions for making flower pots
- Prepare the bottle for use (get rid of the label and wash the inside).
- Decide on the height of the future product and mark a horizontal line around the bottle.
- Above the line, schematically draw 2 triangles – the cat’s ears.
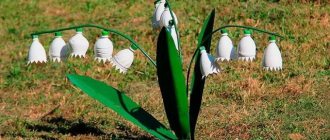
- On the opposite side, draw an elongated oval - the tail of the animal.
- Carefully cut with a utility knife (scissors) along the marked outline (including the ears and tail).
- Cover the top with acrylic or spray paint. Paint the tail part on both sides.
- After complete drying, draw a muzzle (eyes, nose, antennae) with a marker.
- Bend the tail and decorate it with a decorative bow.
In order for the plants to grow better and the root system not to rot, several holes must be made at the bottom of the bottle. Pierce the bottom of the homemade pot with a hot awl or nail. Now the plants will not only look original, but also grow well.
Such pots can be used not only for planting home flowers, but also for storing small items (spools of thread, decorative shells, etc.). An interesting solution would be a napkin holder or organizer made in a similar way (for colored pencils and pens). You can also pour candy or crackers inside.
In order to eliminate the possibility of injury from the sharp cut edge of the bottle, before painting the part, hold a lit match or lighter near the edges. The edges of the product will melt a little and will no longer be so sharp and traumatic.
If you take a large bottle (5 - 6 liters) for work, then a similar pot can be used for planting flowers in your garden.
Materials and tools
- decor: eyes for toys, satin ribbons;
- scissors, marker and felt-tip pens;
- plastic bottle;
- white paint;
- brush or sponge;
- colored cardboard;
- towel;
- glue;
Note:
select in advance the pot with the flower for which the flowerpot is being made. Take a ruler and measure how many centimeters the pot is in height. We mark the edge of the plastic bottle at a distance slightly lower so that it is convenient to remove the pot with the plant and it does not sink into it.
When applying paint to a container, you can use a wide brush or sponge.
In these instructions, regular “moment” glue was used.
Cat as a garden sculpture
In order to make a cat from plastic bottles, you don’t need any special skills, the main thing is that you have paints on hand with which you can color it. The rest of the steps will be very simple:
- Take a six-liter plastic bottle, clean it of dirt and degrease it.
- We make cuts in the places where we plan to make the ears and tail.
- From the second vessel we cut out the small parts missing for the figure.
- We paint the whole bottle and small parts as your imagination requires, and let it dry well.
- We insert the ears and tail into the prepared cuts.
Thus, we get a cute cat that can either sit or stand. Its location depends only on how the bottle will be placed.
A figurine of the cat Matroskin can be considered a modernized analogue of the previous cat. Making it yourself is more difficult, but it also looks more interesting.
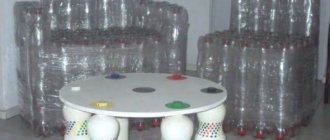
More material will be needed for its construction. In particular, you will need bottles with a volume of 6 and 10 liters, one piece each, and 4 pieces of plastic 1.5 liter bottles. In addition, you will need a hose with a diameter of 10 mm.
A cat made from plastic bottles is made using the following algorithm:
- In a large bottle we make holes into which we extend two pieces of medium-length hose - we get paws.
- One and a half liter containers are attached to the paws so that the feet come out. It is better to cut off the top part of them and attach only the bottom.
- A six-liter plastic bottle is cut so as to remove the middle of the bottle. We connect the bottom with the neck, thereby obtaining the head of a cat.
- We attach ears cut out in the shape of triangles to the corners of the bottom of a six-liter bottle.
- The entire figure is decorated with your own hands using paint in the style of Matroskin the cat.
Instructions for making a cat
You can make many options for cats from plastic bottles. Let's look at the most interesting ones.
Cat as a garden sculpture
The whole point of making such a cat is in the beautiful design of the craft.
The main essence of its production is the skill of painting with acrylic paints. The manufacturing process itself can be done even by a small child.
You need to take a plastic bottle of at least five liters and wash it thoroughly, as well as degrease it.
After this, a second bottle is taken, from which the remaining small elements are produced. When you paint them, after the paint dries, you can glue everything into a single figure.
Such a cat will perfectly decorate an ordinary garden plot. There are many such figures that can be made, in various shapes and sizes.
Cat Matroskin
This cat model made from plastic bottles is difficult to make, but the result will please you
This is a modernized version of a cat for a garden plot. Accordingly, the process of its manufacture is much more complicated.
The material you will need is one 6- and 10-liter bottle, as well as four plastic bottles of one and a half liters each. You also need a hose with an average diameter of 10 millimeters.
Several holes are made in the largest bottle, into which two pieces of hose are threaded. These will be the paws.
One and a half liter bottles will serve as feet. They will need to be secured to the paws.
For a plastic bottle with a capacity of six liters, the middle is cut out and joined together with the bottom and neck. This is the head.
All that remains is to glue on the ears and design the face to look like Matroskin’s cat.
Cat - plant pot
A pot in the shape of a cat can be used to decorate both a house, a veranda or a garden plot.
The basis of the potty cat will be a plastic two-liter bottle. Be sure to wash it and remove all unnecessary labels.
After these simple procedures, you need to mark the cut line from below. The end result should be a bottom with protruding ears.
Using fire (for example, from a candle flame), you will need to process all protruding sharp corners.
The workpiece is thoroughly washed in a solution of washing powder and then painted with acrylic paints. It is best to repeat the last procedure twice.
Be sure to wait for the paint to dry completely.
All that remains is to draw the cat’s cute face, after which he will be ready.
Planting and caring for astilbe in the garden - find out how to do it correctly
Every owner of a furry pet knows how difficult it is for cats to endure illness and surgery. But the real difficulty lies in the rehabilitation period, when the pet’s wounds need to be lubricated with ointment or bandages applied to them. After all, cats are extremely capricious and impatient animals and try to immediately remove a foreign object from their body. In such cases, veterinarians recommend wearing a protective collar on your pets. What is such a collar and is it possible to make it yourself?
Cat made of plastic bottles
Hello, dear friends! In the souvenir and gift departments, I often pay attention to cat figurines; I really like them. And recently I got the idea to make a similar cat out of plastic bottles with my own hands.
My youngest son Alexander helped me with this. Of course, I “handled” the knife and scissors myself, and he happily covered our cat with paint.
To make a cat we will need:
1. Plastic bottles - 2 pcs. (any size)
2. Knife and scissors.
3. Paints and brushes. You can use acrylic, spray paint, enamel and car paints, gouache (if the cat will stand in a dry place).
The sequence of making a cat from plastic bottles
♦ We take two plastic bottles, we used one and a half liter transparent ones.
♦ One bottle will be the body of a cat.
♦ From another bottle we cut out parts for the head, 2 ears and a tail.
♦ The head consists of two halves: we cut off the lower part of the bottles (the second half can be cut off from the bottle for the body, or you can take the third), then insert it into each other.
♦We make cuts with a knife for the ears in the upper part of the head, in the lower part there is a hole for the neck of the bottle-body, in the back there is a cut for the tail.
♦ We paint all the details with paint, we used gouache, but it is better to use the paints listed above. You can choose the color to your liking.
♦ When the paint dries, draw out the muzzle, chest, front legs, tip of the tail and ears.
♦ Putting all the details together.
So we got a cat made from plastic bottles.
You can use it at your discretion: to decorate the interior of a house, a garden plot, or you can make an additional cut and you will get a spacious piggy bank.
And for anyone interested in finding out what benefits real cats bring, I advise you to read here.
Cat from a plastic bottle
If your child has recently begun to actively stare at street cats and dogs running past, then it’s time to distract him a little. First, let a cat from a plastic bottle appear in the apartment. There are so many options for creating it that a child, actively making his tenth cat, may forget about his recent desires, then switching to a plastic bunny, hedgehog or donkey. What if this becomes an impetus for the development of his creative potential or design skills? Also, these step-by-step instructions and photo ideas will be useful to all cat lovers.
Cat flower bed made of plastic bottle and cement
This funny flowerbed cat is made from a plastic bottle and cement. It was made with your own hands from scrap materials, the main thing is to use your imagination.
For this masterpiece, you will need: - sand, - water, - cement, - plaster, - wire, - a large plastic bottle, - varnish, - paint and wooden slats.
We need to take a plastic bottle and cut it so that this container becomes our flower garden. The bottle must be tightly wrapped with wire. This is necessary so that the cement with which we will later cover the bottle does not slip. After this, it is necessary to knock down a frame from the prepared slats and attach a container to it.
Mix the cement mortar. The consistency should be like thick sour cream. To do this, you need to take 1 part cement and 1 part sand. But gypsum should only be added to the ready-made mixture, which we will take in our hands, otherwise the solution with gypsum will harden instantly. Before you start covering the container with a solution of cement and plaster, you should wear rubber gloves.
Take the prepared cement solution in your hand and add a tablespoon (tablespoon) of gypsum to it. Knead the resulting mixture in your hands and roll it into a sausage. After that, attach it all to the frame. Gradually, apply such a solution to the frame, making the necessary proportions and convexities.
Making a cat figurine for the garden with your own hands
You can turn your garden or small summer cottage into a masterpiece if you approach its decoration with creativity. Thus, garden figurines can not only convey the mood of the owners, but also distinguish your site from the mass of similar ones, especially if these figurines are made by yourself. Today we will learn how to make a wonderful flowerbed cat with our own hands from a plastic bottle and cement. Everything is in the best traditions of garden crafts: available materials, a little imagination and the desire to decorate your site.
So, in order to make a cute cat,
we will need:
- large plastic bottle;
- cement;
- gypsum;
- sand;
- wire;
- wooden slats;
- dye;
- varnish
First you need to find a large, dense plastic bottle - this is the basis for the future cat. We cut off exactly half of it - the part in which there is a neck. Since in the future cement will be attached to the base, in order for it not to slip and stay well, you need to wrap the body with wire.
Now we knock down a wooden frame from slats, which in the future will serve us as the legs, tail and neck of the cat. We attach a plastic container to the frame and proceed to mixing the cement.
The cement mortar should have the consistency of thick sour cream: add 1 part sand to 1 part cement. Since we will need gypsum for the figure itself, but when it is added to the solution it will harden instantly, we will add gypsum only to a portion of the solution taken in hand. Be sure to carry out all this work wearing rubber gloves.
Take a handful of the solution, add about a tablespoon of gypsum and knead the mixture in your hands. Then we attach all this to the finished frame, creating the necessary shapes: bulges, depressions, etc. - everything is like a real cat. We repeat this until we have molded the body, paws, neck and tail of the figure, gradually smoothing out the formed surface. Then we form the head - a ball or oval of decent size. We leave a depression in the body - the basis for the pot.
Now let's get down to the small details. So, all the elements of the head, and these are ears, cheeks, eyes, etc., are sculpted in approximately the same way as plasticine figures were sculpted in childhood - no problems should arise here. After these parts are ready, we attach them to the base, but in order for them to hold better, it is advisable to first moisten the surface of the figure with water. As a mustache, we use wire of the desired length. But in place of the pupils, you can first insert buttons.
When the base is completely ready, polish the surface and leave it to dry under cellophane for 3-4 days. Moreover, on the first day you can moisten the figure with water. After everything was dry, we carefully sanded our work.
And now the fun part – coloring. You can paint it in any color: the cat can be red, black, two-tone, with a white collar, etc. – it’s only up to your imagination. It is better to use water-based paints, car paints or enamels, and after drying, varnish.
Now you can pour soil and plant flowers, but do not forget to hide the figurine in the house for the winter, otherwise it may crack in the cold.
Decorative decoration for the garden “Cat family”
On personal plots you can often see various decorative figures (gnomes, mushrooms, etc.). Owners most often buy figurines for garden decoration in specialized garden stores, and, as a rule, almost all of them are identical. To be original and decorate your site in a special way, we suggest making similar figures with your own hands.
In order to decorate the garden with a funny cat family, you will need 2 plastic bottles, acrylic paints, scissors, a heat gun and a decorative bow.
Description of step-by-step work
- Cut off the bottom of the bottle, but not completely, but by cutting out 2 triangles (cat ears).
- From the remaining part, cut a ring a few centimeters wide and cut it (you will get a tail part).
- Use acrylic paints to paint the cut parts (muzzle with ears) and the whole bottle (body).
- To make the garden figurine stable and not fall from the wind, pour sand or small pebbles into the body bottle.
- Using a heat gun, glue the tail to the back. Fold the ears up and glue the muzzle to the body.
- Decorate the figurine with a bright bow.
Not only children, but also adults will admire such unusual cats and kittens. And the popularity of your garden plot will be ensured!
LiveInternetLiveInternet
—Quote book
1. A man is a species of animal who lives most of his life by instincts. Warning: do not watch e.
Sometimes a very strong man with powerful solar energy appears in a woman’s life. And he lay down.
Oddly enough, our character largely depends on what we are called.
What to do? Quick recommendations There is an ancient and simple way: if you don’t think about it and unconsciously.
The ancient Romans and Greeks attributed magical properties to laurel and used it in their rituals.
Flower girl made from a plastic container
Another interesting solution is to make a flower girl in the shape of a funny cat. True, for the work you will need not only a set of necessary materials and tools, but also a creative approach and the ability to work with cement (clay, gypsum).
The photo shows step by step the work of making a flower girl in the shape of a cat.
With a little time and creativity, you can make real masterpieces out of ordinary waste materials!
Related Posts
leave a comment
Mosaic in the form of a cat
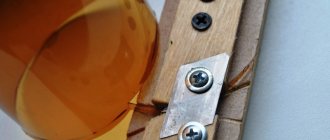
Often, when making figures from plastic bottles, the caps are thrown away. But it’s better not to do this, as they can still be used. There are a lot of ideas for traffic jams in the country. For example, making curtains or laying out a garden path.
Mosaics made from plastic bottle caps look very interesting on various surfaces, for example, on the wall of a house or a fence. You don’t need a lot of materials for this; it’s enough to have plugs and nails or self-tapping screws. You can choose the colors of the corks or simply paint them later. For example, this cat looks very cute, which could easily be depicted on the wall near the playground.
How to make a cat from a plastic bottle
It’s always nice to look at a beautiful and well-kept dacha plot. And if there are also objects of the owner’s creativity on it, then it is doubly pleasant. Nowadays there is a huge number of different garden figures that can easily be bought in the store.
But why not make your own? Various animals are a very common theme among craftsmen. Today we will tell you how you can place a cute cat made from a plastic bottle on your property and spend time usefully.
Why do you need a protective collar?
Cats are susceptible to many diseases, including those that require external application of ointment or antiseptic powder.
And also, many owners subject their pets to sterilization and after this simple operation a seam remains for some time
, which must be treated with healing agents.
But the problem is that cats are used to treating themselves by licking their wounds with their tongues.
and it is impossible to explain to the animal that in this way he can get an infection or lick off a harmful medicine. In addition, after surgery, most cats try to get rid of the bandage or surgical sutures in any way.
To prevent the pet from damaging the wound and removing the stitches prematurely, a protective collar
. This device restricts the animal’s movements and prevents it from touching the wound.
To prevent the cat from damaging the wound, a protective collar was invented.
When is a collar needed?
For the treatment to be effective and for postoperative wounds to heal better, the cat must be wearing a protective collar.
How to choose the right collar
You can purchase a protective collar at veterinary pharmacies or pet stores. But, since this item must be safe and reliable and not impede the pet’s breathing,
Finding the right size can be quite difficult.
You can purchase a protective collar at a pet store.
Therefore, the best way out of the situation would be to make your own collar from scrap materials, for example, from a plastic bottle, thick fabric, cardboard or a pot for indoor plants.
Making it at home is not that difficult, you just need to be patient, scissors and a tape measure.