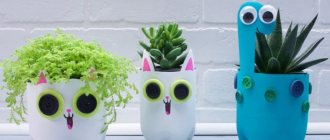
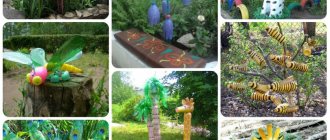
DIY garden ideas are so capacious that an ordinary plastic bottle can be turned into an “almost magical” object. Moreover, it’s quite simple.
For example, Chinese wishing lanterns are considered magical. Real Chinese wishing lanterns are flying (they are filled with hot air or gas). But they don’t fly all the time: waiting for a special occasion, Chinese lanterns serve as decorations for the garden or home (in a suspended state), as well as original lamps.
Crafts for the garden in the form of Chinese lanterns are a rewarding endeavor. The material is free and available in unlimited quantities. The technique is the simplest. But it requires caution.
Content:
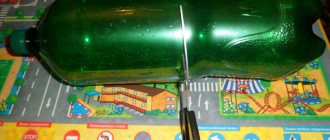
- Step 1. Cut the plastic bottle
- Step 2. Turn the workpiece into a ball
- Step 3. Color the blank
- Step 4. Hanging the lanterns
- Transformation into a real lamp
They say that magic lanterns can make our wishes come true, especially if hieroglyphs are drawn on them, symbolizing love, happiness, prosperity, etc.
They can be hung everywhere - on trees, gazebos, on terraces in front of the house, arches, etc.
So get to work!
Step 2. Turn the workpiece into a ball ↑
Even with the walls cut, the bottle will keep its shape. We need to make a ball out of it.
- Using a hot awl, carefully make 2 holes in the bottom and stretch a fishing line through them, the free ends of which will be pulled out through the neck.
- Pull both ends and squeeze the bottle. The more we pull the line, the more rounded the structure becomes.
- Now let's secure its ends (wrap and tie around the neck). You may need a couple more holes - a heated awl will always help.
- Don't cut off the ends - you'll need them to hang the decoration.
Pros and cons of homemade lanterns
A DIY bottle lamp has several advantages over purchased analogues:
- It's simply cheaper.
- Raw materials that need to be recycled are used and given a “second life”.
- Making a lamp is not as difficult as it seems. All you have to do is not deviate from the instructions.
- Your own design vision is realized, in all the details, instead of searching for the right lamp in stores.
The disadvantages are also not a revelation:
- Glass should be handled with extreme caution.
- Cutting yourself with plastic is also much easier than it seems.
- Any deviation from the manufacturing algorithm may result in the lamp simply not turning on.
Step 3. Color the blank ↑
In order for such crafts made from plastic bottles to look good in the garden, they need to be painted with bright colors. You can use acrylic ones, but oil ones will also look good.
The first option is to carefully paint the cut strips with a thin brush in different colors. It will look very elegant against the background of green foliage.
The second option is more difficult.
- We paint the workpiece with one color. This can be done at the very beginning, when the bottle has not yet been cut. Chinese tradition calls for red! But we are not in China. So we choose the one we like.
- When the paint dries, apply hieroglyphs on top of it in a contrasting color. It will turn out very beautiful. And if we choose those that mean “love”, “well-being”, “health” - perhaps such a flashlight will really fulfill our desire. The Internet will always help you find the right one.
- If you apply a layer of varnish over the dried paint, the structure will be better preserved. And it will look even more like real Chinese lamps.
How to make magical carved lanterns from plastic bottles and paper
What is the easiest way to cut out parts of any complexity? That's right, from plain paper. What are the easiest parts to bend and give them one shape or another? That's right, all from the same paper! With only a small addition in the form of an unnecessary plastic bottle (or a tall transparent glass - to choose from for a specific light source) you will get magic lanterns/night lights/table lamps for the nursery, for holidays in the house or on the street, and simply for atmospheric decoration of living spaces according to your mood . And such works will look great both in daylight and in the dark!
This idea turns the creation of carved lamps into an ultimately elementary but creative work. And the result is so aesthetically pleasing that such lanterns can even be used for wedding or New Year’s decor. By the way, they are also great for Halloween.
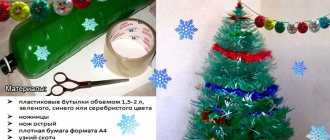
You will need : - Plastic bottles without(!) labels (we soak them in water and then easily remove the labels), but of any shape (bends, corrugations are not a problem here), volume - 0.3-0.5-0.6 l ( you can even cut liter or one and a half liter analogs if you want to make a wide lamp, but remember that it will be more difficult to properly illuminate it (you may need a couple of garlands instead of one), and besides, short wide lamps turn out to be less aesthetically pleasing, since they are on top their “filling” is clearly visible); – Tall transparent glasses (analogues of plastic bottles, if you decide to use candles inside the lanterns): tall ones are needed so that the candle does not burn or blacken the paper while burning; – White paper – ordinary sheets of A4 or larger format, but you can also take special thicker paper, on which three-dimensional details are better obtained (and then visible); – LED Christmas tree garlands with the simplest design of light bulbs – that is, with “naked” light bulbs: it is possible with plugs for ordinary sockets, but it is more convenient with a battery-powered control panel; – Floating candles (larger ones, plus they can be placed on water in a glass to raise them a little higher) or “tea” candles – an analogue for LED garlands; – A stationery, craft knife or any other short and sharp knife for cutting out designs; – A special mat for cutting various materials, a flat, clean and large cutting board, or, finally, just a pile of newspapers/magazines; – Transparent regular tape or double-sided tape; – Design templates for lamps found online or hand-drawn – with or without three-dimensional parts – based on the principle of carving Halloween pumpkins; – Printer or pencil and eraser.
1. So, we completely remove the label from the plastic bottle and all traces of it - with alcohol and cotton wool or just water. We cut the top of the bottle to a height of about 20 cm. Also at this stage, cut a hole on the bottom side of the bottle if your garland will be connected to an outlet.
2. We enlarge the template to the required size on a PC in a graphics program, then print it out, or draw it on a scale of 1:1 with a pencil by hand directly on paper, which will then become a flashlight. We choose an electronic template where all the drawn lines are as thin as possible, or we print any one onto paper, place this paper on top of another blank sheet, temporarily gluing the edges of the sheets together so that they do not move during work, then cut two lines along the lines at once sheets together. Then we glue and use the bottom cut sheet for a flashlight. We simply do not put pressure on the pencil so that it does not leave too clear marks on the paper.
Also remember that a template is not just ordinary outlines of an image, especially if you decide to make three-dimensional details. Immediately, while still creating the template, decide which parts from it you will cut out completely and what to bend, which lines of the shapes you need to draw in volume, and then cut out these lines themselves completely in order to get a visible outline of the shapes on the paper when you turn on the source light in a flashlight.
Do not forget that when choosing the size of the future flashlight, that gluing two sheets of paper together in some sense will not work, since overlapping seams will be clearly visible in the dark when the light source is turned on inside, and butt seams glued with transparent adhesive tape, will be visible during the day - and such a seam is only allowed at the back of your future lamp. Therefore, look for larger paper sizes for larger night lights.
2. Next, place the template on a mat/stack of newspapers and carefully cut out the design along the lines with a short, sharp knife.
3. Carefully bend upward the individual cut-out details of the design/pattern on the paper to obtain three-dimensional – three-dimensional – elements on the flashlight. In this case, these are parts of dandelion seeds and parts of its leaves. Bend, but never bring the paper to a clear fold!
When you have bent all the parts with your hands to make them even more protruding forward, use a large knife or a thin spatula in order to be able to “crawl” to the very beginning of the cut parts. Also act very carefully, because it is very easy to tear the paper here.
4. We wrap the finished bottle in carved paper, bring the edges of the paper together at the back, evenly cutting off the excess width of the paper as necessary. We fix the paper on the bottle either with double-sided transparent tape in a circle, or simply very evenly and carefully glue the joint at the back of the flashlight with a narrow transparent adhesive tape.
If necessary (a garland that plugs into an outlet), below above the hole in the plastic bottle, cut out a semicircle in the paper to the very bottom.
In the case of a glass, since it will most likely be narrow, we simply glue the carved paper end to end, getting a kind of pipe, and place it loosely on top around the glass.
5. Insert the batteries into the power supply of the garland and place it completely and together with the unit in a plastic bottle. Or, through the hole, gradually and again carefully insert the garland into the bottle so that only the wire with the plug for the socket sticks out from behind. The weight of the garland will securely hold a lightweight plastic bottle in place.
Or (with or without water; if with water, then you can pour just a little of it, so that there is always a large distance from the candle flame to the edge of the glass - this is the key point of the safety of such lamps) we put the candle in a tall glass and then light it and, finally, We place the glass inside the “shade” made of carved paper.
Remember to play with different shapes and formats of patterns and images. After all, the possibilities here are endless! You can, for example, glue thin translucent colored paper under white paper to make the lanterns look better during the day. But using this link you can download several ready-made designs if you like the template in the pictures.
These lanterns can be placed on an electric rotating base to illuminate the room with delicate shadows. Or you can place it near a mirror so that it reflects a fixed pattern on the opposite wall.
Sources: www.instructables.com/id/Dandeline-Lanterns www.apieceofrainbow.com/diy-dimensional-paper-lanterns-2