If a lot of empty plastic bottles have accumulated at your summer cottage, do not rush to throw them away.
They can find useful applications on the site and on the farm. Using bottles you can not only decorate your garden, but also build structures that will be very useful in everyday life.
It is worth noting that for this you do not need special education as a builder or designer. In addition, you will not need to buy expensive equipment and building materials.
Using, at first glance, such an accessible and simple material, you can significantly transform the area near your house or make items from it that are useful in the household and everyday life.
Advantages of fake plastic bottles
- The opportunity to realize your creative potential;
- Original design;
- Not big financial expenses;
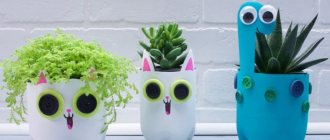
You can make very attractive flower beds for plants with your own hands from plastic bottles. Or create a flowerbed in which “plastic” flowers will bloom.
Using cut bottles you can fence off a pond or flower bed. It is enough to dig the bottles into the ground so that the bottom is at the top. Multi-colored tones will add a “zest” to such a border.
Technique for obtaining blanks
The combination of colors and the play of their shades will help you create a unique designer decoration.
In order to get different shades of color, you need to perform a few simple steps.
- From two colors of the mass you need to make a pair of rectangular blocks of equal size.
- Cut them diagonally with a knife.
- Combine the resulting triangular shapes to form two-color blocks.
- Cut small pieces from the preparations, knead thoroughly.
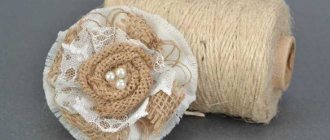
From the resulting blanks it is easy to make original beads or make a beautiful flower.
Making plastic flowers
Before you begin the process, you need to prepare the necessary materials. Namely: the required number of plastic containers and acrylic paint.
To make the plastic “ikebana” look more beautiful, you can use bottles of different sizes. This will allow you to make flowers of different shapes. After all, the size of the flowers depends on the size of the bottle.
You will need paint to paint the plastic in different colors. When choosing a paint, it is important to pay attention to its composition and make sure that it is suitable for application to a plastic surface.
To decorate your summer cottage beautifully, you cannot do without an alpine slide!
LiveInternetLiveInternet
Quote from perlana
Read in full In your quotation book or community!
Magic mirror beads from multi-colored scraps.
Natashas beads (Natasha beads) and Assembling beads on a waxed cord Beads using the original technology Natashas beads and Assembling beads on a waxed cord - MK from Kalinkapolinka and Natasha Designs
Magic mirror beads from multi-colored scraps. Natashas beads (Natashas beads) - MK from Kalinkapolinka
So, for work we need a sharp knife, toothpicks and colorful, beautiful leftovers (you can use unsuccessful sausages). The other day I was just making sausage with a pineapple flower, so I will use the trimmings from this sausage (photo 1). I fold all the scraps tightly into a sausage. The smaller the initial pattern, the thinner the sausage. If the pattern is too small, then you can simply add a primary color for expressiveness (photo 2). We twist the sausage, the smaller the pattern, the less we twist, and vice versa (photo 3). Make the sausage square (photo 4).
Cut a piece of sausage the size of a bead (photo 1). Cut it in half without turning it over (photo 2). We cut each half in half again (photo 3), turn the two halves on the right and the two halves on the left on the other side (photo 4) and connect them, we get a symmetrical pattern (photo 5) We fold the resulting halves back into the bead, while the entire pattern that was on top remains inside, we as if we turned the bead inside out, we make sure that the symmetry of the pattern is not broken (photo 6). At first it seems that the explanation is complicated, you just have to try and everything will work out. It is almost impossible to guess the pattern in advance if these are scraps and not specially prepared sausages. If, when cutting, the pattern turns out to be too large and rough, twist the sausage even more tightly.
Insert a toothpick into the center of the bead, press it with another toothpick so that the seam disappears and the parts stick together well. The photo shows that in the center I have already rolled out the seam, but towards the edge the seam is uneven. After this, you can wipe with a damp cloth to level the surface and remove small dust particles.
From such a square bead you can make beads of any shape; you can take out a toothpick and roll it in your hands so that the beads become round or squeeze the corners towards the base. That's all, all that remains is to use your imagination to come up with different shapes
For inspiration, a few more bead options: These are beads made from sausage trimmings with the Om sign. A cut of a small spiral is pasted on top
These are beads made from scraps of black and white sausage with flowers.
And this is what I created from what was, multi-colored riches
https://www.kalinkapolinka.ru/publ/master_klassy/vo...aznocvetnykh_obrezkov/2-1-0-56
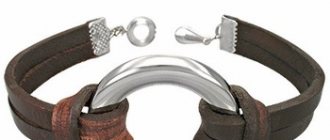
Assembling beads on a waxed cord using a clasp
What we need for the job: Beads (I sanded and varnished them a little beforehand), waxed cord and toggle clasp.
We string beads onto a single waxed cord, tying knots between them. After the last bead we also tie knots, and before the knot we tie a small piece of cord. We do this because the beads are massive, we want the clasp to also have sufficient volume, and not a thin cord. We tie a cord about half a meter long to the clasp, one end is about 10-15 cm, the other is longer.
Next, we attach the clasp using the method that I showed in the lesson with hearts when we made the keychain. I’ll copy the photo from there, instead of the base for the keychain there is a clasp) We attach the cord to the clasp, make a single knot, put the clasp in the right place, connect the cords all together and make a common knot. Having stepped back a couple of centimeters from the fastener, we begin to wrap the cords from the bottom up, and at the end we tie a loop. We cut off all the excess cords from the bottom and the tip from the top too. For strength, you can drip glue both above and below.
This is how the beads turned out:
Natasha bids:
(My free translation and the original text left for correction)
| 1. I've started with two colors, red and blue. I will make a very large bead to help illustrate this process. 1. I started with two colors, red and blue. I will be making a very large bead to help illustrate this process. | 2. I made a log from the blue and I'm going to cover it with the red! 2. I made a cylinder (log) from blue clay and covered it with red! | 3. You can see the blue all covered with Red. The example in the rear is used to illustrate what it looks like inside the sample I just made! 3. You can see the bare one covered completely in red. Here you can see what it all looks like from the inside. |
| 4. Now I'm going to TWIST this log from 3 to 5 times. 4.You can see how this ripples the line made from the meeting of the two colors of clay in the inside example! 4. Now I'm going to roll (twist) this piece 3 to 5 times. You can see this by the midline resulting from the meeting of two colors | 5. Square up this lump of clay, or I should say, rectangle up this lump of clay! 5. We again turn this piece of clay into a rectangle, i.e. make the lump into a rectangle | 6. Slice the rectangle in half lengthwise. 6. Cut this rectangle along the length |
| 7. Slice it again making 4 equal parts. 7. Cut again to get 4 equal parts | 8. I've put X's on the tops of each piece. I'm hoping this will make it easier to see what I'm doing! I marked an X on the top of each piece. This way I hope it will be easier to see what I will do! | 9. Take section 1 and start peeling it back like it was a banana. 9. Take section 1 and begin to peel it back, just as we peel a banana. |
| 10. Keep peeling! 10.Keep the part turned away! | 11. Keep peeling, remember where the “X” is. 11. Keep this part, don't forget where X is. | 12. Lift the bottom up so that the “X” side is now on the bottom. 12. Lift the top upside down so that the X is now down. |
| 13. Slide this back into it's original position, but you have turned it inside out and upside down! 13. Return this part to its original place, but you have already turned it inside and from top to bottom. | 14. From the top you can see 3 sections with “X”'s haven't been moved yet, but our first one has been! 14. We see that at the top there are 3 parts with X still in the same place, but the first part has already been moved. | 15. Now turn one quarter turn to the right and start peeling the next piece! 15. Now let’s unfold the quarter to the right of the first part and begin to unscrew it |
| 16. Peel it down! 16. Turned down | 17. Slide it back into it's place. 17. They moved it to its place. | 18. We are actually half done with this, see two “X's” left. 18. We're half done by looking at the X on the left. |
| 19. Another quarter turn, start peeling. 17. We turn the other quarter towards ourselves and begin to unscrew it | 20. Keep peeling down. 20. Hold the turned-away piece | 21. Pull up the bottom and slide it into place. 20. Turn it upside down and put it on revenge |
| 22. Three down and one to go! 22. Three done and one left! | 23. Quarter turn, Peel. 22. Turn the fourth, turn it away | 24. Peel, Lift 24. Turn away, lift |
| 25. Slide back in place 25. Putting it in place | 26. Your basic moves are done! 26. Basic movement done | 27. All the pieces have been moved, don't squeeze too tight yet! 27. All the pieces have been moved, don't squeeze it too tight yet! |
| 28. All the edges might not meet up right yet, so we will now straighten up the edges! 28. All the edges are not yet straight (have not met), now let’s start straightening the edges | 29. Start from the top of each side nad match up the pattern so that it is even on both sides. 29. Start at the top of each side and press down until the pieces match on both sides | 30. Work your way down to the bottom of each side, being sure to hold on to all 4 pieces while your straightening up each seem. 30. Do the same on the bottom of each side, holding all 4 pieces firmly until all 4 pieces are straightened. |
| 31. Blend the seams together, I use the needle tool from Kemper for almost everything! 31. When mixing seams together, I use a knitting needle from the Kemper tools that I use most often. | 32. Square up the bead with a brayer, or roll it out like a log if you prefer! 32. Now you need to cut the bead square or roll it into the shape you prefer | 33. And there is your bead! We'll it's a little big, but I thought it would be easier to see! Look for the Natasha Project sheet coming soon! 33. And here is your bead. We made it a little big, but this is for clarity |
https://www.polymerclaycentral.com/poleigh/natasha.html
Series of messages “Plasticity”:
Part 1 - Polymer clay for beginners: basic information and simple working techniques Part 2 - Polymer clay for beginners: FIMO color mixing table ... Part 27 - Polymer clay: Imitation of rust and Imitation of bone - 2 MK Part 28 - Polymer clay for beginners: Imitation of ceramics from polymer clay. DIY candlesticks and a bracelet made from several parts Part 29 - Magic mirror beads from multi-colored scraps. Natashas beads (Natasha beads) and Assembling beads on a waxed cord Part 30 - Master class on modeling from polymer clay - beads with the pattern “Spiral” and “Chips” Part 31 - Foamiran: Magic flowers from Marina Teplyakova’s rose garden. Peony "Lime" and Rainbow Rose (Master's MK) Part 32 - Three MKs for beginners on sculpting flowers from polymer clay from kalinkapolinka.ru Part 33 - Polymer clay for beginners: buttons on the stem, stamps and tinting, a bracelet made of several parts - 3 MK
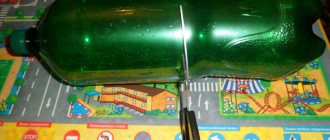
Step-by-step operating instructions
First of all, cut off the neck of the bottle. You don't have to cut off a lot of plastic. It is enough to cut off only the screw part, the rest will “go” to the petals.
Now we need to cut out petals of the appropriate shape and size from plastic. It is important not to cut them off from the bottom, because the “stem” will be attached to it.
We round the petals with a heated knife. To make the flower more attractive, you can make it multi-layered. To do this, we connect the bottom of two similar crafts using wire.
Finally, we attach a “stem” to the bottom in the form of a strong stick or thick wire.
In this simple way, you can make a whole flower bed that will delight the eyes of all residents of the site.
Crafts for home
Bottles are great for creating cute and practical storage systems. To do this, it is enough to cut the bottoms at the required height and lightly sand the cut area, removing all burrs and irregularities.
The resulting jars are suitable for storing nails, spools of thread, bags of spices, cutlery, and will become multi-colored vases for sweets or cookies.
The bottoms can be connected to each other or attached to a wooden crossbar. In this case, the craft will acquire additional stability, ease of use and a nice appearance.
Two bottoms slightly different in diameter will create an unusual translucent jewelry box.
Use of bottles in everyday life
Plastic bottles can be useful not only in the garden, but also in everyday life. For example, housewives in the kitchen can make excellent containers for storing cereals from them.
To do this, you need to cut off the neck of one bottle and the bottom of the other. The cut bottom will serve as a lid. Just a couple of minutes and the original container is ready!
If you are into knitting, you can cut off the bottom of the bottle and place a ball of thread in it. By pulling the thread into the neck, you don’t have to worry about the threads getting tangled.
Don’t rush to get rid of plastic containers, because they can serve as a good material for realizing all your creative fantasies.
Of course, you need to start with small projects, but as you gain experience you will certainly be able to move on to larger ones.
Rolled lawn: types, lawn laying and care- Design of the porch of a private house - ideas for beautiful design in 2022 (131 photos)
Metal tile Monterrey - A beautiful and inexpensive option for arrangement (60 photos)