Pasta is an interesting and affordable material for needlework. The industry does not stand still and on store shelves you will already find not only classic spaghetti, spirals and shells, but also stars, wheels, and bows.
Pasta is always at hand or within walking distance. They are safe, inexpensive and come in a plentiful package. Children's crafts made from pasta are a great way to please your family and friends.
The advantage of pasta crafts
The first advantage is the different shapes of pasta. For example, horns, spirals, spaghetti, feathers, butterflies and others. They all have a certain look. Due to the different shapes of pasta, the child begins to select the most suitable product for its counterfeit. Thanks to this, children learn to distinguish shapes and imagine.
If a child wants to make a house, then he needs large and thick pasta, and thin ones for the windows. And the window on the roof can be made round. The most important thing is to show your imagination.
The next advantage is safety. Children often try to chew on something. If they chew the pasta and then swallow it, then nothing will happen to the child, compared to any hard parts, after which they can accidentally choke.
The development of fine motor skills is also an advantage of pasta crafts. Children go through small parts and glue their creative product into the right place. For a child from one to three years old, the process itself is very useful. It helps to keep attention on one thing, develop memory, strengthen the nervous system and promotes the perception of the world around us. It also promotes the development of spoken language.
The very idea of making crafts from pasta for children is new, still a little rare and interesting. Therefore, these advantages prove that it will be interesting to use the idea in practice.
Decorative jars with colored pasta
The most basic option, where you don’t need to do almost anything, is perfect for beginners. But the result is simply magnificent!
For such souvenirs you need:
- Several cans of different shapes
- A piece of burlap for lids
- Harsh thread for tying operculums
- Egg dye
- Vinegar
- Pasta
As you understand, all you need to do is paint the pasta in matching colors, dry it and pour it into a jar. Well, cover them with a burlap lid, of course.
The only thing we can advise is to try to choose any color of pasta so that it harmonizes with either the furniture or textiles in the kitchen.
And select the rest of the color scheme to match it. In this case, the containers will look harmonious.
For children, painting and filling these colorful jars will be fun and, most importantly, easy entertainment.
Preparing tools for the creative process
First, you need a tool with which to glue the pasta together. There may be several options, depending on the complexity of the product:
- PVA glue is practically the safest tool for gluing parts. The child can use it independently. But the glue is not very strong and is suitable for fixing to cardboard or other support.
- Paste is a glue that consists of starch and flour. It is safe, you can glue large figures with it, but it takes a long time to dry. Because of this, children will start to get bored and get bored with the whole process.
- Plasticine is a favorite children's tool. They can also connect product parts. For very young children, you can use edible plasticine, which will not harm them in any way.
- Double sided tape. If you don’t have anything at hand, you can attach one side of the tape to the base and lay out the details of the craft on the other. But things won’t go beyond the foundation of the product.
- Glue gun - a stick of glue is inserted into the gun and heated. It is convenient for them to glue all the parts together, and they will hold firmly in the product. This tool can be used by children from the age of four, but under the supervision of their parents.
- Superglue - will help to glue the most complex parts where glue from a glue gun does not hold up. But this is the most not recommended glue for use in creating crafts.
It is known how to glue products together. But how to paint pasta for crafts? Kids won't be interested in using regular white pasta. There are two possible answers to this question.
- Paint each pasta by hand with a brush. It will take a long time, but if you need few details and different colors, then this option is suitable.
- Paint a lot of pasta with the same color at once. Place the pasta in a plastic bag and fill it with liquid food coloring of the color you want. Next, tie and twist the bag so that all the pasta is colored. Then let the products dry, and you can start creating.
How do you glue pasta together?
The best and most lasting results are produced by a special gun, which is sold in handicraft stores. The glue there is silicone and is served hot, and when it hardens it forms a very dense plastic drop that is not afraid of any shaking.
Some advise using PVA glue, but this will be a short-lived result, until the first slightest blow. Therefore, we do not recommend that you opt for something that does not guarantee good clutch quality.
After all, you want the product to please the eye not for a couple of days, but for much longer? In addition, do not forget that children will constantly touch them and show them to their friends!
In the case of a glue gun, skill is required. The drop hardens quite quickly, so you need to have time to glue as many parts as possible in one application of glue.
Therefore, we recommend that you first practice a little folding the figures without applying glue, and when you see that things are moving quickly, then warm up the gun.
No need to drip glue from a gun directly onto the pasta! The drop comes out big enough for such small parts. Just take a little glue mass with a toothpick and quickly apply it to the pasta.
Transport
A train that will be a beautiful decoration. It is better to secure all parts with hot glue. It will last longer.
Cars, trains, planes. There is enough for the next application. Of course, it will require a lot of work, but what a variety.
You can make any kind of pasta vehicle you could want.
Basic rules for using the material
Crafts made from pasta provide the basic rules for their manufacture:
| Target | Advice |
| To complete the simplest work | You will need cheap products |
| To receive an exclusive masterpiece | It's better to choose a high quality product |
| To get a beautiful piece | The product must be pre-painted in the selected color |
| To extend the longevity of bulky pasta products | It is necessary to fix the finished masterpieces with varnish or paint |
| So that the artificial creation lasts longer | Glue the pasta onto a ready-made cardboard container or other frame, pre-covered with cling film. It can be easily removed later |
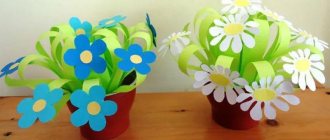
Sun, sky, rainbow
There are funny suns that will always cheer up not only the child, but also the parents. Also simple ones, they can be glued directly onto postcards. Then the cards themselves will turn out original and cute.
A rainbow always makes everyone happy, it is not such a frequent occurrence, so you need to place a rainbow at home to enjoy it every day. But of course, a rainbow requires seven different colors of pasta.
Idea 6. Stationery organizer
Any glass and even a tin can can be turned into a cute organizer for stationery items. All you need is pasta, glue and acrylic paints.
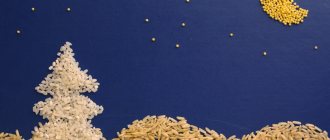
Snowflakes
It’s better to make snowflakes that you can then hang on the Christmas tree. This is a plus that there will be more toys for the New Year. To hang a snowflake, you need to attach ribbons of a suitable color to it.
A snowflake can be made in different colors, but the most important colors are gold, white and silver.
Some crafts seem to be very difficult to make, but in fact, if you take a closer look, they are quite simple. And guests may not understand at all that these snowflakes are made from ordinary pasta.
Curly hedgehog
Because it’s easy to make a variety of animals from pasta. Pay attention, for example, to a hedgehog. It will decorate the interior and cause not only surprise among guests, but even envy. Preschool children can also cope with the craft. In any case, you can give it to a kindergarten or an exhibition. The process will take a couple of hours, but the result will clearly please you.
First of all you need dough. The recipe is also easy: flour, salt, water. Having molded the base, use your vision to divide the forest dweller into the places where the needles begin and the muzzle is visible. Turn the spiral pasta into a silver color. Let's leave the stars on the muzzle, let them cover it tightly. Insert spiral figures onto the rest of the body; these are needles. Finally, find a place for the eyes and nose. Any other decorations will only brighten up the fake.
Cute hedgehog
It was already in the examples of pasta crafts above. Children aged 3 years and older can make this hedgehog. But parents' help will still be needed. Therefore, the whole family needs to sit down and make such a wonderful hedgehog.
You need to prepare:
- Salty dough.
- PVA glue, if not, then you can use a glue gun.
- Different types of pasta: spout shell, small stars and spiral.
- You will also need beads to decorate the needles and eyes.
- Paints.
- Bow.
How to do:
- Prepare the dough. For this you will need 2 tbsp. flour, 1 tbsp. salt and 250 ml water.
- Make a hedgehog from dough. You need to roughly select the muzzle, and the rest will be for the spirals.
- Muzzle. You need to cover it all with glue and glue small stars to it. There should be no spaces. Next you need to paint everything silver.
- The rest of the product. When attaching to the product, you need to coat each pasta with glue and, as in the picture, insert spirals.
- Decorating the hedgehog. Glue a shell onto the nose, make eyes from beads and a small bow in front of the needles. Of course, you need to remember to glue the beads onto the hedgehog’s needles. And now the craft is ready.
Christmas wreath
As a rule, productions can be varied: everyday and festive. Try making a surprise for Christmas. Moreover, everything you need is nearby. You don’t need to waste a lot of time and effort, all you need is desire and imagination. Let's make a wreath step by step.
Take scissors, cardboard, glue, pasta, ribbon, paint of any color, bell.
The process is very simple.
- Familiarize yourself with the work so that in the end it looks like it does in stores. You will need to make your own cardboard base. Preferably something similar to a ring, because the size depends on this.
- Having made the base, start decorating. Using glue and imagination, attach different things without wasting empty space.
- Once completed, lead to decoration. Decorate the item with gold paint.
- You can add a ribbon for yourself. Let it be red, it will look great. Wrap the craft, then fasten the rest.
- Closer to the base we will leave another decoration - a bell. Chic decoration for the holiday. It’s worth a try and you will see for yourself how easy it is to work. When finished, you can take a photo and send it to your friends.
New Year's ball
A New Year's pasta ball will cost much less than buying an equally beautiful one in the store. It can be anything, depending on the imagination of the creator. Below we will describe how to make a pasta craft step by step.
You need to prepare:
- An ordinary balloon or some kind of blank, these are available in special craft stores.
- Pasta of different types.
- Glue.
- Paints.
How to do:
- If you have a blank, then first you need to make a loop to hang the toy on the Christmas tree. Next, you can simply stick pasta on the product and paint everything.
- Craft using a balloon. First you need to inflate it and don’t forget to tie it. Next, use glue to glue the pasta around the ball, but do not glue it to the rubber surface.
- For this product, it is most preferable to use small pasta to create a ball shape.
- Once all the parts are connected, you need to carefully burst the ball with a needle and carefully remove it
- Now all that remains is to glue a thread or ribbon to the ball and color it. The New Year's ball is ready.
Photo frame decorated with macaroni
Here, no comments at all. Take any frame, cover it with pasta and voila! An ordinary frame has turned into a kitchen one. And most importantly, no fraud, only sleight of hand and a little imagination.
In the first version, the pasta is clearly visible, but in this example you’d never guess what the elements are made of:
And here is a version of a children's frame, made from multi-colored pasta tubes:
But you can make not just one frame, but a whole collage on the wall, using several frames, not only for children, but for the whole family.. This is what such a composition will look like:
As you can see, in addition to pasta, other kitchen provisions are used here: beans, sweet straws, spaghetti. Coffee beans, peas and other bulk products are also perfect.
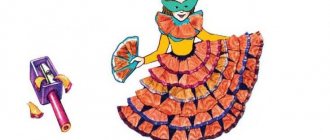
Butterfly
You need to prepare:
- Glue.
- Pasta: 1 spiral or feathers and 4 shells.
- Paints.
How to do:
- First you need to paint the pasta in the desired color and dry it. It is better to spend more paint to make the color more saturated. You can draw interesting designs on the details of the product, but to match the butterfly.
- Now you need to glue all the parts of the craft together to make a butterfly. The antennae can be made from some sticks.
- Now the craft is ready.
Have a nice time!
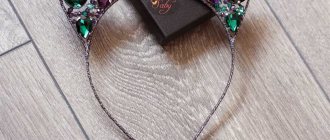
Idea 2. Hair accessories
Pasta can be so beautiful that you can even decorate your hair with it. So, for example, an ordinary hairband will become more elegant if you stick on it spikelets painted with gold spray paint.
You can also make a tiara for a little princess from a headband and wheels and flowers glued together.
You can make hair decorations from butterflies. To do this, they need to be decorated and then glued to bobby pins, clips or hairpins.
Photos of pasta crafts
Making a basket
A basket of pasta will take its rightful place in the house . For Easter, you can put colored eggs, candy, or put flowers in it, which you can also make yourself. You will need:
scallop pasta;- a lid from an old thermos or another container of this shape;
- hot glue gun;
- wire cutters;
- several colors of enamel in aerosols;
- masking tape.
Beads for mom
Use long and curly pasta. They are strung on a wire one by one. Then you can decorate it in different shades.
This painting will please my mother on March 8th. Used as a decorative element. This product has several advantages:
- Easy to make. The child will do the work independently.
- Variety of ideas. You can depict anything: flowers, animals, landscapes, abstractions.
- Availability.
- Uniqueness.
When creating a picture, the child can draw the outline of the picture on a sheet of cardboard with a pencil, and he can then glue on the pasta of his choice.
Various grains and pasta are ideally combined. They are used for decorative panels. Take cardboard of any shape as a basis. It is performed in the form of abstraction, using as many types of pasta and cereals as possible, and can be painted.
Everything is grown up!
Don’t think that pasta creativity is an activity only for children. The older generation also has room to expand here.
Many products—you can no longer call them crafts—require well-developed spatial thinking, creativity, perseverance and painstaking work. Not to mention the amount of glue and pasta.
It’s great if children take part in this work as much as they can. After all, the best example of patience and hard work is personal.
But the manufacture of some elements can be so difficult that something more powerful than PVA is required. Here it is better to remove children from the workplace so that they do not breathe toxic fumes. Yes, everything is adult here!
Tree
Not very difficult to make. You will need a stand or tree pot, spiral pasta, a ball-shaped base on which we will place the pasta. Children find it easier to handle plasticine. Make a medium-sized ball and attach the parts to it so that they hold well. You can use a real branch as a trunk. Combines with cones.
Paint, use different colors at your discretion.
Natural dyes
Their role is played by fresh juice - carrot, beet, berry. The principle of coloring is the same as in the previous version with one exception: natural dyes require longer contact with the pasta, so the soaking time increases.
Since pasta may begin to swell when soaked for a long time, preference should be given to products made from durum wheat.
Paints
Acrylic or in spray cans, they will help you get a bright color for your products. The pasta is soaked in acrylic paints, and aerosol paints are sprayed either on the finished product or on each element separately.
Note!
- DIY airplane craft: the best options for creating an airplane from paper, cardboard and plastic. 120 photo ideas
- DIY crafts for March 8 step by step - a review of the most beautiful crafts for International Women's Day (120 photo ideas)
- Diaper cake for a girl - 180 photos of ideas for original diaper cakes + DIY instructions with examples of finished products
Coloring options with acrylic paints, food and natural dyes are perfect for children. It is worth remembering that gouache and watercolor paints are not suitable for the process: gouache stains your hands even after drying, and watercolor paints require dilution with water, which negatively affects the appearance of the craft.