Beton-House.com
Website about concrete: construction, characteristics, design. We combine the experience of professionals and private craftsmen in one place
Concrete mixer from a metal barrel
For residents of private houses and owners of summer cottages, construction work is an integral part of maintaining normal living conditions.
Any construction, including laying a wooden frame for the construction of a bathhouse, begins with laying a concrete foundation. In addition to the construction of buildings, a stone fence is being erected, terraced beds are being arranged, and concrete paths are being laid. All this work is made easier by using a concrete mixer made from a barrel with your own hands.
- Electric concrete mixer
Concrete mixer from a barrel: advantages
A self-assembled concrete mixer helps save time and make hard work easier. A homemade concrete mixer is designed for mixing cement and sand with water to produce concrete, which cannot be dispensed with during any construction work, especially when building a house, a concrete porch, arranging paths, etc.
To make a concrete mixer, it is recommended to use a 200-liter barrel.
Of course, you can make concrete by hand, armed with a trough and a shovel. But why put in so much effort when you can use special equipment for this. There is no point in purchasing a concrete mixer if you do not plan to take on construction contracts. It is much more economical to make it yourself.
Scheme of a concrete mixer.
The resulting device is simple and reliable to use. All you have to do is pour the components in certain proportions into the drum and add water.
A big advantage in making your own concrete mixer will be significant savings in money on purchasing a factory model. The only disadvantage here will be the lack of experience in the manufacture of such mechanisms, especially if you do not have a technical education. But if you are persistent and love to tinker, you will definitely succeed. Moreover, all the necessary parts can be found on the farm. Look in your garage or shed.
To make your own concrete mixer, you will need: a container (an old barrel) in which the solution will be mixed, an axis of rotation, an electric motor (if you do not want to rotate the drum by hand) and a base frame on which it all needs to be attached.
Experience in construction
The homemade concrete mixer is ready, the first tests were successful. Having studied the experience of forum members, belor44 found the most acceptable order for loading components for mixing concrete:
- Loaded all the crushed stone;
- Filled in some water;
- Filled up some of the cement;
- Filled the water again;
- Another piece of cement;
- Little by little - sand.
To cover the garage, the owner made a stronger solution by mixing cement, sand, crushed stone and water in a ratio of 1:2:3:0.7 -0.6 and adding C-3 plasticizer.
To make it more convenient, when loading, the forum member placed the pear vertically. Thanks to this, two buckets of 12 liters of cement, 4 of sand, 6 of crushed stone, and 2 (0.7 liters each) of water could easily fit and mix in the container.
See other topics from our users about the manufacture of vibration equipment: vibrating tables, vibrating plates, mixers, concrete mixers with photographs, drawings and reviews.
Based on materials from a participant in the “House and Dacha” forum
Source
How to make a concrete mixer - key stages of work
DIY concrete mixer diagram: 1 – barrel; 2 – blades; 3 – handle for tipping the hopper; 4 – frame; 5 – electric motor; 6 – worm gearbox; 7 – suspension loop of the electric motor platform; 8 – limiter.
A concrete mixer from a barrel is made as follows.
Assembling the frame of the future unit. It must be durable as it will have to withstand enormous loads. A 130 mm steel angle works well as a base. If you do not have the skills to work with a welding machine, then you need to prepare the bolts for assembling the frame. The best option is bolts with a diameter of 27 mm. The tilt of the barrel to the base should be at an angle of 35°. If a suitable motor is not found, the drive can be made manual. Of course, you will have to put in some effort, but it’s still better than mixing concrete in a trough with a shovel.
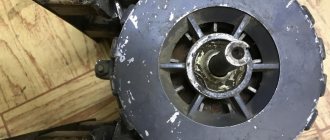
Before placing the barrel on the gearbox, a ring gear (a steel disk with teeth) must be attached to its bottom, preferably from a Volga engine. As practice has shown, it is best suited for this purpose: it is made of hardened metal and has teeth on the outside.
The easiest way to attach the crown is by welding. But if the concrete mixer is assembled without using a welding machine, the crown must be bolted to the bottom of the barrel. To do this, turn the barrel upside down and attach the crown to the bottom. Use a core (a rod with a sharpened end) to make marks on the bottom of the barrel: insert the core into the hole in the crown with the sharp end and hit the blunt end with a hammer. After this, remove the crown and, using a drill, strictly following the marks made with the core, drill holes. Then place the crown back on the bottom of the barrel so that the holes line up. Insert the bolts and tighten the nuts with wrenches.
Place the gearbox on the frame. Do the same as with the crown. Use a core to mark the space for the holes on the frame, drill the holes, bolt the gearbox to the frame, and install the barrel itself on it, not forgetting to first install the blades in it in order to mix the concrete efficiently. It's not difficult to make them. You can simply use bolts inside the barrel along the length to secure 3 corners at a distance equal to each other. Replace the small gear pulley with a suitable gear. It will set the heavy container of concrete in motion. You can take a small gear from the Bendix starter of the same Volga.
The most important part of a concrete mixer is the engine. It must be firmly attached to the bracket on the frame.
To tip a barrel of concrete, you need a steering wheel, not just a handle. To make it, you can take a piece of pipe (sleeve) and radially screw the rods into it. After this, put it on the additional gearbox and secure it. But if such a design causes difficulties, then you can simply take the ready-made solution from the container with a shovel. Just before doing this, do not forget to turn it off and wait until it stops completely.
Preparation and tools
Before you start working on a concrete mixer, you need to make a drawing or at least a sketch of the future project and prepare the workspace. A garage or shed is best suited for this. The main thing is that electricity is supplied to it, because in this case you will need power tools. And the work with metal itself is quite noisy and dirty. Agree that a comfortable apartment is not the place where you can engage in such creativity.
Well, the drawing is ready, and you have prepared the place: you have removed everything that is not relevant. Now let's see what tools you need. If you don’t know this craft and will assemble the entire structure with bolts, you won’t need a welding machine. But you definitely can’t do without a drill. You will also need a set of screwdrivers and a hacksaw. And, of course, the main part of the future concrete mixer is a two-hundred-liter barrel.
It would be great if the bottom of the container was non-removable. Otherwise, it may simply fall off during the process of mixing the solution. The frame can be made from a metal corner. It is more convenient than pipes when connecting with bolts. You can install a gasoline engine or a motor from a drill-mixer as a motor that sets the torque. The main thing is that its power is at least 1.3 kW. And don’t forget to think about and install paddles inside the barrel for the most effective mixing of the components.
Important: the top lid of the barrel must be securely fastened, otherwise you risk covering the entire area with concrete.
In addition, even at the development and preparation stage, think about what kind of future concrete mixer you want to see - mobile on wheels or stationary. Then you won’t have to hastily adjust the drawings and make changes to the almost finished design. If you have everything ready, then you can start the most interesting part - making a concrete mixer with your own hands.
Manufacturing technology of manual concrete mixer
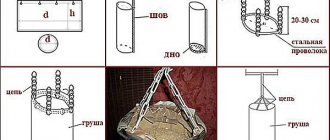
A diagram of the simplest design of a concrete mixer made from a barrel is shown in the figure.
Assembly drawing of a barrel product
The drawing shows the main components:
- Pos. 4 – drum or barrel.
- Pos. 5 – blades.
- Pos. 7 – support.
- Pos. 9 – solution container.
- Pos. 10 – handle.
Instructions for assembling the structure:
- The tightness of the connection between the bottom of the product and the side surfaces is checked. If holes are found, they should be welded with a welding machine.
- The bottom can be strengthened by welding an additional metal sheet.
- Two holes are made in the center of the top and bottom of the tub.
- A metal axle Ø30 mm is threaded through the barrel and carefully scalded so that the container is firmly attached to the shaft.
- In the center of the side surface of the tub, a hole measuring 90x30 centimeters is cut out, through which the components of the solution will be poured, and after completion of the work, the finished mixture is poured into a substitute container. A hatch that is too small will make it difficult to fill in building materials; a hatch that is too large will reduce the strength of the structure.
- Several blades are made from a square and welded firmly inside the container - one side to the axis, the other to the wall of the barrel. Usually 5 blades are enough, distributed evenly along the entire length of the structure.
Installing blades in a barrel
The cover is installed. It is attached to door hinges welded to the barrel or in any other way: install a latch, bolt, or simply slide in any direction. The main purpose of the element when the concrete mixer is running is to prevent the solution from falling out.
Manual concrete mixer from a barrel
Next, the barrel must be installed on a support approximately 1 meter high.
For this:
- The frame is welded. A 50 cm long base is welded to a 1 meter long channel. Two such units are made.
- Bushings are welded at the other end of the long channels.
- The axle is inserted into the bushings, thick washers are welded, which will act as retaining rings, which will prevent the shaft from moving when preparing concrete.
- A steering wheel or other type of handle is attached to rotate the drum.
Electric concrete mixer
Drive for a homemade concrete mixer
To manufacture a structure with an electric drive, it is additionally necessary to purchase and install a low-power motor. For a 200 liter barrel, 1 kW is enough.
Wherein:
- A small sprocket is installed on the engine axis.
- A larger diameter sprocket is welded onto the pipe axis to reduce the number of revolutions of the structure.
- The elements are connected by chain transmission.
- If desired, the transmission of rotation from the engine to the drum can be carried out by a belt drive, as in the photo above.
To learn more about how to make a concrete mixer from a barrel, you should watch the video in this article.
Tricks of operation
Despite the fact that the homemade design produces the same work as the factory version, it is operated a little differently to obtain maximum comfort.
Here are some useful tips that will make working with a device you made yourself easy and comfortable:
- Periodically, units in which friction of mating surfaces occurs must be lubricated with grease. These are bushings, wheel axles, if available. This will facilitate the process of obtaining the solution and reduce abrasion of the surfaces of the parts.
- If you want to make the structure mobile, wheels can be used from a construction wheelbarrow or even a washing machine.
- Increasing the angle of inclination of the tub makes it easier to work with the equipment. The greatest angle of inclination can be 45°. As it increases, mixing of components will become worse.
Inclined design of concrete mixer
- If it is necessary to install a drive, the motor can be used from a washing machine. In this case, the gear ratio on the sprockets is 1:8.
- The washing machine flywheel can be installed instead of the steering wheel.
- For long-term storage, it is better to lubricate the barrel with waste oil.
This is a brief description of how to make a concrete mixer from a barrel - the video lesson will help you solve all your questions about the manufacture, use and storage of a product you make yourself.
Approximate diagram of a homemade vibrating mixer
1 – body of the container in which the components of the solution are mixed. Preference is given to round, not too large in radius, but high tubs (barrels).
2 – a bracket is rigidly attached to the body, which houses a vibration pulse generator, in our case a hammer drill (item 3).
The power of the hammer drill must be at least 1.3 - 1.5 kW. Even this will not guarantee success, and with less drive force, it is not worth trying.
A long rod (pos. 4) is inserted into the hammer drill chuck, which is connected to a vibrator (pos. 6). This rod must be of such length that the disc vibrator is located in height approximately in the center of the layer of the prepared solution (item 5).
It seems that everything is simple, but such a scheme does not always show good results. Mistakes most often lie in neglecting seemingly small nuances:
- A flat vibrator simply won’t work. A shape is needed that will propagate vibrations in a dense medium from a central point almost spherically to the periphery. There should be something spindle-shaped, similar to two plates connected together with the bottoms facing out. In principle, this is one of the solutions - two metal plates mounted on an axis.
- The diameter of the vibrator depends on the drive power. When making calculations, you can proceed from their approximate proportions: 150 ÷ 200 mm per 1 kW of hammer drill power. So, if we take a 1.5 kW hammer drill, then we prepare “plates” from 225 to 300 mm in diameter.
- The diameter of the cylinder itself should be such that from the outer edge of the vibrator, placed exactly in the center, to the wall of the container there is a distance approximately equal to the radius of the plate.
- To create vibration waves capable of handling the mixing of the cement-sand mixture, the level of the solution above and below the vibrator must be approximately equal to the diameter of the “plates”.
Vibration mixing of concrete mixtures produces excellent quality mortar. The process is very easily monitored visually - from active stirring, movement, bubbling - to a smooth, rippling surface (ready solution). But, you must admit that for this you need to comply with a lot of specific “whims”. And one more thing - “heavy” solutions with gravel or crushed stone are also problematic to prepare in this way. So this method is not widely used among private owners - it is easier to make a concrete mixer according to the “classical” scheme.
Self-production of a “classic” concrete mixer
It is necessary to immediately warn the “hot heads” - not everyone can take on the production of such a concrete mixer. Although in many articles there is a “bravura motive” that it is both easier and cheaper than buying a ready-made one, you still shouldn’t believe it.
- Firstly, you should not start such work if the owner knows about the art of welding only by hearsay or is taking his first steps
.
“Secondly, the work will be profitable if most of the components for making a concrete mixer can be found among unnecessary things in your own household, from neighbors or even in a landfill.
- Thirdly, the existing experience in design, production of plumbing, welding, electrical work and available inexpensive or even free materials must be multiplied by the expressed desire to make a concrete mixer yourself. There is a fairly large category of people who can’t wait to try to do everything with their own hands - this is a task specifically for them. If you start work without fulfilling such conditions, simply cherishing the ephemeral hope of saving something, then it’s better not to start. Time and materials will be wasted, and it will be much cheaper and easier to purchase a small and inexpensive concrete mixer - fortunately, the choice is quite large.
Instructions for assembling a forced-action concrete mixer
The difference from the previous scheme is the presence of blades welded onto the working shaft, ensuring uniform mixing of components with any density. An old washing machine is used for work; the main steps include:
- Preparing a frame from thick wooden beams or metal. In the first case, a system of grooves or self-tapping screws are used to connect individual elements; in the second, they form a rigid frame using a welding machine. At this stage, the location of a rotating mechanism is also provided to facilitate the process of unloading the solution.
- Removing the motor from the washing machine and replacing it with a shaft.
- Cutting blades from a thick sheet of steel and screwing them to the axle using bolts. The thicker the metal, the better; due to the high degree of wear, the recommended minimum is 3 mm.
- Sealing the tank drain hole.
- Fixing the container on a rigid base.
- Connecting an electric motor, the best option would be a gear drive.
- Installation of the protective casing.
Professional homemade concrete mixers are assembled according to ready-made drawings; their distinctive feature is the shape of the working container in the shape of a pear (with tapering edges). You can make it yourself from a simple barrel, but the best indicators of the quality of the solutions and the strength and reliability of the unit itself are achieved by cutting out cone-shaped elements from a single sheet of metal and welding them together. At least two symmetrical blades are welded inside, the shaft is mounted on bearings first, and only then the engine and gearbox are installed.
Nuances of assembly technology, tips and tricks
The main problems are related to organizing the correct transmission of torque to the shaft and ensuring convenient unloading, tightness and stability. When planning frequent use, preference is given to models that rotate in different directions with a mechanism for fixing the working container in a certain position (rotary gear limiters). To simplify the mixing process and ensure safe and long-term operation of a homemade concrete mixer, we recommend:
1. Maintain alignment and symmetry when placing blades or teeth inside a barrel or welded tub. Their shift relative to the center of gravity or each other leads to poor mixing of the solution, lateral runout, additional loads on the walls of the bowl and rapid failure.
2. Clean metal parts from rust and treat them with anti-corrosion primers. Upon completion of assembly, the mixer is painted again.
3. Install additional stiffening ribs to improve the stability of both stationary and mobile units. In the second case, wheels from an old wheelbarrow are welded to the bottom of the base.
4. Make two handles when assembling a manual concrete mixer. This will allow you to rotate it from any convenient side yourself or use the strength of two people.
https://youtube.com/watch?v=-LXMVuKFucs
5. Monitor the condition of pulleys and similar elements connecting the gearbox and engine. They should not be too loose or strained; the belt, chain or gear drive is fixed on the same plane as the ring mounted on the main working shaft.
6. Connect the power cable to the engine via a starter with a button.
7. Use homogeneous types of metal.
8. Provide protection for the engine from splashes of mortar; such a casing is easiest to construct from a coarsely perforated tin or steel sheet.
9. Periodically check and tighten the connections of the concrete mixer bolts.
Are you planning a construction project? Then you will need a concrete mixer to mix the cement mortar. But where can I get it? It’s expensive to buy, especially since you may only need it once.
The solution may be a homemade concrete mixer from a washing machine. If you have an old washing machine with a working engine, then you can make your own equipment for household needs.
At what speed should I mix concrete?
We will not consider in detail the process of mixing concrete - this is the topic of a separate article. Let us only note the fact that the torsional moment plays an important role.
This is why the washer gearbox is better than a regular motor from a scooter or car. It can withstand almost any load and can operate at low speeds. 25 full cycles (revolutions) per minute is enough.
To provide this quantity, the gearbox can have a different design. The simplest, most typical option is when the gearbox is made of a belt and pulley. A do-it-yourself concrete mixer with a moped motor is distinguished by its mobility. The gearbox is convenient and compact; it does not require electricity to operate. Even if you have a large area, the made device moves around it without unnecessary worries and hassle.
The gearbox in this case must be chain, otherwise the design will not function well.
Types of nozzle shanks
Depending on the shape of the shank, the attachment can only be used with a mixer or with a drill and hammer drill. Here are a few types of shanks found in mortar mixing attachments:
- Hexagon . This is the most common type of shank and is easily clamped by the drill chuck. These attachments can also be used with construction mixers. They have the following standard sizes: 8, 8.5, 9 and 10 mm. For example, one of the popular ones is the KWB 4977-08 with a shank diameter of 8.5 mm.
- Hexagon with groove for spring fastening . This shank is designed for HEX or keyless chucks. These attachments are most convenient for mixing mixtures with a screwdriver, although they are also suitable for a drill. However, you need to take a powerful device with high torque.
- Threaded . Here at the end there is a thread with a tightening nut. The most popular sizes are M12 and M14. They are used exclusively in conjunction with construction mixers. This is the most reliable fastening that can withstand high loads and high torque, therefore large beaters for mixing heavy mixtures are usually produced with such shanks.
- Shank for SDS+ chuck . This is also one of the types of hexagons, but with grooves for attaching to an SDS+ cartridge. We can say that these attachments were produced specifically for rotary hammers, so if you are the happy owner of such heavy equipment, be guided by the appropriate attachments.
There are also nozzles with Morse taper shanks, but they are intended for industrial use and are not practical to use at home.
How to make a cheap sifter for sand and crushed stone from a concrete mixer
сhichicFORUMHOUSE user
I don’t have much space on my site, so when I brought in sand and crushed stone, they were dumped into one pile. Over the course of several years, they got mixed up. I didn’t want to sift through this volume manually. So I made a sifter out of a concrete mixer.
We'll tell you how to make this necessary household device:
- Take two strips of galvanized metal 100 and 200 mm wide.
- Bend a strip 100 mm wide and tighten it with bolts around the neck of the concrete mixer.
- Bend a 200 mm wide strip into a ring and secure the ends with rivets.
- Cut the mesh with a 6 mm mesh to the diameter of the ring with an overlap. Bend the ends and secure them with rivets to the ring through a metal tape.
It turned out to be a large sieve. For ease of operation, screw the handles onto the sieve. Insert the sieve into the concrete mixer with the mesh side down.
Turn on the concrete mixer and sift through the bulk materials. Then stop the concrete mixer and only then remove the sieve!
The sifted sand and stone dust remain in the “pear”.
Finished products.
сhichicFORUMHOUSE user
I liked the homemade product. I plan to buy a mesh with a mesh of 4 mm and 8 mm and make two more sieves for different jobs.
User recommends:
Do not sift the bulk until the concrete mixer is fully loaded. It is enough to sift 8 shovels and immediately pour the contents of the concrete mixer into the bag. If you fill the entire “pear” with sand, it will be compressed at the bottom into a dense mass. It is inconvenient to pack it in bags.
If during operation you need to stop the concrete mixer filled with concrete and then turn it on again, then turn the “pear” so that its mouth is directed upward. Only then start the concrete mixer and turn the “pear” at the desired angle for normal mixing of the mixture. This will reduce the load on the motor and drive, and they will last longer.
Another design of a sifter for bulk building materials from Vitek.
Does the length of the nozzle matter?
All beaters for construction mixers, drills and hammer drills have two standard lengths: 400 and 600 mm. But what if you need to mix 200 liters or more? Here extension cords that are attached to the rims come to the rescue. The maximum extension cord size that is commercially available is 1000 mm. That is, you can get a nozzle 1.4 or 1.6 m long.
Why lengthen the whisk at all? In order to reach the fragments of the mixture at the bottom and get a truly homogeneous consistency. But according to our practice, in 99% of cases, extension cords are not required for personal needs.
Equipment for working with nozzles:
Concrete mixer from a barrel
The design of any such concrete mixer is not too complicated, and therefore it can also be implemented using available materials.
This design implements oblique movement, the solution moves from one edge of the container to the other. There are 2 options available: a manual concrete mixer and an electric concrete mixer. Let's talk about the first, but the second is not very different from it, you just need to install the engine, sprockets, and chain.
Typically the filling connector is located at the bottom. This is a cut off part (about a third), connected to the bottom with loops, secured with rubber sealing around the perimeter and locked with 2 locks.
To load the barrel, it is turned with the hatch up. To unload, lower it down. There is no need to use a shovel or trowel; the solution will fall into the container on its own.
Concrete mixer from a washing machine
But there is a big drawback to this design, the essence of which is that the solution will need to be scraped out with a trowel. To avoid such inconveniences, it is better to do everything yourself by installing the engine and tank on a frame of your own making.
Consider a “swing” type frame. This design has a number of positive features:
- it is easy to clean it from the solution
- it is designed for heavy loads
- It is quite mobile and easy to move.
Making a “swing” is not difficult:
We connect 2 triangles from a 50x50 millimeter corner by welding. The base is made of 2 pieces 0.6 meters high, the sides are made of 4 pieces 0.8 meters high. We place them opposite each other, weld two 0.5 meter corners to the sides. A reliable design of 2 triangles is ready.
We put 2 nuts on top of the triangles (you can use pieces of pipes) so that the shaft, with a diameter of approximately 25 millimeters, can rotate without difficulty. To lock, we weld on the edges of the shaft. She will allow him not to escape from the hole.
We take 2 corners of 1.4 meters and 3 of 0.4 meters. Using welding, we make a ladder, placing the middle corner in the center. Using the middle corner, cook it strongly towards the shaft. The swing with movable ends is ready.
We dismantle the activator. We cut steel strips 50x4 millimeters so that 2 pieces of 0.9 meters in length come out. We make holes in the middle to match the size of the axle thread. You need to think about the axle in advance, install a pulley mount at the end, the other end should be threaded, protruding five centimeters from the bottom.
To give the plates the shape of blades, you need to bend them slightly. We mount them on the axle at an angle of 90 degrees, fix them with a nut and weld them.
Testing the blades. They should pass without difficulty and not touch the tank. Opposite the swing we place the engine. To fix it with standard studs, we make holes in the corners of the ladder. To protect the engine from water, we install a rubber casing.
We connect the engine to the network to test the concrete mixer. The solution is released by lifting the swing by the side with the motor. If you need the tank to be at a certain angle, then a T-shaped crutch is placed at the bottom of it.
All is ready. Now you know how to make a concrete mixer with your own hands.
Mixing options
In the simplest case, you can “quickly” prepare a solution without auxiliary devices. The solution is poured into any container and mixed with an ordinary shovel while gradually adding water. In some cases, with a small volume of solution, you can do without a container entirely and prepare the mixture on a hard, flat surface. It is ineffective, tedious and poor quality as the mixture dries out quickly.
Sometimes they use a drill with a special mixing attachment and mix the solution in a bucket in a circular motion. In this case, a power tool that is not designed for such loads quickly breaks down, and the mixture is not completely mixed. Dry voids usually remain in areas near the edges.
Therefore, it is advisable to assemble a simple homemade concrete mixer.
There are three ways to mix concrete mortar:
- Gravitational.
- Vibrating.
- Combined.
Tips for use
Functionally, “small forms” of concrete mixers are no different from serious industrial models. But in order for the operation of homemade devices to be productive and convenient, you need to follow a number of rules
In addition, special attention should be paid to compliance with safety requirements.
Rules for operating a manual concrete mixer:
Before work, it is necessary to check the insulation of cables and contacts
Pay attention to the presence of grounding. Since the concrete mixer vibrates, the screw connections must be tightened before operation. If the device is mobile, then it is necessary to put chocks under the wheels. The operating unit must always be within sight
Strangers, especially children, should not be allowed to approach him. It is strictly forbidden to check the quality of the mixture while the engine is running. A stick or shovel placed in the drum at this time may break and cause serious injury to the worker. If the barrel is not used for a long time, it is recommended to lubricate it with old solution. Then it will last much longer.
Thus, you can make several options for concrete mixers with your own hands.
It is important to follow the necessary safety rules, and then the work process will bring excellent results
https://youtube.com/watch?v=-LXMVuKFucs
How do concrete mixers work?
Since we are talking about mixing methods, it doesn’t hurt to figure out how a concrete mixer generally works. And it will also be useful for a complete understanding of what follows.
There are mainly four methods of mixing cement-sand mortar:
- gravitational;
- forced mechanical;
- forced vibration;
- combined gravitational-mechanical.
During gravity mixing, the container with the solution components is tipped over, the solution plops onto itself and is mixed at the same time. You can’t mix a large volume this way; the quality of the finished concrete is only satisfactory, so this method is not used in industry. But you can quickly and easily make a quite decent gravity concrete mixer for yourself, see below.
During vibration mixing, the tub remains motionless, and the mixer-kneader excites compression waves in the mass of the initial mixture, which mix and compact the solution very well. The disadvantage of this method is high energy consumption: for 20 liters of solution a 1.3 kW mixer-vibrator drive is required. But the quality of the concrete is exceptional, so vibromixing is used for especially critical structures: hydroelectric dams, etc. In this case, to save energy, the pre-mixed solution is poured into the formwork and “finished” with vibrators on site. But you can make a small vibrating mixer yourself; this will be discussed later.
Purpose
The construction sector of the industry does not stand still - every year new compounds appear that are used for the construction of structures, minor and major repairs. Glue, plaster and many other materials go on sale in the form of a powder, which must be diluted with water in order to make a complete composition out of it.
In order for the components of the mixture to mix as efficiently as possible and form a homogeneous working mass, it is necessary to choose the right tool. For example, if you can mix wallpaper glue with a regular stick, then for cement mortars and putties which method will be ineffective, especially if you need the solution in large volumes.
Mixing construction mixtures with improvised means, as a rule, does not give the required quality of the working composition: many lumps form in it and a large percentage of dry matter remains, which could not be properly wetted.
In such situations, many users resort to a hammer drill , which has the necessary rotation capability; however, experts do not recommend using this method, since the hammer drill is initially oriented to loads in a different plane without any influence of radial forces. Of course, you can mix a small volume of solution with it, but in large quantities you risk simply destroying your tool, which, by the way, is quite expensive.
An excellent solution in this situation would be to purchase a drill-mixer, which is optimal for mixing up to 15 liters of mixtures in one go.
Such devices are optimal both for everyday use and for professional repairs. Unlike a hammer drill and a conventional drill, they have a stronger bearing; in addition, the mechanism is equipped with a powerful gearbox, which is protected by a particularly durable metal case. Thanks to this configuration, the device can operate even at the lowest speeds .
An important advantage is that such a construction mixer can simultaneously perform the function of drilling a surface , that is, in fact, it is a 2 in 1 device.