One of the most exciting types of needlework is crafts made from scraps and fabric scraps. Handmade Tilda dolls, denim souvenirs, bags, rugs, rugs and bedspreads in patchwork style, as well as decorative patches for stylish clothes.
Simple and affordable ways to combine materials and methods for quick edge processing, shown in the note, are easy to put into practice.
Reasons why handmade work is far from cheap
- The time spent on producing one copy will be required many times more than if similar work was performed on a production line.
- Making crafts involves your imagination, rethinking the vision of the finished result of the item, and changing the methodology.
- DIY fabric crafts are always exclusive options that do not have an exact copy.
- Your product is your name.
- A lot of time is spent searching and selecting fabric (even if it’s scraps found at home), threads, and accessories.
- Handmade is always very individual.
- Thorough knowledge of the entire process of making crafts.
- When working on a craft, the master puts high quality first.
- Creating a unique unique thing is not a matter of one hour.
- Your work is always filled with history, soul, its own temperament and character.
If someone thinks it’s too expensive, let them try it themselves.
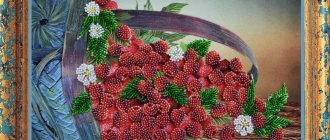
Panel
Choose a coating for the painting. The fabric should be dense. Place on solid material and secure.
The details of the composition are cut out using the template. For children's creativity, choose animals or other characters that are easy to make. Since leftover materials are used, parts from different fabrics are combined.
Glue to the canvas. Whole paintings are created from sketches.
Second life of fabric scraps
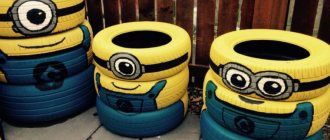
Don't throw away any remaining pieces of fabric or items that are out of fashion. From them you can make a huge number of pleasant, cute and simply necessary products. And both experienced craftswomen and novice needlewomen can make them. They will find their use in various areas: in decorating the house, in the garden, these are unique gifts.
Absolutely all types of fabrics are suitable for work. You can work with one type, or you can combine and combine fabric scraps of different structure, properties and texture. Master classes from professionals will teach you how to make crafts from fabric, as well as communication with those who have already fallen in love with this wonderful handicraft.
Product painting
To make it more like a natural flower, its petals are painted. On dark fabric, the folds are painted with lighter colors. And fabrics of white, pale pink or cream shades of brightness will add color to a tone darker.
To obtain a smooth transition, the fabric must be moistened before painting. Flower painting is an incredible art, once you get acquainted with it, it is impossible to stop the flow of creative inspiration.
Within one petal, you can use several shades of a suitable color, and then the effect will be simply stunning. Such painting will add three-dimensionality and a resemblance to naturalness to the products.
After drying, bend each petal in the desired direction. They can be bent inward and twisted outward - the buds will look like a blossoming or blooming flower. The beautiful curves of the petals are given by fabric that stretches in all directions.
Tack
This item is necessary for every housewife. To make this piece you will need a little fabric, time and basic manipulation of a needle, thread and scissors. Even novice needlewomen can make such a product.
Recommendations regarding the manufacturing process
These tips are important in any case, regardless of the chosen pattern. When working on this kitchen accessory, you should focus on the following points:
- to create a potholder, linen or cotton fabric is most suitable;
- flammable material not suitable for such products;
- when creating this kitchen attribute, a layer is always necessary;
- the selected scraps require washing and ironing before cutting, so that at the end of the work the fabric does not shrink, which will ultimately negatively affect the finished product;
- It is also worth checking the fabric for its ability to shed;
- When cutting out details, do not forget to make allowances for seams.
Templates for creating buds
The templates are circles of different diameters. The bottom circle will be the largest. It will be 1 cm larger than the future flower. Cut subsequent circles 0.5 cm smaller than the previous (bottom) one.
The more magnificent the bud, the more circles will be needed. To create a very lush bud you need 3-4 circles of each diameter. Then transfer these template circles onto the fabric and make cuts according to the number of petals.
Usually 4 petals are made. They need to be rounded off with nail scissors and the edges burned over a candle flame. The blanks are fastened together in decreasing order - a blank with larger petals is placed on a blank with a smaller diameter, stitched or glued together.
Leave the middle free for the core or stamens. As a result, the whole process of work consists of cutting out the petals, processing them with a candle, collecting and securing the petals. An affordable and fairly simple option, and the result will surprise you.
Note!
DIY bracelets | Selection of the best models and master class on making beautiful bracelets- DIY bird feeder - interesting ideas on how to make it quickly and easily from scrap materials
- Do-it-yourself cold porcelain: the best options for porcelain products, step-by-step instructions and recipes for making it yourself (photo + video)
Mitten-shaped potholder
This craft is fashionable, practical, and looks great.
You will need:
- pattern;
- suitable fabric;
- a sealant is required;
- adhesive interlining;
- accessories for decoration.
Creating such a potholder is not at all difficult. Prepare the pattern you like. Using this pattern, cut out four pieces of fabric and two interlinings from non-woven fabric. For them, you will need to cut out elements from the same material.
Glue the edging and assemble the parts into a single whole. Sew, turn the product inside out, decorate with edging and sew on a loop. Decorate as your imagination dictates.
We recycle supplies: patchwork crafts for the home in the kitchen, bathroom, hallway
There is room for your imagination to run wild here. You can make your kitchen or any room in your apartment in one unique style. One or two decorative details are enough and your home will be transformed and find its own zest.
Children's room interior
Almost every housewife has a box with leftover fabric, on the shelves there are clothes that have gone out of fashion, children's things from which the child has outgrown. Don't rush to dispose of them. Decorating a children's room, crafts made from fabric for children - this is a small fraction of where this material can be used.
To decorate your baby's room, you need bright, colorful, natural fabrics. You have collected a certain number of wonderful children's photographs - frame them with fabrics and hang them on the wall. Moreover, it is extremely simple.
Wall decoration
In the play corner, you can use crafts from leftover fabric to decorate the wall. Create a beautiful landscape.
You will need various pieces of fabric, a glue gun, and scissors.
- Cut out a tree trunk and branches from brown fabric and carefully glue it to the wall.
- Cut leaves of different sizes from multi-colored bright scraps.
- Glue to the branches (children can become active helpers in this process).
- You can add butterflies and birds.
Such a place will cause indescribable delight for the baby.
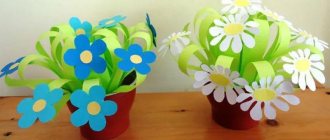
Flower arrangements
Creating a floral composition is akin to painting: each new element is like an artist’s brush stroke. By selecting harmonious color combinations from buds and leaves, combining different materials, you create not just an interior decoration, but a real work of art. A delicate flower arrangement will decorate your home and become a spectacular gift for a birthday or wedding anniversary of relatives and friends.
Small flowers, such as violets, forget-me-nots, and small roses, can be made from purple, blue and pink silk or woolen fabrics. Leaves are made from leftover green velvet or felt.
The veins are easily marked by pressing with a hot knitting needle. To make the stem, a narrow grass-colored strip is wrapped around the wire. Leaves and petals are cut out from scraps using a bias thread.
Braided rug
One of the well-known techniques for creating rugs is weaving. It can be made using the macrame technique, on a frame or on a hoop, or by weaving. For these products, old things will serve as good material.
But the above methods require space, special equipment, and a sufficiently large amount of time. And the proposed type is simpler and more accessible.
Handicraft Basics
However, in order to get high-quality, creative clothes with your own hands, you need to know the basics of needlework and adhere to these rules:
- If the fabric has deteriorated, frayed, faded, burned, or has indelible stains on it, then it is best to throw it away.
- To sew together pieces of fabric, you must use a sewing machine, otherwise the product will turn out sloppy
- If you decide to repaint, then buy only good paint, otherwise the thing will deteriorate
- Before you start making a pattern, be sure to first put all the measurements on the product itself.
- You can sew things together and get something new and unique in your wardrobe.
- For decoration, use beads, sequins, stripes or simple badges
- Replace old-fashioned buttons and zippers with new ones when altering them
- It's easier to sew with large items. And the remains can be used in decoration
Braiding
All mothers, grandmothers, older sisters know how to weave braids, and fathers are no exception. What you will need to create a floor mat:
- old things that you will cut into strips without any regret;
- threads, needles, pins.
The first step in creating this product will be cutting the strips. Then three strips of fabric need to be firmly secured with a pin and begin to weave a very ordinary braid.
Twist the resulting braid into a spiral, not forgetting to sew along the perimeter for strength. These products are quite easy to create. By the way, the braid does not have to be twisted (a round rug), it can be folded in parallel strips and create a square or rectangular rug.
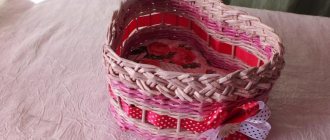
Basket
The item is used to store small items.
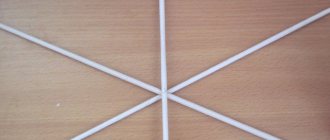
- The flaps are cut into long strips 1 cm wide.
- Three tapes are connected to each other and attached to a fixed support.
- Weave a braid, tightly connecting the strips. When it ends, the end is sewn up with thread. Make the next braid.
- Sew the pieces together lengthwise.
- Twist the braid onto the end and sew each layer together. This creates the bottom of the basket.
- Raise the braid by twisting the sides. To do this, bend it upward and fasten it with seams.
- They make pens. Eyelets are inserted into the sides of the basket and a piece of braid is threaded through them.
Summer light blanket
Children's T-shirts wear out very quickly, because they are worn almost every day. T-shirts get dirty, stretch, and fade. But often the designs remain bright, and soft knitwear is an excellent material for creativity.
You can quickly make a baby blanket from T-shirts. Cut the T-shirt into pieces and sew it together like a patchwork quilt. The edging can be made of plain fabric.
Details can be alternated: elements of the same tone with patches with patterns. This blanket will become an integral part of a child's afternoon nap.
Piece by piece
In the days of our great-grandparents, a hand-sewn quilt was a must-have item in every home. Times have changed, and so has the technique of patchwork - patchwork. Blankets, rugs and pillows, rugs have complex patterns. New ways of folding patches have emerged, resulting in different styles of patchwork:
Traditional, which is based on the folding of ornaments from scraps of geometric shapes - triangles, squares, rhombuses, which are stitched together to form a single canvas. This technique is used for sewing blankets, chair cushions, and rugs.
Crazy patchwork does not require the use of patches of the same shape, strict lines: the more intricate the shapes, the more chaotic the patterns, the more interesting the final product will be. This technique is used to sew decorative pillows, bedspreads, wall panels and other decorative items.
Knitted patchwork combines two types of needlework: sewing and knitting. With the help of a hook, scraps of fabric are connected to each other, or elements are knitted entirely from yarn (in addition to the traditional “granny squares”, new technologies and patterns have appeared - for example, “African knitting”).
There are other technologies for creating unique products from scraps of fabric, which will find a worthy place not only in vintage interiors, but also in bright oriental and even fashionable modern ones - loft, hi-tech.
Fabrics for creativity
The range of fabrics intended for needlework is huge. In specialized stores you can purchase scraps for sewing various products and toys. All the necessary materials, tools, and decorative elements for the job are selected here.
However, fabric crafts for the home made from things you have on hand are closer to home. Since these things belonged to you and your family members, they will remain a part of your home and home comfort. An example of this is handmade fabric crafts.
Be smart by filling your home with new, bright and fashionable products that do not involve financial costs, but give a charge of positive emotions and a great mood.
Which direction to move and where to start?
There are a great many types of needlework from scraps:
- Patchwork.
- Textile dolls and soft toys.
- Applications.
- Making three-dimensional figures using the origami principle from paper (for example, the Orinuno technique in Japan)
- Creation of panels, paintings, etc.
There are two ways to determine what kind of DIY crafts you will start making. The first is to start from your supplies, the second is to decide on the direction and then purchase the scraps necessary for creativity.
Advice. If you plan to make crafts from used rags, then first wash and iron, cutting off all unnecessary parts, buttons, and seams. Sort scraps by color, size, and type. This will make it more convenient to select and arrange them together.